Front-End Web & Mobile
Building a Gen AI-Powered Manufacturing Search Engine with AWS Amplify Gen 2
In the manufacturing industry, the ability to quickly and accurately access relevant information across various systems is critical. However, traditional search engines often struggle with siloed data, making it difficult to connect the dots between defect logs, operational data, and cost analyses. This fragmentation can hinder decision-making and operational efficiency.
By leveraging Artificial Intelligence (AI) and advanced search technologies, manufacturers can break down data silos and centralize access to critical insights. With AI-powered search engines that utilize natural language processing (NLP), manufacturing teams can query defect types, severity, trends, and repair costs in a more intuitive and human-like manner. This approach enables manufacturers to:
- Improve response times in identifying and addressing defects.
- Optimize maintenance workflows by surfacing relevant insights from dispersed data sources.
- Reduce downtime by quickly locating actionable insights to mitigate critical issues.
- Streamline quality assurance by uncovering patterns and trends in defect data.
This blog walks you through building a search engine using AWS Amplify, Amazon Bedrock, Amazon OpenSearch, focusing on a manufacturing dataset involving defect tracking across various products. Using this data, you’ll learn how to query defect types, severity, and associated repair costs. AWS Amplify Gen 2, powered by the AWS Cloud Development Kit (CDK), enhances flexibility, allowing you to customize your backend resources and integrate a variety of AWS services to build robust applications. Whether it’s detecting defect trends or optimizing inspection methods, you’ll see how generative AI can transform manufacturing workflows.
 Figure 1 Trends in defects over time or by location query.
To create your AI-powered search engine, you’ll utilize the following AWS technologies:
- AWS Amplify: A comprehensive set of tools and services that help developers build, deploy, and manage secure full-stack applications. It integrates with AWS services including Amazon Cognito for user authentication and authorization. AWS Amplify also supports seamless integration with other services like Amazon S3 and AWS AppSync for storage and API management.
- Amazon Bedrock: An AI service that offers high-performing foundation models (FMs). Amazon Bedrock connects with multiple data sources to form a knowledge base (KB). For this app, you’ll use Amazon S3 to form the by storing defect data, which is then processed and indexed by Amazon Bedrock, allowing for intelligent retrieval and response.
- Amazon OpenSearch Service: : A flexible, scalable search engine that enables full-text search and analytics. After Amazon Bedrock retrieves the relevant data from the knowledge base, it sends the vectorized results to OpenSearch Service for optimized querying, enabling efficient and accurate defect detection, analysis, and troubleshooting.
- Amazon Simple Storage (S3): A scalable storage solution used to store data, such as defect logs. Amazon S3 acts as the primary storage solution for the manufacturing defect data, feeding information into Amazon Bedrock to create the knowledge base used by the search engine.
By combining these AWS services, you’ll be able to create a search engine that not only indexes and retrieves data but also understands the intent behind user queries, providing more accurate and contextually relevant results. AI-powered search engines can help manufacturing customers reduce downtime, optimize defect detection, and improve product quality. With AWS Amplify’s scalability, you can build custom, real-time applications tailored to manufacturing workflows, making it easier to trace defects and streamline production processes.
 Figure 2 Generative AI Defect Manufacturing Search Engine architecture diagram.
Prerequisites
- An AWS account: Note that AWS Amplify is part of the AWS Free Tier.
- Install: npm (v9 or later), and git (v2.14.1 or later).
- A Text Editor: For this guide we will use VSCode, but you can use your preferred IDE.
- Example Dataset: You’ll be utilizing manufacturing defect data in the provided manufacturing defect data file from Kaggle. However, feel free to explore other datasets available on the site that best fit your needs.
- Amazon Bedrock Model Access: This guide requires access to Amazon Titan Text Embeddings V2 and the Anthropic Claude 3 Haiku model. Visit Amazon Bedrock Model access to request access to the listed models.
Cloning the Repo
Step 1: Navigate to the repository on AWS Samples and fork it to your GitHub repositories.
Step 2: Clone the app by running the command below in your terminal.
git clone https://github.com/<YOUR_GITHUB>/amplify-genai-manufacturing-search.git
Step 3: Access the newly cloned repository in VSCode by executing the commands below in your terminal.
cd amplify-genai-manufacturing-search
code . -r
VSCode will open the repository folder, including the Amplify folder, which contains the app code that you’ll review in the next section.
 Figure 3 Opening code in VSCode.
Step 4: Install the required packages, including the Amplify Gen2 packages, by running the following command:
npm i
The Amplify Backend
In the final app (as seen in the gif at the beginning of the post), users type in their query and click a button to request information relevant to their query from Amazon Bedrock’s knowledge base. The code for this is in the repository you cloned. Here, you’ll go over the key steps for creating your Amplify-developed and hosted search engine app. In the repository, you’ll find an Amplify folder containing a data directory.
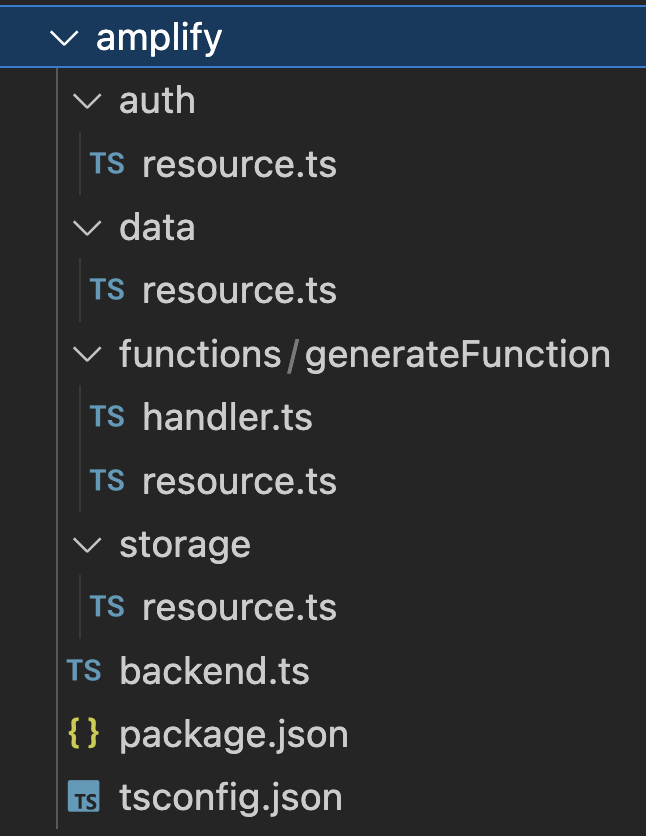
Figure 4 Amplify Gen 2 Project Folder Structure.
In the amplify/auth/resource.ts file,authentication is configured to require users to log in with their email to access the application and upload files. By enabling email-based login, you ensure only verified users can interact with sensitive data and functionalities.
import { defineAuth } from '@aws-amplify/backend';

export const auth = defineAuth({
    loginWith: {
        email: true,
    },
});
Next, in the amplify/data/resource.ts file, you’ll find a GraphQL query capable of receiving a list of sensor readings or defect data and linking to Amazon Bedrock to produce a contextually relevant response to the user. The GraphQL API schema consists of two main parts:
- generateHaiku Query: This query takes a string argument called
promptand returns the response generated by Claude Haiku as a string.You restrict access to authenticated users using.authorization((allow) => [allow.authenticated()]), ensuring only signed-in users can query the search engine. This improves security by leveraging Amazon Cognito user pools for stronger access control, rather than relying on a public API key. The.handler(a.handler.function(generateHaikuFunction))processes the response based on the provided prompt. - API Schema Configuration: The schema is defined using
a.schemaschema where the generateHaiku query is configured. The API’s default authorization mode is set to use userPools, specified in the authorizationModes configuration.
import { type ClientSchema, a, defineData } from "@aws-amplify/backend";
import { generateHaikuFunction } from "../functions/generateFunction/resource";

const schema = a.schema({
  generateHaiku: a.query()
    .arguments({ prompt: a.string().required() })
    .returns(a.string())
    .authorization((allow) => => [allow.authenticated()])
    .handler(a.handler.function(generateHaikuFunction)),
});

export type Schema = ClientSchema<typeof schema>;

export const data = defineData({
  schema,
  authorizationModes: {
    defaultAuthorizationMode: "userPool",
  },
});
The amplify/functions/generateFunction/resource.ts file defines a Lambda function that contains a handler.ts function to resolve your custom GraphQL queries.
import { defineFunction } from '@aws-amplify/backend';

export const generateHaikuFunction = defineFunction({
    name: 'generate-haiku',
    entry: './handler.ts',
    timeoutSeconds: 60
});
In the handler.ts function, you use the RetrieveAndGenerateCommand from the AWS SDK’s Agent Runtime client to retrieve relevant data from an Amazon Bedrock knowledge base, structure the user’s input with a predefined template, and generate a response based on the retrieved information. The session is secured with an AWS Key Management Service (KMS) ) key, and the function parses the response to extract the generated data and citations for a structured output.
import type { Schema } from "../../data/resource";

import {
    BedrockAgentRuntimeClient,
    RetrieveAndGenerateCommand,
    RetrieveAndGenerateCommandInput,
    PromptTemplate
} from "@aws-sdk/client-bedrock-agent-runtime";

const client = new BedrockAgentRuntimeClient();

export const handler: Schema["generateHaiku"]["functionHandler"] = async (
    event,
) => {
    const prompt = event.arguments.prompt;

    const promptTemplate: PromptTemplate = {
        textPromptTemplate: `
            Based on the following search results:
            $search_results$
            Respond to the specific query, focusing on the relevant information based on the search results.
            If the query asks about repair costs, format the repair cost as follows: include a $ sign before the amount.
            Example for repair cost:
            Defect ID: 176, Product ID: 13, Defect Type: Structural, Date: 3/9/2024, Location: Surface, Severity: Critical, Inspection Method: Manual Testing, Repair Cost: $952.49
            Respond directly to the query, and only include relevant fields such as defect severity, inspection type, or trends if applicable.
            Respond only if the search results are relevant. Do not respond to queries outside of the search results.
            Do not include introductory phrases like 'Here is a haiku' or 'From haiku'. Respond directly to the query.`,
    };

    const input: RetrieveAndGenerateCommandInput = {
        input: {
            text: prompt,
        },

        retrieveAndGenerateConfiguration: {
            type: "KNOWLEDGE_BASE",
            knowledgeBaseConfiguration: {
                knowledgeBaseId: process.env.KNOWLEDGE_BASE_ID!,
                modelArn: process.env.MODEL_ARN!,
                retrievalConfiguration: {
                    vectorSearchConfiguration: {
                        numberOfResults: 10
                    },
                },
                generationConfiguration: {
                    promptTemplate,
                    inferenceConfig: {
                        textInferenceConfig: {
                            temperature: 0.7,
                            maxTokens: 150,
                        },
                    },
                },
            },
        },
        sessionConfiguration: {
            kmsKeyArn: process.env.KMS_KEY!,
        },
    };

    const command = new RetrieveAndGenerateCommand(input);

    const response = await client.send(command);

    const generatedText = response.output?.text || "The query does not match any known results.";

    const citations = response.citations?.map((citation, index) => {
        const location = citation.retrievedReferences?.[0]?.location;
        if (location) {
            const s3Uri = location.s3Location?.uri || "";
            return `${index + 1}. ${s3Uri}`;
        } else {
            return `${index + 1}.`;
        }
    }).join("\n") || "No citations available";

    return `${generatedText}\n\nCitations:\n${citations}`;
};
In the amplify/storage/resource.ts file, you configure Amplify Storage, built on Amazon S3, to manage file storage and enable essential operations like uploads. You use the defineStorage function to instantiate the storage with a user-friendly name for internal reference. Although AWS Amplify generates a unique identifier for the bucket, providing a bucket name helps identify it within your app’s backend configuration. The bucket is set up to allow authenticated users to read and write to the public/* path, for storing sample search data.
import { defineStorage } from "@aws-amplify/backend";

export const storage = defineStorage({
    name: "amplify-search-tool-storage",
    access: (allow) => ({
        'public/*': [
            allow.authenticated.to(['read', 'write'])
        ]
    })
});
In the amplify/backend.ts you import the CDK libraries to configure various aspects of your application. The aws-iam library is used to manage permissions, aws-kms handles session management, aws-opensearchserverless configures Amazon OpenSearch Service, and aws-bedrock facilitates response generation. Each library serves a distinct purpose, ensuring your application is properly configured.
import * as kms from 'aws-cdk-lib/aws-kms';
import * as iam from 'aws-cdk-lib/aws-iam';
import * as opensearchserverless from 'aws-cdk-lib/aws-opensearchserverless'

// /* AWS CDK LIBRARIES FOR 2ND DEPLOYMENT */
// import * as bedrock from 'aws-cdk-lib/aws-bedrock';
// import { Effect, PolicyStatement } from "aws-cdk-lib/aws-iam";
Next, use the backend.createStack() method to direct the backend to generate a new CloudFormation Stack to house custom resources. With AWS Amplify Gen 2, you can create custom resources using the CDK, enabling the use of services beyond the Amplify library, with stacks backed by CloudFormation templates for scalability. For example, you could create a Generative AI stack for AI-related services and an authentication stack for managing Cognito resources, ensuring logical organization before adding custom AWS resources. Now, you can begin defining custom AWS resources!
const customResourceStack = backend.createStack('MyCustomResources');Within the customResourceStack, define an Amazon OpenSearch Serverless access policy (CfnAccessPolicy) that outlines the permissions required to manage both indices and collections in Amazon OpenSearch Serverless. The Principal in this policy is set to `arn:aws:iam::${customResourceStack.account}:role/Admin` to ensure that only authorized entities with the specified IAM role can perform critical operations like creating, updating, and deleting indices and collections.
In addition to the access policy, define a security policy (CfnSecurityPolicy) that specifies encryption settings for the OpenSearch Service collection. This policy ensures that all data stored in the amplify-aoss-collection collection is encrypted using an AWS-owned key, which simplifies key management while ensuring data is protected at rest.
const accessPolicy = new opensearchserverless.CfnAccessPolicy(customResourceStack, 'OpenSearchAccessPolicy', {
  name: 'collection-policy',
  type: 'data',
  description: 'Access policy for collection',
  policy: JSON.stringify([{
    Description: 'Access for test-user',
    Rules: [
      {
        ResourceType: 'index',
        Resource: ['index/amplify-aoss-collection/*'],
        Permission: [
          'aoss:CreateIndex',
          'aoss:DeleteIndex',
          'aoss:UpdateIndex',
          'aoss:DescribeIndex',
          'aoss:ReadDocument',
          'aoss:WriteDocument'
        ]
      },
      {
        ResourceType: 'collection',
        Resource: ['collection/amplify-aoss-collection'],
        Permission: [
          'aoss:CreateCollectionItems',
          'aoss:DeleteCollectionItems',
          'aoss:UpdateCollectionItems',
          'aoss:DescribeCollectionItems'
        ]
      }
    ],
    /* REPLACE  WITH THE DEFAULT PRINCIPAL */
    Principal: [permissions.roleArn,`arn:aws:iam::${customResourceStack.account}:role/Admin`],
  }])
});

/* DEFINE AMAZON OPENSEARCH SECURITY POLICY */
const securityPolicy = new opensearchserverless.CfnSecurityPolicy(customResourceStack, 'OpenSearchSecurityPolicy', {
  description: 'Security policy for my-collection',
  name: 'amplify-security-policy',
  type: 'encryption',
  policy: JSON.stringify({
    Rules: [
      {
        ResourceType: 'collection',
        Resource: ['collection/amplify-aoss-collection'],
      }
    ],
    AWSOwnedKey: true,
  })
});
A collection is a grouping of one or more indexes, representing an analytics workload. This collection will serve as a scalable and efficient storage solution for your search engine data, enabling rapid search operations and ensuring high availability. By specifying the CfnCollection construct, you lay the foundation for data storage and retrieval capabilities.
const collection = new opensearchserverless.CfnCollection(customResourceStack, 'OpenSearchCollection', {
  name: 'amplify-aoss-collection',
  type: 'VECTORSEARCH',
  description: 'Collection for amplify search tool',
});
When you run the app (as demonstrated in the next section), a file named amplify_outputs.json is generated automatically. This file holds your API’s endpoint and Auth metadata details. In the src/app/App.tsx, you initialize and configure the AWS Amplify client library, then create a data client to facilitate fully-typed API requests to the AWS Amplify backend. The query is made in the handleSearch function using the client.queries.generateHaiku method.
import { Amplify } from 'aws-amplify';
import outputs from '../amplify_outputs.json';
import { generateClient } from "aws-amplify/api";
import { Schema } from "../amplify/data/resource";

Amplify.configure(outputs);

const client = generateClient();

const App: React.FC = () => {
  const [messages, setMessages] = useState([]);

  const handleSearch = async (query: string) => {
    if (!query.trim()) {
      setMessages((prevMessages) => [...prevMessages, { user: 'bot', text: 'Query cannot be empty.' }]);
      return;
    }

    try {
      const { data, errors } = await client.queries.generateHaiku({ prompt: query });

      if (errors) {
        throw new Error(`Error from Bedrock: ${errors[0].message}`);
      }

      setMessages((prevMessages) => [...prevMessages, { user: 'bot', text: data || "No response from AI" }]);
    } catch (error) {
      let errorMessage = 'Error fetching data.';
      if (error instanceof Error) {
        errorMessage = error.message;
      }
      setMessages((prevMessages) => [...prevMessages, { user: 'bot', text: `Error fetching data: ${errorMessage}` }]);
    }
  };
In src/components/Uploader.tsx the Amplify Storage Manager UI component streamlines file upload operations directly from your user interface to your Amazon S3 bucket. This component simplifies the process, enabling you to integrate robust file storage functionality with minimal setup. Whether you’re handling images, documents, or other file types, the Amplify Storage Manager offers flexible configuration options, such as setting upload limits, handling resumable uploads, and customizing file paths.
import React from 'react';
import { StorageManager } from '@aws-amplify/ui-react-storage';
import '@aws-amplify/ui-react/styles.css';

const Uploader: React.FC = () => {
    return (
        <div class="uploader">
            <StorageManager
                acceptedFileTypes={['.csv']}
                path="public/"
                maxFileCount={10}
                isResumable
            />
        </div>
    );
};

export default Uploader;
Running the App
Step 1: Amplify provides each developer with a personal cloud sandbox environment, offering isolated development spaces for rapid building, testing, and iteration. To initiate a cloud sandbox environment, open a new terminal window and execute the following command:
npx ampx sandboxStep 2: Execute the command below to start a localhost development server.
npm run devAfter running the previous command to start the application, use the ‘Create Account‘ feature of the Amplify Authenticator component, to provide an email address and password. After finalizing user setup via a confirmation email, log in to gain access to the application.
 Figure 5 Signing into the app, after creating an account.
After interacting with the app on the development server, stop the sandbox environment by pressing Ctrl + C in the terminal. Make sure to enter ‘Y’ when prompted to delete resources in the sandbox environment.
 Figure 6 Delete cloud sandbox resources.
Deploying backend resources
With the app functioning as expected, deploy your backend resources by following the steps in ‘Getting Started with Deploying an App to Amplify Hosting’. Ensure that GitHub is selected as the repository for deployment.
Upload Sample Data
After deploying and signing into the application, upload sample data by accessing the app domain URL generated by Amplify. After uploading files, confirm the upload by checking the public/ folder within the Storage section of the AWS Amplify console.
 Figure 7 Uploading Defects data file.
Creating a Vector Index in Amazon OpenSearch Serverless
Before defining a Bedrock knowledge base, in the Amazon OpenSearch console, Create a vector index for the amplify-aoss-collection. (Figure 5)
This index will store and search vector embeddings, which are numerical representations of text, images, or other data. Define the vector field name (for storing embeddings), vector dimensions (up to 16,000), and the distance metric (e.g., Euclidean, cosine, or dot product) to optimize your OpenSearch Service collection for efficient and accurate search operations.
 Figure 8 Create vector index in OpenSearch Serverless collection.
From the Create Vector Index page, define the following values:
- Vector index name:
bedrock-knowledge-base-default-index - Vector fields, Add vector field:
- Vector field name:
bedrock-knowledge-base-default-vector - Engine:
faiss - Dimensions:
1024 - Distance metric:
Euclidiean
- Vector field name:
- Metadata management:
- Mapping field 1:
- Mapping field:
AMAZON_BEDROCK_TEXT_CHUNK - Data type:
String - Filterable:
True
- Mapping field:
- Mapping field 2:
- Mapping field:
AMAZON_BEDROCK_METADATA - Data type:
String - Filterable:
False
- Mapping field:
- Mapping field 1:
Lastly, select Create as shown in Figure 9.
 Figure 9 Select Create for vector index in OpenSearch Serverless collection.
Defining an Amazon Bedrock Knowledgebase
Next, in the backend.ts file, the CfnKnowledgeBase construct creates a vector knowledge base for storing and managing structured and unstructured data. Here you’ll integrate the knowledge base with the OpenSearch Serverless collection to provide advanced vectorization and search capabilities. This knowledge base offers a repository of information that a foundational model can query to deliver accurate and contextually relevant responses.
const knowledgeBase = new bedrock.CfnKnowledgeBase(customResourceStack, 'BedrockKB', {
  knowledgeBaseConfiguration: {
    type: 'VECTOR',
    vectorKnowledgeBaseConfiguration: {
      embeddingModelArn: 'arn:aws:bedrock:us-east-1::foundation-model/amazon.titan-embed-text-v2:0',
    },
  },
  name: 'amplify-search-tool-kb',
  roleArn: permissions.roleArn,
  storageConfiguration: {
    type: 'OPENSEARCH_SERVERLESS',
    opensearchServerlessConfiguration: {
      collectionArn: collection.attrArn,
      vectorIndexName: 'bedrock-knowledge-base-default-index',
      fieldMapping: {
        vectorField: 'bedrock-knowledge-base-default-vector',
        textField: 'AMAZON_BEDROCK_TEXT_CHUNK',
        metadataField: 'AMAZON_BEDROCK_METADATA',
    },
  }
});
After creating the knowledge base, define the Amazon S3 bucket created as the data source for the Amazon Bedrock knowledge base. To achieve this, retrieve the Amazon Resource Name (ARN) of the bucket by accessing its properties using dot notation. Configuring an Amazon S3 bucket to store sample search data facilitates efficient data ingestion and management. Using the CfnDataSource construct, you create a link from Amazon S3 to the knowledge base, allowing the knowledge base to access and process uploaded data.
new bedrock.CfnDataSource(customResourceStack, 'BedrockDataSource', {
  name: 'amplify-search-tool-data-source',
  knowledgeBaseId: knowledgeBase.attrKnowledgeBaseId,
  dataSourceConfiguration: {
    type: 'S3',
    s3Configuration: {
        bucketArn: backend.storage.resources.bucket.bucketArn,
    },
  },
});
Deploying the App Updates
Finalize updates by adding, committing, and pushing changes to your repository. This action automatically triggers a deployment in AWS Amplify, ensuring the app is up-to-date and live.
Sync S3 Data with Bedrock Knowledge Base
After deploying the app, sync the Amazon S3 bucket with the Amazon Bedrock Knowledge base. From the Amazon Bedrock console, navigate to Knowledge bases, select amplify-search-tool-kb. Then, scroll to Data source and select Sync (Figure 10).
 Figure 10 Syncing Amazon S3 bucket data with Amazon Bedrock knowledge base.
Once the data source syncs successfully and the status shows “Available“, start querying the search engine directly through the application!
 Figure 11 Interfacing with Defect Search app.
Cleaning Up
Navigate to the AWS Amplify console, click on “View app” for the application created during this blog. Then, go to “App Settings” followed by “General Settings.” Finally, select “Delete app” to remove the application and associated backend resources. Note, AWS Amplify will delete all backend resources created a part of your project.
Conclusion
Now that you’ve learned how to configure and deploy a generative AI-powered search engine using AWS Amplify Gen 2, Amazon Bedrock, Amazon OpenSearch Service, and other AWS services, it’s time to take the next step. Start building your own custom applications with the Amplify Gen 2 Workshop, and consider leveraging a generative AI-powered coding assistant, Amazon Q Developer, for your development efforts.
Looking for a quick way to start building AI-powered applications with AWS Amplify? Check out the Amplify AI Kit to bring your ideas to life faster than ever. By utilizing these advanced AI services, you can create and deploy sophisticated search capabilities that deliver enhanced user experiences.