AWS Security Blog
Top four ways to improve your Security Hub security score
AWS Security Hub is a cloud security posture management (CSPM) service that performs security best practice checks across your Amazon Web Services (AWS) accounts and AWS Regions, aggregates alerts, and enables automated remediation. Security Hub is designed to simplify and streamline the management of security-related data from various AWS services and third-party tools. It provides a holistic view of your organization’s security state that you can use to prioritize and respond to security alerts efficiently.
Security Hub assigns a security score to your environment, which is calculated based on passed and failed controls. A control is a safeguard or countermeasure prescribed for an information system or an organization that’s designed to protect the confidentiality, integrity, and availability of the system and to meet a set of defined security requirements. You can use the security score as a mechanism to baseline the accounts. The score is displayed as a percentage rounded up or down to the nearest whole number.
In this blog post, we review the top four mechanisms that you can use to improve your security score, review the five controls in Security Hub that most often fail, and provide recommendations on how to remediate them. This can help you reduce the number of failed controls, thus improving your security score for the accounts.
What is the security score?
Security scores represent the proportion of passed controls to enabled controls. The score is displayed as a percentage rounded to the nearest whole number. It’s a measure of how well your AWS accounts are aligned with security best practices and compliance standards. The security score is dynamic and changes based on the evolving state of your AWS environment. As you address and remediate findings associated with controls, your security score can improve. Similarly, changes in your environment or the introduction of new Security Hub findings will affect the score.
Each check is a point-in-time evaluation of a rule against a single resource that results in a compliance status of PASSED, FAILED, WARNING, or NOT_AVAILBLE. A control is considered passed when the compliance status of all underlying checks for resources are PASSED or if the FAILED checks have a workflow status of SUPPRESSED. You can view the security score through the Security Hub console summary page—as shown in figure 1—to quickly gain insights into your security posture. The dashboard provides visual representations and details of specific findings contributing to the score. For more information about how scores are calculated, see determining security scores.
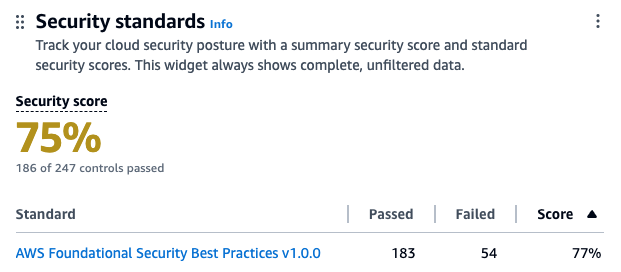
Figure. 1 Security Hub dashboard
How to improve the security score?
You can improve your security score in four ways:
- Remediating failed controls: After the resources responsible for failed checks in a control are configured with compliant settings and the check is repeated, Security Hub marks the compliance status of the checks as PASSED and the workflow status as RESOLVED. This increases the number of passed controls, thus improving the score.
- Suppressing findings associated with failed controls: When calculating the control status, Security Hub ignores findings in the ARCHIVED state as well as findings with a workflow status of SUPPRESSED, which will affect security scores. So if you suppress all failed findings for a control, the control status becomes passed.
If you determine that a Security Hub finding for a resource is an accepted risk, you can manually set the workflow status of the finding to SUPPRESSED from the Security Hub console or using the BatchUpdateFindings API. Suppression doesn’t stop new findings from being generated, but you can set up an automation rule to suppress all future new and updated findings that meet the filtering criteria.
- Disabling controls that aren’t relevant: Security Hub provides flexibility by allowing administrators to customize and configure security controls. This includes the ability to disable specific controls or adjust settings to help align with organizational security policies. When a control is disabled, security checks are no longer performed and no additional findings are generated. Existing findings are set to ARCHIVED and the control is excluded from the security score calculations.
Use Security Hub central configuration with the Security Hub delegated administrator (DA) account to centrally manage Security Hub controls and standards and to view your Security Hub configuration throughout your organization from a single place. You can also deploy these settings to organizational units (OUs).
Use central configuration in Security Hub to tailor the security controls to help align with your organization’s specific requirements. You can fine-tune your security controls, focus on relevant issues, and improve the accuracy and relevance of your security score. Introducing new central configuration capabilities in AWS Security Hub provides an overview and the benefits of central configuration.
Suppression should be used when you want to tune control findings from specific resources whereas controls should be disabled only when the control is no longer relevant for your AWS environment.
- Customize parameter values to fine tune controls: Some Security Hub controls use parameters that affect how the control is evaluated. Typically, these controls are evaluated against the default parameter values that Security Hub defines. However, for a subset of these controls, you can customize the parameter values. When you customize a parameter value for a control, Security Hub starts evaluating the control against the value that you specify. If the resource underlying the control satisfies the custom value, Security Hub generates a PASSED finding.
We will use these mechanisms to address the most commonly failed controls in the following sections.
Identifying the most commonly failed controls in Security Hub
You can use the AWS Management Console to identify the most commonly failed controls across your accounts in AWS Organizations:
- Sign in to the delegated administrator account and open the Security Hub console.
- On the navigation pain, choose Controls.
Here, you will see the status of your controls sorted by the severity of the failed controls. You will also see the associated number of failed checks with the failed controls in the Failed checks column on this page. A check is performed for each resource. If a column says 85 out of 124 for a control, it means 85 resources out of 124 failed the check for that control. You can sort this column in descending order to identify failed controls that have the most resources as shown in Figure 2.
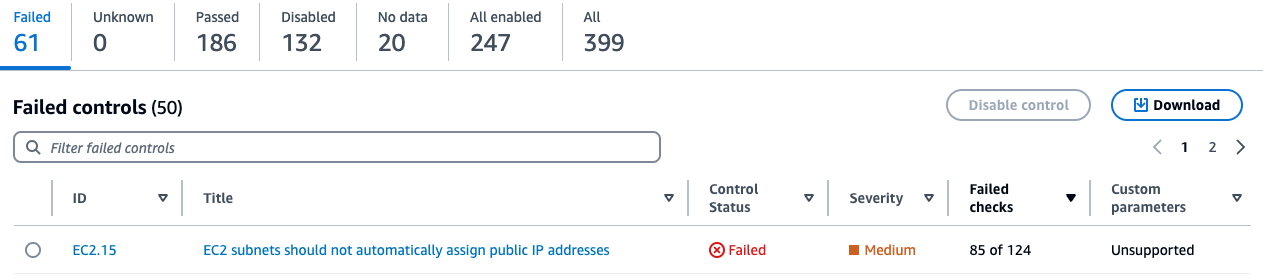
Figure 2: Security Hub control status page
Addressing the most commonly failed controls
In this section we address remediation strategies for the most used Security Hub controls that have Critical and High severity and have a high failure rate amongst AWS customers. We review five such controls and provide recommended best practices, default settings for the resource type at deployment, guardrails, and compensating controls where applicable.
AutoScaling.3: Auto Scaling group launch configuration
An Auto Scaling group in AWS is a service that automatically adjusts the number of Amazon Elastic Compute Cloud (Amazon EC2) instances in a fleet based on user-defined policies, making sure that the desired number of instances are available to handle varying levels of application demand. A launch configuration is a blueprint that defines the configuration of the EC2 instances to be launched by the Auto Scaling group. The AutoScaling.3 control checks whether Instance Metadata Service Version 2 (IMDSv2) is enabled on the instances launched by EC2 Auto Scaling groups using launch configurations. The control fails if the Instance Metadata Service (IMDS) version isn’t included in the launch configuration, or if both Instance Metadata Service Version 1 (IMDSv1) and IMDSv2 are included. AutoScaling.3 aligns with best practice SEC06-BP02 Reduce attack surface of the well architected framework.
The IMDS is a service on Amazon EC2 that provides metadata about EC2 instances, such as instance ID, public IP address, AWS Identity and Access Management (IAM) role information, and user data such as scripts during launch. IMDS also provides credentials for the IAM role attached to the EC2 instance, which can be used by threat actors for privilege escalation. The existing instance metadata service (IMDSv1) is fully secure, and AWS will continue to support it. If your organization strategy involves using IMDSv1, then consider disabling AutoScaling.3 and EC2.8 Security Hub controls. EC2.8 is a similar control, but checks the IMDS configuration for each EC2 instance instead of the launch configuration.
IMDSv2 adds protection for four types of vulnerabilities that could be used to access the IMDS, including misconfigured or open website application firewalls, misconfigured or open reverse proxies, unpatched service-side request forgery (SSRF) vulnerabilities, and misconfigured or open layer 3 firewalls and network address translation. It does so by requiring the use of a session token using a PUT request when requesting instance metadata and using a Time to Live (TTL) default of 1 so the token cannot travel outside the EC2 instance. For more information on protections added by IMDSv2, see Add defense in depth against open firewalls, reverse proxies, and SSRF vulnerabilities with enhancements to the EC2 Instance Metadata Service.
The Autoscaling.3 control creates a failed check finding for every Amazon EC2 launch configuration that is out of compliance. An Auto Scaling group is associated with one launch configuration at a time. You cannot modify a launch configuration after you create it. To change the launch configuration for an Auto Scaling group, use an existing launch configuration as the basis for a new launch configuration with IMDSv2 enabled and then delete the old launch configuration. After you delete the launch configuration that’s out of compliance, Security Hub will automatically update the finding state to ARCHIVED. It’s recommended to use Amazon EC2 launch templates, which is a successor to launch configurations because you cannot create launch configurations with new EC2 instances released after December 31, 2022. See Migrate your Auto Scaling groups to launch templates for more information.
Amazon has taken a series of steps to make IMDSv2 the default. For example, Amazon Linux 2023 uses IMDSv2 by default for launches. You can also set the default instance metadata version at the account level to IMDSv2 for each Region. When an instance is launched, the instance metadata version is automatically set to the account level value. If you’re using the account-level setting to require the use of IMDSv2 outside of launch configuration, then consider using the central Security Hub configuration to disable AutoScaling.3 for these accounts. See the Sample Security Hub central configuration policy section for an example policy.
EC2.18: Security group configuration
AWS security groups act as virtual stateful firewalls for your EC2 instances to control inbound and outbound traffic and should follow the principle of least privileged access. In the Well-Architected Framework security pillar recommendation SEC05-BP01 Create network layers, it’s best practice to not use overly permissive or unrestricted (0.0.0.0/0) security groups because it exposes resources to misuse and abuse. By default, the EC2.18 control checks whether a security group permits unrestricted incoming TCP traffic on ports except for the allowlisted ports 80 and 443. It also checks if unrestricted UDP traffic is allowed on a port. For example, the check will fail if your security group has an inbound rule with unrestricted traffic to port 22. This control allows custom control parameters that can be used to edit the list of authorized ports for which unrestricted traffic is allowed. If you don’t expect any security groups in your organization to have unrestricted access on any port, then you can edit the control parameters and remove all ports from being allowlisted. You can use a central configuration policy as shown in Sample Security Hub central configuration policy to update the parameter across multiple accounts and Regions. Alternately, you can also add authorized ports to the list of ports you want to allowlist for the check to pass.
EC2.18 checks the rules in the security groups in accounts, whether the security groups are in use or not. You can use AWS Firewall Manager to identify and delete unused security groups in your organization using usage audit security group policies. Deleting unused security groups that have failed the checks will change the finding state of associated findings to ARCHIVED and exclude them from security score calculation. Deleting unused resources also aligns with SUS02-BP03 of the sustainability pillar of the Well-Architected Framework. You can create a Firewall Manager usage audit security group policy through the firewall manager using the following steps:
To configure Firewall Manager:
- Sign in to the Firewall Manager administrator account and open the Firewall Manager console.
- In the navigation pane, select Security policies.
- Choose Create policy.
- On Choose policy type and Region:
- For Region, select the AWS Region the policy is meant for.
- For Policy type, select Security group.
- For Security group policy type, select Auditing and cleanup of unused and redundant security groups.
- Choose Next.
- On Describe policy:
- Enter a Policy name and description.
- For Policy rules, select Security groups within this policy scope must be used by at least one resource.
- You can optionally specify how many minutes a security group can exist unused before it’s considered noncompliant, up to 525,600 minutes (365 days). You can use this setting to allow yourself time to associate new security groups with resources.
- For Policy action, we recommend starting by selecting Identify resources that don’t comply with the policy rules, but don’t auto remediate. This allows you to assess the effects of your new policy before you apply it. When you’re satisfied that the changes are what you want, edit the policy and change the policy action by selecting Auto remediate any noncompliant resources.
- Choose Next.
- On Define policy scope:
- For AWS accounts this policy applies to, select one of the three options as appropriate.
- For Resource type, select Security Group.
- For Resources, you can narrow the scope of the policy using tagging, by either including or excluding resources with the tags that you specify. You can use inclusion or exclusion, but not both.
- Choose Next.
- Review the policy settings to be sure they’re what you want, and then choose Create policy.
Firewall manager is a Regional service so these policies must be created in each Region you have services in.
You can also set up guardrails for security groups using Firewall Manager policies to remediate new or updated security groups that allow unrestricted access. You can create a Firewall Manager content audit security group policy through the Firewall Manager console:
To create a Firewall Manager security group policy:
- Sign in to the Firewall Manager administrator account.
- Open the Firewall Manager console.
- In the navigation pane, select Security policies.
- Choose Create policy.
- On Choose policy type and Region:
- For Region, select a Region.
- For Policy type, select Security group.
- For Security group policy type, select Auditing and enforcement of security group rules.
- Choose Next.
- On Describe policy:
- Enter a Policy name and description.
- For Policy rule options, select configure managed audit policy rules.
- Configure the following options under Policy rules.
- For the Security group rules to audit, select Inbound rules from the drop down.
- Select Audit overly permissive security group rules.
- Select Rule allows all traffic.
- For Policy action, we recommend starting by selecting Identify resources that don’t comply with the policy rules, but don’t auto remediate. This allows you to assess the effects of your new policy before you apply it. When you’re satisfied that the changes are what you want, edit the policy and change the policy action by selecting Auto remediate any noncompliant resources.
- Choose Next.
- On Define policy scope:
- For AWS accounts this policy applies to, select one of the three options as appropriate.
- For Resource type, select Security Group.
- For Resources, you can narrow the scope of the policy using tagging, by either including or excluding resources with the tags that you specify. You can use inclusion or exclusion, but not both.
- Choose Next.
- Review the policy settings to be sure they’re what you want, and then choose Create policy.
For use cases such as a bastion host where you might have unrestricted inbound access to port 22 (SSH), EC2.18 will fail. A bastion host is a server whose purpose is to provide access to a private network from an external network, such as the internet. In this scenario, you might want to suppress findings associated with the bastion host security groups instead of disabling the control. You can create a Security Hub automation rule in the Security Hub delegated administrator account based on a tag or resource ID to set the workflow status of future findings to SUPPRESSED. Note that an automation rule applies only in the Region in which it’s created. To apply a rule in multiple Regions, the delegated administrator must create the rule in each Region.
To create an automation rule:
- Sign in to the delegated administrator account and open the Security Hub console.
- In the navigation pane, select Automations, and then choose Create rule.
- Enter a Rule Name and Rule Description.
- For Rule Type, select Create custom rule.
- In the Rule section, provide a unique rule name and a description for your rule.
- For Criteria, use the Key, Operator, and Value drop down menus to select your rule criteria. Use the following fields in the criteria section:
- Add key ProductName with operator Equals and enter the value Security Hub.
- Add key WorkFlowStatus with operator Equals and enter the value NEW.
- Add key ComplianceSecurityControlId with operator Equals and enter the value EC2.18.
- Add key ResourceId with operator Equals and enter the Amazon Resource Name (ARN) of the bastion host security group as the value.
- For Automated action:
- Choose the drop down under Workflow Status and select SUPPRESSED.
- Under Note, enter text such as EC2.18 exception.
- For Rule status, select Enabled.
- Choose Create rule.
This automation rule will set the workflow status of all future updated and new findings to SUPPRESSED.
IAM.6: Hardware MFA configuration for the root user
When you first create an AWS account, you begin with a single identity that has complete access to the AWS services and resources in the account. This identity is called the AWS account root user and is accessed by signing in with the email address and password that you used to create the account.
The root user has administrator level access to your AWS accounts, which requires that you apply several layers of security controls to protect this account. In this section, we walk you through:
- When to apply which best practice to secure the root user, including the root user of the Organizations management account.
- What to do when the root account isn’t required on your Organizations member accounts and what to do when the root user is required.
We recommend using a layered approach and applying multiple best practices to secure your root account across these scenarios.
AWS root user best practices include recommendations from SEC02-BP01, which recommends multi-factor authentication (MFA) for the root user be enabled. IAM.6 checks whether your AWS account is enabled to use a hardware MFA device to sign in with root user credentials. The control fails if MFA isn’t enabled or if any virtual MFA devices are permitted for signing in with root user credentials. A finding is generated for every account that doesn’t meet compliance. To remediate, see General steps for enabling MFA devices, which describes how to set up and use MFA with a root account. Remember that the root account should be used only when absolutely necessary and is only required for a subset of tasks. As a best practice, for other tasks we recommend signing in to your AWS accounts using federation, which provides temporary access keys by assuming an IAM role instead of using long-lived static credentials.
The Organizations management account deploys universal security guardrails, and you can configure additional services that will affect the member accounts in the organization. So, you should restrict who can sign in and administer the root user in your management account and is why you should apply hardware MFA as an added layer of security.
Note: Beginning on May 16, 2024, AWS requires multi-factor authentication (MFA) for the root user of your Organizations management account when accessing the console.
Many customers manage hundreds of AWS accounts across their organization and managing hardware MFA devices for each root account can be a challenge. While it’s a best practice to use MFA, an alternative approach might be necessary. This includes mapping out and identifying the most critical AWS accounts. This analysis should be done carefully—consider if this is a production environment, what type of data is present, and the overall criticality of the workloads running in that account.
This subset of your most critical AWS accounts should be configured with MFA. For other accounts, consider that in most cases the root account isn’t required and you can disable the use of the root account across the Organizations member accounts using Organizations service control policies (SCP). The following is an example:
If you’re using AWS Control Tower, use the disallow actions as a root user guardrail. If you’re using an SCP for organizations or the AWS Control Tower guardrail to restrict root use in member accounts, consider disabling the IAM.6 control in those member accounts. However, do not disable IAM.6 in the management account. See the Sample Security Hub central configuration policy section for an example policy.
If root account use is required within a member account, confirmed as a valid root-user-task, then perform the following steps:
- Complete the root user account recovery steps.
- Temporarily move that member account into a different OU that doesn’t include the root restriction SCP policy, limited to the timeframe required to make the necessary changes.
- Sign in using the recovered root user password and make the necessary changes.
- After the task is complete, move the account back into its original Organizations OU with the root restricted SCP in place.
When you take this approach, we recommend configuring Amazon CloudWatch to alert on root sign-in activity within AWS CloudTrail. Consider the Monitor IAM root user activity solution in the aws-samples GitHub to get started. Alternately, if Amazon GuardDuty is enabled, it will generate the Policy:IAMUser/RootCredentialUsage finding when the root user is used for a task.
Another consideration and best practice is to make sure that all AWS accounts have updated contact information, including the email attached to the root user. This is important for several reasons. For example, you must have access to the email associated with the root user to reset the root user’s password. See how to update the email address associated with the root user. AWS uses account contact information to notify and communicate with the AWS account administrators on several important topics including security, operations, and billing related information. Consider using an email distribution list to make sure these email addresses are mapped to a common internal mailbox restricted to your cloud or security team. See how to update your AWS primary and secondary account contact details.
EC2.2: Default security groups configuration
Each Amazon Virtual Private Cloud (Amazon VPC) comes with a default security group. We recommend that you create security groups for EC2 instances or groups of instances instead of using the default security group. If you don’t specify a security group when you launch an instance, the service associates the instance with the default security group for the VPC. In addition, the default security group cannot be deleted because it’s the default security group assigned to an EC2 instance if another security group is not created or assigned.
The default security group allows outbound and inbound traffic from network interfaces (and their associated instances) that are assigned to the same security group. EC2.2 checks whether the default security group of a VPC allows inbound or outbound traffic, and the control fails if the security group allows inbound or outbound traffic. This control doesn’t check if the default security group is in use. A finding is generated for each default VPC security group that’s out of compliance. The default security group doesn’t adhere to least privilege and therefore the following steps are recommended. If no EC2 instance is attached to the default security group, delete the inbound and outbound rules of the default security group. However, if you’re not certain that the default security group is in use, use the following AWS Command Line Interface (AWS CLI) command across each account and Region. If the command returns a list of EC2 instance IDs, then the default security group is in use by these instances. If it returns an empty list, then the default security group isn’t used in that account. Use the ‐‐region option to change Regions.
For these instances, replace the default security group with a new security group using similar rules and work with the owners of those EC2 instances to determine a least privilege security group and ruleset that could be applied. After the instances are moved to the replacement security group, you can remove the inbound and outbound rules of the default security group. You can use an AWS Config rule in each account and Region to remove the inbound and outbound rules of the default security group.
To create a rule with auto remediation:
- If you haven’t already, set up a service role access for automation. After the role is created, copy the ARN of the service role to use in later steps.
- Open the AWS Config console.
- In the navigation pane, select Rules.
- On the Rules page, choose Add rule.
- On the Specify rule type page, enter vpc-default-security-group-closed in the search field.
Note: This will check if the default security group of the VPC doesn’t allow inbound or outbound traffic.
- On the Configure rule page:
- Enter a name and description.
- Add tags as needed.
- Choose Next.
- Review and then choose Save.
- Search for the rule by its name on the rules list page and select the rule.
- From the Actions dropdown list, choose Manage remediation.
- Choose Auto remediation to automatically remediate noncompliant resources
- In the Remediation action dropdown, select AWSConfigRemediation-RemoveVPCDefaultSecurityGroupRules document.
- Adjust Rate Limits as needed.
- Under the Resource ID Parameter dropdown, select GroupId.
- Under Parameter, enter the ARN of the automation service role you copied in step 1.
- Choose Save.
It’s important to verify that changes and configurations are clearly communicated to all users of an environment. We recommend that you take the opportunity to update your company’s central cloud security requirements and governance guidance and notify users in advance of the pending change.
ECS.5: ECS container access configuration
An Amazon Elastic Container Service (Amazon ECS) task definition is a blueprint for running Docker containers within an ECS cluster. It defines various parameters required for launching containers, such as Docker image, CPU and memory requirements, networking configuration, container dependencies, environment variables, and data volumes. An ECS task definition is to containers is what a launch configuration is to EC2 instances. ECS.5 is a control related to ECS and ensures that the ECS task definition has read-only access to mounted root filesystem enabled. This control is important and great for defense in depth because it helps prevent containers from making changes to the container’s root file system, prevents privilege escalation if a container is compromised, and can improve security and stability. This control fails if the readonlyRootFilesystem parameter doesn’t exist or is set to false in the ECS task definition JSON.
If you’re using the console to create the task definition, then you must select the read-only box against the root file system parameter in the console as show in Figure 3. If you are using JSON for task definition, then the parameter readonlyRootFilesystem must be set to true and supplied with the container definition or updated in order for this check to pass. This control creates a failed check finding for every ECS task definition that is out of compliance.

Figure 3: Using the ECS console to set readonlyRootFilesystem to true
Follow the steps in the remediation section of the control user guide to fix the resources identified by the control. Consider using infrastructure as code (IaC) tools such as AWS CloudFormation to define your task definitions as code, with the read-only root filesystem set to true to help prevent accidental misconfigurations. If you use continuous integration and delivery (CI/CD) to create your container task definitions, then consider adding a check that looks for the existence of the readonlyRootFilesystem parameter in the task definition and that its set to true.
If this is expected behavior for certain task definitions, you can use Security Hub automation rules to suppress the findings by matching on the ComplianceSecurityControlID and ResourceId filters in the criteria section.
To create the automation rule:
- Sign in to the delegated administrator account and open the Security Hub console.
- In the navigation pane, select Automations.
- Choose Create rule. For Rule Type, select Create custom rule.
- Enter a Rule Name and Rule Description.
- In the Rule section, enter a unique rule name and a description for your rule.
- For Criteria, use the Key, Operator, and Value drop down menus to specify your rule criteria. Use the following fields in the criteria section:
- Add key ProductName with operator Equals and enter the value Security Hub.
- Add key WorkFlowStatus with operator Equals and enter the value NEW.
- Add key ComplianceSecurityControlId with operator Equals and enter the value ECS.5.
- Add key ResourceId with operator Equals and enter the ARN of the ECS task definition as the value.
- For Automated action,
- Choose the dropdown under Workflow Status and select SUPPRESSED.
- Under note, enter a description such as ECS.5 exception.
- For Rule status, select Enabled
- Choose Create rule.
Sample Security Hub central configuration policy
In this section, we cover a sample policy for the controls reviewed in this post using central configuration. To use central configuration, you must integrate Security Hub with Organizations and designate a home Region. The home Region is also your Security Hub aggregation Region, which receives findings, insights, and other data from linked Regions. If you use the Security Hub console, these prerequisites are included in the opt-in workflow for central configuration. Remember that an account or OU can only be associated with one configuration policy at a given time as to not have conflicting configurations. The policy should also provide complete specifications of settings applied to that account. Review the policy considerations document to understand how central configuration policies work. Follow the steps in the Start using central configuration to get started.
If you want to disable controls and update parameters as described in this post, then you must create two policies in the Security Hub delegated administrator account home Region. One policy applies to the management account and another policy applies to the member accounts.
First, create a policy to disable IAM.6, Autoscaling.3, and update the ports for the EC2.18 control to identify security groups with unrestricted access on the ports. Apply this policy to all member accounts. Use the Exclude organization units or accounts section to enter the account ID of the AWS management account.
To create a policy to disable IAM.6, Autoscaling.3 and update the ports:
- Open the Security Hub console in the Security Hub delegated administrator account home Region.
- In the navigation pane, select Configuration and then the Policies tab. Then, choose Create policy. If you already have an existing policy that applies to all member accounts, then select the policy and choose Edit.
- For Controls, select Disable specific controls.
- For Controls to disable, select IAM.6 and AutoScaling.3.
- Select Customize controls parameters.
- From the Select a Control dropdown, select EC2.18.
- Edit the cell under List of authorized TCP ports, and add ports that are allow listed for unrestricted access. If no ports should be allow listed for unrestricted access then delete the text in the cell.
- For Accounts, select All accounts.
- Choose Exclude organizational units or accounts and enter the account ID of the management account.
- For Policy details, enter a policy name and description.
- Choose Next.
- On the Review and apply page, review your configuration policy details. Choose Create policy and apply.
Create another policy in the Security Hub delegated administrator account home Region to disable Autoscaling.3 and update the ports for the EC2.18 control to fail the check for security groups with unrestricted access on any port. Apply this policy to the management account. Use the Specific accounts option for the Accounts section and then the Enter organization unit or accounts tab to enter the account ID of the management account.
To disable Autoscaling.3 and update the ports:
- Open the AWS Security Hub console in the Security Hub delegated administrator account home Region.
- In the navigation pane, select Configuration and the Policies tab.
- Choose Create policy. If you already have an existing policy that applies to the management account only, then select the policy and choose Edit.
- For Controls, choose Disable specific controls.
- For Controls to disable, select AutoScaling.3.
- Select Customize controls parameters.
- From the Select a Control dropdown, select EC2.18.
- Edit the cell under List of authorized TCP ports and add ports that are allow listed for unrestricted access. If no ports should be allow listed for unrestricted access then delete the text in the cell.
- For Accounts, select Specific accounts.
- Select the Enter Organization units or accounts tab and enter the Account ID of the management account.
- For Policy details, enter a policy name and description.
- Choose Next.
- On the Review and apply page, review your configuration policy details. Choose Create policy and apply.
Conclusion
In this post, we reviewed the importance of the Security Hub security score and the four methods that you can use to improve your score. The methods include remediation of non-complaint resources, managing controls using Security Hub central configuration, suppressing findings using Security Hub automation rules, and using custom parameters to customize controls. You saw ways to address the five most commonly failed controls across Security Hub customers, including remediation strategies and guardrails for each of these controls.
If you have feedback about this post, submit comments in the Comments section below. If you have questions about this post, contact AWS Support.