Amazon Web Services ブログ
Amplify カスタムリソースを用いた AWS Step Functions と AWS Amplify の連携
AWS Amplify では、amplify add custom コマンドと AWS Cloud Development Kit (AWS CDK) または AWS CloudFormation を使用して、Amplify で作成したバックエンドにカスタム AWS リソースを追加することが可能です。これによって開発者は Amplify のビルトインユースケースを超える AWS リソースをプロジェクトに簡単に追加・管理することができます。
AWS Amplify は、AWS 上でクラウドを利用したモバイルおよび Web アプリケーションを迅速かつ容易に構築することができます。Amplify はモバイルおよび Web のフロントエンド開発者が AWS サービスを活用して革新的で機能豊富なアプリケーションを構築できるようにする一連のツールとサービスから構成されています。Amplify CLI はフロントエンド開発者がクラウド上でアプリのバックエンドを作成するのに役立つコマンドラインツールチェーンです。
本記事では、Amplify カスタムリソースを使用して AWS Step Functions ワークフローを Amplify プロジェクトに追加します。
AWS Step Functions は AWS Lambda 関数と10,000 以上の AWS API アクションを組み合わせて、ビジネスクリティカルなアプリケーションを構築できるサーバーレスオーケストレーションサービスです。Step Functions ワークフローを利用することで、失敗、再試行、並列化、サービス統合、および観測性を管理することができるため、開発者はより価値の高いビジネスロジックに集中することができます。
学べること
- AWS CDK を使用して Step Functions ワークフローを Amplify カスタムリソースとして作成する方法
- カスタムリソースを既存の Amplify で管理されている GraphQL API に接続する方法
アーキテクチャ
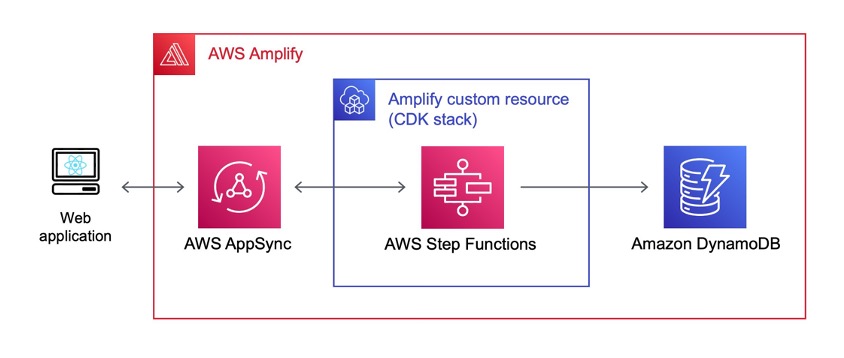
図 1:アーキテクチャ
ソリューションは、以下の要素で構成されています:
- サンプル Web アプリケーションは、Vite と Amplify UI を使用して構築された顧客フィードバックフォームです。
- フィードバックフォームを送信すると、Amplify が管理する AWS AppSync API を経由して Amplify カスタムリソースとして作成された Step Functions express ワークフローが起動します。
- Step Functions ワークフローは Amazon Comprehend の
DetectSentiment APIを使用して送信されたフィードバックの感情を検出します。 - 次に、ワークフローはフィードバックと検出された感情を Amplify が管理する Amazon DynamoDB テーブルに保存します。
- ネガティブな感情が検出された場合、ワークフローは Amazon Simple Notification Service (Amazon SNS) を使用してカスタマーサポートのメールアドレスに通知をします。
- 感情分析の結果に応じて Web アプリケーションは顧客に異なる確認メッセージを表示します。
Step Functions ワークフローは以下の画像のようになります。
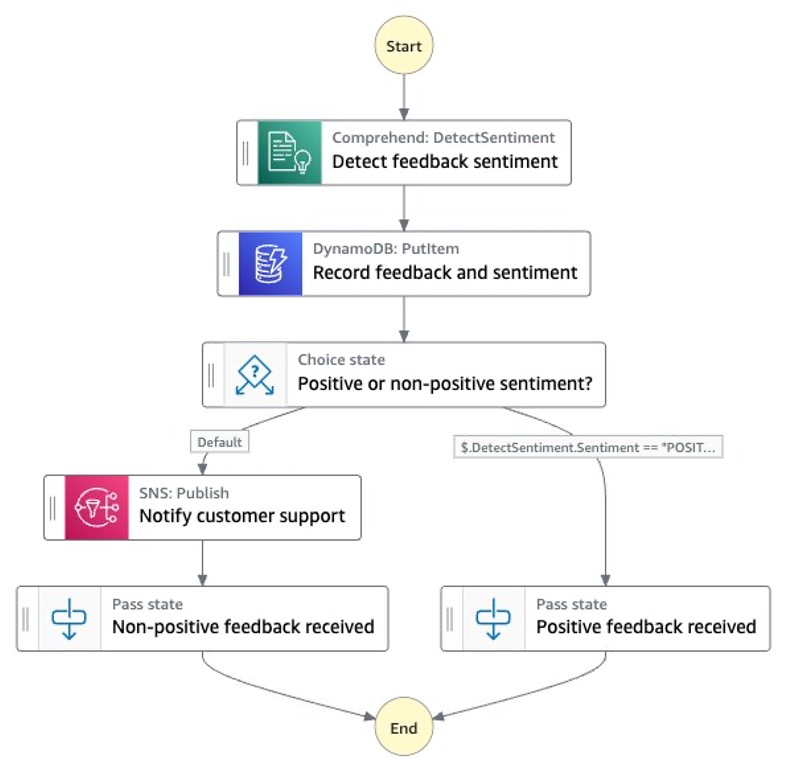
図 2:ユーザーフィードバックを処理するための Step Functions ワークフロー
Web アプリケーションは以下の画像のようになります。
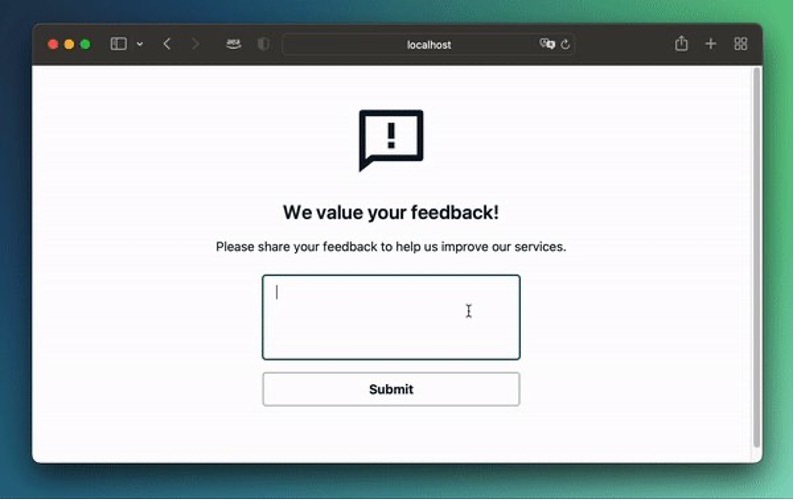
図 3:ソリューションのデモ
チュートリアル
前提条件
Amplify CLI のセットアップ
Amplify CLI をインストールするには、以下のコマンドを使用します。
npm install -g @aws-amplify/cliAmplify プロジェクトのセットアップ
aws-samples GitHub リポジトリからサンプルプロジェクトをクローンします。
git clone https://github.com/aws-samples/aws-amplify-stepfunctions-example.git
cd aws-amplify-stepfunctions-example
次に、Amplify CLI を使用して、以下のコマンドでサンプルプロジェクトに含まれるリソースを AWS アカウントに作成します。
amplify init以下の画像のように、プロジェクトを設定します。

これで Amplify が AWS にプロジェクト環境を構築し、完了したら通知してくれます。

これで Amplify CLI を使用してAWS リソースを Amplify スタックに追加する準備ができました。
GraphQL API のセットアップ
まず、Amplify スタックに GraphQL API を追加します。チュートリアルの後半では Step Functions ワークフローをこの API に接続する予定です。以下のコマンドを実行し、API を以下の画像のように設定します:
amplify add api
amplify/backend/api/<project_name>/ にある schema.graphql ファイルを開いてください。以下のように GraphQL スキーマを定義します:
以下のコマンドを実行して、Amplify にこのスキーマを AWS リソースに適用させます。
amplify push新しく作成された GraphQL API のコードを生成するかどうか尋ねられたら Yes と答え、ターゲット言語として JavaScript を指定し、その他はデフォルトのままにします。

Amplify カスタムリソースの追加
Amplify プロジェクトに Step Functions ワークフローを追加するために、Amplify カスタムリソースを使用します。
amplify add custom
Amplify カスタムリソースの名前を指定すると、Amplify は空の AWS CDK スタックを amplify/backend/custom/<our custom resource name>/ に作成します。
必要な依存関係を AWS CDK スタックにインポート
これで、スタックのコードをカスタマイズしてStep Functionsリソースを追加し、GraphQL APIに接続することができます。カスタムリソーススタックのサンプルコードは、クローンした git リポジトリの template/ ディレクトリ、または GitHub のここにあります。このウォークスルーでは、コードを順を追って説明します。
まず amplify/backend/custom/<our custom resource name>/ を開いて、AWS CDK スタックにAWS リソースを追加します。
Step Functions ワークフローを構築するために必要な依存関係を追加し、コメントアウトされた AWS CDK リソースを削除して、ファイルが次のように一致するようにしましょう。
cdk-stack.ts の内容を以下のように置き換えます。
import * as cdk from "aws-cdk-lib";
import * as AmplifyHelpers from "@aws-amplify/cli-extensibility-helper";
import { AmplifyDependentResourcesAttributes } from "../../types/amplify-dependent-resources-ref";
import { Construct } from "constructs";
import * as iam from "aws-cdk-lib/aws-iam";
import * as sns from "aws-cdk-lib/aws-sns";
import * as subs from "aws-cdk-lib/aws-sns-subscriptions";
import * as appsync from "aws-cdk-lib/aws-appsync";
import * as sfn from "aws-cdk-lib/aws-stepfunctions";
import * as tasks from "aws-cdk-lib/aws-stepfunctions-tasks";
import * as dynamodb from "aws-cdk-lib/aws-dynamodb";


export class cdkStack extends cdk.Stack {
  constructor(
    scope: Construct,
    id: string,
    props?: cdk.StackProps,
    amplifyResourceProps?: AmplifyHelpers.AmplifyResourceProps
  ) {
    super(scope, id, props);
    /* Do not remove - Amplify CLI automatically injects the current deployment environment in this input parameter */
    new cdk.CfnParameter(this, "env", {
      type: "String",
      description: "Current Amplify CLI env name",
    });

    // All CDK resources we define as part of this walkthrough will go here.

  }
}
カスタムリソーススタックで 既存の GraphQL API の参照
最初のステップとして、AWS CDK スタックの依存関係として既存の GraphQL API リソースを参照します。API リソース名は、Amplify CLI によって生成されたディレクトリを見ることで見つけることができます。プロジェクトの名前を変えている場合、このフォルダの名前は異なる可能性があることに注意してください。

API リソースの名前が例のように amplifysfn でない場合は、2 か所更新します。
// Defines the existing GraphQL API as a dependency for the custom resource CDK stack
const dependencies: AmplifyDependentResourcesAttributes =
    AmplifyHelpers.addResourceDependency(
    this,
    amplifyResourceProps.category,
    amplifyResourceProps.resourceName,
    [
        {
        category: "api",
        resourceName: "amplifysfn", // <- Adjust with name of your API resource
        },
    ]
    );

// Get the ID of the existing GraphQL API
const apiId = cdk.Fn.ref(
    dependencies.api.amplifysfn.GraphQLAPIIdOutput // <- Adjust with name of your API resource
);

// References the existing API via its ID
const api = appsync.GraphqlApi.fromGraphqlApiAttributes(this, "API", {
    graphqlApiId: apiId,
});

// Adds the AWS Step Functions (SFN) service endpoint as a new HTTP data source to the GraphQL API
const httpdatasource = api.addHttpDataSource(
    "ds",
    "https://sync-states." + cdk.Stack.of(this).region + ".amazonaws.com",
    {
    name: "HTTPDataSourceWithSFN",
    authorizationConfig: {
        signingRegion: cdk.Stack.of(this).region,
        signingServiceName: "states",
    },
    }
);
カスタムリソーススタックに Step Functions ワークフローを作成
これで、@aws-cdk/aws-stepfunctions と @aws-cdk/aws-stepfunctions-tasks モジュールを使って AWS CDK スタックの中で直接 Step Function ワークフローを作成できるようになりました。まず、すべてのタスクとロジックステートを含むステートマシン定義を作成します。
/*
Defines the first task in our SFN workflow.
We call the Amazon Comprehend detectSentiment API with
the input provided with the SFN execution.
*/
const detect_sentiment_task = new tasks.CallAwsService(
    this,
    "Detect feedback sentiment",
    {
    service: "comprehend",
    action: "detectSentiment",
    iamResources: ["*"],
    iamAction: "comprehend:DetectSentiment",
    parameters: { "Text.$": "$.input", LanguageCode: "en" },
   resultPath: "$.DetectSentiment",
    }
);

// Get the name of the current Amplify environment (e.g., "dev", "prod")
const envName = AmplifyHelpers.getProjectInfo().envName;

// Import the DynamoDB table created by Amplify as a result of the @model directive in our GraphQL schema
const feedbackTable = dynamodb.Table.fromTableName(
    this,
    "FeedbackTable",
    "Feedback-" + apiId + "-" + envName
);

// Save feedback and detected sentiment to DynamoDB table
const save_to_ddb = new tasks.DynamoPutItem(
    this,
    "Record feedback and sentiment",
    {
    item: {
        id: tasks.DynamoAttributeValue.fromString(
        sfn.JsonPath.stringAt("$$.Execution.Id")
        ),
        __typename: tasks.DynamoAttributeValue.fromString("Feedback"),
        createdAt: tasks.DynamoAttributeValue.fromString(
        sfn.JsonPath.stringAt("$$.State.EnteredTime")
        ),
        updatedAt: tasks.DynamoAttributeValue.fromString(
        sfn.JsonPath.stringAt("$$.State.EnteredTime")
        ),
        content: tasks.DynamoAttributeValue.fromString(
        sfn.JsonPath.stringAt("$.input")
        ),
        sentiment: tasks.DynamoAttributeValue.fromString(
        sfn.JsonPath.stringAt("$.DetectSentiment.Sentiment")
        ),
    },
    table: feedbackTable,
    resultPath: sfn.JsonPath.DISCARD,
    }
);
これで DetectSentiment API から結果を受け取り、元の入力と一緒に DynamoDB に格納しました。次に、ステップ関数では、ポジティブな結果とそうでない結果を異なる方法で処理する必要があります。
// Creates an Amazon SNS topic to which we'll later publish notifications from our SFN workflow
const customer_support_topic = new sns.Topic(
    this,
    "Customer support SNS topic"
);

/* Creates a subscription to the topic defined above using our own email
address. Make sure to replace this with an actual email address you have
access to.
*/
customer_support_topic.addSubscription(
    new subs.EmailSubscription("email@example.com") // <- replace with your email
);

/*
Defines a SFN task that publishs a notification
containing the sentiment detected by Amazon Rekognition to
the SNS topic we defined above.
*/
const handleNonPositiveResult = new tasks.SnsPublish(
    this,
    "Notify customer support",
    {
    topic: customer_support_topic,
    message: sfn.TaskInput.fromObject({
        Message: "Non-positive feedback detected.",
            "Detected sentiment": sfn.JsonPath.stringAt(
            "$.DetectSentiment.Sentiment"
            ),
    }),
    }
);

// Defines a pass state that outputs that a negative sentiment was detected
const nonPositiveResult = new sfn.Pass(
    this,
    "Non-positive feedback received",
    {
    result: sfn.Result.fromObject({ Sentiment: "NON-POSITIVE" }),
    }
);

// Defines what state the workflow moves to after the handleNonPositiveResult state
handleNonPositiveResult.next(nonPositiveResult);

// Defines a pass state that outputs that a positive sentiment was detected
const positiveResult = new sfn.Pass(this, "Positive feedback received", {
    result: sfn.Result.fromObject({ Sentiment: "POSITIVE" }),
});

// Defines a Choice state
const sentiment_choice = new sfn.Choice(
    this,
    "Positive or non-positive sentiment?"
);

// Defines what happens if our Choice state receives a positive sentiment
sentiment_choice.when(
    sfn.Condition.stringEquals("$.DetectSentiment.Sentiment", "POSITIVE"),
    positiveResult
);

// Defines what happens if our Choice state receives anything other than a positive sentiment
sentiment_choice.otherwise(handleNonPositiveResult);
Step Functions リソースの定義
最後に、ステートマシンの定義に基づいて Step Functions ワークフローリソースを定義します。まず、ワークフローに含まれるタスクを実行するための正しい IAM アクセス権を定義する必要があります。
// The state machine definition brings together all our defined tasks
const stateMachineDefinition = detect_sentiment_task
    .next(save_to_ddb)
    .next(sentiment_choice);

// Create a service role for SFN to use
const serviceRole = new iam.Role(this, "Role", {
    assumedBy: new iam.ServicePrincipal(
    "states." + cdk.Stack.of(this).region + ".amazonaws.com"
    ),
});

/*
Defines the express SFN workflow resource using the state
machine definition as well as the service role defined above.
*/
const stateMachine = new sfn.StateMachine(this, "SyncStateMachine", {
    definition: stateMachineDefinition,
    stateMachineType: sfn.StateMachineType.EXPRESS,
    role: serviceRole,
});

// Grant AppSync HTTP data source rights to execute the SFN workflow
stateMachine.grant(
    httpdatasource.grantPrincipal,
    "states:StartSyncExecution"
);

// Creates an IAM role that can be assumed by the AWS AppSync service
const appsyncStepFunctionsRole = new iam.Role(
    this,
    "SyncStateMachineRole",
    {
    assumedBy: new iam.ServicePrincipal("appsync.amazonaws.com"),
    }
);

// Allows the role we defined above to execute express SFN workflows
appsyncStepFunctionsRole.addToPolicy(
    new iam.PolicyStatement({
    resources: [stateMachine.stateMachineArn],
    actions: ["states:StartSyncExecution"],
    })
);
ワークフローと GraphQL API の連携
Step Functionsワークフローが AWS CDK スタックを設計しているので、ワークフローの Amazon Resource Name(ARN)を参照する GraphQL API データソースの新しいリゾルバを作成することができます:
/*
Adds a GraphQL resolver to our HTTP data source that defines how
GraphQL requests and fetches information from our SFN workflow.
*/
httpdatasource.createResolver("execute-state-machine", {
    typeName: "Mutation",
    fieldName: "executeStateMachine",
    requestMappingTemplate: appsync.MappingTemplate.fromString(
    START_EXECUTION_REQUEST_TEMPLATE(stateMachine.stateMachineArn)
    ),
    responseMappingTemplate:
    appsync.MappingTemplate.fromString(RESPONSE_TEMPLATE),
});
リゾルバーはリクエストマッピングテンプレートとレスポンスマッピングテンプレートの両方を参照しています。これらのマッピングテンプレートは、GraphQL リゾルバーがデータソース(この場合は Step Functions ワークフロー)と通信する方法を定義します。cdk-stack.ts でリクエストとレスポンスの両方のマッピングテンプレートを定義してみましょう。
// ...
import * as tasks from "@aws-cdk/aws-stepfunctions-tasks";
import * as dynamodb from "@aws-cdk/aws-dynamodb";

const START_EXECUTION_REQUEST_TEMPLATE = (stateMachineArn: String) => {
  return `
  {
    "version": "2018-05-29",
    "method": "POST",
    "resourcePath": "/",
    "params": {
      "headers": {
        "content-type": "application/x-amz-json-1.0",
        "x-amz-target":"AWSStepFunctions.StartSyncExecution"
      },
      "body": {
        "stateMachineArn": "${stateMachineArn}",
        "input": "{ \\\"input\\\": \\\"$context.args.input\\\"}"
      }
    }
  }
`;
};

const RESPONSE_TEMPLATE = `
## Raise a GraphQL field error in case of a datasource invocation error
#if($ctx.error)
  $util.error($ctx.error.message, $ctx.error.type)
#end
## if the response status code is not 200, then return an error. Else return the body **
#if($ctx.result.statusCode == 200)
    ## If response is 200, return the body.
  $ctx.result.body
#else
    ## If response is not 200, append the response to error block.
    $utils.appendError($ctx.result.body, $ctx.result.statusCode)
#end
`;

export class cdkStack extends cdk.Stack {
    // ...
繰り返しになりますが、Amplify カスタムスタックのコードの全容を知るには、GitHub のファイルを見るようにしてください。
Amplify カスタムリソースをデプロイ
プロジェクトルートに戻り、カスタムリソースを AWS にデプロイします。
amplify pushカスタマーサポート の SNS トピックへの登録を確認するためのメールが届きます。サブスクリプションの確認はワークフローを正常に実行するために忘れずに行う必要があります。
ワークフローのテスト
Amplify のリソースをセットアップしたところで、サンプル Web アプリケーションも用意しましょう。GitHub から Clone したサンプルコードには、Vite を使った Web アプリケーションが含まれています。プロジェクトのルートディレクトリに戻り、npm を使用してプロジェクトの必要な依存関係をインストールします。
npm ciワークフローをテストするために、Web アプリケーションを経由して起動します。
npm startフォームにポジティブなフィードバックとネガティブなフィードバックを入力してみましょう。図3 に示すように、Submit ボタンを押した後、フィードバックの感情によって異なる成功メッセージが表示されます。また、ポジティブな感情を持たないフィードバックは、カスタマーサポートの SNS トピックでメールが送信されるトリガーとなります。
クリーンアップ
このチュートリアルで作成されたリソースを削除するには、プロジェクトのルートディレクトリから amplify delete を実行し、CLI の指示に従います。
まとめ
本記事では Step Functions ワークフローを Amplify カスタムリソースとしてセットアップする方法と、Amplify が管理する GraphQL API に接続する方法について説明しました。AWS サービスを Amplify プロジェクトに統合する詳細については、Amplify カスタムリソースのドキュメントを参照してください。AWS Step Functions Workshop で AWS Step Functions の詳細を学び、AWS Step Functions 用の AWS CDK ドキュメントを使用してサンプルワークフローを拡張できます。
GitHub issue を開くか、以下のコメントでフィードバックを共有してください。
本記事は、Integrate AWS Step Functions with AWS Amplify using Amplify Custom Resources を翻訳したものです。翻訳はソリューションアーキテクトの稲田大陸が担当しました。