AWS Contact Center
Automate transaction confirmation using outbound calls with Amazon Connect
As financial institutions continue to embrace digital transformation, the reliance on traditional phone interactions to engage with corporate clients remains prevalent. For instance, in many countries, regulations mandate that banks confirm transaction details with their clients via phone (“affirmations”). The banks must also record these calls for future audits for compliance and quality assurance. These manual processes can be time-consuming and require significant human intervention.
Financial organizations can use Amazon Connect to automate phone-based processes, improve customer and agent experiences, and reduce manual work. Amazon Connect advanced analytics can also provide valuable insights to help these businesses make informed decisions and improve their operations.
In this blog post, we demonstrate how to initiate a call to a customer, confirm the details of a transaction, and store the audio and transcription.
Solution Overview
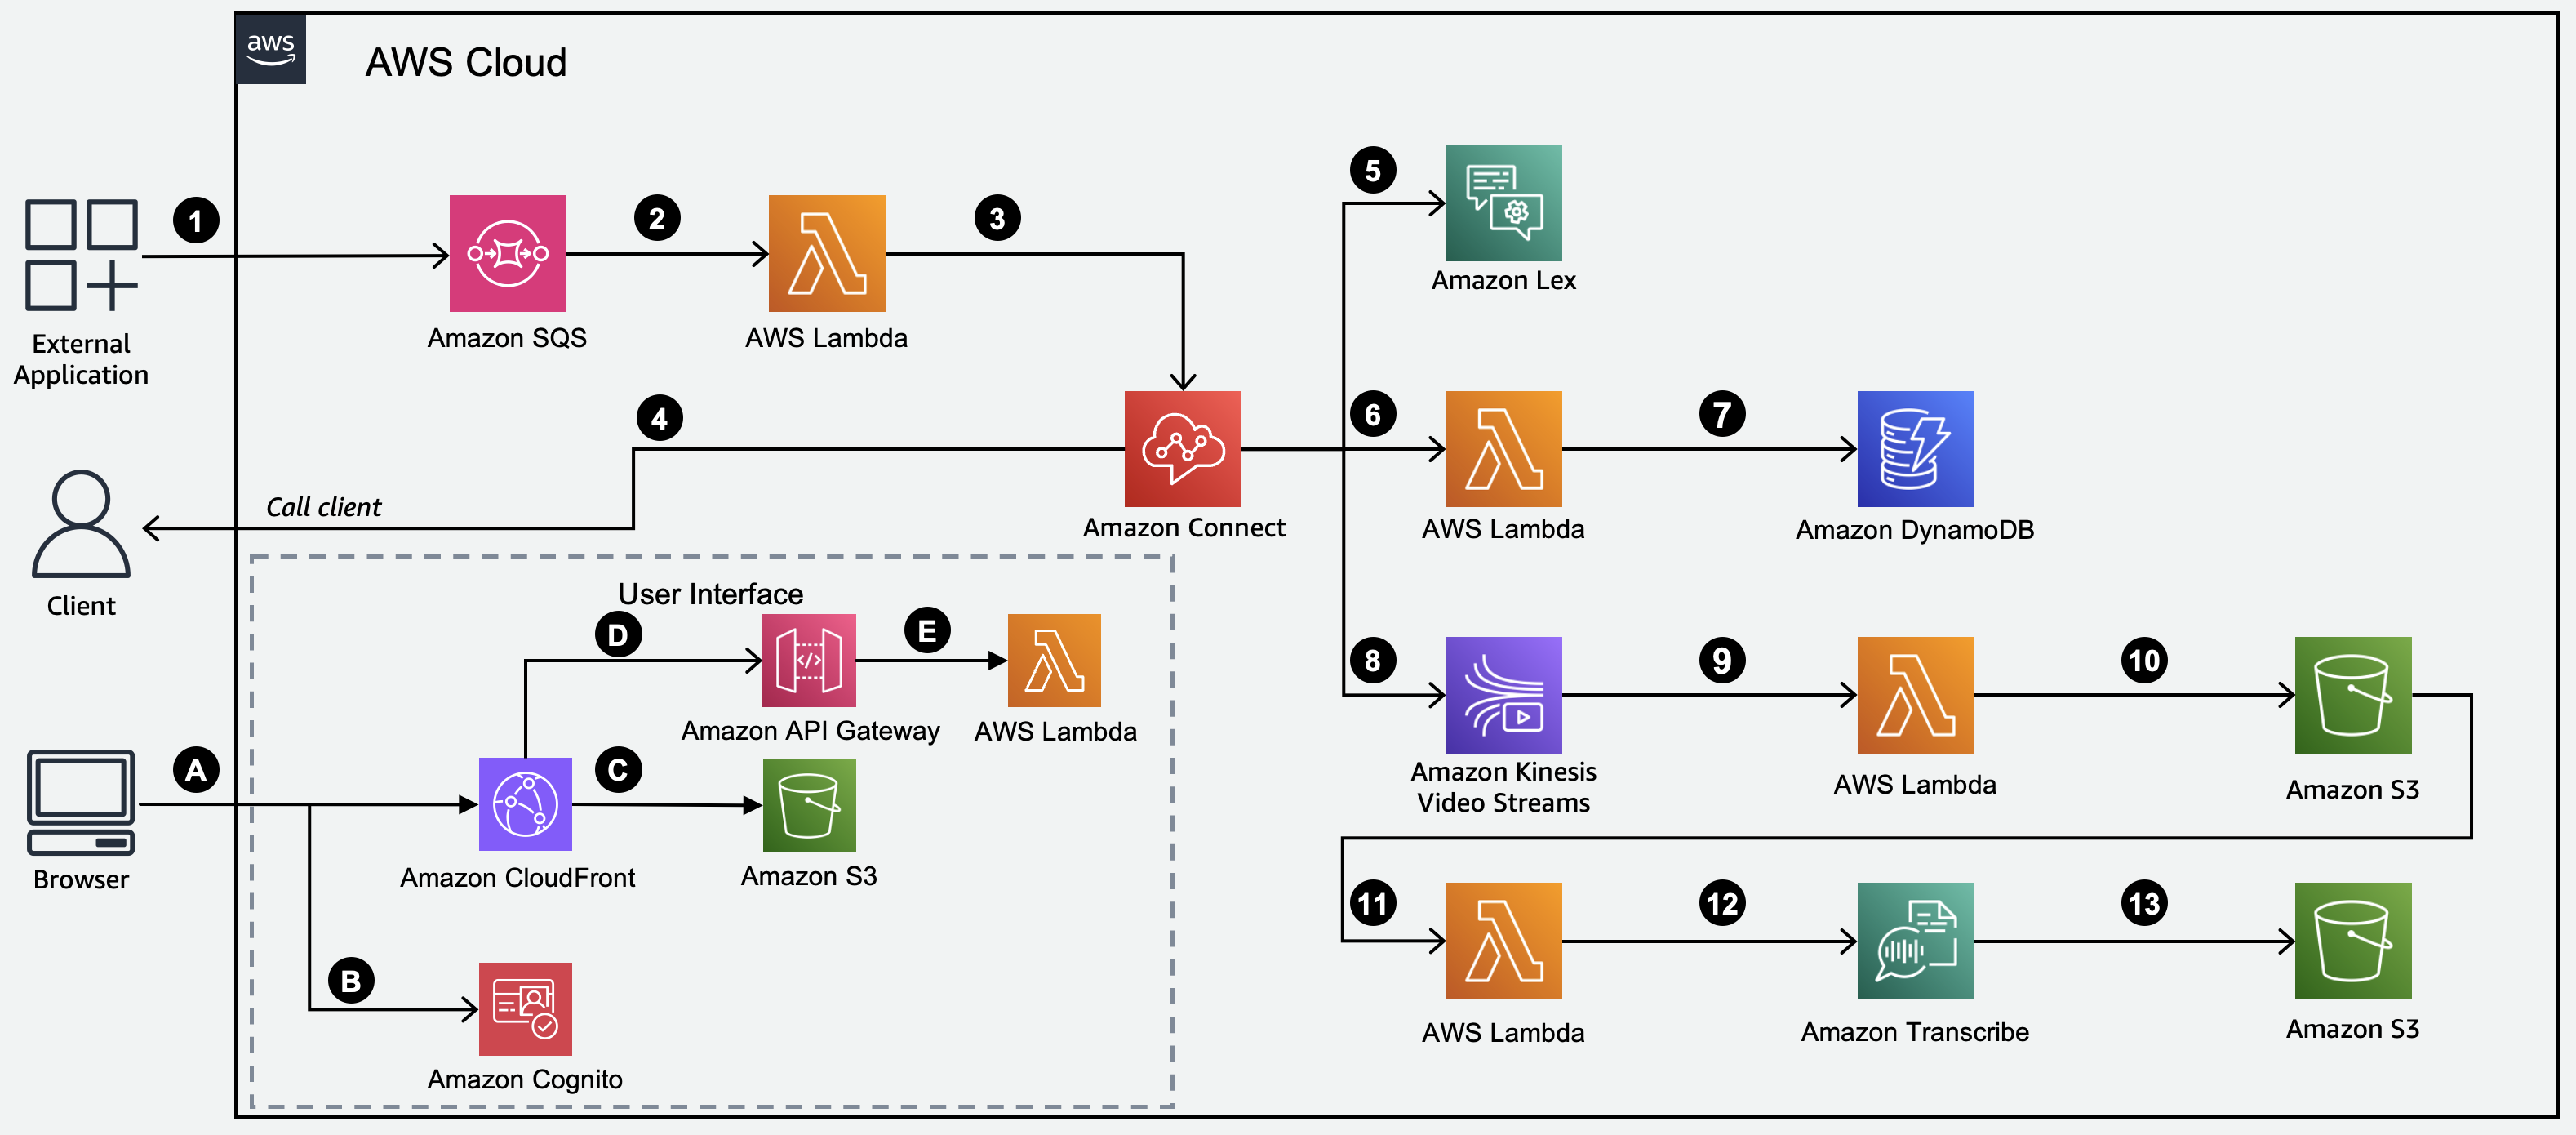
The following steps explain how the preceding solution works:
- An external system or application places an outbound call request in an Amazon SQS queue (with the relevant parameters).
- Amazon SQS invokes a Lambda function.
- This Lambda function sends the relevant information to Amazon Connect to initiate an outbound call.
- Amazon Connect initiates a call to the relevant Client.
- Amazon Connect uses three Amazon Lex bots to have a conversation with the Client and to capture responses to a set of questions.
- At the end of the call, Amazon Connect invokes a Lambda function.
- That Lambda function stores the status of the call (SUCCESS, FAILED) in a DynamoDB table for reference and audit.
- Amazon Connect streams the audio from the call is streamed to an Amazon Kinesis Video stream.
- A Lambda function subscribes to the video stream.
- The Lambda function processes audio and stores the audio on an Amazon S3 bucket.
- Amazon S3 event notifications invoke the Lambda function.
- That function uses Amazon Transcribe to transcribe audio into text.
- The resulting text is then stored in another S3 bucket for future reference.
In order for you to test the solution, we have created a small web application, which works as follows:
- User requests Single Page Application (SPA).
- User will be authenticated against Amazon Cognito User Pools.
- Amazon CloudFront will return the SPA from Amazon S3 Buckets.
- The SPA will invoke API operations on Amazon API Gateway via Amazon CloudFront.
- Amazon API Gateway will delegate the call to the , which implements the core API functionality to handle and process the request.
Prerequisites
To follow along with this post, you should have the following:
- Familiarity with the AWS Cloud Development Kit (AWS CDK) and the command line.
- Familiarity with the AWS Management Console.
- Familiarity with Amazon Connect Contact Flows and Amazon Lex Bots.
- Access to an AWS Account, along with an AWS Identity and Access Management (IAM) role with the relevant permissions.
- The latest Long-Term Support (LTS) versions of Node.js, Python, TypeScript, and the CDK installed.
You can find the AWS CDK code to deploy the required infrastructure solution in the GitHub repository.
This solution uses AWS Cloud Development Kit in TypeScript to provision the required AWS Services. It consists of six CloudFormation
OutboundCallBaseStackfor creating S3 Buckets used for logging and an AWS KMS key that is used throughout the solution for encryption.OutboundCallLexStackfor creating Amazon Lex bots that are used to have a conversation with the Client and capture responses.OutboundCallConnectStackfor creating the Amazon Connect instance and supporting Lambda functions.OutboundCallMainStackfor creating the integration between UI and Amazon Connect Instance, as well as the SQS queue.OutboundCallWafStackfor creating AWS WAF for Amazon CloudFront. This will be created in theus-east-1Region.OutboundCallFrontendStackfor creating a Web Application to trigger the outbound call as well as displaying the call result.
Step 1: Download the solution from the repository
Clone the repository to your local machine:
Step 2: Create Lambda Layers
The Lambda functions in this solution require some packages that will be imported via Lambda layers. Before you deploy the application, a zip file containing all the required packages must be generated.
- FFmpeg Lambda Layer
To convert the audio to WAV file, you will use the FFmpeg library. To create a Lambda layer for this library, download the FFmpeg Library and extract them to amazon-connect-outbound-call-demo/lambdas-layer
On Linux or macOS you can run the following commands to download and extract the FFmpeg Library:
Optionally, you can validate the checksum of the downloaded file:
Extract the downloaded file build:
Build the Lambda layer.
- Third party Python Library Lambda Layer
The solution uses pydub for manipulating audio file and ebmlite for parsing EBML file data. To build the Lambda layer for those libraries, type the following commands:
Then, install the third-party libraries.
Finally, create the zip file.
Step 3: Build the Web Application
Before deploying the CloudFormation Stack, you must build the Web Application:

This will create a dist folder in amazon-connect-outbound-call-demo/web-app
Step 4: Update Amazon Connect Admin Password and Amazon Connect Instance alias
The default password for the Amazon Connect Admin user is stored in amazon-connect-outbound-call-demo/amazon-connect-outbound-call-cdk/cdk.json. You can change this default password.
Additionally, you must update the Amazon Connect Instance Alias to a unique value.
Step 5: Deploy CDK Templates
To deploy the solution, navigate to the main CDK template:
If this is your first time deploying the solution, you must install the required CDK libraries and bootstrap your environment by running the following commands:

To deploy the entire solution, you can run the following command:
This process will take approximately 15 minutes to complete, and it will display the WebApp URL as well:

Alternatively, you can also navigate to the AWS Management Console, then click on CloudFormation and then Stacks to view the deployed Stacks.

Step 6: Access the Web UI
Take note of the CloudFront distribution name from the outputs of the OutboundCallFrontendStack OutboundCallFrontendStack.webappurl:

You can also navigate to the AWS Management Console, then click on CloudFormation and look at the OutboundCallFrontend Stack Outputs tab.

Open a web browser and navigate to the Web Application URL. You will be presented with a login screen:

Step 7: Create a new user

The solution is integrated with Amazon Cognito. You must create a new user before you can access the Web UI.
- On the login screen, choose Create Account Tab.
- Enter your email and password. The email must be a valid email address as you will receive a verification code to activate your account. The password must have a minimum of 8 characters and contain a combination of upper case, lower case, digits and symbols.
- Click on Create Account.
- You will receive a verification code in your registered email. Enter the code and click Confirm to access the Web UI.
Step 8: Testing: Initiate outbound call
You can initiate the outbound call via the Web UI:
- Navigate to the Web Application URL.
- Choose the hamburger button on the top left corner and choose Initiate Callback.
- Choose the country code and enter the recipient phone number.
- Modify the instruction details accordingly.
- Click on Submit button.
This will initiate an outgoing call to the given phone number

On the backend, when a user submits through the Web UI, the message payload is stored in an Amazon SQS queue. This queued message then triggers a Lambda function that initiates the outbound call.
Note: During the first outbound call attempt, you may encounter an initialization failure because the Kinesis Streams are being created. If this occurs, simply retry the call – subsequent attempts should succeed.
How the solution handles customer interaction
The solution uses Amazon Lex to handle customer interaction. To do that, we have 3 Amazon Lex bots to handle different interactions.

The GetCustomerName bot is used to capture the customer’s name and has a single intent. The MainBot handles customer responses to instructions and has multiple intents, such as confirming, rejecting , and modifying the instruction. Lastly, the ModificationBot handles customer intents to modify the instruction, with intents for modifying the beneficiary account and the value date.
How Amazon Connect flows work
The Outbound Call Flow defines the customer experience when the call is connected. Here is how it works:

- The flow starts with enabling logging to Amazon CloudWatch Logs.
- The Invoke module
InitFlowModulewill handle the initialization:- Start Streaming to Kinesis Video Streams for audio from and to the customer.
- Invoke Lambda function
OutboundCall-triggerCallRecordingLambda. This Lambda function will publish an Amazon SQS message to another Lambda functionOutboundCall-startCallRecordingLambdathat will asynchronously record the audio stream from Amazon Kinesis Video Streams and store it as an audio file. - Invoke Set voice block to set the text to speech voice.

- The Invoke module
getCustNameFlowModulewill invoke Amazon Lex BotGetCustomerNameto request customer for their name.

- The Invoke module
getCustomerResponseModulewill invoke the Amazon Lex BotsMainBotandModificationBotto obtain the customer’s response.

Step 9: Call Audit, Recording and Transcription
After the call has been completed, you can access the Web UI to view the call logs:
- Navigate to the Web Application URL.
- Choose the hamburger button on the top left corner and choose Call Logs

You can click on the Voicemail icon to download the call recording stored in the Amazon S3 bucket. Additionally, you can view the recording transcription by hovering your pointer over the Voicemail icon.
Clean up
Use the AWS CloudFormation Console to delete the stack, or you can run the following command.
Conclusion
In this post we demonstrated how to use AWS services to automate outbound calls, interact with customers to gather information, and record and transcribe those conversations. This solution can not only help financial institutions address the “affirmations” call use case, but also other industries with similar needs such as Healthcare and Retail.
With Amazon Connect, you can integrate your contact center workflows to your internal case management system such as ServiceNow or CRM such as SalesForce.
About the Authors
 Camille Birbes is a Senior Solutions Architect with AWS and is based in Hong Kong. He works with major financial institutions to design and build secure, scalable, and highly available solutions in the cloud. Outside of work, Camille enjoys any form of gaming, from board games to the latest video game.
 Budi Boentaran is a Technical Program Manager at AWS, based in Singapore. With over two decades of experience in the financial services industry, he partners with major financial institutions to accelerate their cloud transformation journeys. His deep industry knowledge and technical expertise help customers navigate complex cloud adoption challenges. Outside of work, Budi enjoys playing video games and spending quality time with his family.