AWS Database Blog
Migrate self-managed MariaDB to Amazon Aurora MySQL
Amazon Aurora is a fully managed MySQL and PostgreSQL-compatible relational database, offered as part of the Amazon Relational Database Service (Amazon RDS). With a managed service like Aurora, customers can free their teams from time-consuming database tasks like server provisioning, patching, and backups. Amazon Aurora provide continuous monitoring, self-healing storage, and automated scaling to help you focus on application development.
In this post, we present three different methods for migrating from self-managed MariaDB to Amazon Aurora MySQL, each with different downtimes associated with them. You can also apply these methods to move from self-managed MySQL and Percona MySQL databases to Aurora MySQL.
mysqldump
mysqldump is a utility used to produce logical backup of MySQL and MariaDB. This tool produces dumps in the form of SQL files that contain data definition language (DDL), data control language (DCL), and data manipulation language (DML) statements. The statements carry information about data structures, data access rules, and the actual data, respectively. It dumps one or more MySQL databases for backup or transfer to another server.
The migration process is: stop traffic on source database > run mysqldump > import dump file into Aurora MySQL > redirect application to Aurora MySQL.
This approach is the simplest and is well suited to smaller databases (less than 50 GB in size) with a relatively larger downtime window. This downtime is dependent on the time it takes for the mysqldump process to complete. This method is a good fit for applications with higher downtime tolerance that is typical in development and test environments.
The following example runs mysqldump on a client to export data from external database, and then pipes the dump into the mysql client utility, which loads the data into the Aurora MySQL database.
Multi-threaded migration using mydumper
mysqldump is simple to use, but it’s single threaded and therefore isn’t suitable for large databases. An open-source solution that supports multi-threaded export and import is a combination of mydumper and myloader. These are popular MySQL export/import tools designed to address performance issues associated with the legacy mysqldump program. mydumper is much faster than mysqldump because it supports backing up the database using multiple parallel threads, up to one thread per available CPU core. The utility produces several files, which you can use to restore a database using the related tool myloader. See the following code:
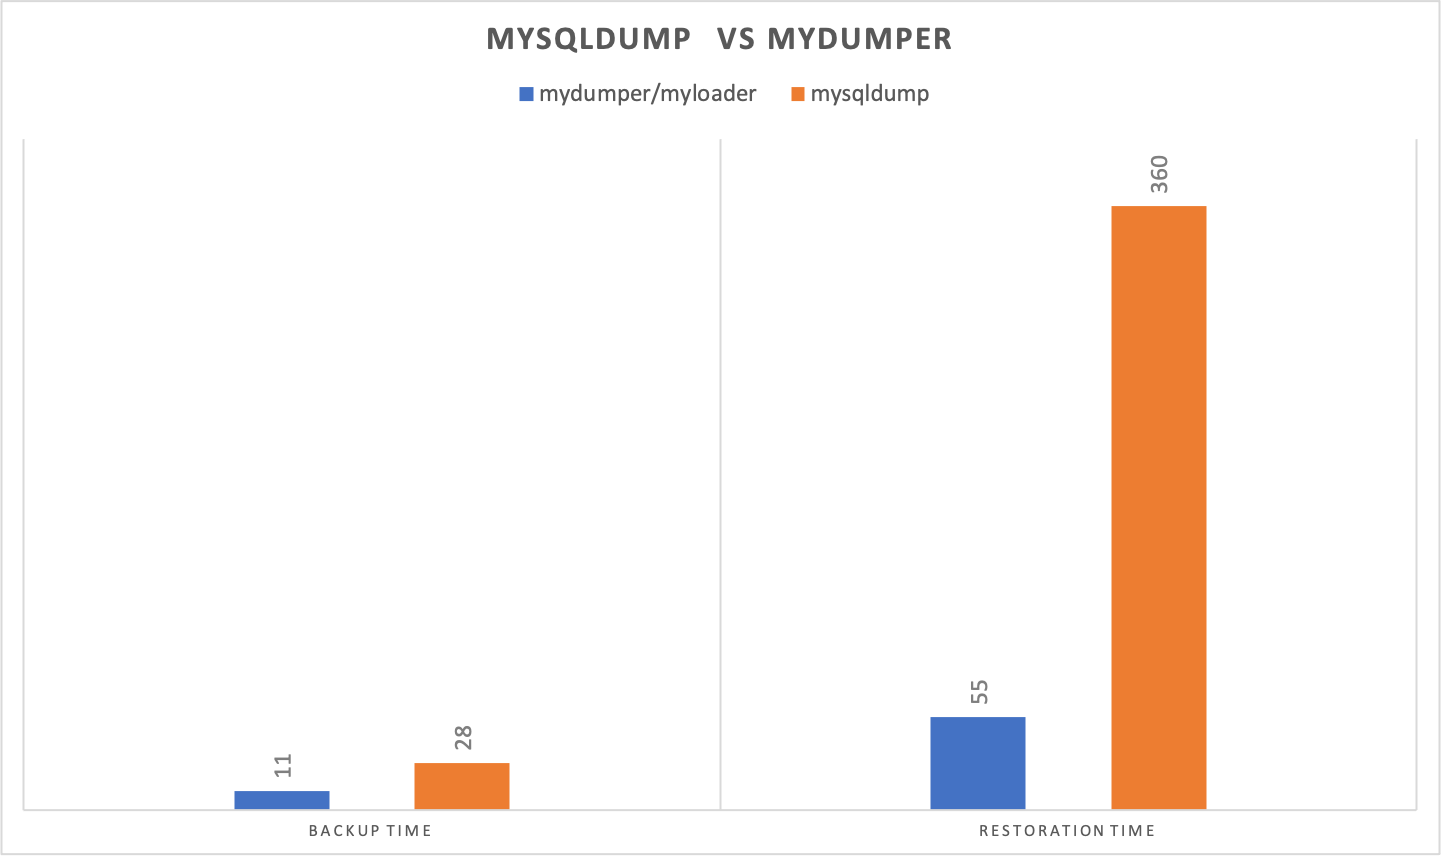
We ran mysqldump and mydumper (four threads) to export a 215 GB database data set on MariaDB instance running on an i3en.xlarge Amazon Elastic Compute Cloud (Amazon EC2) instance (4 vCPUs) to compare the performance with the exports. We restored the files produced by the export processes on an RDS r5.db.4xlarge instance using mysqlnative import and myloader (four threads). The following results show that the mydumper/myloader processes are significantly faster. Backup and restore time is in minutes (smaller is better).
This method speeds up backup and restore, but there is still a downtime that is dependent on the time it takes for the mydumper and myloader process to complete. In the next section, we see how we can minimize downtime by setting up logical replication.
Reduce downtime associated with logical exports
You can use logical binlog replication in conjunction with the logical export/import approach to reduce downtime. Using binlog replication , target Aurora MySQL instance will catch up to any transactions that happened on the source database during the restore process.
We start binlog replication from the self managed MariaDB to Aurora MySQL.
The steps to use binlog replication are as follows:
- Create a MariaDB read-only replica of the source MariaDB database.
- Stop the replication when the read-only replica has caught up or the replica lag is minimal. To check replica lag, you must run
show slave statuson the replica. To stop replication, runstop slave. - Capture the binlog position on the read-only replica using
show slave status\G. - Run mysqldump or mydumper against the read-only replica to export the database objects and import them to the destination Aurora MySQL instance.
- Set binlog retention on source MariaDB of a few days by setting the variable
binlog_expire_logs_seconds. - Set up binlog replication between the source MariaDB database and Aurora MySQL instance by running the
mysql.rds_set_external_masterstored procedure. This stored procedure has the following syntax: - For
mysql_binary_log_file_nameandmysql_binary_log_file_location, use the values you noted in Step 3. - Start binary log replication by running the
mysql.rds_start_replicationstored procedure: - Monitor how far Aurora replica is behind MariaDB source database. To do so, connect to the Aurora MySQL cluster and run the following command:
In the command output, the Seconds Behind Master field shows how far the Aurora replica is behind the source MariaDB database.
- When the replication lag between self managed MariaDB and Aurora MySQL is close to zero, stop the workload and let the transactions drain.
- Stop replication once everything is caught up.
- Switch over the application to the newly promoted Aurora MySQL cluster.
AWS DMS
AWS Database Migration Service (AWS DMS) helps you migrate databases to AWS quickly and securely. The source database remains fully operational during the migration, minimizing downtime to applications that rely on the database. AWS DMS can migrate your data to and from the most widely used commercial and open-source databases. You can use AWS DMS for initial load into the Aurora cluster as well as for continuous data replication. AWS DMS captures changes from binary logs and applies them in a transactionally consistent way to the target.
To use this approach, complete the following steps:
- Enable binary logs on the source MariaDB database by starting the server with the
--log-bin[=name]option. - Create an AWS DMS replication instance, and source and target endpoints to connect the replication instance to the on-premises MariaDB database and the Aurora MySQL cluster.
For best practices on sizing your replication instance, see Choosing the best size for a replication instance.
- Run mysqldump on the source database with the
--no-dataflag set so only the table definitions are exported. - Import these table definitions to Aurora MySQL.
- Create and start an AWS DMS task to migrate existing data and replicate ongoing changes.
- Monitor the replication lag on the AWS DMS replication instance and stop the transactions on the source database when the replication lag is zero.
- Switch the application over to the Aurora MySQL cluster.
Conclusion
In this post, we showed you different migration approaches to migrate a self-managed MariaDB/MySQL database to Aurora MySQL. We also discussed how to select your approach based on environment, database size, and downtime tolerance.
With a successful migration to Aurora, you can focus on what matters to your organization’s business, such as optimizing database design, capacity sizing, and performance tuning.
If you have any questions or suggestions, please leave us a comment.
About the Authors
 Veerendra Nayak is a Senior Database Solution Architect with Amazon Web Services.
 Sam Selvan is a Senior Analytics Solution Architect with Amazon Web Services.