AWS HPC Blog
Large scale training with NVIDIA NeMo Megatron on AWS ParallelCluster using P5 instances
This post was contributed by Akshit Arora (NVIDIA), Peter Dykas (NVIDIA), Aman Shanbhag (AWS), Sean Smith (AWS), Pierre-Yves (AWS)
Today we’ll take you on a step-by-step guide to help you to create a cluster of p5.48xlarge instances, using AWS ParallelCluster to launch GPT training through the NVIDIA NeMo Megatron framework, using Slurm. We’ve put detailed information about this in our GitHub repo.
We use ParallelCluster to execute NVIDIA NeMo Megatron across multiple nodes, because it takes care of mounting a fast shared filesystem between the nodes, synchronizing the SSH keys, creating a host file, and all the other overheads that make job submission possible.
AWS ParallelCluster is a supported, open-source cluster management tool that makes it easy to create, scale, and manage clusters of accelerated instances based on the open-source Slurm scheduler. It uses a YAML configuration file to stand up a head node, accelerated compute nodes, and a file system. Users can login and submit jobs to pre-provisioned nodes, or dynamically spin-up Amazon Elastic Compute Cloud (Amazon EC2) instances using On-Demand or Spot. ParallelCluster also offers a web-based user interface that serves as a dashboard for creating, monitoring, and managing clusters.
Introducing NVIDIA NeMO Framework
The NVIDIA NeMo Framework (or just NeMo FW for the rest of this post) focuses on foundation model-training for generative AI models. Large language model (LLM) pre-training typically needs a lot of compute and model parallelism to efficiently scale training. NeMo FW’s model training scales to thousands of NVIDIA GPUs and can be used for training LLMs on trillions of tokens.
The NVIDIA NeMo Megatron Launcher (NeMo Launcher) is a cloud-native tool for launching end-to-end NeMo FW training jobs. The Launcher is designed to be a simple and easy-to-use tool for launching NeMo FW training jobs on CSPs or on-prem clusters.
The launcher is typically used from a head node and only requires a minimal python installation. Launcher will generate (and launch) the submission scripts needed by the cluster scheduler and will also organize and store the job results. Launcher includes tested configuration files, but anything in a configuration file can be modified by the user. Launcher supports many functionalities, from cluster setup and configuration, data downloading, curating and model training setup, evaluation and deployment.
Steps to create cluster and launch jobs
This guide assumes that Amazon EC2 P5 instances are available in us-east-2 for you, but this may vary depending on your account / capacity reservation and the region you plan to use.
Step 0: Install ParallelCluster CLI
Installing CLI Instructions: https://docs.aws.amazon.com/parallelcluster/latest/ug/install-v3-virtual-environment.html
- If
virtualenvis not installed, installvirtualenvusingpip3.
python3 -m pip install --upgrade pip
python3 -m pip install --user --upgrade virtualenv
- Create a virtual environment, name it, and activate it.
python3 -m virtualenv ~/apc-ve
source ~/apc-ve/bin/activate
- Install ParallelCluster into your virtual environment.
(apc-ve)~$ python3 -m pip install "aws-parallelcluster" --upgrade --user- Install Node Version Manager (
nvm) and the latest Long-Term Support (LTS)Node.jsversion.
$ curl -o- https://raw.githubusercontent.com/nvm-sh/nvm/v0.38.0/install.sh | bash
$ chmod ug+x ~/.nvm/nvm.sh
$ source ~/.nvm/nvm.sh
$ nvm install --lts
$ node --version
$ export PATH=$PATH:~/.local/bin
$ pcluster version
Step 1: Create a VPC and Security Groups
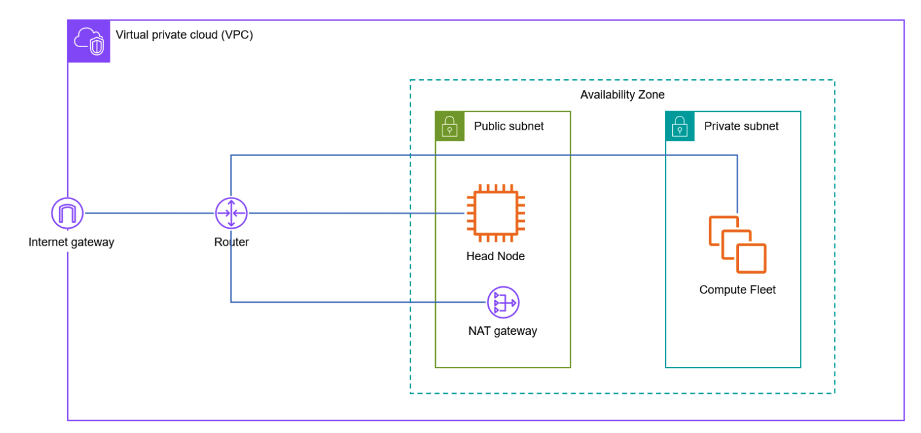
Figure 1 – A VPC configuration in a new account with one public subnet and one private subnet in the target region. The P5 instance topology is defined to have 32 ENI cards of 100Gbps each.
If you’re using a new AWS account, your VPC configuration will consist of one public subnet and a private subnet in the target region. We define the P5 instance topology to have a total of 32 Elastic Network Interfaces (ENI) cards of 100Gbps each. To handle 32 ENIs, compute instances need to be placed into a private subnet, otherwise your cluster will fail in creation because a public IP is not automatically assigned on instances with multiple NICs. You can find more information about deploying a VPC for ParallelCluster in our GitHub repo.
Unless you’re comfortable deploying a private subnet and setting the routes and security groups, we recommend that you deploy a custom VPC using the CloudFormation template called ML-VPC. This template is region-agnostic and enables you to create a VPC with the required network architecture to run your workloads.
You can follow the steps to deploy your new VPC:
- Deploy this CloudFormation template.
- You’ll see a list of parameters:
- In Name of your VPC, you can leave it as default LargeScaleVPC.
- For Availability zones (AZ’s), select your desired AZ. This will deploy a public and private subnet in that AZ. If you’re using a capacity reservation (CR), use the AZ specific to the CR.
- Keep the S3 Endpoint, Public Subnet and DynamoDB Endpoint as true.
- Check the acknowledgement box in the Capabilities section and create the stack.
It’ll take a few minutes to deploy your network architecture. The stack outputs tab will contain IDs of your security groups and subnets. You’ll need to keep this information handy for the next step.
Step 2: Build ParallelCluster custom AMI
We used the following configuration (which we saved as image_build.yaml), for adding ParallelCluster dependencies on top of the AWS Deep Learning Base GPU AMI. This Deep Learning AMI page also contains a command for retrieving the AMI ID (search for “Query AMI-ID with AWSCLI”). You can specify which AMI to use as base depending on your requirements, and then install ParallelCluster dependencies on top of it following the tutorial in our service documentation.
Now ensure that the SubnetId, ParentImage, and SecurityGroupIds are set to the values exported when deploying your network architecture in Step 1. Save the configuration to the file image_build.yaml.
Build:
 InstanceType: p5.48xlarge
 SubnetId: subnet-xxxxxx
 ParentImage: ami-xxxxxx
 SecurityGroupIds:
 - sg-xxxxxx
Note: We specify security groups and subnet specific to private subnet (in the required AZ) created as a result of Step 1.
Now launch the ParallelCluster custom AMI creation job like this:
pcluster build-image --image-id p5-pcluster-dlgpu-baseami --image-configuration image_build.yaml --region us-east-2This step takes about 30-45 minutes to complete.
Step 3: Launch ParallelCluster
Once the AMI is ready, it’s time to launch your cluster.
Here’s a reference configuration:
Image:
 Os: ubuntu2204
HeadNode:
 InstanceType: m5.8xlarge
 LocalStorage:
   RootVolume:
     Size: 200
     DeleteOnTermination: true
 Networking:
   SubnetId: subnet-xxxxxx
 Ssh:
   KeyName: <key-name>
 Iam:
   S3Access:
     - BucketName: <s3-bucket-name>
 CustomActions:
   OnNodeConfigured:
     Script: https://raw.githubusercontent.com/aws-samples/aws-parallelcluster-post-install-scripts/authentication-credentials/multi-runner/postinstall.sh
     Args:
       - https://raw.githubusercontent.com/aws-samples/aws-parallelcluster-post-install-scripts/authentication-credentials/pyxis/postinstall.sh
       - -/fsx
       - https://raw.githubusercontent.com/aws-samples/aws-parallelcluster-post-install-scripts/main/docker/postinstall.sh
Scheduling:
 Scheduler: slurm
 SlurmQueues:
 - Name: compute
   ComputeSettings:
     LocalStorage:
       RootVolume:
         Size: 200
   ComputeResources:
   - Name: compute
     InstanceType: p5.48xlarge
     MinCount: 2
     MaxCount: 2
     CapacityReservationTarget:
           CapacityReservationId: cr-xxxxxx
     Efa:
       Enabled: true
   Networking:
     PlacementGroup:
       Enabled: true
     SubnetIds:
       - subnet-xxxxxx
   CustomActions:
     OnNodeConfigured:
       Script: https://raw.githubusercontent.com/aws-samples/aws-parallelcluster-post-install-scripts/authentication-credentials/multi-runner/postinstall.sh
       Args:
         - https://raw.githubusercontent.com/aws-samples/aws-parallelcluster-post-install-scripts/authentication-credentials/pyxis/postinstall.sh
         - -/fsx
   Image:
     CustomAmi: ami-xxxxxx
SharedStorage:
 - MountDir: /fsx
   Name: FSxDataMount
   StorageType: FsxLustre
   FsxLustreSettings:
     StorageCapacity: 1200
     DeploymentType: PERSISTENT_2
Monitoring:
 DetailedMonitoring: true
 Logs:
   CloudWatch:
     Enabled: true # good for debug
 Dashboards:
   CloudWatch:
     Enabled: false # provide basic dashboards
Now, you should:
- Update the
Regionto your intended region - Update the
Networking:SubnetId(for the head node) to the public subnet you created in Step 1. - Update the
Ssh:KeyName, to your specific key. - Update the
MinCountandMaxCountto the desired numbers of instances you’d like in the cluster. - Set the
CapacityReservationId, if any. - Update the compute node
Networking:SubnetIdto private subnet you created in Step 1. - Optionally:
- Set the
Iam:S3Access:BucketName, if you’d like the compute instances to be able to access an Amazon Simple Storage Service (Amazon S3) bucket. - Update the
ImportPathwithinSharedStorageto an Amazon S3 bucket URI, if you’d like to initialize your Lustre storage with data from an S3 bucket.
- Set the
There’s more information about postinstall scripts and a library of especially useful ones in our GitHub repo.
You can launch the cluster-creation process using a command like this once you’ve chosen a name for your cluster:
pcluster create-cluster --cluster-name <cluster-name> --cluster-configuration pcluster_config.yaml --region us-east-2 --rollback-on-failure FalseSome additional commands you’ll need later:
- To destroy a cluster:
pcluster delete-cluster -n <cluster-name> -r us-east-2 - To SSH to the head node:
pcluster ssh -n <cluster-name> -r us-east-2 -i ssh_key.pem - You can use
sinfoon the head node to validate the cluster. - You can get cluster status, too:
pcluster describe-cluster -n <cluster-name> -r us-east-2
Once your cluster is launched, you can validate some important elements by checking package versions:
- Elastic fabric adapter (EFA) – this is the custom-built, high-speed network interface into the Amazon EC2 fabric for running HPC and distributed machine-learning codes:
$ fi_info --version
fi_info: 1.18.2amzn1.0
libfabric: 1.18.2amzn1.0
libfabric api: 1.18

$ cat /opt/amazon/efa_installed_packages
# EFA installer version: 1.24.1
# Debug packages installed: no
# Packages installed:
efa-config_1.15_all efa-profile_1.5_all libfabric-aws-bin_1.18.1_amd64 libfabric-aws-dev_1.18.1_amd64 libfabric1-aws_1.18.1_amd64 openmpi40-aws_4.1.5-1_amd64 ibacm_46.0-1_amd64 ibverbs-providers_46.0-1_amd64 ibverbs-utils_46.0-1_amd64 infiniband-diags_46.0-1_amd64 libibmad-dev_46.0-1_amd64 libibmad5_46.0-1_amd64 libibnetdisc-dev_46.0-1_amd64 libibnetdisc5_46.0-1_amd64 libibumad-dev_46.0-1_amd64 libibumad3_46.0-1_amd64 libibverbs-dev_46.0-1_amd64 libibverbs1_46.0-1_amd64 librdmacm-dev_46.0-1_amd64 librdmacm1_46.0-1_amd64 rdma-core_46.0-1_amd64 rdmacm-utils_46.0-1_amd64 efa_2.5.0-1.amzn1_amd64
We have a document to help streamline EFA environment variables in your Docker image and scripts, along with some additional guidance.
- Message-passing interface (MPI)
$ mpirun --version
mpirun (Open MPI) 4.1.6- AWS-OFI-NCCL plugin
-
- NCCL is the NVIDIA Collective Communications Library; it provides inter-GPU communication primitives. AWS-OFI-NCCL is a plug-in that enables developers on AWS to use libfabric as a network provider while running NCCL based applications.
- The plugin is the easiest way to get the version is by running a NCCL (NVIDIA Collective Communications Library) test. You can build the tests using these instructions, and look for logs reporting the version. You should see something like:
Initializing aws-ofi-nccl 1.7.4-aws
- NCCL version – you should also find
NCCL version 2.18.5+cuda12.2in the logs of the NCCL test.
To resolve issues regarding Cluster Creation, please refer to our troubleshooting documentation.
Step 4: Cluster validation
NeMo Launcher offers a cluster validation script which runs NVIDIA DCGM (Data Center GPU Manager) tests and NCCL tests. The DCGM is a suite of tools for managing and monitoring NVIDIA GPUs in cluster environments. All DCGM functionality is available via the dcgmi, which is the DCGM command-line utility.
cd /path/to/NeMoMegatronLauncher/csp_tools/aws && bash cluster_validation.sh --nodes=2To resolve issues regarding Cluster Validation, please refer to the “Troubleshooting” section later.
Step 5: Launch GPT training job
Use enroot to import the container to local:
enroot import --output nemo_megatron_training.sqsh dockerd://nvcr.io/nvidia/nemo:devNext, download the vocab and merges files:
wget https://s3.amazonaws.com/models.huggingface.co/bert/gpt2-vocab.json
wget https://s3.amazonaws.com/models.huggingface.co/bert/gpt2-merges.txt
Here is the config.yaml for a GPT 20B training job. Make a copy of this file and make changes as we describe next:
defaults:
  - _self_
  - cluster: bcm  # Leave it as bcm even if using bcp. It will be ignored for bcp.
  - data_preparation: gpt3/download_gpt3_pile
  - training: gpt3/20b
  - conversion: gpt3/convert_gpt3
  - fine_tuning: null
  - prompt_learning: null
  - adapter_learning: null
  - ia3_learning: null
  - evaluation: gpt3/evaluate_all
  - export: gpt3/export_gpt3
  - override hydra/job_logging: stdout

hydra:
  run:
    dir: .
  output_subdir: null

debug: False

stages:
  - training
  # - conversion
  # - evaluation
  # - export

cluster_type: bcm  # bcm or bcp. If bcm, it must match - cluster above.
launcher_scripts_path: /home/ubuntu/NeMo-Megatron-Launcher/launcher_scripts  # Path to NeMo Megatron Launch scripts, should ends with /launcher_scripts
data_dir: /fsx/gpt3_dataset  # Location to store and read the data.
base_results_dir: /fsx/gpt3_dataset/results  # Location to store the results, checkpoints and logs.
container_mounts:
  - /home/ubuntu/NeMo-Megatron-Launcher/csp_tools/aws/:/nccl
container: /home/ubuntu/NeMo-Megatron-Launcher/nemo_megatron_training.sqsh

wandb_api_key_file: null  # File where the w&B api key is stored. Key must be on the first line.

env_vars:
  NCCL_TOPO_FILE: /nccl/topo.xml # Should be a path to an XML file describing the topology
  UCX_IB_PCI_RELAXED_ORDERING: null # Needed to improve Azure performance
  NCCL_IB_PCI_RELAXED_ORDERING: null # Needed to improve Azure performance
  NCCL_IB_TIMEOUT: null # InfiniBand Verbs Timeout. Set to 22 for Azure
  NCCL_DEBUG: INFO # Logging level for NCCL. Set to "INFO" for debug information
  NCCL_PROTO: simple # Protocol NCCL will use. Set to "simple" for AWS
  TRANSFORMERS_OFFLINE: 1
  NCCL_AVOID_RECORD_STREAMS: 1

# GPU Mapping
numa_mapping:
  enable: True  # Set to False to disable all mapping (performance will suffer).
  mode: unique_contiguous  # One of: all, single, single_unique, unique_interleaved or unique_contiguous.
  scope: node  # Either node or socket.
  cores: all_logical  # Either all_logical or single_logical.
  balanced: True  # Whether to assing an equal number of physical cores to each process.
  min_cores: 1  # Minimum number of physical cores per process.
  max_cores: 8  # Maximum number of physical cores per process. Can be null to use all available cores.

# Do not modify below, use the values above instead.
data_preparation_config: ${hydra:runtime.choices.data_preparation}
training_config: ${hydra:runtime.choices.training}
fine_tuning_config: ${hydra:runtime.choices.fine_tuning}
prompt_learning_config: ${hydra:runtime.choices.prompt_learning}
adapter_learning_config: ${hydra:runtime.choices.adapter_learning}
ia3_learning_config: ${hydra:runtime.choices.ia3_learning}
evaluation_config: ${hydra:runtime.choices.evaluation}
conversion_config: ${hydra:runtime.choices.conversion}
export_config: ${hydra:runtime.choices.export}
In this config.yaml file:
- Update the
launcher_scripts_pathto the absolute path for NeMo Launcher’s launcher_scripts - Update the
data_dirto wherever the data is residing. - Update container with path to
sqsh - Update the
base_results_dirto point to the directory where you’d like to organize the results. - Update
NCCL_TOPO_FILEto point to a xml specific to P5. - Optionally update
container_mountsto mount a specific directory from host into container.
You can find some example configuration files in our GitHub repo.
To launch the job:
cd /path/to/NeMoMegatronLauncher/launcher_scripts && python main.py &Once you launch this job, you can look at the .log file (of format log-nemo-megatron-<model_name>_<date>.log) to track the logs of the training job. Additionally, you can use a .err file (of format log-nemo-megatron-<model_name>_<date>.err) to track the errors and warnings, if any, of your training job. If you set up TensorBoard, you can also check the events file (of format events.out.tfevents.<compute_details>) to look over the loss curves, learning rates and other parameters that NeMo tracks. For more information on this, refer to the TensorBoard documentation.
Note: The files mentioned above are located in the directory specified by you in the base_results_dir field in the config.yaml file above.
This is what an example .log file looks like. Note, this is only a part of the entire log file (“…” below entails omitted parts of the output), until step 3 of the training job (the actual logs contain logs until step 60000000):
    ************** Experiment configuration ***********
…
[NeMo I 2024-01-18 00:20:43 exp_manager:394] Experiments will be logged at /shared/backup120820231021/gpt_results/gpt3_126m_8_fp8_01172024_1619/results
[NeMo I 2024-01-18 00:20:43 exp_manager:835] TensorboardLogger has been set up
…
[NeMo I 2024-01-18 00:21:13 lr_scheduler:910] Scheduler "<nemo.core.optim.lr_scheduler.CosineAnnealing object at 0x7fe75b3387f0>"
    will be used during training (effective maximum steps = 60000000) -
    Parameters :
…
Sanity Checking DataLoader 0:   0%|                | 0/2 [00:00<?, ?it/s]
Sanity Checking DataLoader 0: 100%|████████| 2/2 [00:07<00:00,  3.92s/it]
…
Epoch 0: :   0%| | 1/60000000 [00:35<583621:51:56, v_num=, reduced_train_
Epoch 0: :   0%| | 2/60000000 [00:36<303128:00:21, v_num=, reduced_train_
Epoch 0: :   0%| | 3/60000000 [00:36<202786:11:11, v_num=, reduced_train_
…
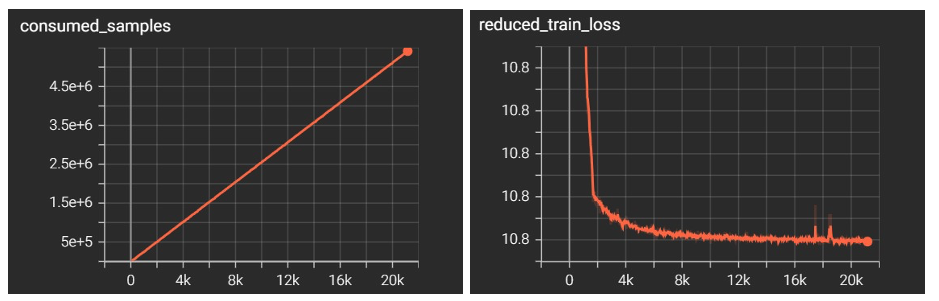
Figure 2 – Sample output graphs from our run using TensorBoard.
Troubleshooting
Cluster creation failed
Bringing up a cluster can fail for many reasons. The easiest way to debug is to create a cluster with --rollback-on-failure False. Then you can see information in the AWS CloudFormation console detailing why the cluster creation failed. Even more detailed information will be in the logs on the head node which you can find in: /var/log/cfn-init.log /var/log/cloud-init.log /var/log/cloud-init-output.log.
The most common reason for cluster failure is that you may not have access to the target EC2 capacity. You’ll see this in the /var/log/parallelcluster/clustermgtd log on the head node, or in CloudFormation.
Cluster Validation Issues
1 – DCGMI output
Error: Unable to complete diagnostic for group 2147483647. Return: (-21) Host engine connection invalid/disconnected.
srun: error: compute-st-compute-1: task 0: Exited with exit code 235
Error: Unable to complete diagnostic for group 2147483647. Return: (-21) Host engine connection invalid/disconnected.
srun: error: compute-st-compute-2: task 1: Exited with exit code 235
Resolution: The DCGM container may not be accessible from NGC. Try converting the DCGM container to a local .sqsh file using enroot and pointing the validation script (csp_tools/aws/dcgmi_diag.sh) to this local file, like this:
enroot import --output dcgm.sqsh 'docker://$oauthtoken@nvcr.io#nvidia/cloud-native/dcgm:2.3.5-1-ub
i8'
srun --container-image=dcgm.sqsh bash -c "dcgmi diag -r 3"
2 – PMIX Error in NCCL Logs
[compute-st-compute-2:201457] PMIX ERROR: ERROR in file gds_ds12_lock_pthread.c at line 168Resolution: This is a non-fatal error. Try adding export PMIX_MCA_gds=^ds12 to the csp_tools/aws/nccl.sh script.
Conclusion
In this blog post, we’ve shown you how to leverage the AWS ParallelCluster and the NVIDIA NeMo Megatron Framework to enable large-scale Large Language Model (LLM) training on AWS P5 instances. Together, AWS ParallelCluster and the NVIDIA NeMo Megatron Framework can empower researchers and developers to train LLMs on trillions of tokens, scaling to thousands of GPUs, which means accelerating time-to-market for cutting-edge natural language processing (NLP) applications.
To learn more about training GPT3 NeMo Megatron on Slurm, refer to AWS Samples. To learn more about ParallelCluster and Nemo Megatron, check out the ParallelCluster User Guide, NeMo Megatron Launcher, and Parallel Cluster UI.