AWS Big Data Blog
Process data with varying data ingestion frequencies using AWS Glue job bookmarks
We often have data processing requirements in which we need to merge multiple datasets with varying data ingestion frequencies. Some of these datasets are ingested one time in full, received infrequently, and always used in their entirety, whereas other datasets are incremental, received at certain intervals, and joined with the full datasets to generate output. To address this requirement, this post demonstrates how to build an extract, transform, and load (ETL) pipeline using AWS Glue.
Using AWS Glue
AWS Glue provides a serverless environment to extract, transform, and load a large number of datasets from several sources for analytics purposes. It has a feature called job bookmarks to process incremental data when rerunning a job on a scheduled interval. A job bookmark is composed of the states for various job elements, such as sources, transformations, and targets. This is done by persisting state information from a job run that helps AWS Glue prevent reprocessing old data.
For this use case, we use an AWS Glue job with job bookmarks enabled to process files received in varying frequencies (a full dataset signifying files that are received one time, and incremental datasets signifying files that are received in certain regular intervals). These files are merged together. In addition to enabling job bookmarks, we also use an optional parameter transformation_ctx (transformation context) in an AWS Glue PySpark dynamic frame. This acts as a unique identifier for the ETL operator instance to identify state information within a job bookmark for a given operator. AWS Glue uses transformation_ctx to index the key to the bookmark state.
You can capture and maintain state information for incremental datasets and avoid reprocessing by using transformation context. Transformation context is omitted for the full dataset file, which results in the job run state information not getting captured for the full dataset and allowing it to participate in the next processing event in its entirety. Even though the job bookmark flag is enabled at the AWS Glue job level, because transformation context is omitted for the full dataset, every time the job runs, the entire data from the full dataset is used as part of the job. In contrast, only the newly arrived datasets are processed for the incremental datasets.
Solution overview
To demonstrate the job bookmark utility of AWS Glue, we use TLC Trip Record Data datasets. We use NYC yellow taxi trip data monthly files as the incremental dataset, and NYC taxi zone lookup as the full dataset. The monthly yellow taxi trip data has a field named PULocationID (where a customer was picked up), which is joined with the LocationID field from the NYC taxi zone lookup file to create an output dataset that contains Borough, Zone, and service_zone from the NYC taxi zone lookup dataset and all the fields (except the PULocationID field) from the monthly NYC taxi trip data file.
The following diagram depicts a high-level architecture of the process.

Descriptions of Diagram
- Two Amazon S3 Raw bucket locations are used for storing incoming CSV source data (NYC taxi monthly files (Incremental Dataset) and NYC Taxi lookup file (Full Dataset)).
- A Bookmark enabled glue Job joins data between monthly trip data file and the taxi zone lookup file to generate output parquet files and creates NYC taxi trip table in Glue Data Catalog and Redshift database.
- S3 Curated Bucket is used to store NYC Taxi monthly processed parquet files.
Creating the AWS CloudFormation stack
You use the following AWS CloudFormation template to create the below mentioned resources in your preferred AWS account and Region:
![]()
- Network resources (VPC, subnet, and security group)
- Amazon Redshift cluster
- Amazon Elastic Compute Cloud (Amazon EC2) instance, which is used as a proxy for accessing the Amazon Redshift cluster
- Amazon Simple Storage Service (Amazon S3) bucket, where all the required files are stored
- Amazon Simple Notification Service (Amazon SNS) topic for notification
- AWS Glue Data Catalog
- AWS Glue JDBC connection to connect to the Amazon Redshift cluster from AWS Glue jobs
Additionally, make sure you have an Amazon EC2 key pair created in the account and Region you’re launching the stack from.
To provide the stack parameters, complete the following steps:
- For Stack name, enter
BigDataBlog-GlueBookmark-Stack.

- For RedshiftClusterIdentifier, enter
bigdatablogrscluster. - For NodeType, choose large.
- For NumberOfNodes, choose 2.
- For DatabaseName, enter
bigdatablogdev.

- For MasterUserName, enter
bigdatabloguser. - For MasterUserPassword, enter a password for the master user account.
- For Maintenancewindow, enter
sun:05:00-sun:05:30. - For EC2InstanceType, choose micro.
- For SubscriptionEmail, enter your preferred email.
- For MyIPAddressCidr, enter your IP address.
You can find your IP Address by browsing https://www.whatismyip.com/ and looking up the value for My Public IPv4 is:. Add /32 at the end to make it CIDR-compatible and most restrictive.
- For DestinationPrefixListId, enter your prefix list ID.
PrefixListId can be found by running aws ec2 describe-prefix-lists --region <<AWS region>> where PrefixListName is com.amazonaws.<<AWS region>>.s3 from the output. Please refer to the Link for more information.

- For gluedatabase, enter
bigdatabloggluedb. - For EC2KeyName, enter the name of your key pair.

For instructions on creating a stack, see Creating a Stack on the AWS CloudFormation Console.
Make sure the stack is complete before moving to the next steps.
Creating the AWS Glue job
To create your AWS Glue job, complete the following steps:
- Download NYC yellow monthly trip data for October 2019 and November 2019 and save them under the
s3://<<Your S3 Bucket>>/tripdata/prefix. - Download the NYC Taxi Zone lookup table and save it under the
s3://<<Your S3 Bucket>>/tripdata-lookup/prefix. - Use the following PySpark script and change the piece of the code enclosed inside
<<…>>.
You can find the values for the following keys on the Outputs tab for the CloudFormation stack:
-
S3BucketSnstopicGlueconnection

You can find the values for the following keys on the Parameters tab for the CloudFormation stack:
-
EC2KeyNameMyIPAddressCidrSubscriptionEmailDatabaseNamegluedatabase

- When the AWS Glue script is ready, upload it to the S3 bucket under the
s3://<<Your S3 Bucket>>/glue-script/prefix.
You refer to this when you create the AWS Glue job.
- On the AWS Glue console, under ETL, choose Jobs.
- Choose Create job.
- For Name, enter a name for the job. For more information about AWS Glue job naming, see Jobs.
- For IAM role, choose the role the CloudFormation template created. Use the value for the key
Glueaccessrolefrom the stack outputs. - For Type, choose Spark.
- For Glue version, choose Spark 2.4, Python 3 (Glue Version 1.0).
- For This job runs, choose An existing script that you provide.
- For S3 path where the script is stored, choose the script file that you saved earlier under the
s3://<<Your S3 Bucket>>/Glue-script/prefix. - In the Advanced properties section, for Job bookmark, choose Enable.
- For Catalog options, select Use Glue Data Catalog as the Hive metastore.
- For Connections, enter the value of the key
GlueConnectionfrom the stack outputs. - Choose Save job and edit script.
Creating an Amazon Redshift database schema
Before you run the AWS Glue job, you need to connect to the Amazon Redshift cluster and create an Amazon Redshift database schema named Glue_bookmark_redshift_schema. To connect to the cluster, use one of the JDBC client-based SQL tools, such as SQL Workbench/J. For instructions, see How can I access a private Amazon Redshift cluster from my local machine?
To access the cluster, you use the Amazon Redshift master user bigdatabloguser (the value for MasterUserName on the Parameters tab of the CloudFormation stack) and the password you provided when creating the stack.
Running AWS Glue job
The Glue Job takes only one argument; name of the file being processed. Pass the file name, such as yellow_tripdata_2019-10.csv, while processing that file. This enables you to track the records that belong to a specific file so that it’s easier to evaluate the result of multiple job runs using different files.
When the Glue job run is successful, you can see the output Parquet files under the /tripdata-joined-output/ prefix inside the S3 bucket you created by running the CloudFormation template. You can also use Amazon Athena to query the data from the table created in the Data Catalog. For more information, see Running SQL Queries Using Amazon Athena.
Query the Amazon Redshift database table named redshift_bookmark_table and review the output.
Explaining the solution
A bookmark-enabled AWS Glue job (in PySpark) is created that reads the NYC yellow taxi trip’s monthly file, joins it with NYC taxi zone lookup file, produces files in Parquet format, and saves them in an Amazon s3 location.
A Data Catalog table is created that refers to the Parquet files’ location in Amazon S3. The resulting dataset is also loaded into an Amazon Redshift table using the AWS Glue PySpark job.
The AWS Glue job bookmark transformation context is used while the AWS Glue dynamic frame is created by reading a monthly NYC taxi file, whereas the transformation context is disabled while reading and creating the dynamic frame for the taxi zone lookup file (because the entire file is required for processing each monthly trip file). This allows you to process each monthly trip file exactly one time and reuse the entire taxi zone lookup file as many times as required because the missing transformation context for the lookup file doesn’t allow the bookmark context to be set for that file.
When a new NYC trip data monthly file arrives and the AWS Glue job runs, it only processes the newly arrived monthly file and ignores any previously processed monthly files. Similarly, when the Data Catalog table data is copied into Amazon Redshift, it only copies the newly processed underlying Parquet files’ data and appends it to the Amazon Redshift table. At this time the transformation context is enabled to utilize the job bookmark, and the AWS Glue dynamic frame is created by reading the Data Catalog table.
The following PySpark code uses the transformation context to create an AWS Glue dynamic frame while reading the monthly incremental file:
However, the following code omits transformation context when creating the AWS Glue dynamic frame for the lookup file:
Additionally, the following code uses the transformation context while reading the Data Catalog table, which is loaded into an Amazon Redshift table:
You can see in the screenshot below that the 2019 October yellow taxi trip data file has arrived for processing (the incremental dataset).

To process each month’s data, you need the taxi zone lookup (full dataset).

The following screenshot shows the output of the AWS Glue job after processing the 2019 October trip data, saved in Parquet format.

The following two screenshots show the Amazon Redshift table, displaying the count of records for the October 2019 taxi data and only October 2019 taxi data file has been processed so far, respectively


The following screenshot shows that the November 2019 NYC taxi data file has arrived for processing.

The following screenshot shows the output of the AWS Glue job after processing the 2019 November trip data, saved in Parquet format. The job only processed the November data and ignored the October data (to be reprocessed) because the job bookmark and transformation context was enabled.

The following screenshot shows that the Amazon Redshift table now has both October and November data and shows the total record count.

The following screenshot shows individual record count for each month.

Querying with Athena
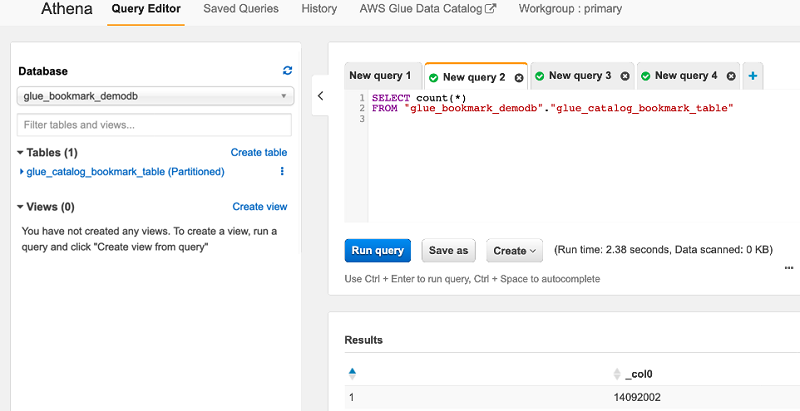
You can also review the dataset in Athena, which uses the same Glue Data Catalog. The following screenshot of an Athena query shows the Data Catalog table has both October and November data, with the total record count.
The following screenshot of an Athena query shows the individual record count for each month.

The following screenshot shows the location information, including borough, zone, and service zone, which is available in the taxi zone lookup and is joined with the October taxi trip data.

The following screenshot shows the output for the same query on the November data.

Cleaning up
When you’re done using this solution, you should delete the CloudFormation stack to avoid incurring any further charges.
Conclusion
This post describes how you can merge datasets received in different frequencies as part of your ETL pipeline processing using AWS Glue job bookmarks. The use case demonstrated how to use job bookmarks and transformation context to build an ETL pipeline for processing several incremental datasets.
About the Authors
 Dipankar is a Senior Data Architect with AWS Professional Services, helping customers build analytics platform and solutions. He has a keen interest in distributed computing. Dipankar enjoys spending time playing chess and watching old Hollywood movies.
 Ashok Padmanabhan is a big data consultant with AWS Professional Services, helping customers build big data and analytics platform and solutions. When not building and designing data lakes, Ashok enjoys spending time at beaches near his home in Florida.