AWS for Games Blog
Cost optimize your Minecraft Java EC2 Server
A key principle of cloud services is to run compute services only when actively in use. Minecraft servers on the cloud often run at times without players connected resulting in wasted compute spend. This blog offers a way to cost optimize Minecraft servers on Amazon Elastic Compute Cloud (Amazon EC2) by reducing the time the EC2 Instance is online while Minecraft players are offline. In this overview we will deploy an automated solution to stop your Minecraft server when inactive. Using Amazon Web Services (AWS) Systems Manager (Systems Manager) you will deploy and manage the solution on Amazon EC2.
Solution overview
This solution is straightforward to set up. Your main task is to deploy a premade script to your Amazon EC2 instance using Systems Manager. Figure 1 shows numbered steps in the architecture diagram detailing the order of processes when the script is deployed.

Figure 1: High-level architecture.
Following is a description of each step designated within the diagram and how the script flow is enacted.
- The user downloads and executes the deployment script on your EC2 instance using the AWS Systems Manager “run command”. The amount of RAM and idle time before shutdown can be configured by storing values in Systems Manager Parameter Store.
- The deployment script creates the various Bash scripts and SystemD jobs for the solution. These include starting and stopping the server automatically.
- The Minecraft Java server is launched by the “Start Script”.
- Players connect to the server.
- The “Monitor Script” checks the Minecraft Java server every 60 seconds for active player connections.
- After the last player disconnects and the server is empty for a period of time (default is 15 minutes) the “Monitor Script” calls the “Stop Script” to save the Minecraft world and stop the EC2 instance.
Cost information
Shutting down your EC2 instance during periods of inactivity can lead to significant cost savings. Compared to running an EC2 instance all day, this solution can dramatically reduce costs based on your playerbase’s activity level.
The following table shows example pricing for vanilla Minecraft servers running on an EC2 instance in the us-east-1 region using this blog’s solution. You can create your own calculation to better optimize server size and price.

Table 1: Instance size by player recommendations.
Walkthrough
Prerequisites
Make certain you complete these prerequisites before attempting the solution.
- AWS account
- Minecraft Java Edition Account
- Minecraft server on Linux EC2 instance
- If you do not have a Minecraft server on Amazon EC2 then follow this blog, and you will be ready to start the walkthrough.
- If you have a Minecraft server on a Linux EC2 instance already, make sure your
server.jaris in the/opt/minecraft/server/directory.
Steps
- Set up AWS Systems Manager for your EC2 instance
- Run the deployment script through Systems Manager
- (Optional) Change your server RAM and timer using Systems Manager Parameters
Set up AWS Systems Manager for your EC2 instance
- Verify your EC2 instance has an AWS Identity and Access Management (IAM) role with the
AmazonSSMManagedInstanceCorepolicy attached. You can create a new role or attach it to an existing one.
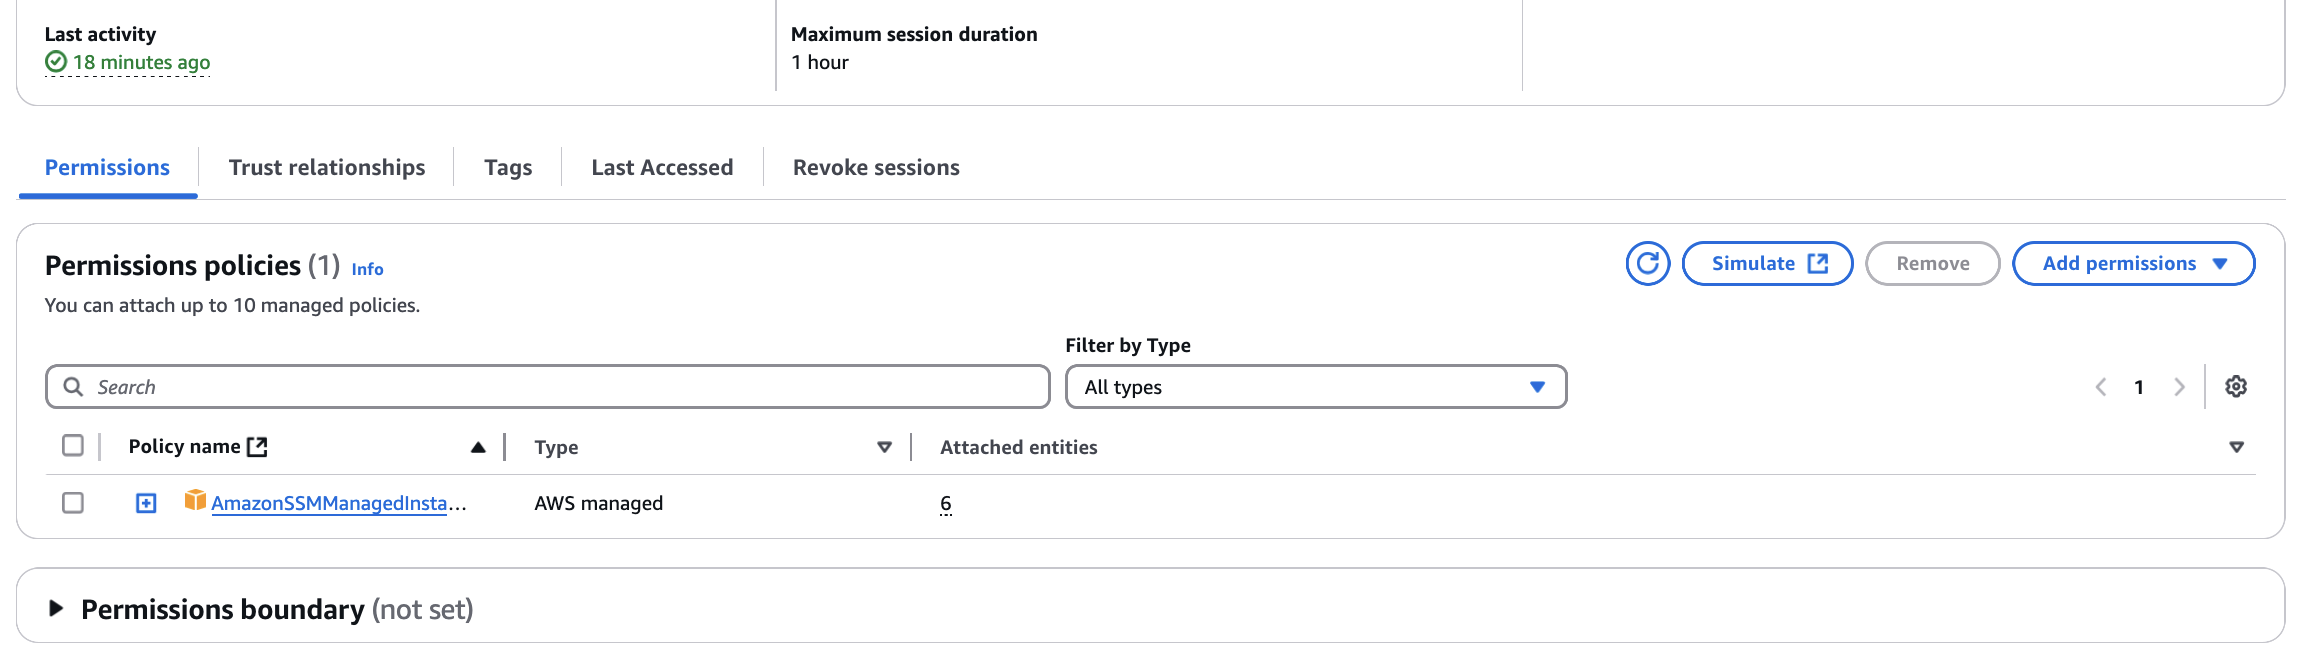
Figure 2: Permissions needed for the AWS IAM role to enable Amazon Systems Manager on the EC2 instance.
- Connect to your EC2 instance and check if you have the Systems Manager agent (SSM Agent) installed. All Amazon Linux instances should come with it installed by default, but you can check the status by using the
sudo systemctl status amazon-ssm-agentIt should show the agent is running. If you are not using Amazon Linux as your OS, follow this documentation and set up the agent. - Once you have the SSM Agent running and the correct IAM permissions, navigate to the Systems Manager console in the AWS Management Console. Choose Fleet Manager from the left sidebar under Node Management, and verify that your instance appears in the list. If it’s not listed, confirm that your instance is in a supported region and that the necessary configurations are correct.

Figure 3: EC2 instance under Fleet Manger in the Systems Manager console.
Run the deployment script through AWS Systems Manager
- In the AWS Systems Manager console, go to Run Command under the Node Management
- Choose Run Command, select the AWS-RunShellScript document, and select your EC2 instance that hosts the Minecraft server from the list.
- In the Command Parameters, paste the following shell script snippet.
- After pasting the script, choose Run. After the command is executed, go to the Command history section and check the output. It should say Succeeded.
- Note: this script assumes you have your Minecraft server in the
/opt/minecraft/serverdirectory (See Minecraft Java Server setup on Amazon EC2 blog for how to complete this).
- Note: this script assumes you have your Minecraft server in the
- You can verify everything was set up by logging into your EC2 instance and going to the
/opt/minecraft/server/directory with thecd /opt/minecraft/server/command and making sure the “monitor” file exists. - You have now set up an automated solution that helps you cost-optimize your Minecraft server.
(Optional) Change your server RAM and timer using Systems Manager Parameters
By default, this solution gives 1.3 GB of RAM to your Minecraft server and shuts down automatically after 15 minutes of the server being empty. To edit the RAM and shutdown timer, you will use AWS Systems Manager Parameter Store and create the following two variables.
/mc/ram– Specifies the amount of RAM (in MB) for the Java server. Default value is 1300 (1.3 GB). Make certain that your EC2 instance has enough RAM to support your desired RAM value, otherwise your server java process will fail.
/mc/shutdowntimer– Defines how long (in seconds) the server waits to shut down after no players are online. It is recommended to keep a value over 300 to avoid the server stopping automatically before players can join. Default value is 900 (15 minutes).
Using Systems Manager Parameters allows you to adjust the settings without directly accessing your EC2 instance, making it straightforward to upgrade or downgrade your instance. It’s crucial that you name the parameters exactly as shown: /mc/ram and /mc/shutdowntimer.

Figure 4: Your Systems Manager Parameters will show up in the Management Console.
- Navigate to the Systems Manager service in the console. In the Systems Manager service, find and choose “Parameter Store” in the left sidebar.
- Choose the “Create parameter” button. Enter
/mc/ramfor the RAM parameter. Optionally, provide a brief description. - Set Tier to “Standard”, and Type to “String”. Input your desired RAM in MB for your Minecraft server. If the RAM size is too large for your EC2 instance, then the server will fail. Make sure you are putting in a value that your EC2 instance can actually accommodate.
- Choose “Create Parameter” after you are done. Repeat the same steps for
/mc/shutdowntimer. Remember that/mc/shutdowntimeris in seconds, so 600 seconds equals 10 minutes before your server shuts down.- Whenever you update these parameters, you must restart the
server.jarfile and monitor script. The fastest way to do so is to reboot your EC2 instance so that your values update.
- Whenever you update these parameters, you must restart the

Figure 5: Correct configurations for both Systems Manager Parameters.
FAQ and additional information
What SystemD jobs does the solution create?
This solution creates two SystemD jobs.
- minecraft.service starts the Java server and launches it automatically when the EC2 instance is booted.
- monitor_minecraft.service monitors player activity and shuts down the Minecraft server and EC2 instance after players leave. This service starts when the EC2 instance boots up.
These SystemD jobs utilize the “start”, “stop”, and “monitor” scripts found in /opt/minecraft/server/.
How do I access the Minecraft server console?
When the server is run using SystemD, you can’t access the Minecraft console directly. To access it, manually stop and start the server using the scripts in the /opt/minecraft/server/ directory with the commands sudo stop and sudo start, in that order. Once you finish, restart your EC2 instance for the server to start automatically again.
How do I run a Minecraft command from the server without stopping it?
If you need to run Minecraft server commands from the console, such as banning or making a player an operator, you can do so from the Amazon EC2 terminal without stopping the server. For example, to make a player an operator you can use the sudo echo "/op YOURPLAYERNAME" > /run/minecraft.stdin command.
This “echo” command format can be used for any valid Minecraft command. Just make sure to include the beginning “/” for the command like you would in-game.
How do I prevent the server from automatically turning off?
To stop the monitoring SystemD job, run the systemctl stop monitor_minecraft command. To start the monitoring process run the systemctl start monitor_minecraft command.
Where can I learn more about the deployment solution?
You can visit this GitHub repository to view the scripts that are being deployed for this solution.
Cleaning up your resources
Be certain to follow these directions for proper resource cleanup.
- On the Amazon EC2 dashboard, select your EC2 instance by clicking the select box. On the top right, select Instance State, and then select Terminate.
- On the same Amazon EC2 screen, open the sidebar and choose Elastic IPs. Press the select box next to your Elastic IP used for your EC2 instance, choose Actions on the top right, and then select Release Elastic IP Addresses.
- If you created parameters in the Systems Manager Parameter Store, navigate to the Systems Manager dashboard and select Parameter Store. From there, select your parameters and delete them.
Conclusion
You can now successfully cost-optimize your Minecraft Java server running on Amazon EC2. Using AWS Systems Manager to deploy this automated solution, your Minecraft world and EC2 instance will automatically stop during times of player inactivity. This will help you save on compute spend. Feel free to experiment and further customize this solution to make it the best experience for you and your users.
Contact an AWS Representative to know how we can help accelerate your business.
Further reading
- Learn how to run commands on an EC2 instance with AWS Systems Manager
- Learn more about AWS Systems Manager Parameter Store
- Amazon EC2 instance types (We recommend the t4g, r8g, and m7g families)
- If you would like more information on editing the Minecraft server properties, here is a link explaining the server.properties file
- Here is more information on running console commands on the Minecraft server, such as whitelisting, banning, or operating players