AWS Storage Blog
Setting file system-wide soft and hard quotas on Amazon Elastic File System (EFS)
Sometimes the infrastructure operations team might face a challenge in managing the development team’s data storage practices. The development team tends to store data in an uncontrolled manner, leading to potential issues such as excessive storage consumption and inefficient resource usage. This challenge arises from the lack of quota or capacity management capabilities in the current storage solution. Without the ability to set and enforce storage quotas, the operations team cannot effectively regulate the development team’s storage practices.
Amazon Elastic File System (Amazon EFS) provides a serverless elastic file system for use with AWS Cloud services and accessibility from on-premises resources as far as you have a private network from your site to your VPC. It offers file storage with high availability and durability, allowing you to share file data without provisioning file servers as managed service. Amazon EFS means that storage capacity is elastic, growing and shrinking automatically as you add and remove files, thus you only pay for the storage that you use.
In this post, we cover how to set file system-wide soft and hard quotas on Amazon EFS using file system policy and Amazon CloudWatch. This can help you prevent unexpected usage that could lead to high costs within your organization.
Caveat
This solution could limit the users’ ability to write data to the EFS file system, which may disrupt production processes. Therefore, users need to be aware of the possible consequences. If this impacted your ability to write a file on an applied EFS file system, then you can restore functionality by reversing the EFS file system policy.
Solution overview
Figure 1: shows the workflow of EFS file system-wide quota.

Figure 1: Workflow of EFS file system-wide quota
Solution walkthrough
To set the Amazon EFS quota, we will demonstrate the following steps:
- Configure a soft quota
- Configure a hard quota
- Testing a hard quota
1. Configure a soft quota
a. Go to the CloudWatch console and create an alarm for the StorageBytes metric of your EFS file system. Navigate to CloudWatch console -> Alamrs -> Create alarm, and choose the metric All->EFS-> Filesystem Storage Metrics-> Total of StorageClass, as shown in figure 2.
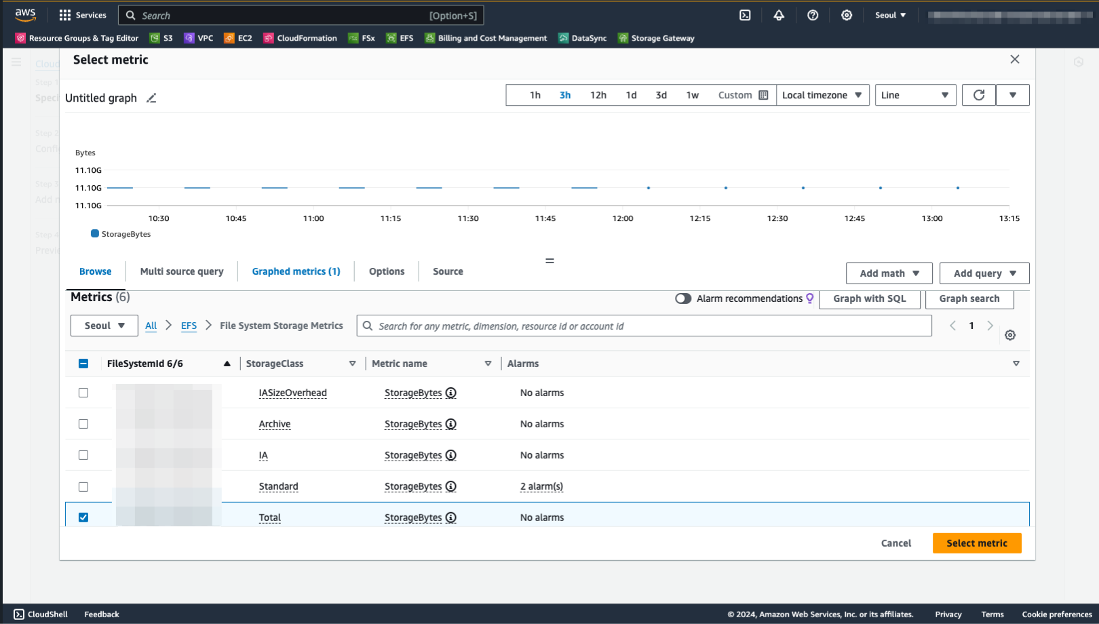
Figure 2: Selecting metric for CloudWatch alarm
b. Specify metric and conditions, and set the threshold value based on your desired limit for the file system usage, as shown in figure 3. Set one hour for the monitoring period to get rid of too many notifications. However, you can set a shorter period for the test.

Figure 3: Configuring CloudWatch alarm
c. Set the threshold value for storage usage. The unit is bytes, so 1000000000 means approximately 1 GB. After inputting the threshold value, choose Next, as shown in figure 4.

Figure 4: Specifying conditions for CloudWatch alarm
d. Create an Amazon Simple Notification Service (Amazon SNS) topic for notification. Create the SNS topic to receive e-mail when file system usage reaches the threshold. After choosing Create topic, choose Next, as shown in figure 5.

Figure 5: Configuring actions for CloudWatch alarm
After creating the SNS topic, you receive a subscription confirmation message in your mailbox, as shown in figure 6.
e. Input Alarm name and message.

Figure 6: Setting name and description for CloudWatch alarm
F. After reviewing the configuration, choose Create alarm, as shown figure 7.
G. Now, you should see the CloudWatch Alarm, and you should receive an e-mail notification when the alarm arises.

Figure 7: Confirming efs_soft_alarm is created
2. Configure a hard quota
The Amazon EFS file system policy can be used to set file system into read-only mode, which prevents write on. When usage of the file system reaches threshold of hard quota, CloudWatch alarm triggers AWS Lambda. Then, the Lambda function adds a resource-based policy on the specified file system for configuring read-only mode.
a. Create CloudWatch Alarm for hard quota.
First, create a new CloudWatch alarm for hard quota named efs_hard_quota. You can follow the previous step of creating efs_soft_quota CloudWatch Alarm while increasing the threshold value to 2000000000(:= 2GB). After creating efs_hard_quota alarm, you have a copy of this alarm’s Amazon Resource Name (ARN), as shown in figure 8.

Figure 8: ARN of efs_hard_quota CloudWatch alarm
b. Next, create the efs-readonly Lambda function, which inserts the file system policy to make the file system read-only mode. Navigate to the Lambda Console, choose Create function, and choose Author from scratch.
- Function name: efs-readonly
- Runtime: Python 3.X
- Architecture: x86_64
Code source:
import boto3
import json

def lambda_handler(event, context):
    # Create an EFS client
    efs_client = boto3.client('efs')
    # set file_system_id, region, account_number variables
    file_system_id = 'YOUR_EFS_FILE_SYSTEM_ID'
    region = 'YOUR_REGION'
    account_number = 'YOUR_ACCOUNT_ID'

    # Define the read-only policy
    read_only_policy = {
        "Version": "2012-10-17",
        "Statement": [
            {
                "Effect": "Allow",
                "Principal": {
                    "AWS": "*"
                },
                "Action": [
                    "elasticfilesystem:ClientMount",
                    "elasticfilesystem:ClientRootAccess"
                ],
                "Resource": f"arn:aws:elasticfilesystem:{region}:{account_number}:file-system/{file_system_id}"
            }
        ]
    }

    # Update the file system policy
    efs_client.put_file_system_policy(
        FileSystemId=file_system_id,
        Policy=json.dumps(read_only_policy)
    )

    return {
        'statusCode': 200,
        'body': 'File system policy updated to read-only'
    }
c. Replace ‘YOUR_EFS_FILE_SYSTEM_ID‘, ‘YOUR_REGION‘, and ‘YOUR_ACCOUNT_ID‘ with the appropriate values for your EFS file system.
Do not omit the character “f” in front of the ARN strings for Resource. This is the prefix in Python 3.x to replace valuables with strings that you set into the JSON document.
YOUR_EFS_FILE_SYSTEM_ID: You can get your file system ID from Management Console -> Amazon EFS -> File systems or from FileSystemId value from the following AWS Command Line Interface (AWS CLI).
| $ aws efs describe-file-systems |
YOUR_REGION and YOUR_ACCOUNT_ID: You can get your AWS account ID from Management Console -> Your account profile on the top of right corner, or from the OwnerId/FileSystemArn value from the same AWS CLI as before.
d. Next, you must set two IAM policies that are the Execution Role to insert the EFS file system policy, and Resource-based policy to CloudWatch invoke Lambda. See figure 9.
Go to Lambda Console -> Functions -> efs-readonly -> Configuration -> Permissions. In Execution role, you can find the auto generated role in “Role name”, then chooe it to jump to the IAM configuration. You can find an auto generated policy named AWSLambdaBasicExecutionRole-xxxx in the role, then edit this policy to add the PutFileSystemPolicy policy. Finally, go to Visual -> Add more permissions -> and choose EFS in Service.
For the Execution role, edit the existing Lambda role, which is created with the function automatically, and add the PutFileSystemPolicy policy.

Figure 9: Setting the IAM policy
e. For Resources, set the ARN for the file system, which is set on the previous Lambda function on this policy configuration.
Add ARNs -> You need to put the same region with YOUR_REGION and the same file system ID with YOUR_FILE_SYSTEM_ID respectively in the previous Lambda function code.
If you have multiple EFS file systems that you want to configure, then Any in this account helps for you to reuse the same role.
Choose Next -> to save changes.
For the resource-based policy, add permission for the policy.
Go back to the Lambda function, as shown in figure 10.
Lambda -> Functions -> efs-readonly -> Configuration -> Permissions -> Resource-based policy statements -> Add permissions
Choose the AWS service.
- Service: Other
- Statement ID: input your preferred name
- Principle: lambda.alarms.cloudwatch.amazonaws.com
- Source ARN: efs_hard_quota CloudWatch Alarm ARN
- Action: lambda:InvokeFunction

Figure 10: Configuring resource-based-policy in Lambda
f. Finally, the Lambda function has been created, as shown in figure 11.

Figure 11: Confirming Lambda function is created
g. Edit the CloudWatch alarm for hard quota as shown in figure 12.

Figure 12: Configuring actions in CloudWatch alarm
3. Testing a hard quota
a. Connect your Amazon Elastic Compute Cloud (Amazon EC2) instance, mount EFS file system on Linux, and create the 1 GB file.
ec2-user$ sudo mount -t efs -o tls fs-00xxxx0000xxxx0000:/ efs
ec2-user$ dd if=/dev/random of=file_2gb bs=1M count=2040
b. Monitor the CloudWatch alarm status, as shown in figure 13.

Figure 13: Monitoring the CloudWatch alarm dashboard
c. Create a new file, and confirm it is failed.
Wait several minutes to apply the policy. Refer to the official Amazon EFS document for creating policy.
ec2-user$ dd if=/dev/random of=file_1gb bs=1M count=1000
dd: failed to open ‘file_1gb’: Read-only file system
d. To enable write on file system, you can delete file system policy from the EFS console as shown in figure 14. It will take several minutes for file system to turn to write-mode.
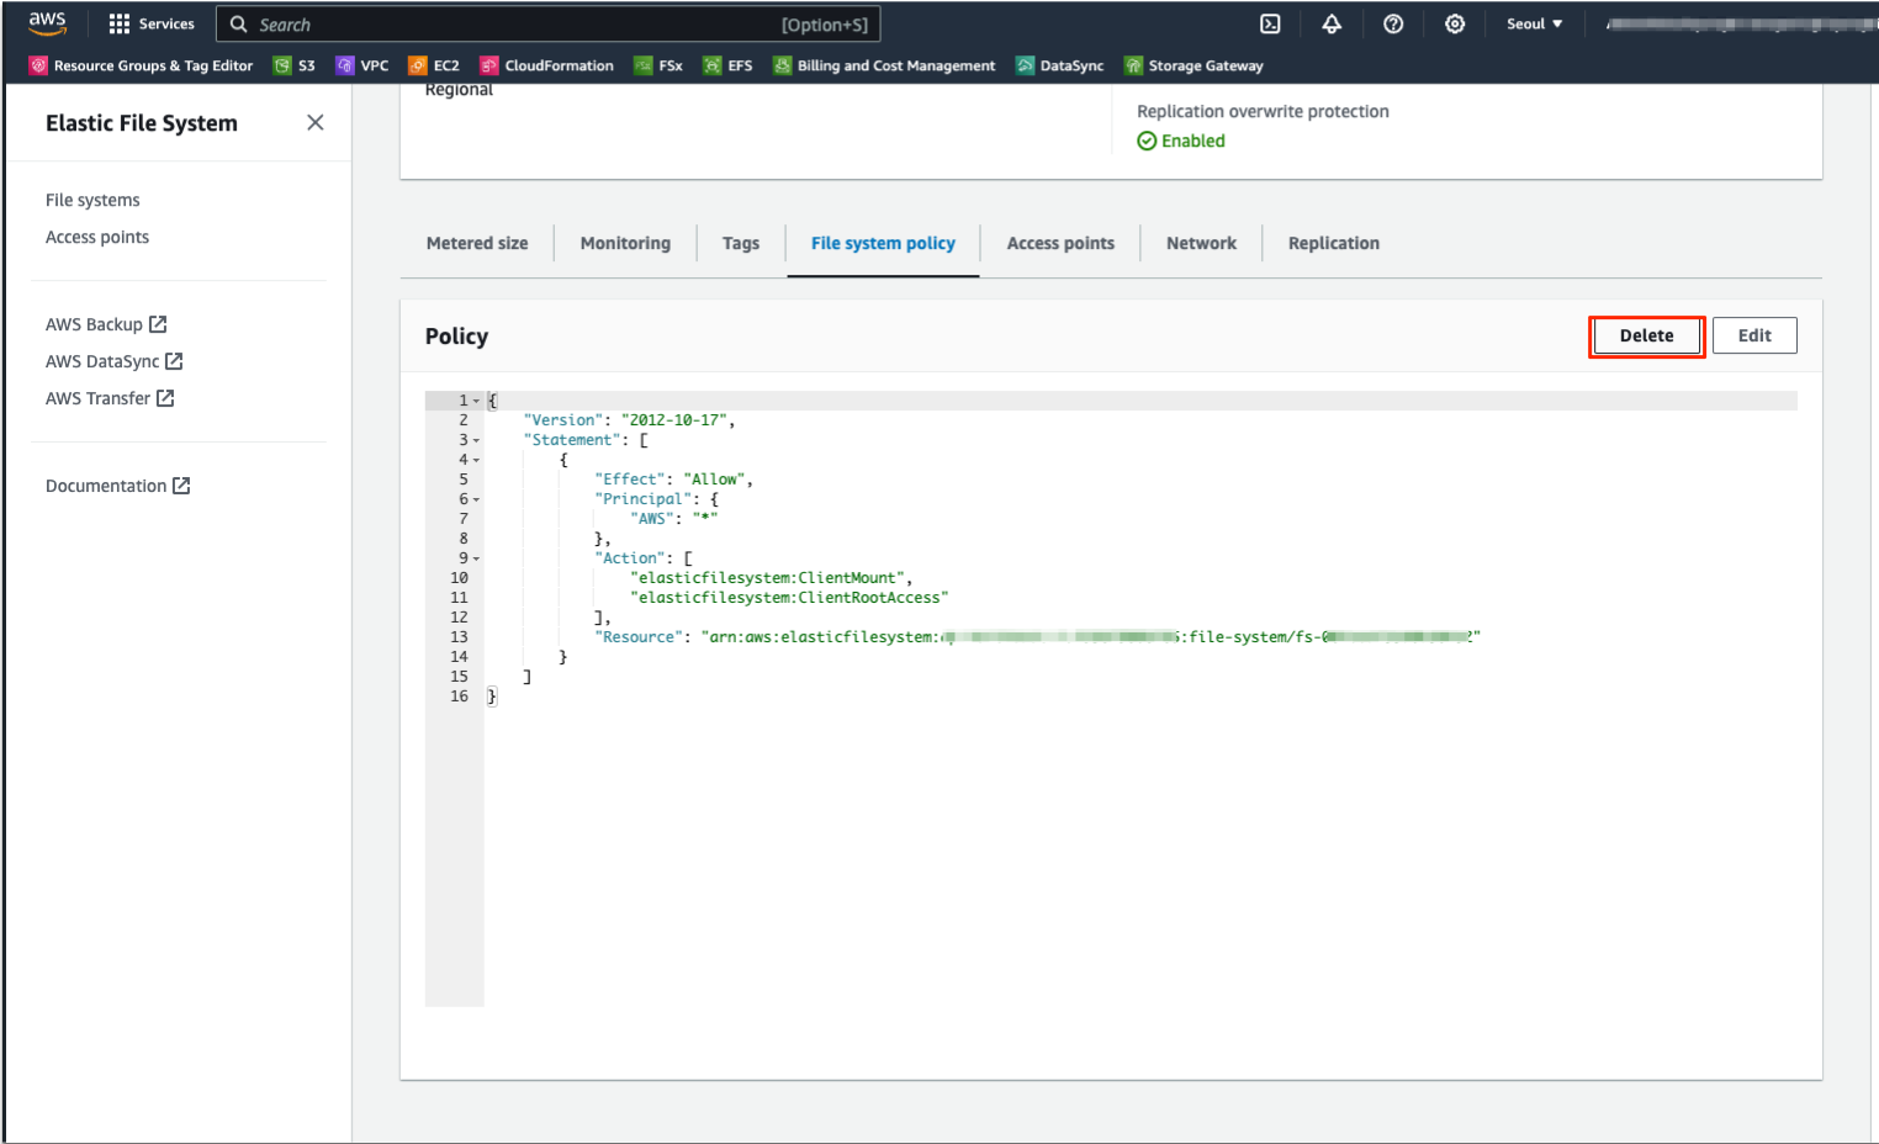
Figure 14: Read-only EFS file system policy
Cleaning up
To avoid incurring future charges, delete the following resources.
- CloudWatch alarms
- Lambda function
Conclusion
In in this post, we demonstrated how implementing storage quotas on Amazon EFS using file system policies can help operations teams effectively manage and regulate the data storage practices of development teams. Setting soft and hard quotas allows organizations to prevent excessive and uncontrolled storage consumption, leading to more efficient resource usage and cost savings. The Amazon EFS serverless and elastic file system architecture streamlines storage management, allowing capacity to automatically grow and shrink based on usage. With the ability to enforce quotas, operations teams can strike a balance between providing sufficient storage resources for development needs while maintaining control over costs and resource allocation. This capability empowers organizations to proactively address the challenges posed by unregulated storage practices, fostering a more efficient and cost-effective cloud storage environment. For more information, please see the Amazon EFS User Guide.