Containers
Automating AL2023 custom hardened AMI updates for Amazon EKS managed nodes
This post was authored by Abhishek Nanda, Containers Specialist Solutions Architect and co-written with Jayaprakash Alawala, Principal Container Specialist Solutions Architect and Rajesh Singh, Sr. Containers Specialist BDM.
Introduction
Amazon EKS users in the Regulatory and Compliance industry invest time and effort to build EKS custom AMIs for the worker nodes Operating System (OS) to harden for various Benchmarks including Centre for Internet Security (CIS). The CIS is a community-driven nonprofit, responsible for the CIS Controls and CIS Benchmarks, globally recognized best practices for securing IT systems and data. They represent the consensus-based effort of cybersecurity experts globally to help you protect your systems against threats more confidently. Their CIS Hardened Images provide secure, on-demand, scalable computing environments in the cloud.
Many users in highly regulated industries such as Financial Services Industry (FSI), healthcare, government, and defense deploy sensitive workloads on Amazon Elastic Kubernetes Service (Amazon EKS). These organizations need to harden the Operating System (OS) of the cluster nodes to meet stringent security and compliance benchmarks mandated by various regulatory authorities. These requirements are essential for protecting sensitive data, maintaining industry standards, and avoiding potential legal and financial penalties. A popular benchmark across these sectors is the CIS Benchmark Level 2 for Amazon Linux 2023, which provides a comprehensive set of security configuration guidelines.
As of this writing, these are the two approaches to creating a custom hardened image:
- Take the Amazon EKS Amazon Machine Image (AMI) as a base and add hardening on top of it as shown in this blog. This process needs someone to apply the necessary configuration, for example in the Amazon Linux 2023 CIS Benchmark specification. For creating custom EKS AMIs, you can also refer other blog posts [1,2]
- Take an already hardened AMI from the AWS Marketplace as a base, and rebuild it by adding Amazon EKS-specific components on top of it. For more details on this approach refer to this blog post. However, the build process is often manual, users manage the packer scripts, they must continuously check for newer releases (Amazon EKS optimized AMI). Testing and updating EKS production and non-production environments remains a manual process that’s prone to errors. With frequent Amazon EKS optimized AMI and CIS Hardened AMI releases, users typically spend 3-4 days building, deploying and validating their new custom AMIs. You need to make sure custom images are compliant whenever Amazon EKS Optimized AMI or CIS version is updated. This blog post provides a solution to set up an automated pipeline to build, deploy and validate custom hardened images on EKS clusters. Using this approach, you can reduce the time it takes from 3-4 days to 50 minutes.
Amazon EKS users can also leverage EKS Auto Mode which comes by default with Bottlerocket EKS AMIs that are CIS Level 1 compliant.
Solution overview
The following sections go through the architecture, assumptions, solution workflow, prerequisites, and solution walkthrough.
Architecture
The following figure shows the architecture of this solution.
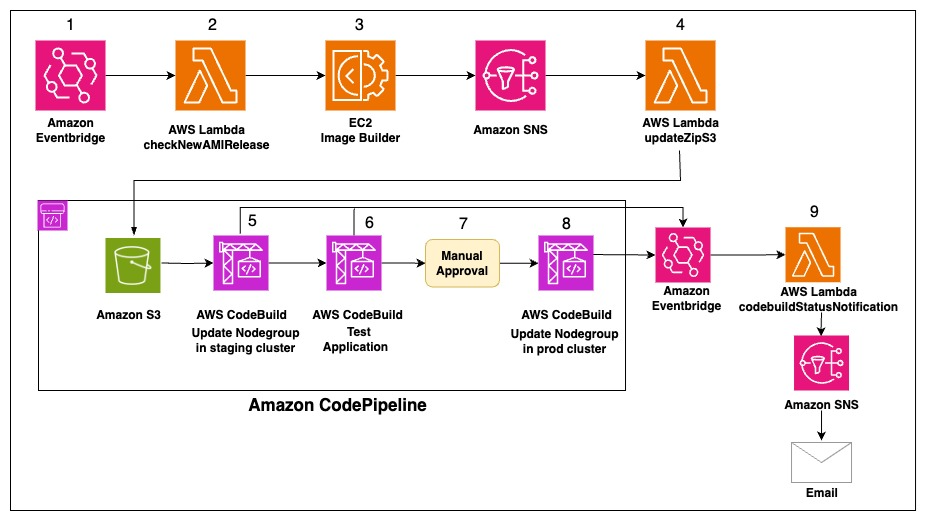
Figure 1: Solution Architecture
Assumptions
This solution architecture assumes the following:
1. The EKS cluster contains Amazon EKS managed node groups.
2. The Amazon EKS managed node groups use a custom Amazon Elastic Compute Cloud (Amazon EC2) launch template with Amazon EKS optimized Linux 2023 AMI.
Solution workflow
AMI Update Check and Creation:
1. Amazon EventBridge is set up to invoke the checkNewAMIRelease AWS Lambda function every 24 hours. The schedule is configurable as per your needs.
2. The checkNewAMIRelease Lambda function checks whether a new CIS Amazon Linux 2023 Benchmark – Level 2 AMI or an Amazon EKS optimized Amazon Linux 2023 AMI has been released following the current Amazon managed node group AMI creation date. The Lambda function does the following for every Amazon EKS managed node group.
-
- It retrieves the EKS cluster version and current AMI creation date.
- It retrieves the creation date of the following AMIs:
- The latest CIS Amazon Linux 2023 Benchmark – Level 2 AMI
- The latest Amazon EKS optimized Linux 2023 AMI for the given EKS cluster version.
- Then, it builds a custom Amazon EKS AMI using EC2 Image Builder if one of the following is true:
- AMI creation date in the latest CIS Amazon Linux 2023 Benchmark – Level 2 AMI is newer than the current AMI creation date
- AMI creation date in the latest Amazon EKS optimized Linux 2023 AMI for the given EKS cluster version is newer than the EKS cluster version and current AMI creation date.
3. EC2 Image Builder uses the CIS Amazon Linux 2023 Benchmark Level 2 AMI as the base Image and installs Amazon EKS components on top of it. When the custom Amazon EKS AMI is created, EC2 Image Builder notifies the Amazon Simple Notification Service (Amazon SNS) topic.
-
- We have added SELinux Policy Management tool
semanagecommands in our solution to update the file context tobin_tfor kubelet and nodeadm binary files to run with enforced SELinux mode. - Also, the
nftablesservice has been disabled in our solution and port10250has been added in the iptables to enable the communication between the Amazon EKS control plane and dataplane.
- We have added SELinux Policy Management tool
Release History Management:
4. The Amazon SNS topic triggers the updateZipS3Lambda function. The updateZipS3 Lambda function fetches the Amazon EKS Custom AMI from the SNS event and updates a file (releaseHistory.json) with the following details in the Amazon S3 bucket, and zips the file and uploads it (releaseHistory.zip) to the S3 bucket. This is used by AWS CodeBuild to read the content of the file and update the managed nodegroups:
-
- EKSClusterVersion: This is the current EKS cluster version.
- CurrentNodegroupAMI: This is the current AMI ID in the Amazon Managed nodegroup before the update.
- NewAMIID: This is the new Amazon EKS Custom AMI ID that is built using EC2 Image Builder.
- NewAMICreationDate: This is the creation date of the new Amazon EKS Custom AMI ID.
- UpdateType: This indicates if the new Amazon EKS Custom AMI is created because of either
new CIS Amazon Linux 2023 Benchmark – Level 2 AMIornew Amazon EKS optimized Amazon Linux 2023 AMI - UpdatedNodegroups: This is the list of the Amazon EKS managed node groups that need be updated.
- When the
releaseHistory.jsonfile is updated, it starts the pipeline. - Sample
releaseHistory.jsonfile:
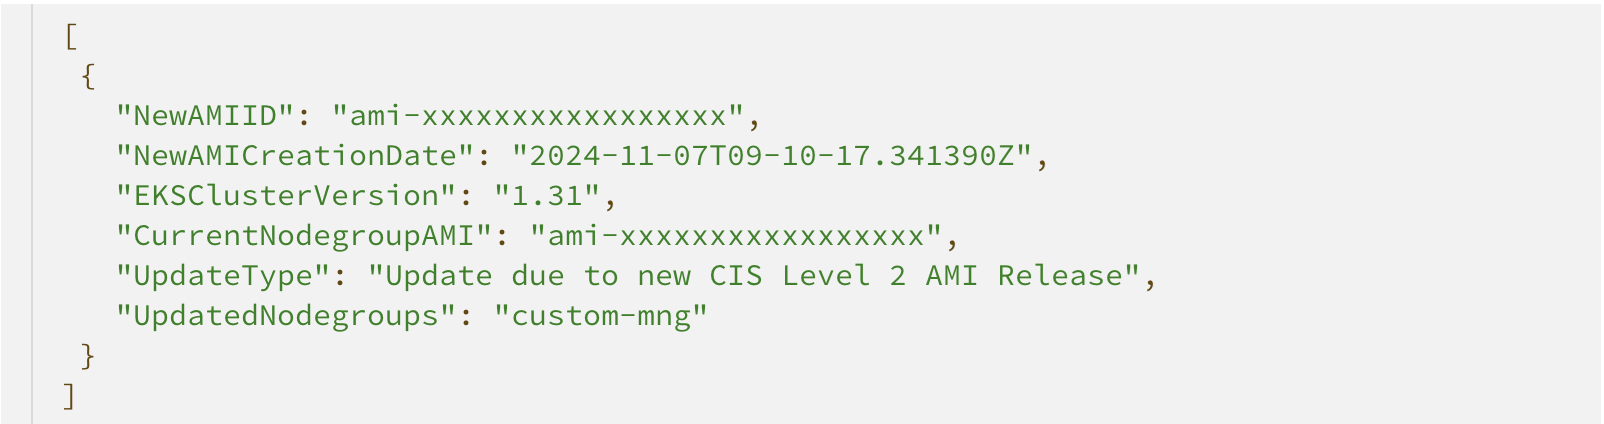
Figure 2: Sample releaseHistory.json
Staging Cluster Update:
5. Update Nodegroup in staging cluster: The AWS CodeBuild project retrieves the new Amazon EKS Custom AMI ID from the releaseHistory.json file from the releaseHistory.zip from the S3 bucket uploaded in the previous step. Furthermore, it does the following for the Amazon EKS managed node groups in the staging EKS cluster.
-
- Gets the current EC2 launch template details of the Amazon EKS managed node group.
- Creates a new EC2 launch template version with the new Amazon EKS Custom AMI ID.
- Updates the Amazon EKS managed node group with the new EC2 launch template version.
- Waits until the Amazon EKS managed node group reaches the ACTIVE status following the update operation.
- The pipeline behavior depends on the result of the nodegroup update:
- If the update is successful, then it enters the next stage, which is Test Application
- If the update fails, then the pipeline stops and an email is sent with the custom message generated by the codeBuildStatusNotifcation lambda function through EventBridge and Amazon SNS.
Application Testing:
6. Test Application: The AWS CodeBuild project validates a sample test application in the Staging EKS cluster to validate the new Amazon EKS Custom AMI ID. The pipeline behavior depends on the result of the sample application testing.
-
- If the sample application testing is successful, then it enters the next stage, which is Manual approval.
- If the sample application testing fails, then the pipeline stops and an email is sent with the custom message generated by the codeBuildStatusNotifcation lambda function through EventBridge and Amazon SNS.
Production Cluster Update:
7. The Manual Approval Stage waits for a human user to approve the Amazon Managed node group update in the EKS prod cluster.
8. Update Node group in prod cluster: The CodeBuild project updates the Amazon Managed node groups in the EKS prod cluster using the same steps described in Step 6.
Notification System:
9. The codeBuildStatusNotifcation Lambda function creates a custom message and sends an email notification.
Solution walkthrough
The following sections walk you through this solution.
Prerequisites
The following prerequisites are required to complete this solution:
-
- AWS Command Line Interface (AWS CLI) version 2 (Estimated Setup time: 3 minutes)
- eksctl ( Estimated Setup time: 2 minutes)
- kubectl ( Estimated Setup time: 1 minute)
- jq ( Estimated Setup time: 1 minute)
- git ( Estimated Setup time: 1 minute)
- Helm ( Estimated Setup time: 1 minute)
- AWS Marketplace subscription to CIS Hardened Image Level 2 on Amazon Linux 3 (Estimated Setup time: 5 minutes)
Start by setting the following environment variables:
Note: Provide your EmailID to receive AWS SNS subscription that would notify the AWS Codebuild status on that particular email ID.
Create staging and prod EKS clusters with Amazon EKS managed node group with launch template
While creating the Amazon EKS Managed node group, you use an older Amazon EKS optimized Linux 2023 AMI, for example amazon-eks-node-al2023-x86_64-standard-1.31-v20240928. This allows us to trigger the Lambda function in the subsequent steps to build a new AMI. You can retrieve the AMI ID using the following command:
Enter the following command to create an Amazon EKS Staging Cluster config and a managed node group with Amazon EKS Optimized AMI. The eksctl tool creates a launch template when an AMI ID is passed to the managed nodegroup configuration.
Create similar file cluster_prod.yaml replacing CLUSTER_NAME_STAGING with CLUSTER_NAME_PROD environment variable to create Amazon EKS production cluster.
Each cluster creation takes approximately 10 minutes. When both clusters are created, then update the kubeconfig to add the contexts for both the clusters:
Verify the nodes in each Amazon EKS cluster:
kubectl --context=$EKS_STAGING_CLUSTER_CONTEXT get nodes

Figure 3: Amazon EKS Staging Cluster worker nodes
kubectl --context=$EKS_PROD_CLUSTER_CONTEXT get nodes

Figure 4: Amazon EKS Production cluster worker nodes
Set up AWS Load Balancer Controller on both Amazon EKS clusters
Deploy a sample application
Deploy a sample application using the following Helm commands on both EKS clusters.
1. Clone the sample application
- git clone https://github.com/aws-containers/eks-app-mesh-polyglot-demo.git
2. Deploy application using helm in the Amazon EKS staging cluster
- helm –kube-context=$EKS_STAGING_CLUSTER_CONTEXT install workshop eks-app-mesh-polyglot-demo/workshop/helm-chart/
- Confirm the set up and access the application on both clusters
- kubectl –context=$EKS_STAGING_CLUSTER_CONTEXT get pod,svc -n workshop -o wide
3. Deploy the application using Helm on the Amazon EKS production cluster repeating the above steps.
4. The Load Balancer creation takes few minutes. Once the Load Balancers have been created then verify that the sample application is up and running in both the staging and prod EKS clusters by accessing the Network Load Balancer (NLB) URL in the browser.
- Access the application in browser using the load balancer DNS
- export STAGING_LB_NAME=$(kubectl –context=$EKS_STAGING_CLUSTER_CONTEXT get svc frontend -n workshop -o jsonpath=”{.status.loadBalancer.ingress[*].hostname}”)
- echo $STAGING_LB_NAME
- Access the application in browser using the load balancer DNS
- export PROD_LB_NAME=$(kubectl –context=$EKS_PROD_CLUSTER_CONTEXT get svc frontend -n workshop -o jsonpath=”{.status.loadBalancer.ingress[*].hostname}”)
- echo $PROD_LB_NAME
Set up the automated managed node group update
5. Upload the Lambda function code to an Amazon S3 bucket.
- Create an S3 bucket to store the zip files of the Lambda functions using the following command:
- export codeS3Bucket=$(aws s3 mb s3://eks-node-update-$ACCOUNT_ID | awk -F “: ” ‘{print $2}’)
- Create an S3 bucket to store the release notes of the upgrades and enable versioning for the bucket using the following commands:
- export releaseNotesS3Bucket=$(aws s3 mb s3://releasenotes-$ACCOUNT_ID | awk -F “: ” ‘{print $2}’)
- aws s3api put-bucket-versioning –bucket $releaseNotesS3Bucket –versioning-configuration Status=Enabled
- Clone the repository.
- git clone https://github.com/aws-samples/automating-amazon-eks-managed-nodegroup-update-custom-linux-ami-with-cis-hardening
- Upload the AWS CloudFormation template and the Lambda function zips to the S3 bucket created previously.
- aws s3 cp automating-amazon-eks-managed-nodegroup-update-custom-linux-ami-with-cis-hardening/amazon-linux-2023/cfn.yaml s3://$codeS3Bucket
- aws s3 cp –recursive automating-amazon-eks-managed-nodegroup-update-custom-linux-ami-with-cis-hardening/amazon-linux-2023/lambda-functions/zip_files/ s3://$codeS3Bucket# Export cfnTemplateURL to be used while creating the cloudformation stackexport cfnTemplateURL=”https://${codeS3Bucket}.s3.${AWS_REGION}.amazonaws.com/cfn.yaml”
Set up the solution infrastructure using the CloudFormation template
1. Run the below command to create the AWS CloudFormation stack to build the solution infrastructure
2. We are providing the following parameters in the above command while creating the cloudformation stack:
-
- Stack Name: eks-node-update (you can provide any other stack name).
- LoadBalancerDNS: This is the Network Load Balancer FQDN that was deployed in the Amazon EKS staging cluster in Step 4 of Deploy a sample application
- EmailID: Provide the email ID that would be subscribed to the Amazon SNS topic that would send notifications for the CodeBuild status change.
- Arch: This is x86-64. This parameter has been provided for future inclusions of other architectures.
- S3Bucket: Provide the S3 bucket name created in the previously in the Step 5a. where the AWS Lambda functions and AWS CloudFormation template was uploaded.
- CISLatestLevel2AMI: The latest CIS Level 2 Amazon Linux 2023 AMI ID
- ReleaseNotesS3Bucket: The Release Notes S3 bucket name created in the previously in the Step 5b.
- Schedule: rate (1 day) (This schedule will set up Amazon EventBridge to run the checkNewAMIRelease AWS Lambda function at particular interval). The frequency can be changed to 10 minutes, 1 day, 7 days and 30 days.
3. Wait for the stack creation to reach CREATE_COMPLETE in the AWS CloudFormation console.
4. When the stack has been created successfully, an email should send through Amazon SNS to subscribe to the newly created Amazon SNS topic. Confirm the subscription so that you can get the notifications for the CodeBuild stage changes.
Grant the CodeBuild Service Role access to the EKS staging cluster using EKS Access Entries
Add the CodeBuild application testing project’s (eks-new-ami-testapp) service role to the Amazon EKS staging cluster so that CodeBuild can access the EKS cluster for entering the test kubectl commands. Use the Amazon EKS Access Entries feature to add the AWS Identity and Access Management (IAM) role for access to the Amazon EKS staging cluster.
1. Get the CodeBuild service role arn:
2. Create an access entry in the staging cluster:
3. Associate access policy to the access entry:
Solution testing
Run the checkNewAMIRelease Lambda function and check if one of the custom nodegroups in your EKS cluster needs an update. If the nodegroups need an update, then the Lambda function triggers the EC2 Image builder to create a new AMI, as shown in the following images.
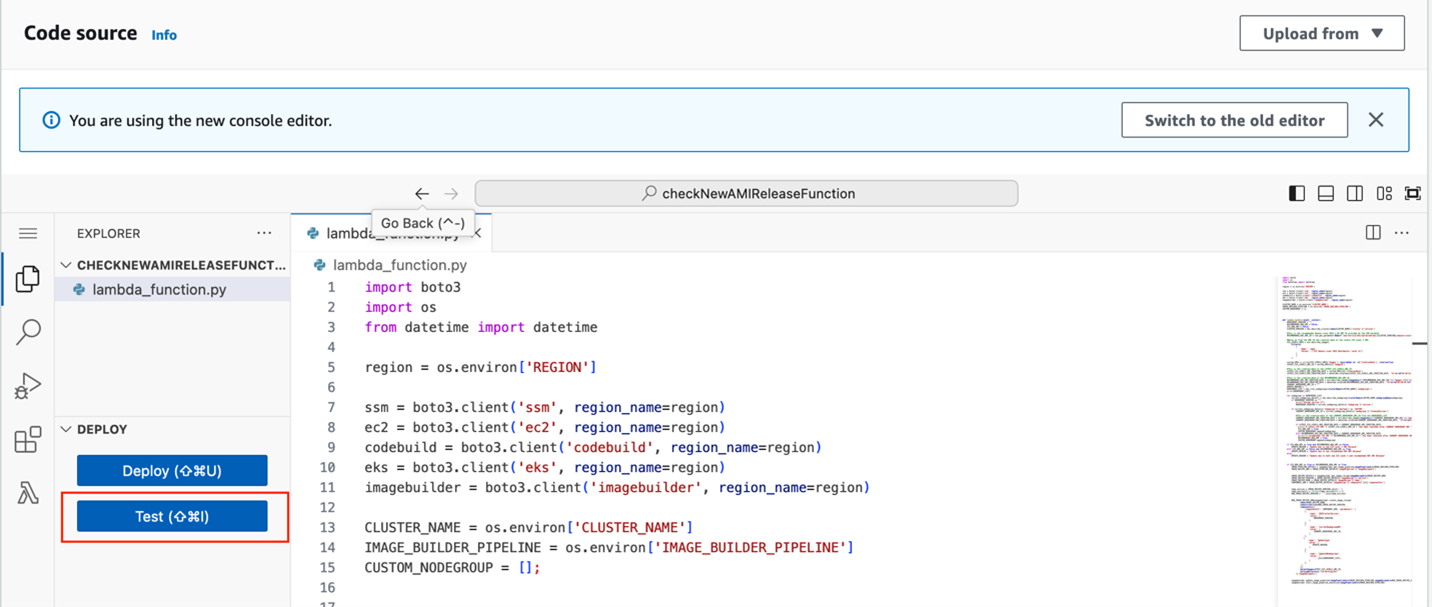
Figure 5: Triggering the checkNewAMIRelease Lambda function

Figure 6: checkNewAMIRelease Lambda execution logs

Figure 7: EC2 Image Builder console
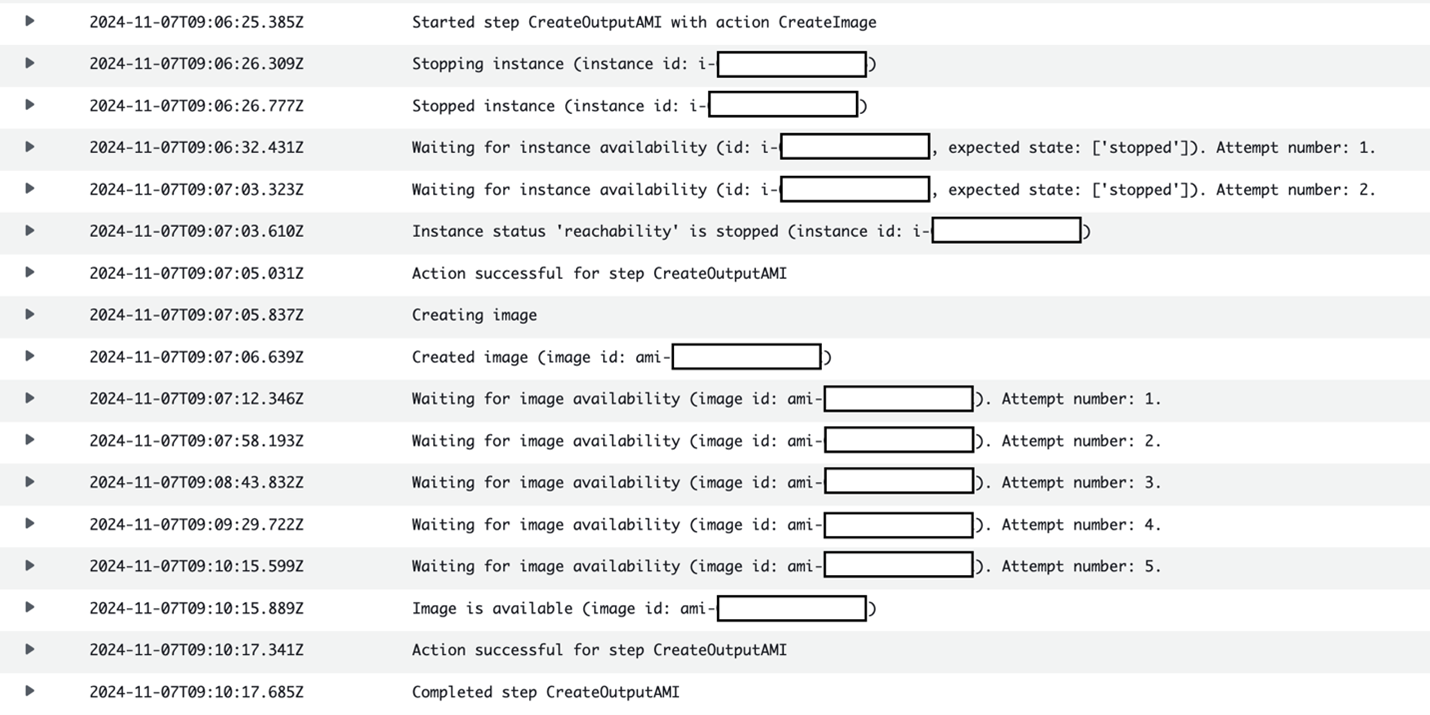
Figure 8: EC2 Image Builder logs showing AMI creation

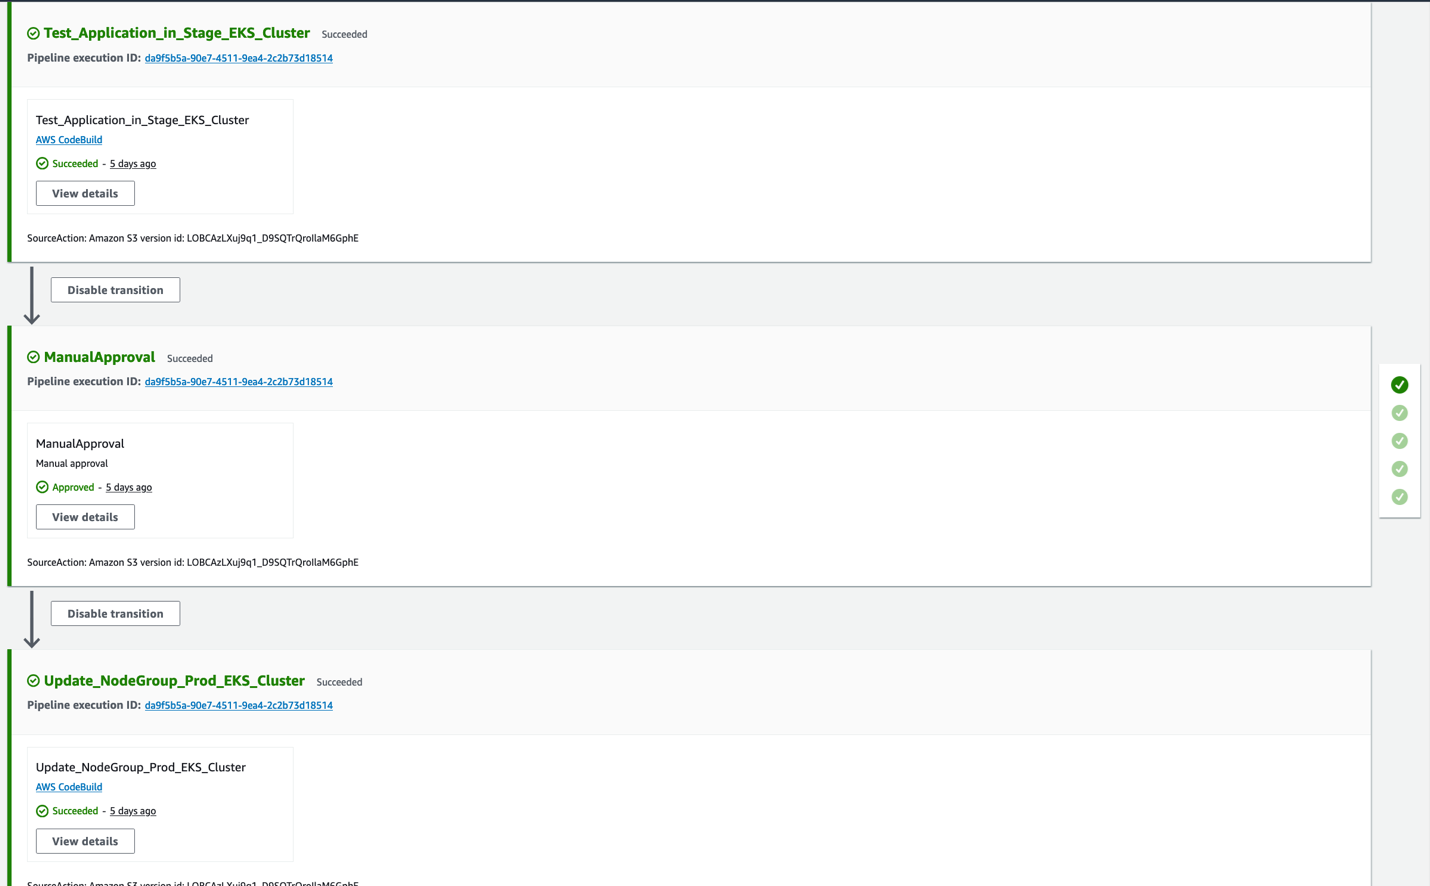
Figure 9: Pipeline that updates the custom managed nodegroups in test and production clusters

Figure 10: Amazon SNS sends notification with the update details when the CodeBuild run is completed.
Clean Up
- Delete the CloudFormation Stack
- Delete all the EC2 image builder image recipes that was created as part of your image pipeline runs. The stack initially created the EKSCISAMIRecipe with version 1.0.0. So, the other image recipes need to be deleted before attempting to delete the Cloudformation stack. The following shell commands can be used to achieve the same.
-
- Run the below commands to delete the cloudformation stack
-
- Once the CloudFormation has been successfully deleted , then
- Deregister all the AMIs created by EC2 image builder in the Amazon EC2 console that are not needed for future purpose.
- Delete the snapshots under Volumes in the Amazon EC2 console. If you are retaining any AMI for future use, then retain the corresponding snapshots. The snapshot description contains the AMI name, hence filter the snapshots that are not part of the retained AMI and delete the same.
- Once the CloudFormation has been successfully deleted , then
- Uninstall the sample application
helm --kube-context=$EKS_STAGING_CLUSTER_CONTEXT uninstall workshop
helm --kube-context=$EKS_PROD_CLUSTER_CONTEXT uninstall workshop
- Delete the Amazon EKS Clusters
eksctl delete cluster -f cluster_staging.yaml
eksctl delete cluster -f cluster_prod.yaml
- Delete the codeS3Bucket Amazon S3 bucket
aws s3 rm s3://$codeS3Bucket --recursive
aws s3 rb s3://$codeS3Bucket
- Delete the releaseNotesS3Bucket Amazon S3 bucket
Best practices to reduce application downtime during upgrades
1. Run multiple replicas of your application spread across multiple worker nodes across Availability Zones (AZs).
2. Set up Pod Disruption Budgets (PDBs) for the critical workloads to always keep the minimum number of replicas for the application component running. PDBs always try to create new pods first to maintain the minimum number of replicas before the old pods are removed during voluntary disruptions.
3. Set up the necessary probes (liveness, readiness, and startup) for your application containers that would help check the application containers’ aliveness and readiness to accept the traffic.
4. Analyze and set up graceful shutdown for your application containers to handle SIGTERM signals. It is good practice for the application to handle SIGTERM signals so that it can close the connections gracefully at the application level.
Conclusion
In this post, we demonstrated how to build an automated pipeline to build, deploy and validate Amazon EKS custom AMIs. We used CIS Amazon Linux 2023 Benchmark Level 2 AMI and used EC2 Image Builder to create custom AMI. This solution significantly reduces overall build, validate, update times from days to under an hour, improving security posture and operational overhead. This will help organizations especially in regulatory industries to be compliant with their security standards.
By implementing this automated pipeline, you can:
- Consistently apply CIS hardening standards across multiple EKS clusters
- Improve regulatory compliance and reduce the attack surface
- Save time and resources by minimizing operational overhead
- Stay current with the latest security benchmarks
To dive deeper into EKS security best practices, explore the documentation. We’re excited to see how you’ll use this solution to enhance the EKS environments and welcome your feedback and questions in the comments section. Also to learn how to implement various Amazon EKS Security features, please visit Amazon EKS Security Workshop.