Containers
Building Amazon Linux 2 CIS Benchmark AMIs for Amazon EKS
Introduction
The Center for Internet Security (CIS) Benchmarks are best practices for the secure configuration of a target system. They define various Benchmarks for Kubernetes control plane and the data plane. For Amazon EKS clusters, it is strongly recommended to follow the CIS Amazon EKS Benchmark. If the data plane of an Amazon EKS cluster uses Amazon Linux 2 as a node group Operating System, it is recommended to implement the CIS Amazon Linux 2 Benchmark. This blog provides detailed, step-by-step instructions on how customers can build an Amazon EKS Amazon Machine Image (AMI) compliant with the CIS Amazon Linux2 Benchmarks.
As Kubernetes adoption grows, many organizations are choosing it as their platform to build and host their modern and secure applications. Security is one of the primary design criteria for many workloads, especially those dealing with sensitive data, such as financial data processing. These workloads have a stringent requirement to adhere to various security and compliance controls.
Many Amazon EKS customers, especially enterprise customers from Banking and Finance, are looking for guidance from AWS on hardening Amazon EKS. This is primarily for meeting the security and compliance requirements, such as Amazon Linux 2 (AL2) CIS Benchmark Level 1 or Level 2.
Update: This blog post is updated on May 3rd 2023 with additional instructions to modify the build scripts and configurations to accommodate the changes in the Amazon EKS AMI github file structure, CIS Amazon Linux 2 AMI and also to use the latest Amazon EKS Version as of this date.
Amazon EKS AMI Hardening Process
The Amazon Linux 2 (AL2) CIS Benchmarks define two profiles for hardening i.e. Level1 and Level 2.
- A Level 1 profile is intended to be practical and prudent, provide a clear security benefit, and not inhibit the utility of the technology beyond acceptable means.
- A Level 2 profile is intended for environments or use cases where security is paramount, acts as a defense in depth measure, and may negatively inhibit the utility or performance of the technology.
There are two approaches for hardening the Amazon EKS AMI for CIS Benchmark Level 1 or Level 2 profiles.
- Use the standard Amazon EKS Optimized AMI as a base and add hardening on top of it. This process requires someone to apply all of configuration mentioned in the Amazon Linux 2 CIS Benchmark specification.
- Use the Amazon Linux 2 (AL2) CIS Benchmark Level 1 and Level 2AMI from the AWS Marketplace as a base, and add Amazon EKS specific components on top of it. This blog addresses this approach and provides step by step instructions on how build an Amazon EKS hardened AMI, leveraging the Amazon AL2 CIS Benchmark AMI.
The following is a proposed solution for hardening an Amazon EKS AMI and deploying in an Amazon EKS Cluster.
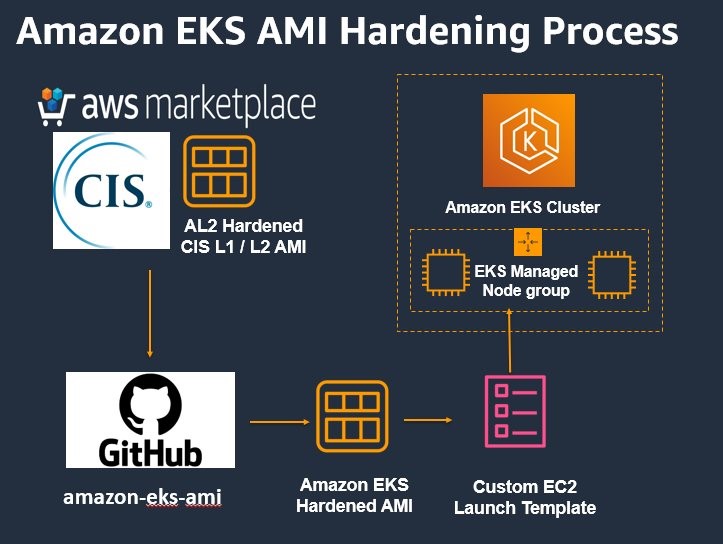
The proposed approach is outlined below.
- Subscribe to the CIS Amazon Linux 2 Benchmark – Level 2 AMI from the market place.
Note: this will incur costs for the software subscription in addition to the EC2 instance type used.
- Build a custom Amazon EKS AMI using above Amazon Linux (AL2) AMI as the base AMI.
- Create an Amazon EKS Cluster along with an Amazon EKS managed node group which uses the above custom Amazon EKS AMI.
- Deploy a sample application on this node group.
Solution walk through
Pre-requisites
You will need the following to complete the tutorial:
Note: We have tested the CLI steps in this post on Amazon Linux 2.
Let’s start by setting a few environment variables.
Subscribe to CIS Amazon Linux 2 Benchmark – Level 2 AMI
Note: the below section mentions Level 2 but the same procedure can be used for Level 1.
Go to the CIS Amazon Linux 2 Benchmark – Level 2 AWS Marketplace page. Click on “Continue to Subscribe” on the top-right of the page.

On the next page, Accept Terms and Conditions and follow the instructions.
Ensure that the newly subscribed CIS Amazon Linux 2 Benchmark – Level 2 AMI appears in your EC2 console. Sort the AMIs based on the Creation date and select the latest AMI for x86_64 Architecture.

Make a note of the following properties of the AMI and export them into an environment variables
- AMI ID
- AMI name
- Owner account ID
Building a custom Amazon EKS AMI
Clone the repo for building a custom Amazon EKS AMI
Install the Packer tool for your platform. Below instructions assume you are using an Amazon Linux based machine to build the AMI.
Get the default Amazon Virtual Private Cloud (VPC) ID and get one of the subnet IDs and replace them in eks-worker-al2.json. The packer tool will launch a temporary Amazon EC2 Instance in this subnet to create the custom Amazon EKS AMI.
Run the following commands to modify few configuration and script files.
Apart from the above changes, add below command to the shell provisioner configurations in the file eks-worker-al2.json as per the githbub issue.
"execute_command": "{{.Vars}} bash '{{.Path}}'"
The updated eks-worker-al2.json file looks like below. The additional changes are highlighted below.
 "provisioners": [
    {
      "type": "shell",
        ...
        "ADDITIONAL_YUM_REPOS={{user `additional_yum_repos`}}"
      ], "execute_command": "{{.Vars}} bash '{{.Path}}'"
    },
    {
      "type": "shell",
      ...
      "inline": [
        "mkdir -p /home/ec2-user/worker/log-collector-script/"
      ], "execute_command": "{{.Vars}} bash '{{.Path}}'"
    },
....
{
      "type": "shell",
        ...
        "sudo mv /home/ec2-user/worker/bin/* /usr/bin/"
      ], "execute_command": "{{.Vars}} bash '{{.Path}}'"
    },
    {
      "type": "shell",
        ...
        "KUBERNETES_VERSION={{user `kubernetes_version`}}",
        "KERNEL_VERSION={{user `kernel_version`}}"
      ], "execute_command": "{{.Vars}} bash '{{.Path}}'"
    },
    {
      "type": "shell",
      ...
        "PAUSE_CONTAINER_VERSION={{user `pause_container_version`}}",
        "CACHE_CONTAINER_IMAGES={{user `cache_container_images`}}"
      ], "execute_command": "{{.Vars}} bash '{{.Path}}'"
    },
    {
      "type": "shell",
      ...
      "script": "{{template_dir}}/scripts/cleanup.sh", "execute_command": "{{.Vars}} bash '{{.Path}}'"
    },
    {
      "type": "shell",
       ...
      "environment_vars": [
        "ADDITIONAL_YUM_REPOS={{user `additional_yum_repos`}}"
      ], "execute_command": "{{.Vars}} bash '{{.Path}}'"
    },
    {
      "type": "shell",
        ...
      "environment_vars": [
        "KERNEL_VERSION={{user `kernel_version`}}"
      ], "execute_command": "{{.Vars}} bash '{{.Path}}'"
    },
Run the following Make command with command line options, which are passed to packer tool as configuration parameters.
The successful build looks something like below. Make a note of the custom Amazon EKS AMI.
Set an environment variable with the above custom Amazon EKS AMI.
Create Amazon EKS Cluster with EKS Managed Node group using custom EKS AMI
Run the below command to create an Amazon EKS Cluster along with a managed node group using custom Amazon EKS AMI.
Once the cluster is created, ensure that kubectl is working.
Deploy a sample application
Let’s deploy a sample application to these new nodes.
Ensure the Nginx pod is running fine on these new nodes.
Run the below command to exec into the pod and run a curl command:
 POD_NAME=$(kubectl get pods -l=app=nginx -o=jsonpath={.items..metadata.name})
kubectl exec -it  $POD_NAME -- /bin/bash
root@nginx-65d78895bd-tfp9s:/# curl 127.0.0.1:80
<!DOCTYPE html>
<html>
<head>
<title>Welcome to nginx!</title>
<style>
html { color-scheme: light dark; }
body { width: 35em; margin: 0 auto;
font-family: Tahoma, Verdana, Arial, sans-serif; }
</style>
</head>
<body>
<h1>Welcome to nginx!</h1>
<p>If you see this page, the nginx web server is successfully installed and
working. Further configuration is required.</p>

<p>For online documentation and support please refer to
<a href="http://nginx.org/">nginx.org</a>.<br/>
Commercial support is available at
<a href="http://nginx.com/">nginx.com</a>.</p>

<p><em>Thank you for using nginx.</em></p>
</body>
</html>
root@nginx-65d78895bd-tfp9s:/# exit
exit
Run the below command to access the logs from the pod and then Ctrl + C to exit from the container log output:
kubectl logs -f  $POD_NAME
/docker-entrypoint.sh: /docker-entrypoint.d/ is not empty, will attempt to perform configuration
/docker-entrypoint.sh: Looking for shell scripts in /docker-entrypoint.d/
/docker-entrypoint.sh: Launching /docker-entrypoint.d/10-listen-on-ipv6-by-default.sh
10-listen-on-ipv6-by-default.sh: info: Getting the checksum of /etc/nginx/conf.d/default.conf
10-listen-on-ipv6-by-default.sh: info: Enabled listen on IPv6 in /etc/nginx/conf.d/default.conf
/docker-entrypoint.sh: Launching /docker-entrypoint.d/20-envsubst-on-templates.sh
/docker-entrypoint.sh: Launching /docker-entrypoint.d/30-tune-worker-processes.sh
/docker-entrypoint.sh: Configuration complete; ready for start up
2023/05/03 06:53:22 [notice] 1#1: using the "epoll" event method
2023/05/03 06:53:22 [notice] 1#1: nginx/1.23.4
2023/05/03 06:53:22 [notice] 1#1: built by gcc 10.2.1 20210110 (Debian 10.2.1-6)
2023/05/03 06:53:22 [notice] 1#1: OS: Linux 5.10.177-158.645.amzn2.x86_64
2023/05/03 06:53:22 [notice] 1#1: getrlimit(RLIMIT_NOFILE): 1048576:1048576
2023/05/03 06:53:22 [notice] 1#1: start worker processes
2023/05/03 06:53:22 [notice] 1#1: start worker process 29
2023/05/03 06:53:22 [notice] 1#1: start worker process 30
127.0.0.1 - - [03/May/2023:06:53:46 +0000] "GET / HTTP/1.1" 200 615 "-" "curl/7.74.0" "-"
q^X^C
Cleanup
Use these commands to delete the resources created during this post:
Follow this link to cancel the Amazon Marketplace subscription for the CIS Amazon Linux 2 Benchmark Level 2 AMI.
Conclusion
In this blog, we showed you a detailed procedure on how to build an Amazon EKS AMI based on the AWS Market place AMI for CIS Benchmark Amazon Linux 2 profile and also on how to leverage the custom AMI with EKS Managed node groups. These instructions remain same for both CIS Benchmark Amazon Linux 2 Level 1 as well.
Check out our Containers Roadmap!
If you have ideas about how we can improve Amazon container services, please use our Containers Roadmap to provide feedback and review our existing roadmap items.