Networking & Content Delivery
Using Amazon Route 53 Resolver DNS Firewall to detect malicious domains
In this post, we show how organizations can use Amazon Route 53 Resolver DNS Firewall to detect and block access to malicious domains. We show how you can use the Amazon Web Services (AWS) Managed Domain Lists, which contain domains associated with malicious activity or potential threats, and share best practices for implementing Route 53 Resolver DNS Firewall in your environment.
If left unprotected, malicious domains may pose a serious security threat, allowing for activities that compromise sensitive data and systems. Proactively identifying and blocking access to these domains is crucial, but traditional deny list maintenance can be time-consuming and ineffective against evolving threats. Amazon Route 53 maintains Managed Domain Lists, keeping them up-to-date with the constantly changing threat landscape. This helps you optimize time and effort, as AWS automatically updates the lists with new vulnerabilities and threats, often before public disclosure, enabling DNS Firewall to deploy mitigations proactively. Amazon Route 53 Resolver DNS Firewall also allows you to build your own custom blocklists, giving you the flexibility to implement your organization’s specific filtering policies and rules.
This post addresses the following use cases for Amazon Route 53 Resolver DNS Firewall:
- Security teams can enforce domain access restrictions for the Amazon Virtual Private Clouds (VPCs) in the organization, to meet security and compliance requirements.
- Domain parking businesses can verify and screen domains against AWS managed lists and custom blocklists before accepting them on their platform.
- Organizations can block malicious domains and protect their employee workstations by implementing this solution for their VPCs, for security or compliance reasons.
Solution Overview
This guide demonstrates how to build a pipeline that identifies malicious domains by leveraging AWS Managed Domain Lists alongside your custom list. We use the following AWS services as key components:
- Amazon Route 53 Resolver DNS Firewall, using the AWS Managed Domain lists and custom domain lists for domain lookup and customized DNS query responses, blocking or allowing a domain.
- Amazon API Gateway to create and publish an API for the DNS Firewall domain lookup.
- Amazon S3 to store the input csv files as well as the results.
- AWS Lambda running within the VPC to perform domain resolution and to get appropriate responses from DNS Firewall based on the rules configured.
- Amazon Simple Notification Service (Amazon SNS) used to send email notifications to the administrators with the domain lookup results.
Figure 1 illustrates the architecture. User uploads a list of domains to an S3 bucket, and triggers API Gateway. A Lambda function in the VPC executes DNS Firewall lookups through Amazon Route 53 Resolver DNS Firewall. Amazon SNS immediately notifies administrators about flagged suspicious domains from the DNS Firewall results stored in S3 bucket. This system enables administrators to detect and block suspicious domains.

Figure-1: Shows the architectural flow using Amazon Route 53 Resolver DNS Firewall and other services
In this solution, we show how you can combine AWS Managed Domain Lists with your custom blocklists, to protect against malicious domains in real-time, eliminate manual maintenance, and deliver continuous security coverage. With this solution, you can automatically protect your VPC resources from malicious domains, reduce security team workload through automated threat detection, and meet compliance requirements while leveraging AWS’s continuously updated threat intelligence.
Prerequisites
The following prerequisites are necessary to complete this solution.
- Create AWS account if you haven’t done so already.
- We assume you are familiar with AWS ClouFormation service
Create and upload the dnslib zip file
- Open Cloudshell from your AWS Account and enter the following commands
mkdir pythonpip install dnspython==2.7.0 -t pythonzip -r dnslib.zip python
- Download the dnslib.zip file by clicking on
- ‘Actions’ on the top right corner of Cloudshell console
- select ‘Download file’
- enter the individual file path as ‘/home/cloudshell-user/dnslib.zip‘ to download the file
- Create an S3 bucket for uploading the dnslib.zip file in an AWS Region where you are planning to perform this entire set up.
- Upload the file to the S3 bucket.
Launch AWS CloudFormation stack
You can use AWS CloudFormation to set up the environment. The CloudFormation template sets up the API Gateway, Lambda function, DNS Firewall Rule Groups, S3 buckets, and an Amazon SNS VPC Endpoint.
To launch the provided CloudFormation template, complete the following steps:
- Download the CloudFormation template from here
- Make sure that you are in the correct Region.
- Navigate to the AWS CloudFormation console
- Choose Create stack.
- Choose an existing template.
- Choose Upload a template file.
- Choose Choose file, and specify the YAML template file that you downloaded to your local machine in the first step
- Choose Next.
- For Stack name, enter a name.
- Provide the following parameters:
- DNSFirewallManagedDomainListId –
- Navigate to Amazon Virtual Private Cloud (Amazon VPC) service and click on VPC dashboard
- In the left navigation pane, under DNS Firewall choose Domain lists.
- Look for the domain list named “AWSManagedDomainsAggregateThreatList”
- The ID of the AWSManagedDomainsAggregateThreatList is displayed in the ID column next to its name. It typically starts with “rslvr-fdl-” followed by a unique identifier.
- DNSFirewallManagedDomainListId –

Figure-2: Shows the DNS Firewall Managed Domain list ID
-
- SNSEmailAddress: Email address of the administrator to receive emails associated with malicious domain access.
- DNSLIBS3Bucket: S3 bucket where you uploaded the dnslib.zip file.
- Enter any tags that you want to assign to the stack, and choose Next.
- Choose the acknowledgement check boxes, and choose Create stack
The stack takes approximately 10 minutes to complete. On the CloudFormation console, you can navigate to the stack’s Resources tab to review the resources you created.
Using the default DNS Firewall AWS Managed Domain List
The following steps provide instructions for using the default DNS Firewall AWS Managed Domain List.
Steps to be performed by user
Step 1: Upload a CSV file with the name domains.csv containing a list of domains to be validated as malicious or not, to an S3 bucket aws-checkdomains-<AWS_Account_Number> set up by the CloudFormation stack. In Figure 3 we show sample domains to be validated.
The name of the file must be domains.csv. If any other file name is provided, then the domains list isn’t picked up. If you want to change the file name, then you can modify the Lambda code in the function “DNSDomainResolutionLambda”.

Figure-3: Shows an input list of domains that need to be verified as malicious or not in domains.csv
Step 2: Obtain the DNS Lookup REST API from CloudFormation Stack Output published by API Gateway, to perform the DNS domain lookup and trigger the API, as shown in Figure 4. Obtain the API Key from the API Gateway console. You can use the ‘x-api-key’ in the header and enter the value as the API Key obtained from the API Gateway console. You can use tools such as postman, curl, your own code, etc. to trigger the API.

Figure-4: CloudFormation output showing the API Gateway URL
What happens in the backend
- API Gateway invokes a Lambda function that is running within your VPC and performs DNS query resolution on the list of domains in the CSV file.
- DNS queries originating within the VPC pass through the default DNS Firewall native threat intelligence.
- When DNS Firewall receives a DNS query, it filters the query using the rule groups, rules, and other settings that have been preconfigured by CloudFormation, and it sends the results back to Resolver.
- Responses are saved in the same S3 bucket as dnsanswers.csv. You should see the status code as 200 returned by the Amazon Route 53 DNS Firewall for successfully resolved domains and a status code in 500s for malicious domains tagged by the DNS Firewall Managed Domain List (In Figure 5, we show, 501: domains blocked by managed list/custom list. 502: errors such as domain does not exist and others).
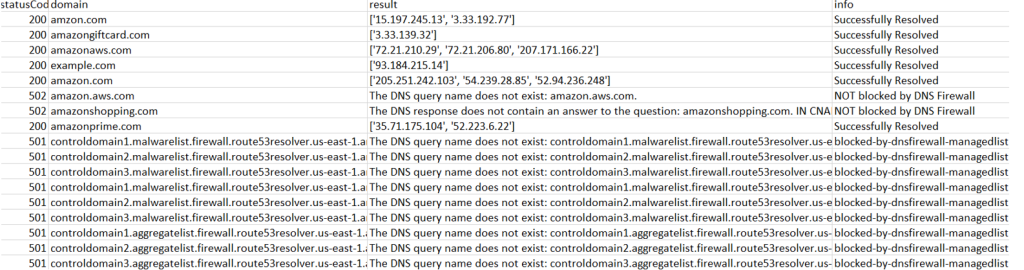
Figure-5: Responses from the DNS Firewall
- Simultaneously, the Administrator receives an instant alert about three domains reporting 501 status code as shown in the Figure 6. For the complete list, refer to the dnsanswers.csv file in the aws-checkdomains-<AWS_Account_Number> S3 bucket.

Figure-6: Email notification with the blocked domains
- You can customize the responses for the DNS queries that are blocked by DNS Firewall. Refer to this Route 53 developer guide for more information.
Using DNS Firewall AWS Custom Domain List
The Amazon Route 53 Resolver DNS firewall also allows you to upload your own list of domains to an S3 bucket and verify whether they are malicious or not. In the previous scenario, “example.com” isn’t categorized as malicious by default
Steps to be followed by user
If you want to add custom malicious domains list to the Route 53 DNS Firewall:
Step 1: Prepare a csv file with the name custom_domains_list.csv containing a list of your custom domains as shown in Figure 7:

Figure-7: List of custom domains to be defined in the DNS Firewall Custom Domain list
If any other file name is provided, then the domains list isn’t picked up. If you want to change the file name, then you can modify the Lambda code in the function “CustomDNSDomainListLambda”. Ensure that there are no duplicate domains in the custom_domains_list.csv file. Otherwise the Lambda function fails with the following error:
- ERROR ValidationException: An error occurred (ValidationException) when calling the UpdateFirewallDomains operation: This request contains duplicated domains. Ensure that every domain is unique.”
Step 2: Upload the file to the S3 bucket created by the CloudFormation stack with the name in the format aws-customdomains-<AWS_Account_Number>. You can find this in the CloudFormation Stack Outputs.
What happens in the backend
- Once the file is uploaded, a Lambda function is invoked automatically and creates a new Route 53 DNS Firewall domain list with the list of the custom domains. Any future uploads overwrite the same custom list.
- The DNS Firewall Rule group contains a combination of Managed List and Custom Domain List as shown in the Figure 8.

Figure-8: List of custom domains to be defined in the DNS Firewall Custom Domain list
Testing
- For testing the custom domains configuration, upload domains.csv to the S3 bucket aws-checkdomains-<AWS_Account_Number> and obtain the DNS Lookup REST API from CloudFormation Stack Output as done previously (APIGatewayURL).
- You should see that the requests to these newly added domains are blocked by the custom domain list as shown in the Figure 9.

Figure-9: Shows custom domains also being blocked by DNS Firewall
Cleaning up
To avoid incurring future charges, delete the CloudFormation stack by following these steps:
Use the AWS Management Console:
- Delete the contents of S3 buckets: aws-checkdomains-<AWS_Account_Number> and aws-customdomains-<AWS_Account_Number>.
- Navigate to the CloudFormation service.
- Locate the stack you want to delete in the list of stacks.
- Choose the stack, and then choose the Delete button in the stack actions menu.
- Confirm the deletion when prompted.
Things to know
Here are few important things to know
- This solution allows for easy input of domains via CSV files, performs real-time domain resolution and checking against both managed and custom lists, and provides immediate feedback through S3-stored results and email notifications. This combination of AWS-managed threat intelligence and custom rule capabilities offers organizations a flexible, low-maintenance way to significantly enhance their security posture against a wide range of cyber threats, including malware, phishing, and botnet activities.
- Note that the DNS Firewall rule actions are set to BLOCK as shown in Figure-8. This rule will block the requests from going to its intended destination. To learn more about the different available rule action type, refer to Rule actions in DNS Firewall.
- We recommend testing the solution in your staging environment and make any necessary updates, including implementing robust security measures, before deploying it to your production environment.
Conclusion
In this post, we showed how to use Amazon Route 53 Resolver DNS Firewall to detect malicious domains and to block any queries heading to these domains. A combination of AWS Managed Domain List and custom lists provide necessary protection against malicious domains and improve the organization’s security posture.
The AWS Managed Domain Lists contain domain names that are known to be associated with various categories of security threats, such as malware, command-and-control servers, phishing, and botnets. Using these lists in Route 53 DNS Firewall rules allows you to automatically block queries to domains that are known to be associated with these threats. Furthermore, you can create custom lists of domains that you want to block or allow based on your specific security requirements.
For further reading and to learn more about DNS resolution in your VPCs, see the Developer Guide for Amazon Route 53. You can also refer to the post on securing VPC with DNS Firewall for more details about how DNS Firewall works. If you have questions about this post, start a new thread on the Route 53 forum or contact AWS Support.
About the authors

