AWS for SAP
SAP IDoc integration with Amazon S3 by using Amazon API Gateway
Our customers who run SAP workloads on Amazon Web Services (AWS) are also invested in data and analytics transformations by using data lake solutions on AWS. These customers can use various third-party solutions to extract data from their SAP applications. However, to increase performance and reduce cost, they’re also asking for native integrations that use AWS solutions.
A common pattern that these customers use for extracting data from SAP applications is through IDoc Interface/Electronic Data Interchange. SAP NetWeaver ABAP-based systems have supported IDocs for a long time and are a very stable framework that powers master and transactional data distributions across SAP and non-SAP systems.
Architectural approaches for integrating SAP IDocs with Amazon Simple Storage Service (Amazon S3) have been published previously in the SAP community, such as in the blog post Integrating SAP’s IDOC Interface into Amazon API Gateway and AWS Lambda. However, those approaches don’t cover the security aspect, which is key for production use. It’s important to secure business-critical APIs to protect them from unauthorized users.
In this blog post, I show you how to store SAP IDocs in Amazon S3 by using API Gateway, with AWS Lambda authorizers and Amazon Cognito both providing the authentication layer.
An AWS Lambda authorizer is an Amazon API Gateway feature that uses a Lambda function to control access to your APIs. To learn more about AWS Lambda authorizers, see Use API Gateway Lambda Authorizers. By using Amazon Cognito, you can add user sign-in and access control mechanisms to your web, mobile, and integration apps. To learn more about Amazon Cognito, see Getting Started with Amazon Cognito.
Use cases
First, let’s look at some of the use cases and business processes that benefit from the architecture that I discuss in this blog post.
Master data integration: Let’s say your SAP application is the source of truth for all your master data like material master and customer master, and you’re integrating this master data with non-SAP applications and other software as a solution (SaaS) offerings. You can set up Application Link Enabling (ALE) in SAP, and extract the master data from SAP as IDocs for storing in Amazon S3. Once the data lands in Amazon S3, you can integrate the master data with other applications, or use the data in your data lake solutions. For a list of all master data objects supported by ALE, see Distributable Master Data Objects.
Business-to-business (B2B) integration: IDocs are still extensively used in B2B integration scenarios. Some use cases include finance data integration with banks, and inventory and material master data integration with suppliers. For a full list of business process integrations that are supported through IDocs, see Distributable Master Data Objects. By bringing your IDoc data to Amazon S3, you can tap into existing integration functionality, without much custom development.
Architecture
The following architecture diagram shows the workflow for integrating IDocs with Amazon S3, which incorporates basic authentication.
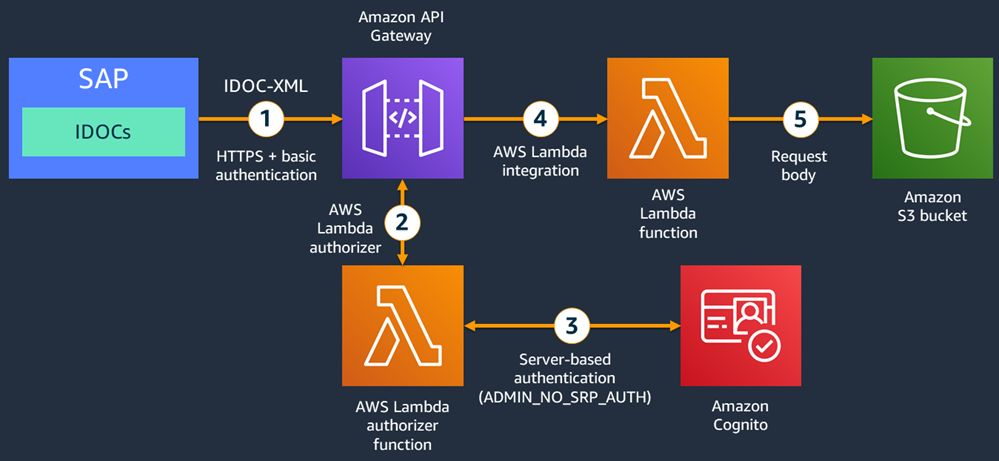
- SAP IDocs can be written as an XML payload to HTTPS endpoints. In this architecture, you create an IDoc port that maps to an HTTPS-based Remote Function Call (RFC) destination in SAP. Out of the box, HTTPS-based RFC destinations support basic authentication with a user name and password. Here, the HTTP destination points to an API Gateway endpoint.
- To support basic authentication in the API Gateway, enable a gateway response for code 401 with a WWW-Authenticate:Basic response header. Then, to validate the user name and password, use a Lambda authorizer function.
- The Lambda authorizer reads the user name and password from the request header, Amazon Cognito user pool ID, and client ID from the request query parameters. Then it launches an admin-initiated authentication to an Amazon Cognito user pool. If the correct user name and password are provided, the Amazon Cognito pool issues a JSON Web Token (JWT). If a valid JWT is received, the Lambda authorizer allows the API call to proceed.
- Once authorized, the API Gateway launches another Lambda function to process the IDoc data.
- The Lambda function reads the IDoc payload information from the request body and, using the AWS SDK, writes the IDoc data as an XML file to the S3 bucket.
Once the data is available in Amazon S3, you can use other AWS solutions like AWS Glue for data transformations, and then load the data into Amazon Redshift or Amazon DynamoDB.
Setting it up
Prerequisites
- Configure AWS Command Line Interface (AWS CLI) for your AWS account and region. For more information, see Configuring the AWS CLI.
- Get administrator access to your AWS account to create resources using AWS CloudFormation.
- Get administrator access to SAP application for uploading certificates, and for creating RFC destinations, IDOC ports, and partner profiles.
AWS setup
Next, implement this integration by going through the steps that follow. To make it easy for you to create the required AWS resources, we’ve published an AWS CloudFormation template, Lambda functions, and a deployment script in a GitHub repository.
Please note that there are costs associated with consuming the resources created by this CloudFormation template. See the “CloudFormation resources” section in this blog post for a full list of resources created.
Step 1:
Clone the aws-cloudformation-apigw-sap-idocs GitHub repo to your local machine.
$ git clone https://github.com/aws-samples/aws-cloudformation-apigw-sap-idocs.git
Step 2:
In the terminal/command window, navigate to the downloaded folder.
$ cd aws-cloudformation-apigw-sap-idocs
Step 3:
Change execute access permission for the build.sh file and execute the build.sh script.
$ chmod +x build.sh
$ ./build.sh
Step 4:
This creates the build folder. Navigate to the newly created build folder.
$ cd build
Step 5:
Open the deploystack.sh file and edit variable values as applicable. Change the value for at least the following variables to suit your needs:
- S3BucketForArtifacts – Where all the artifacts required by the CloudFormation template will be stored.
- USERNAME – The Amazon Cognito user name.
- EMAILID – The email ID attached to the Amazon Cognito user name.
Step 6:
Change execute access permission for the deploystack.sh file, and execute the script. Make sure your AWS Command Line Interface (AWS CLI) is configured for the correct account and region. For more information, see Configuring the AWS CLI.
$ chmod +x deploystack.sh
$ ./deploystack.sh
The script performs the following actions:
- Creates an S3 bucket in your AWS account (per the name specified for variable S3BucketForArtifacts in the
deploystack.shfile) - Uploads all the required files to the S3 bucket
- Deploys the CloudFormation template in your account
- Once all the resources are created, creates an Amazon Cognito user (per the value provided for variable USERNAME in the
deploystack.shfile) - Sets its password (per the value that you provide when you run the script)
For more information about the created resources, see the “CloudFormation resources” section in this blog post.
SAP setup
You can perform the following steps in an existing SAP application in your landscape or stand up an SAP ABAP Developer Edition system by using the SAP Cloud Appliance Library. If you’d rather install a standalone SAP ABAP Developer Edition system in your VPC, we’ve provided a CloudFormation template to speed up the process in the GitHub repo.
Configure RFC connection in SAP
Step 1:
When the SAP application connects to the API Gateway endpoint, it presents a certificate. For the SAP application to trust this certificate, it needs to be uploaded to the SAP certificate store by using the transaction code STRUST. You can download the Amazon server certificates from Amazon Trust Services. In the Root CAs section of that webpage, download all the root CAs (DER format), and upload them under the SSL client SSL Client (Standard) node using transaction code STRUST. If this node doesn’t exist, create it. For more information about SSL client PSE, see Creating the Standard SSL Client PSE.

Step 2:
Open the AWS Management Console and navigate to AWS CloudFormation. Select the stack that you deployed in “AWS setup,” earlier in this blog post. Then, go to the Outputs tab, and note down the values for the IDOCAdapterHost and IDOCAdapterPrefix keys. You will need these fields in the next step.

Step 3:
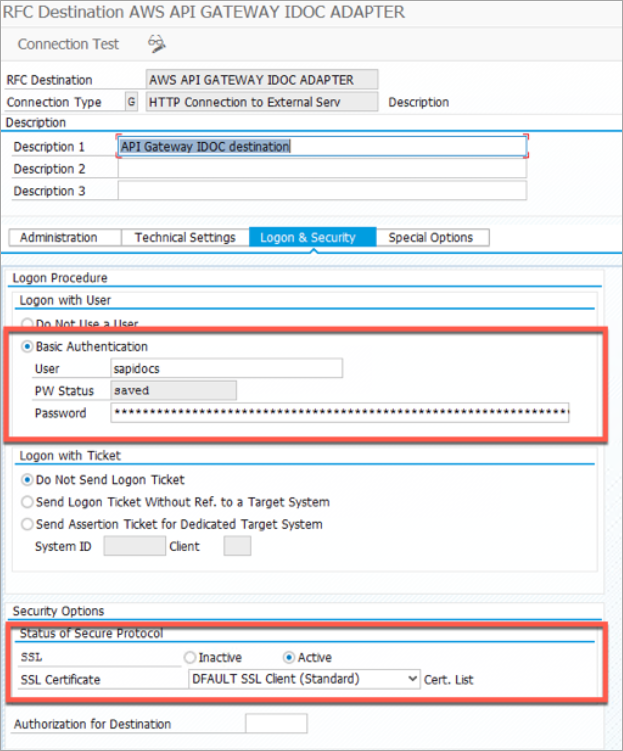
In your SAP application, go to transaction code SM59, and create an RFC destination of type G (HTTP Connection to External Server). For Target Host, provide the value of the key IDOCAdapterHost from the previous step. Similarly, for Path Prefix, provide the value of the key IDOCAdapterPrefix. Also, in Service No., enter 443. Once all the details are filled in, press Enter. You will receive a warning that query parameters aren’t allowed. You can ignore that warning by pressing Enter again.

Step 4:
While still in transaction SM59, choose the Logon & Security tab, and then choose Basic Authentication. In the User field, enter the value of USERNAME that you used in “AWS setup,” earlier in this blog post. In the Password field, enter the value of PASSWORD that you used in “AWS setup.” Then under Security Options, choose Active for SSL, and choose DEFAULT SSL Client (Standard) for SSL Certificate.
Step 5:
Choose Connection Test, and you will get a 200 HTTP response from the API Gateway. If you get an error, recheck the Target Host field (it shouldn’t start with HTTP or HTTPS), make sure the service number is 443, and make sure the path prefix is correct (it should start with a / and contain the full query string). Check whether you provided the correct user name and password. Also, check whether SSL is Active and SSL certificate value is DEFAULT SSL Client (Standard).

Configure IDoc port and partner profiles
Step 1:
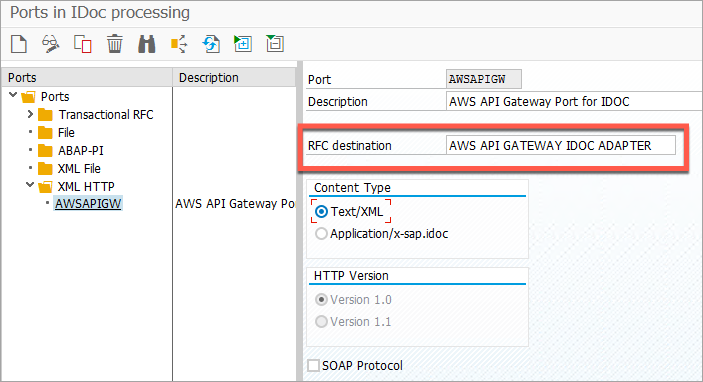
Go to transaction code WE21 and create a port of type XML HTTP using the RFC destination created in “SAP setup,” in this blog post. In Content Type, choose Text/XML.
Step 2:
Go to transaction code BD54, and create a new logical system—for example, AWSAPIGW.

Step 3:
Go to transaction code WE20, and create a new partner profile of type LS.
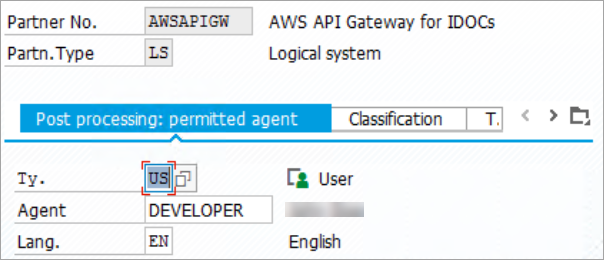
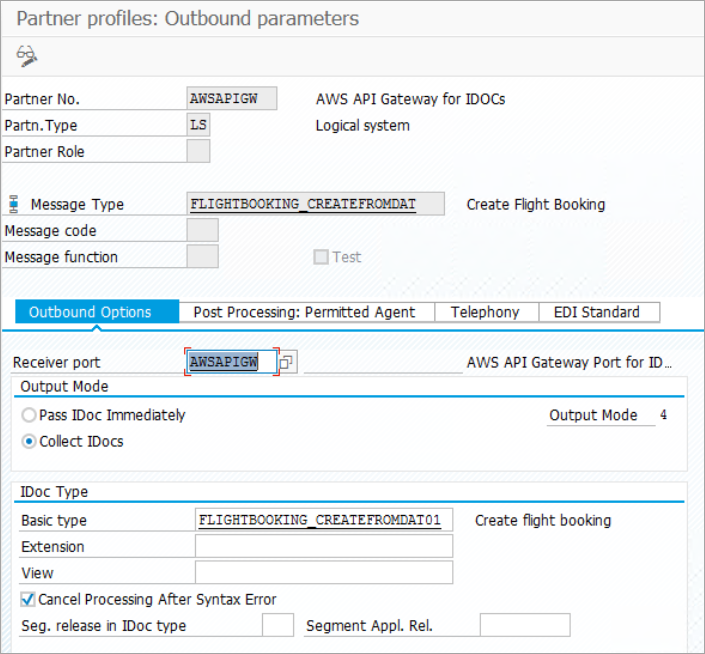
Step 4:
From transaction code WE20, create outbound parameters for the Partner profile that you created in the previous step. For testing purposes, choose FLIGHTBOOKING_CREATEFROMDAT as the message type, the port name (for example, AWSAPIGW) that was created in “SAP setup,” in this blog post, as the receiver port, and FLIGHTBOOKING_CREATEFROMDAT01 as the basic IDoc type.
Test with an outbound IDoc
Step 1:
Go to transaction code WE19. In the Via message type, field enter FLIGHTBOOKING_CREATEFROMDAT, and then choose Execute.

Step 2:
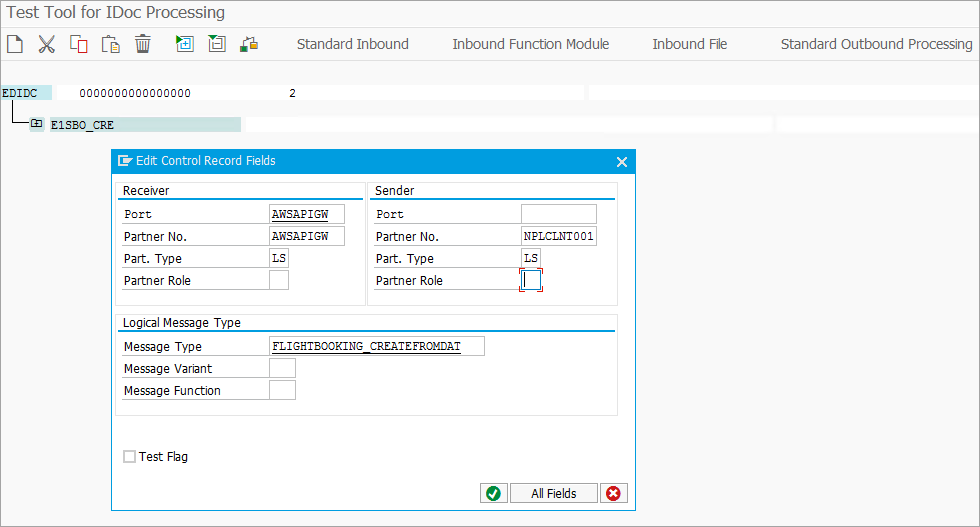
To edit the control record fields, double-click the EDIDC field. Fill in the details for Receiver and Sender. Receiver Partner No. will vary based on your system ID and client. In this example, the system ID is NPL and client is 001. Check transaction BD54 for your logical system name.
Step 3:
Double-click the E1SBO_CRE and E1BPSBONEW nodes, and provide some values. It doesn’t matter what you provide here. There are no validations for the field values. Once done, choose Standard Outbound Processing. This should send the IDoc data to the API Gateway endpoint.

Step 4:
Validate whether the IDoc data is stored in the S3 bucket that was created by the CloudFormation earlier.

Amazon Cognito vs AWS Identity and Access Management (IAM)
We use Amazon Cognito in this architecture because it provides the flexibility to authenticate the user against a user store and to issue short-lived credentials. However, if you would rather use access keys of an IAM user, you can do so by using the access key ID for the user name and access secret key for the password in the RFC destination.
The Lambda function apigw-sap-idoc-authorizer first tries to authenticate the user with Amazon Cognito. If it fails, it tries to authenticate using the access key and secret key. Make sure that the user of these keys has ‘list’ access to the S3 bucket where the IDoc data is stored. For more information, see the inline documentation of the Lambda function apigw-sap-idoc-authorizer. Also, make sure you follow the best practices for maintaining AWS access keys, if you choose to use them instead of Amazon Cognito.
CloudFormation resources
The following resources are created by the CloudFormation template that you deployed in “AWS setup,” earlier in this blog post.
Amazon Cognito user pool: To support user name and password authentication flow from the SAP application, the CloudFormation template creates an Amazon Cognito user pool with the name <Environment>_user_pool (for example, sapidocs_user_pool), where <Environment> is the input parameter from the CloudFormation template. The user pool is set up to act as a user store, with email ID as a required user attribute. Password policies are enforced also.
Amazon Cognito user pool client: An app client is also created in the Amazon Cognito user pool. This app client is set up to Enable sign-in API for server-based authentication (ADMIN_NO_SRP_AUTH) and Enable username-password (non-SRP) flow for app-based authentication (USER_PASSWORD_AUTH). These two settings allow the Lambda authorizer functions to authenticate a user against the Amazon Cognito user pool using the credentials supplied by SAP when making API Gateway calls.
Amazon S3 bucket: An S3 bucket with the name <Your AWS Account ID>-<value from S3BucketForIDOC parameter> (for example, 123456789-sapidocs) is created to store the IDoc XML files.
Lambda authorizer function: A NodeJS Lambda function with the name apigw-sap-idoc-authorizer is created for authorizing API Gateway requests from SAP by performing admin-initiated auth with Amazon Cognito with the user name/password provided in the request.
Lambda integration function: A NodeJS Lambda function with the name apigw-sap-idoc-s3 is created to store the IDoc payload received from SAP into the S3 bucket created earlier. The IDoc data is stored as XML files.
IAM roles: Two roles are created for the Lambda functions.
- A role with the name <Environment>-lambda-authorizer-role (for example, sapidocs-lambda-authorizer-role) is created for providing Amazon Cognito admin-initiated authentication access to the Lambda authorizer function.
- A role with the name <Environment>-lambda-s3-access-policy (for example, sapidocs-lambda-s3-access-policy) is created for providing write access to the S3 bucket for storing IDocs.
API Gateway API: An API Gateway API with the name sap-idoc-adapter-api is created. A Lambda authorizer (‘Request’ based) with the name IDOC_Adapter_Authorizer is also created for this API. This API has a GET method and a POST method. Both these methods use the Lambda authorizer for authentication. The GET method targets a mock endpoint and is only used for testing connections and authorization from the SAP application. The POST method uses Lambda integration by calling the Lambda function apigw-sap-idoc-s3 for uploading the IDoc payload data from the SAP application to the S3 bucket.
Resource limits
- Make sure to note Amazon API Gateway Limits and Important Notes, especially the payload size limit (10 MB at the time of writing) and integration timeout (29 seconds at the time of writing). Batching IDocs might result in higher payload size or higher processing time, which can result in timeouts. You might want to consider smaller batch sizes.
- Make sure to note AWS Lambda Limits. There are limits on the invocation payload size and memory allocations that might also affect the IDoc batch size.
Conclusion
This blog post gives you a way to upload SAP IDoc data to Amazon S3 without any coding in the SAP application, while incorporating security best practices. The API is protected via user authentication by Amazon Cognito and user authorizations through IAM policies. Now you can integrate your SAP master data, such as material master, with other applications that are running on AWS. You can also perform B2B integrations, such as integrating finance data with banks.
This approach works for most use cases. However, there are edge cases where the volume might be high enough to warrant custom coding in the SAP application by using ABAP HTTP client libraries. For such cases, it’s advised that you check third-party adapters or build your own ABAP HTTP client libraries.
I hope that you found this blog post useful. Please don’t hesitate to contact us with your comments or questions.