AWS Cloud Operations Blog
Using AWS Cloud9, AWS CodeCommit, and Troposphere to author AWS CloudFormation templates
AWS Cloud9 was announced at AWS re:Invent in November 2017. It’s a browser-based IDE suitable for many cloud development use cases, including serverless applications. AWS CloudFormation now supports quickly spinning up AWS Cloud9 development environments, with integration with AWS CodeCommit. In this blog post, I’ll explore how to quickly spin up AWS Cloud9 environments with CloudFormation, and also how to code in AWS Cloud9 with Python and Boto3, and generate CloudFormation template code in YAML using Troposphere.
Note: As of the time of this writing, AWS Cloud9 is available in the following AWS Regions: Northern Virginia, Ohio, Oregon, Ireland, and Singapore regions.
Spinning up Cloud9 Environments with CloudFormation
Using the AWS::Cloud9::EnvironmentEC2 resource type, you can quickly deploy AWS Cloud9 development environments, which you can use to set up development environments for a class or workshop at your company. Each AWS Cloud9 environment also creates an Amazon EC2 instance where you can use a command line to set up additional development tools, much like modern IDEs integrate with your local machine’s terminal sessions. You can also use this automation opportunity to set up CodeCommit repositories for each student that is using the environment. When you create these environments using CloudFormation you can also create a Git-compatible repository and integrate it with the Amazon EC2 instance that gets deployed with the AWS Cloud9 environments.
The template code that follows shows how simple it is to set up a single environment using CloudFormation with a CodeCommit repository. There are two prerequisites that you must complete before you deploy this template into a stack:
- Your IAM user must belong to a group that includes the
AWSCodeCommitPowerUserandAWSCodeCommitFullAccess - You need an appropriate subnet to deploy the EC2 instance. I used an account that had a VPC already deployed. (For more information, read Getting Started with Amazon VPC.) I used the intrinsic function
GetAttto connect the instance to the CodeCommit repository being created.
After it’s deployed, this template creates a separate stack that includes the EC2 instance as an output. This additional stack gets deleted after you delete the AWS::Cloud9::EnvironmentEC2 resources, so you don’t have to worry about administering this additional stack for the purposes of this example. After the stack deployment is complete, you can verify that it created both the AWS Cloud9 environment and CodeCommit repository by visiting their respective browser-based consoles.
AWSTemplateFormatVersion: "2010-09-09"
Description: A CodeCommit Repo and Cloud9 Environment for Basic Development
Resources:
  MyRepo:
    Type: "AWS::CodeCommit::Repository"
    Properties:
      RepositoryName: MyRepo
      RepositoryDescription: Sample Repo for Cloud9 CFN Post
  MyC9Environment:
    Type: "AWS::Cloud9::EnvironmentEC2"
    Properties:
      Repositories:
        - PathComponent: /cfn
          RepositoryUrl: !GetAtt MyRepo.CloneUrlHttp
      InstanceType: t2.micro
      SubnetId: subnet-be8735d6
      AutomaticStopTimeMinutes: 45
Figure 1. A CloudFormation template to create a Cloud9 environment and a CodeCommit repository.
More on AWS Cloud9
AWS Cloud9 is a versatile browser-based IDE. After you create your environment, you can operate your environment from typical MacOS, Linux and Windows machines, as well as from Chromebooks and tablets. This modern IDE provides multiple coding panes, as well as a command line pane, so you can switch from the editor to command line functions. As shown in Figure 2, I did some of the coding for this article on an iPad Pro, changing a few keyboard settings like splitting the keyboard so I can see both the editor and command line. I could also disable automatic capitalization, automatic word suggestions, and smart punctuation. As I do more iPad-based coding in the future, I’ll probably choose a more programmer-centric keyboard, like SmoothMobile’s DevKey.

Figure 2. The Cloud9 experience on an iPad.
Basic file editing
When you open your AWS Cloud9 environment, your EC2 instance has already been configured with the AWS CLI and a handful of other utilities, like Python versions 2 and 3, as well as Node 6. Also, the AWS CLI has been preconfigured with the required permissions to execute AWS commands. Finally, your local Git client automatically recognizes the repository you’ve just created, and clones it. Note that because it is a new repository, it will be empty.
Assuming you’ve never used AWS Cloud9 or CodeCommit, now is a good time to create a simple file and add it to the repository. I’ll create a default markdown text file for the repository. After you navigate to your repository and open it in CodeCommit, it will automatically look for a README.md file and render it, behaving in a similar way to Git repositories hosted on GitHub.
The first time you open your AWS Cloud9 environment, it will prompt you to navigate to the (still empty) directory it cloned for your newly created repository. It will also advise you to set up your display name and email for your commits using the following commands:
git config --global user.name “YOUR_USER_NAME”
git config --global user.email YOUR_EMAIL_ADDRESS
I’ll execute those two commands first.
For this example, I’ll create a bare bones markdown file for my sample project, as shown in Figure 3. First, I navigated to the AWS Cloud9 console, found the environment I recently created, and opened it. Then, I leveraged a pre-packaged file template by choosing the File menu, then the New From Template submenu, then the Markdown template option from the resulting submenu. Notice that I also changed the default color theme for the IDE, and I changed the local Git configuration for my commits. In addition, I checked the versions for some of the pre-installed packages in the EC2 instance that AWS Cloud9 presents. I can also preview my markdown file in a separate pane with the Preview button. After I’ve added a few lines, I saved the file inside my repository folder (~/environment/cfn in my example).

Figure 3. Editing a markdown file in Cloud9, previewing it, and checking versions on the instance.
Now that I have a new local file in my repository folder, it’s time to commit it to my remote CodeCommit repository. After I changed directories to my local repository folder, I’ll enter the following sequence of commands:
git status |
Confirms any new files saved to my local repository |
git add –all |
Adds new files to my next commit |
git commit -m “message” |
Adds a helpful message context to my commit action |
git push -u origin master |
Sends the committed files to the (remote) repository |
To verify that everything works as I expected, go to the CodeCommit console and inspect your repository, which we named MyRepo in our template. The README.md file we just created should be there, and it should be automatically rendered.
Using Python and AWS Boto3
In preparation for using Troposphere to generate CloudFormation code, I’ll make sure that I can create and run a Python program, and that I can use the AWS-provided Boto3 library to execute AWS API calls. You can find a fairly easy Python example as part of the Cloud9 documentation here. You’ll find that both Python 2 and 3 are already installed, so you can grab the sample code, save a new file in your instance and repository, and add a new Run Configuration to execute your code. The Run Configuration is handy to inject environment variables as you test your code, as well as to see the active standard output console for a long-running server process.
In Figure 4, I’ve validated that I’m able to compose and run basic Python code in my environment. I created the file by choosing the File menu, then the New From Template submenu, then the Python File template option from the resulting submenu. When I paste the sample code into my editing pane, I get smart syntax highlighting as well. Note the command I entered in the Command: field on the Run pane on the bottom of the screen, and that it is running Python 2.
Now that I’ve verified that I can edit and run Python programs in my environment, I’ll repeat the sequence of Git commands that I used for my earlier markdown file above, and move on to my next sample file.
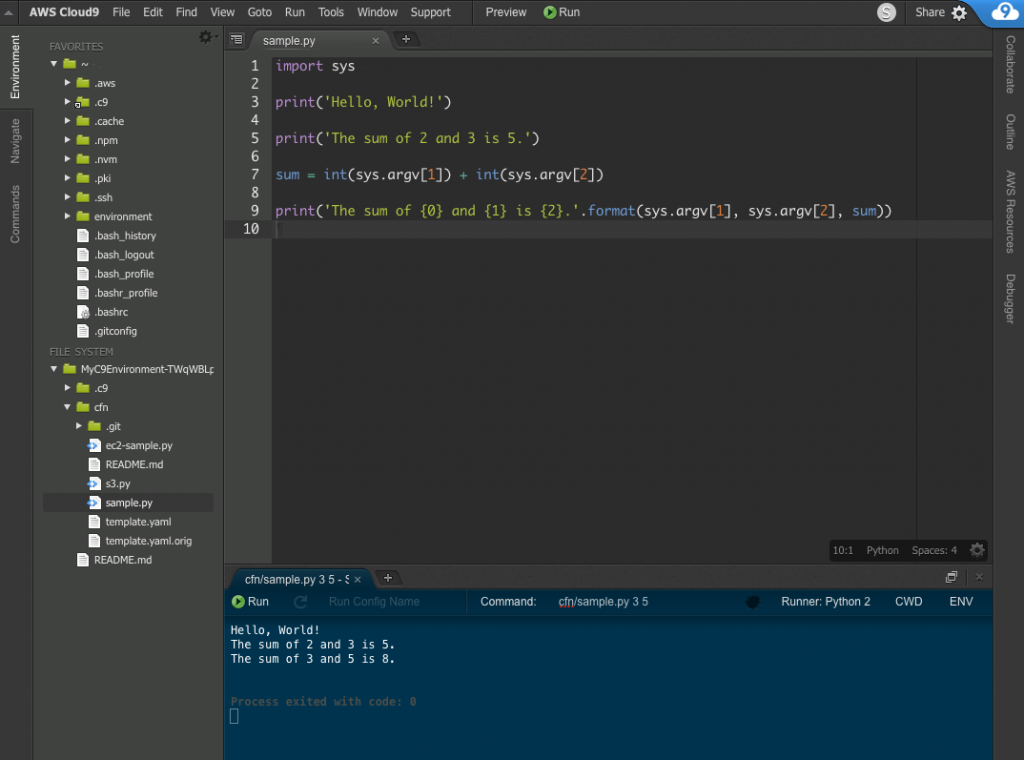
Figure 4. Running a basic Python program in AWS Cloud9.
Next, let’s ensure we can call AWS APIs with the latest version of Boto3. From a terminal tab, enter the following command:
sudo python -m pip install boto3
After it is installed, I’ll use the sample AWS SDK code from the previously mentioned documentation page for AWS Cloud9 and copy it into a new file. When creating the new file, I’ll use the File, New From Template, and Python File menu sequence as I did before, to ensure that I get proper syntax highlighting. Do this for all your language-specific code files and, in some cases, you’ll be able to leverage automatic suggestions as you type. Save your file and execute it in the existing Run Configuration tab. When you use a unique bucket name as the first runtime parameter, and a target Region as the second runtime parameter, the program uses Boto3 to list the current S3 buckets for the current user account. It also adds the new bucket, lists the buckets again, then deletes the newly-added bucket, and lists the buckets again showing that it successfully deleted it. See Figure 5.

Figure 5. Using AWS APIs in Python with Boto3.
Generating CloudFormation template code with Troposphere
Troposphere is an open-source project that enables Python developers to use Boto3 to generate CloudFormation code in either JSON or YAML. Many AWS customers use it. Troposphere is a mature project, its repository provides many examples, and it allows you to use imperative language constructs like looping to generate template code. To add it to our environment, run the following command as you did when installing Boto3 before:
sudo python -m pip install troposphere[policy]
Installing it with the policy option brings an additional project, which makes it easier to generate JSON for the AWS Access Policy Language, although is it not required for this example. To set up our example, first write the header for our template into a file called template.yaml:
AWSTemplateFormatVersion: "2010-09-09"
Description: A CFN Template
With this file in hand, we’ll create a short Python program to loop through the generation of an EC2 instance three times. The code, which uses the installed Troposphere library, is listed in Figure 6.
from troposphere import Ref, Template
import troposphere.ec2 as ec2

template = Template()

envs = ['dev', 'test', 'prod']

for x in envs:
    instancename = x + "Ec2"
    ec2_instance = template.add_resource(ec2.Instance(
        instancename,
        ImageId="ami-a7a242da",
        InstanceType="t2.nano",
    ))

fh = open("template.yaml", "a")
fh.writelines(template.to_yaml())
fh.close()
Figure 6. A sample Python file using Troposphere to generate a CloudFormation YAML code snippet.
As it loops, the EC2 template instance name will be generated from a list of three items. This will have the effect of generating three instances each for dev, test, and prod environments. Then, we’ll append the generated YAML code into the template.yaml header file we manually created earlier, although the header could also be generated in Python code as well. The sample code, as well as the resulting YAML file, are shown in Figure 7.
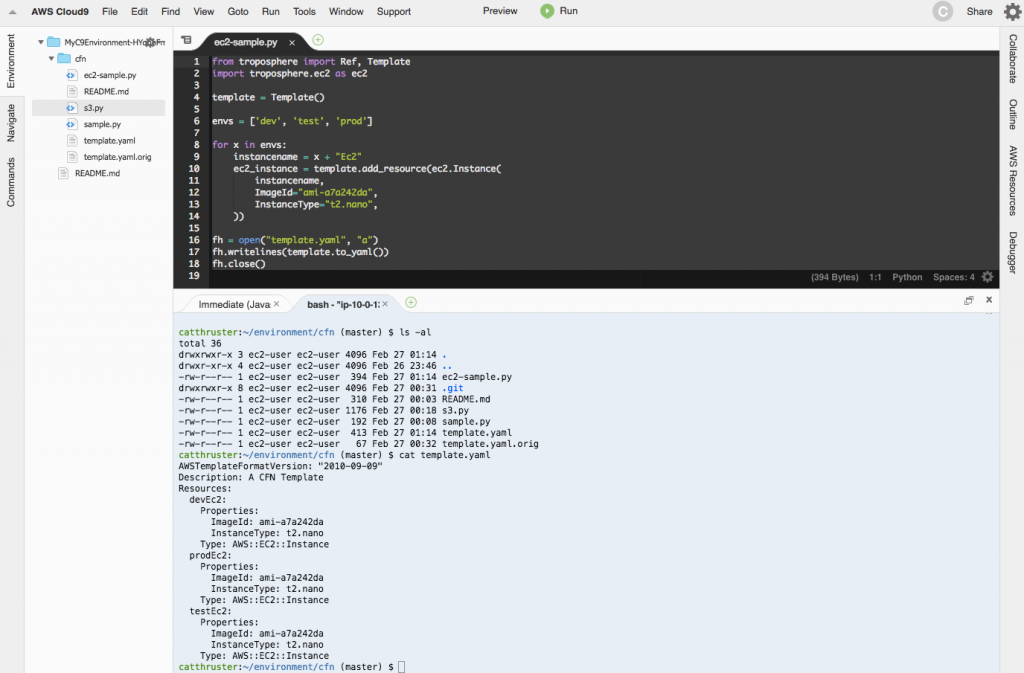
Figure 7. A sample Python file using Troposphere to generate a CloudFormation YAML code snippet.
The resulting YAML file is ready for us to use with CloudFormation. You can either list the file and copy and paste its contents to a local YAML file to upload to CloudFormation, or push it back to your CodeCommit repo and pick up the file from there.
Cleaning up
Now that the sample exercise is completed, I’ll clean up all the resources I’ve created. But first, I’ll probably want to keep the files in my CodeCommit repository for future reference. Since removing the initial stack will remove my AWS Cloud9 environment and CodeCommit repository, I’ll clone my repository locally so I can keep the files I’ve created. To do so, I’ll go to the AWS IAM console and create HTTPS Git credentials for my user account. You can find this option after you choose your user, then choose the Security Credentials tab. Scroll down, and choose the Generate button, as shown in Figure 8. Grab the resulting username and password, and clone your repository locally. To find the URL, open the CodeCommit console, select your repository, and choose the Connect button. This will give you the URL and the Git clone command to enter locally.

Figure 8. Generating Git credentials so you can copy the sample files from your repository to your local machine.
After the files are copied down, go back to the CloudFormation console and delete the sample stack you created from the Troposphere-generated YAML code, as well as the stack that created your AWS Cloud9 environment and CodeCommit repository. You can delete both stacks in parallel since they don’t depend on each other. Also, note that the additional stack that was created to generate your Amazon EC2 instance will be removed as well.
Bonus Tip: Increasing your AWS Cloud9 storage space
While coding on your EC2-backed AWS Cloud9 instance, you may run out of the default 8GB storage space in your connected EBS volume. You can expand the space by following these steps:
- On the AWS Cloud9 IDE, switch to a bash terminal session, and enter the
df -kcommand. You should see the default 8GB disk size under the1K-blockscolumn. This is the value you will change in this procedure. - Close your Cloud9 session, then go to the EC2 console and stop the EC2 instance used by your environment. Its name should have the prefix “
aws-cloud9-YourResourceName-0a0b…”. In the template listed earlier, the prefix is “aws-cloud9-MyC9Environment-0a0b…”. - Wait until the instance state is displayed as stopped, and then choose Volumes from the Elastic Block Store submenu on the left side of the page.
- Choose your volume, and then choose Modify Volume from the Actions menu above the instance list.
- Enter a number larger than 8 in the Size field (for example, 16 corresponds to 16GB, which will double your storage).
- Choose the Modify button and accept the changes.
- Refresh the page a few times, and you will see the state of the volume changing to in-use – optimizing. Continue to refresh the page until the state of the volume changes to in-use – completed (100%).
- Return to the AWS Cloud9 console, and choose Open IDE to start your environment. It will recognize that the instance is stopped, and it will restart the instance and connect to it.
- Run
df -kagain to verify that the space is allocated. In the earlier example, you should see the 16GB size of your disk under the1K-blockscolumn, and yourUse %should be updated to reflect the larger size.
Summary
Setting up a robust browser-based development environment with CloudFormation, AWS Cloud9, and CodeCommit is fast and easy. Using tools like Boto3 and Troposphere, you can use AWS SDK APIs and generate CloudFormation code in YAML from Python just as quickly. There are other ways to use high-level languages like Python to generate CloudFormation code. Other public projects target other languages like Ruby, JavaScript, and Go.
Finally, I should note that we only covered a few of the features of AWS Cloud9 in this blog post. Using AWS Cloud9 you can edit remote files, enable live pair programming, and perform debugging with breakpoints, and show variable values as the program runs. You can clone additional repositories and work on multiple projects from a single AWS Cloud9 environment. There are many additional configuration options, accessible by using the Settings menu or by choosing the gear icon on the right edge of the top menu bar. For more information on AWS Cloud9 features, see the AWS Cloud9 documentation.
I encourage you to experiment with other AWS Cloud9 features, as well as other projects that allow you to use high-level languages to author CloudFormation templates. It is likely that you’ll discover new ideas to help you improve your infrastructure code and your automation options.
About the Author
 |
Luis Colon is a Senior Developer Advocate for the AWS CloudFormation team. He works with customers and internal development teams to focus on and improve the developer experience for CloudFormation users. In his spare time, he mixes progressive trance music. You can reach him via @luiscolon1 on Twitter. |