AWS News Blog
How To Purchase an EC2 Reserved Instance
Update: You can now make this purchase using the AWS Management Console. Click here to learn more.
I thought that it would be worthwhile to outline the steps needed to purchase an EC2 Reserved Instance. Here’s what you need to do:
- Choose a Region.
- Choose an Availability Zone.
- Locate the Reserved Instance offering.
- Make the purchase.
- Enjoy.
This blog post assumes that you have the latest version of the EC2 Command Line tools installed and that you have set the proper environment variables (JAVA_HOME, EC2_HOME, EC2_PRIVATE_KEY, and EC2_CERT) All commands are to be typed in to a Windows Command (cmd.exe) window.
Choose a Region
Per the announcement, you can now purchase Reserved Instances in either the US or in Europe. If you already have an EC2 instance running in a particular region and you want to convert it to a reserved instance, then choose that region. Otherwise, choose the region that is best suited to your needs over the term (1 year or 3 year) of the Reserved Instance.
Based on your chosen region, set your EC2 endpoint appropriately:
US:

Europe:

Choose an Availability Zone
If you already have an On-Demand instance running and you want to convert it to a Reserved Instance, or if you have an EBS volume in a particular Availability Zone, then your choice is clear. You can use the ec2-describe-instances command to figure out the availability zone and instance type if necessary. In the screen shot below, I have highlighted the instance type in yellow and the availability zone in purple to make it clear where to find them:

Locate The Reserved Instance Offering
Now that you know the instance type and Availability Zone, you need to decide if you want to purchase a Reserved Instance for 1 year or for 3 years. You can consult the EC2 Pricing Chart and make a decision based on your needs. Considerations might include the expected lifetime of your site or application, plans for growth, degree of variability expectd in your usage patterns, and so forth.
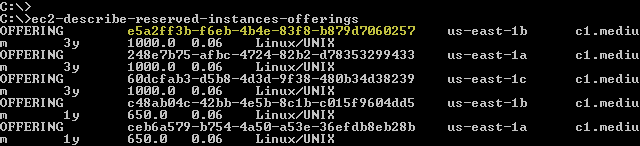
The next step is to run ec2-describe-reserved-instances-offerings and select the appropriate offering. Each offering is identified by an alphanumeric id such as e5a2ff3b-f6eb-4b4e-83f8-b879d7060257 (highlighted in yellow below):
You can also get fancy and run a search pipeline. Here’s how I found an m1.small instance in us-east-1a with a 1 year term:

Make the Purchase
The next step is to actually make the purchase using ec2-purchase-reserved-instances-offering. This command requires an offering id from the previous step and an instance count, allowing purchase of more than one reserved instance at a time. Needless to say, you should use this command with caution since you are spending hundreds or thousands of dollars! Here’s what happened when I made the purchase:

Enjoy
Since I already had an instance running, all further instance hours that it consumes will be billed at the lower rate. As of this fall three of my five offspring will be in college ( Washington, Maryland, and Rochester), so the extra pennies per hour will definitely come in handy!
— Jeff;