← Introduction and Part 1: Amazon EBS
Post by: Tiffany Jernigan and Jeremy Cowan
Introduction
This is the second post in a series showing how to use Docker volumes with Amazon ECS. If you are unfamiliar with Docker volumes or REX-Ray, or want to know how to use a volume plugin with ECS and Amazon Elastic Block Store (Amazon EBS), see Part 1.
In this post, you use the REX-Ray EFS plugin with Amazon Elastic File System (Amazon EFS) to persist and share data among multiple ECS tasks. To help you get started, we have created an AWS CloudFormation template that builds a two-instance ECS cluster across two Availability Zones.
The template bootstraps the REX-Ray EFS plugin onto each node. Each instance has the REX-Ray EFS plugin installed, is assigned an IAM role with an inline policy with permissions for REX-Ray to issue the necessary AWS API calls, and a security group to open port 2049 for EFS. The template also creates a Network Load Balancer that is used to expose an ECS service to the internet.
Set up the environment
First, create a folder in which you create all files and enter it. Next, set the full path for your EC2 key pair that you need later to connect to your instance using SSH.
#example path /Users/tiffany/.aws/ec2-keypair.pem
export KeyPairPath=<your-keypair>
Step 1: Instantiate the CloudFormation template
Next, create a CloudFormation stack with the following S3 template:
rexray-demo-efs.yaml
KeyPairName=$(echo $KeyPairPath | cut -d / -f5 | sed 's/.pem//')
Region=$(aws configure get region) #You can also replace this
CloudFormationStack=$(aws cloudformation create-stack \
--region $Region \
--stack-name rexray-demo-efs \
--capabilities CAPABILITY_NAMED_IAM \
--template-url http://s3.amazonaws.com/ecs-refarch-volume-plugins/rexray-demo-efs.yaml \
--parameters ParameterKey=KeyName,ParameterValue=$KeyPairName \
| jq -r .StackId)
The ECS container instances are bootstrapped with a user data script that installs the rexray/efs Docker plugin using:
docker plugin install rexray/efs REXRAY_PREEMPT=true \
EFS_REGION=${AWS::Region} \
EFS_SECURITYGROUPS=${EFSSecurityGroup} \
--grant-all-permissions
Step 2: Export output parameters as environment variables
This shell script exports the output parameters from the CloudFormation template. With the following command, import them as OS environment variables. Later, you use these variables to create task and service definitions.
cat > get-outputs.sh << 'EOF'
#!/bin/bash
function usage {
  echo "usage: source <(./get-outputs.sh  )"
  echo "stack name or ID must be provided or exported as the CloudFormationStack environment variable"
  echo "region must be provided or set with aws configure"
}

function main {
    #Get stack
    if [ -z "$1" ]; then
        if [ -z "$CloudFormationStack" ]; then
            echo "please provide stack name or ID"
            usage
            exit 1
        fi
    else
        CloudFormationStack="$1"
    fi
    #Get region
    if [ -z "$2" ]; then
        region=$(aws configure get region)
        if [ -z $region ]; then
            echo "please provide region"
            usage
            exit 1
        fi
    else
        region="$2"
    fi

    echo "#Region: $region"
    echo "#Stack: $CloudFormationStack"
    echo "#---"

    echo "#Checking if stack exists..."
    aws cloudformation wait stack-exists \
    --region $region \
    --stack-name $CloudFormationStack

    echo "#Checking if stack creation is complete..."
    aws cloudformation wait stack-create-complete \
    --region $region \
    --stack-name $CloudFormationStack

    echo "#Getting output keys and values..."
    echo "#---"
    aws cloudformation describe-stacks \
    --region $region \
    --stack-name $CloudFormationStack \
    --query 'Stacks[].Outputs[].[OutputKey, OutputValue]' \
    --output text | awk '{print "export", $1"="$2}'
}
main "$@"
EOF
#Add executable permissions
chmod +x get-outputs.sh
Now run the script:
./get-outputs.sh && source <(./get-outputs.sh)
Step 3: Create a task definition
In this step, you create a task definition for an Apache web service, Space, which is an example website using Apache2 on Ubuntu. The scheduler and the REX-Ray EFS plugin ensure that each copy of the task establishes a connection with EFS.
cat > space-taskdef-efs.json << EOF
{
    "containerDefinitions": [
        {
            "logConfiguration": {
                "logDriver": "awslogs",
                "options": {
                    "awslogs-group": "${CWLogGroupName}",
                    "awslogs-region": "${AWSRegion}",
                    "awslogs-stream-prefix": "ecs"
                }
            },
            "portMappings": [
               {
                    "containerPort": 80,
                    "protocol": "tcp"
                }
            ],
            "mountPoints": [
                {
                    "containerPath": "/var/www/",
                    "sourceVolume": "rexray-efs-vol"
                }
            ],
            "image": "tiffanyfay/space:apache",
            "essential": true,
            "name": "space"
        }
    ],
    "memory": "512",
    "family": "rexray-efs",
    "networkMode": "awsvpc",
    "requiresCompatibilities": [
        "EC2"
    ],
    "cpu": "512",
    "volumes": [
        {
            "name": "rexray-efs-vol",
            "dockerVolumeConfiguration": {
                "autoprovision": true,
                "scope": "shared",
                "driver": "rexray/efs"
            }
        }
    ]
}
EOF
Because autoprovision is set to true, the Docker volume driver, rexray/efs, creates a new file system for you. And because scope is shared, the file system can be used across multiple tasks.
Register the task definition and extract the task definition ARN from the result:
TaskDefinitionArn=$(aws ecs register-task-definition \
--region $AWSRegion \
--cli-input-json 'file://space-taskdef-efs.json' \
| jq -r .taskDefinition.taskDefinitionArn)
Step 4: Create a service definition
In this step, you create a service definition for the rexray-efs task definition. An ECS service is a long-running task that is monitored by the service scheduler. If the task dies or becomes unhealthy, the scheduler automatically attempts to restart the task.
The web service is fronted by a Network Load Balancer that is configured for forward traffic on port 80 to the tasks registered with a specific target group. The desired count is the desired number of task copies to run. The minimum and maximum healthy percent parameters inform the scheduler to run only exactly the number of desired copies of this task at a time. Unless a task has been stopped, it does not try starting a new one.
cat > space-svcdef-efs.json << EOF
{
    "cluster": "${ECSClusterName}",
    "serviceName": "space-svc",
    "taskDefinition": "${TaskDefinitionArn}",
    "loadBalancers": [
        {
            "targetGroupArn": "${WebTargetGroupArn}",
            "containerName": "space",
            "containerPort": 80
        }
    ],
    "desiredCount": 4,
    "launchType": "EC2",
    "healthCheckGracePeriodSeconds": 60,
    "deploymentConfiguration": {
        "maximumPercent": 100,
        "minimumHealthyPercent": 0
    },
    "networkConfiguration": {
        "awsvpcConfiguration": {
            "subnets": [
                "${SubnetIds}"
            ],
            "securityGroups": [
                "${EFSSecurityGroupId}",
                "${InstanceSecurityGroupId}"
            ]
        }
    }
}
EOF
Create the Apache service:
SvcDefinitionArn=$(aws ecs create-service \
--region $AWSRegion \
--cli-input-json file://space-svcdef-efs.json \
| jq -r .service.serviceArn)
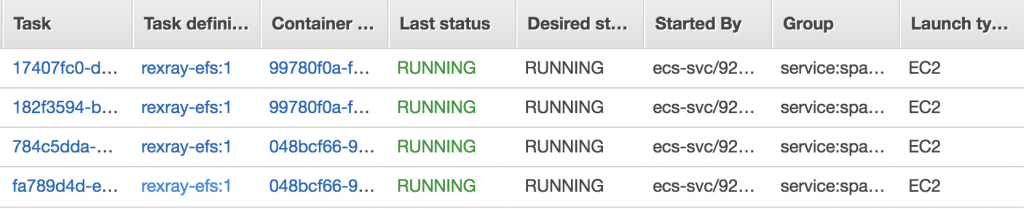
Wait for service to be up with the last status as RUNNING for the tasks using either the CLI or the console:
aws ecs wait services-stable \
--region $AWSRegion \
--cluster $ECSClusterName \
--services $SvcDefinitionArn
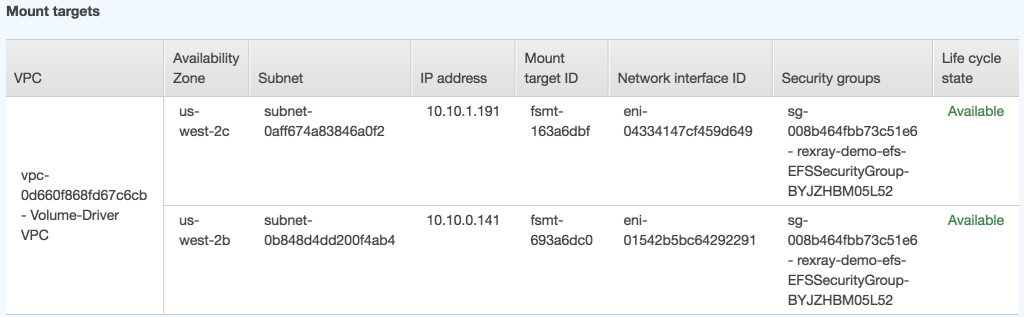
Next, look at your file system and see two mount points—one for each Availability Zone:
FileSystemId=$(aws efs describe-file-systems \
--region $AWSRegion \
--query 'FileSystems[?Name==`/rexray-efs-vol`].FileSystemId' \
--output text)
aws efs describe-mount-targets \
--region $AWSRegion \
--file-system-id $FileSystemId 
Step 5: View the webpage
Now, open a browser and paste NLBDNSName as the URL.
If you refresh the page, you can see that the task ID and EC2 instance ID change as the traffic is being load balanced.
Get the DNS info for an instance so that you can connect to it using SSH and modify index.shtml:
InstanceDns=$(aws ec2 describe-instances \
--region $AWSRegion \
--filter Name="tag:aws:cloudformation:stack-id",Values="$CloudFormationStack" \
--query 'Reservations[1].Instances[].PublicDnsName' \
--output text)
ssh -i $KeyPairPath ec2-user@$InstanceDns
Now, get one of the Docker container IDs and use docker exec to change the image being displayed:
ContainerId=$(docker ps --filter volume="rexray-efs-vol" \
--format "{{.ID}}" --latest)
docker exec -it $ContainerId sed -i "s/ecsship/cruiser/" /var/www/index.shtml
To see the update, refresh the load balancer webpage.
Step 6: Clean up
To clean up the resources that you created in this post, take the following steps.
Delete the mount targets and file system.
FileSystemId=$(aws efs describe-file-systems \
--region $AWSRegion \
--query 'FileSystems[?Name==`/rexray-efs-vol`].FileSystemId' \
--output text)
MountTargetIds=($(aws efs describe-mount-targets \
--region $AWSRegion \
--file-system-id $FileSystemId \
--query 'MountTargets[].MountTargetId' --output text))
aws efs delete-mount-target --region $AWSRegion \
--mount-target-id ${MountTargetIds[2]}
aws efs delete-mount-target --region $AWSRegion \
--mount-target-id ${MountTargetIds[1]}
aws efs delete-file-system --region $AWSRegion \
--file-system-id $FileSystemId
Delete the service.
aws ecs update-service \
--region $AWSRegion \
--cluster $ECSClusterName \
--service $SvcDefinitionArn \
--desired-count 0
aws ecs delete-service \
--region $AWSRegion \
--cluster $ECSClusterName \
--service $SvcDefinitionArn
Delete the CloudFormation template. This removes the rest of the environment that was pre-created for this exercise.
aws cloudformation delete-stack --region $AWSRegion \
--stack-name $CloudFormationStack
Summary
Congratulations on getting your service up and running with Docker volume plugins and EFS!
You have created a CloudFormation stack including two instances, running the REX-Ray EFS plugin, across two subnets, a Network Load Balancer, as well as an ECS cluster. You also created a task definition and service which used the plugin to create an elastic filesystem.
We look forward to hearing about how you use Docker Volume Plugins with ECS.
– Tiffany and Jeremy