Containers
A multi-cluster shared services architecture with Amazon EKS using Cilium ClusterMesh
Introduction
Over the past couple of years, organizations have increased their pace of Kubernetes adoption. They want to be more agile so they can innovate and deliver new products to the market more efficiently. Among many of the early adopters of the Kubernetes platform, it was not uncommon to operate a single large Kubernetes cluster hosting multiple “tenants” and often multiple environments. Managed services like Amazon Elastic Kubernetes Service (Amazon EKS) help customers offload the onerous task of managing the Kubernetes control plane. As a result, customers are more inclined to provisioning multiple clusters because they provide better isolation between tenants. As clusters proliferate, there is an increasing need for better tooling to manage deployments to multiple clusters and enable inter-cluster communications. There are a few open source tools available today that were built to enable cross-cluster connectivity between Kubernetes clusters, namely, Submariner, Istio, and Cilium.
Submariner enables network connectivity between multiple Kubernetes clusters and provides support for several CNI plugins. Submariner’s architecture requires one of the clusters to be designated as the central broker, which is responsible for disseminating metadata about the participating clusters. Each cluster relies on a central gateway engine to handle all cross-cluster traffic and a routing agent running on each worker node in the cluster that routes cross-cluster traffic to this gateway. Service discovery across clusters requires the use of a special domain name and is enabled by a Lighthouse DNS server that runs alongside CoreDNS.
An Istio service mesh can be configured to include multiple clusters. The service mesh orchestrates communication between workload instances across clusters within the mesh. Depending upon the network topology employed, workload instances in the clusters can reach each other either directly or require the use of an Istio gateway. In addition, several deployment models are supported depending on the number of Istio control planes used by the mesh.
Cilium provides network connectivity between applications deployed using Linux container management platforms like Docker and Kubernetes. At its core is the Linux kernel technology called eBPF, which enables the dynamic insertion of programming logic into the Linux kernel. Cilium is available as a commercially supported Kubernetes CNI plugin that can be used as an alternative to the AWS VPC CNI plugin on an Amazon EKS cluster. ClusterMesh is Cilium’s multi-cluster implementation that is built on top of Cilium CNI. It enables users to set up cross-cluster connectivity with standard Kubernetes semantics for transparent service discovery. Each cluster in the mesh participates as a peer. Cross-cluster traffic is handled by individual nodes rather than using a central gateway. The only requirement is that nodes in all clusters have IP connectivity between each other.
In this blog post, we will walk through the details of implementing a Cilium ClusterMesh with two or more Amazon EKS clusters. We will then implement a use case where one cluster hosts services that provide access to a backend data store. A second cluster hosts services that makes use of the latter using standard Kubernetes APIs. This use case demonstrates a shared services architecture in which an EKS cluster hosts common services that could be shared across multiple tenant clusters.
Container networking at a glance
kube-proxy
Kubernetes uses the service abstraction to expose an application running on a set of pods as a network service. Each pod is represented by an endpoint, which is a combination of a pod IP and port. The kube-proxy daemonset that runs on every node of a cluster is responsible for implementing a form of virtual IP for services called cluster IP. At the core of container networking in Kubernetes are iptables. For each service, kube-proxy installs iptables rules on the node, which capture traffic destined for the service’s virtual IP and port, and redirect it to one of the endpoints associated with the service.
The iptables work by interacting with the packet filtering hooks called netfilters in the Linux kernel’s networking stack. The netfilter framework provides 5 hooking points, namely, PRE_ROUTING, INPUT, FORWARD, OUTPUT, and POST_ROUTING, which represent various well-defined points in the networking stack. At each hooking point, rules are organized into different tables, namely, RAW, MANGLE, NAT, FILTER, and SECURITY. The path taken by a packet through the networking stack is depicted in the figure shown below.
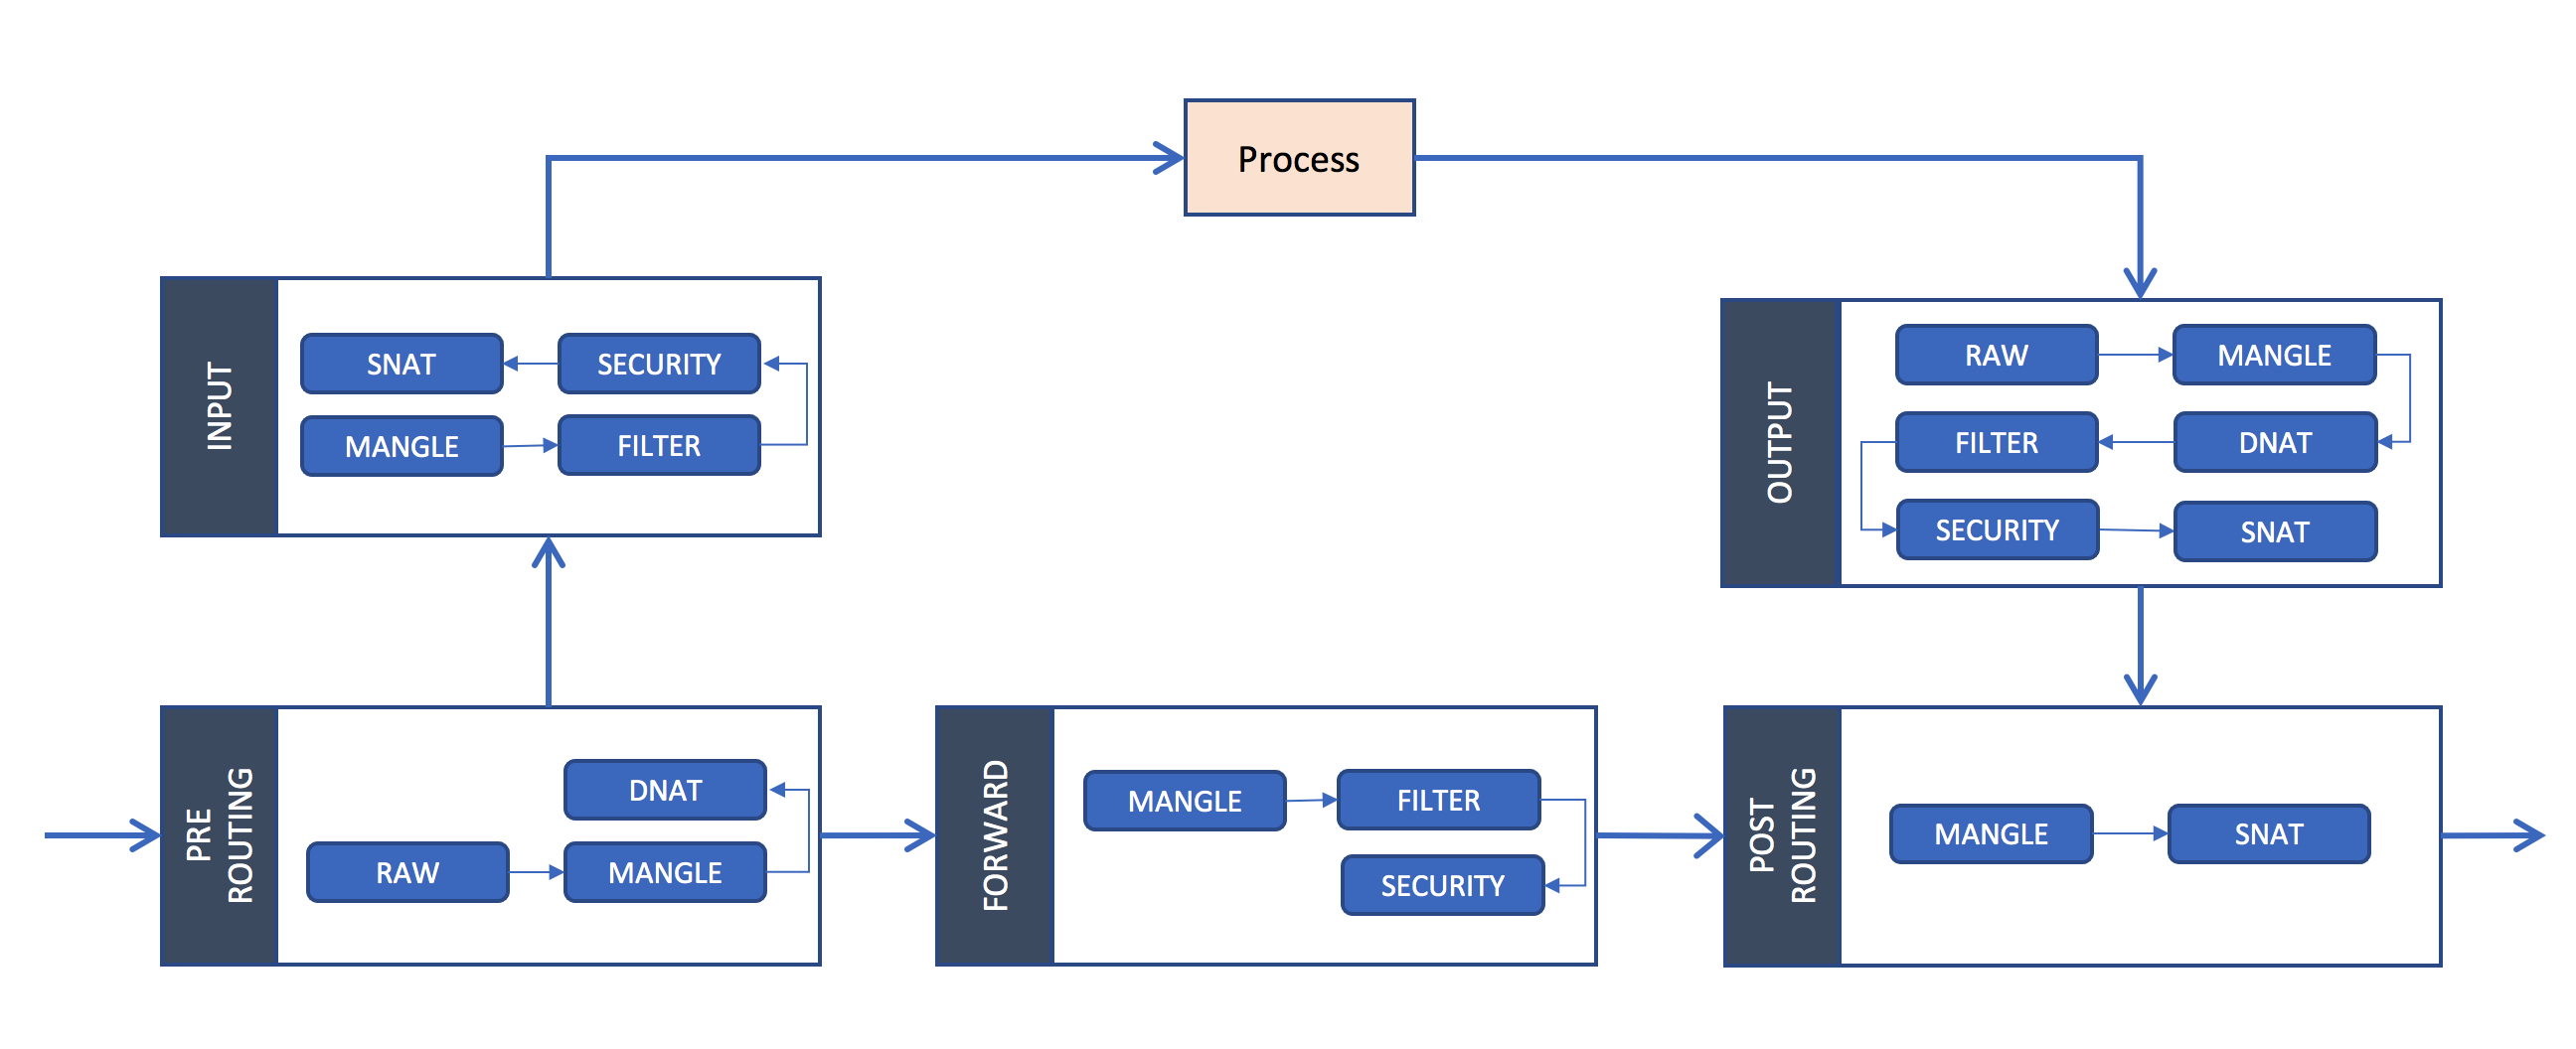
Note that not every table provides rules at every hooking point. The following is a representative example of rule chains in the NAT table enforced at the PRE_ROUTING hooking point that help select at random one of the two backend pods associated with a service. A routing decision is made after the PRE_ROUTING hooking point. Depending upon whether the selected pod is on the same host or on a remote host, the rules defined within the tables at the INPUT or FORWARD hooking point are executed next.
POD_CIDR=10.0.0.0/16
CLUSTER_IP=172.20.17.66/32
POD1_IP=10.0.11.35/32
POD2_IP=10.0.12.67/32
PORT=8080

KUBE-SERVICES ! -s $POD_CIDR -d $CLUSTER_IP -p tcp -m tcp --dport $PORT -j KUBE-MARK-MASQ
KUBE-SERVICES -d $CLUSTER_IP -p tcp -m tcp --dport $PORT -j KUBE-SVC-WEBAPP
KUBE-SVC-WEBAPP -m statistic --mode random --probability 0.50000000000 -j KUBE-SEP-WEBAPP1
KUBE-SVC-WEBAPP -j KUBE-SEP-WEBAPP2
KUBE-SEP-WEBAPP1 -s $POD1_IP -j KUBE-MARK-MASQ
KUBE-SEP-WEBAPP1 -p tcp -m tcp -j DNAT --to-destination $POD1_IP:$PORT
KUBE-SEP-WEBAPP2 -s $POD2_IP -j KUBE-MARK-MASQ
KUBE-SEP-WEBAPP2 -p tcp -m tcp -j DNAT --to-destination $POD2_IP:$PORT
Cilium with eBPF
Similar to the netfilter hooks, the Linux kernel supports another packet processing framework that uses BPF (Berkeley Packet Filter) hooks. Cilium uses these hooks to load and execute eBPF (Extended BPF) programs within the kernel when the kernel or an application passes a certain hook point. Predefined hooks include system calls, network events, traffic control (TC) ingress/egress, and several others. For in-depth technical details about how eBPF works, please refer to the BPF and XDP Reference Guide as well as the eBPF documentation. In a Kubernetes cluster, each pod is assigned its own network namespace and is connected to the host network namespace using a virtual device called veth pair. Network traffic enters/exists a pod through this veth pair. By attaching eBPF programs to these virtual devices as well as to the primary network interface on the host, Cilium monitors and enforces policies on all traffic entering or exiting the pods as well as the host.
The figure below illustrates how Cilium handles the traffic flow when a client pod on a host sends a request to a ClusterIP service. Cilium makes use of an agent that runs on each node of the cluster which watches for events from the Kubernetes API server pertaining to service and endpoint objects and updates a set of eBPF maps on the node. When a client pod tries to connect to a ClusterIP service, an eBPF program attached to the TC hook on virtual device connecting the client pod to its host executes. It looks up the service IP in the eBPF map which provides load-balancing configuration, selects one of the end points associated with the service and changes the destination IP/port in the network packet to that of the selected endpoint. When handling the response from the pod, the eBPF program attached to the TC hook on the primary interface on the host executes, and changes the source IP/port to that of the ClusterIP service. That, in a nutshell, is how Cilium CNI works without the need for iptables. Liberating Kubernetes from kube-proxy and iptables, a presentation by Martynas Pumputis at KubeCon 2019, gives a comprehensive overview of how Cilium handles traffic routing using eBPF in several other scenarios in a Kubernetes cluster.

Cilium ClusterMesh
ClusterMesh is Cilium’s multi-cluster implementation that provides the following features:
- Inter-cluster pod-to-pod connectivity without gateways or proxies.
- Transparent service discovery across clusters using standard Kubernetes services and CoreDNS.
- Network policy enforcement across clusters.
- Encryption in transit between nodes within a cluster as well as across cluster boundaries.
The control plane of a Kubernetes cluster remains completely agnostic of the cluster mesh and only manages the resources within that cluster. Workloads deployed to a cluster in a mesh do not behave any differently from those that are deployed to a standalone cluster. The following Cilium components should be deployed on each cluster in a mesh.
- Cilium etcd operator manages an etcd key-value data store which contains the state of that cluster. The etcd pods are exposed using an internal load balancer which is accessible from other clusters, providing read-only access to each cluster’s state. The data store does not use any persistent storage. If this etcd cluster looses quorum, it will be automatically recreated by the operator. Subsequently, Cilium will automatically recover and recreate all state in etcd.
- Cilium operator is responsible for synchronizing the state of Kubernetes objects such as services, endpoints to the etcd data store as well as handling IP address management (IPAM).
- Cilium agent is deployed as a daemonset. This is the Cilium CNI plugin. It watches for events from the Kubernetes control plane to learn when pods are started/stopped and manages the eBPF programs which are used to control all network traffic ingress and egress out of those pods. The agent also connects to the Cilium etcd data store in other clusters to retrieve relevant state information required to setup the cluster mesh.
Pod IP routing in a Cilium cluster mesh can be enabled in three modes, namely, tunneling (default), direct-routing, and hybrid-routing. For the implementation in this blog, we will be using the tunneling mode which has the fewest requirements on the underlying networking infrastructure. In this mode, the pod IPs are not routable on the underlying network which only sees the IP addresses of the worker nodes. Cilium agent on each node discovers PodCIDRs allocated to other worker nodes across all clusters in the mesh and maintains a mapping of PodCIDR → node. The nodes thus form a mesh of tunnels that encapsulate the network packets emitted by the pods using a VXLAN header. Cilium sets up a virtual interface named cilium_vxlan on each on each worker node to handle encapsulation/decapsulation of pod traffic.
The architecture of the cluster mesh is shown below.

ClusterMesh implementation with Amazon EKS
The Amazon EKS clusters to be used in a Cilium ClusterMesh are setup as follows.
- The clusters can be created using any of the methods outlined under Creating an Amazon EKS cluster. For the implementation in this blog, Kubernetes version 1.19 was used.
- The worker nodes can be provisioned using either a managed node group or self-managed nodes. The clusters will be using Cilium’s eBPF replacement for kube-proxy which has specific requirements on the Linux kernel. Hence, the latest EKS optimized Amazon Linux AMI (version 1.19.6, Kernel version 5.4) was used to launch the worker nodes.
- Security groups assigned to worker nodes should be configured to allow VXLAN traffic over UDP as documented under Firewall Rules.
- The clusters are provisioned in two VPCs with non-overlapping CIDRs, 192.168.0.0/20 and 192.168.16.0/20, with a VPC peering connection setup to enable nodes in the two clusters have IP connectivity between each other.
- The clusters are assigned non-overlapping PodCIDRs, 10.1.0.0/16 and 10.2.0.0/16.
Here is the sequence of steps executed to setup a mesh between these two EKS clusters.
1. Create the cluster
2. As this cluster will be using Cilium CNI with eBPF replacement for kube-proxy, we will have to first delete aws-node and kube-proxy daemonsets. An alternative to deleting these daemonsets is to disable them reversibly by using node selector that does not match any nodes in the cluster. This is done with the following commands:
kubectl patch daemonset aws-node -n kube-system -p '{"spec":{"template":{"spec":{"nodeSelector":{"no-such-node": "true"}}}}}'
kubectl patch daemonset kube-proxy -n kube-system -p '{"spec":{"template":{"spec":{"nodeSelector":{"no-such-node": "true"}}}}}'
3. Next, we will have to scale the CoreDNS deployment down to 0 replicas.
kubectl scale deployment coredns --replicas=0 -n kube-system4. Launch the worker nodes of the cluster. For this implementation, we will launch two worker nodes in each cluster using m5.large instance type.
5. Install Cilium with Helm. Each cluster in the mesh is assigned a unique ID and name with the cluster.id and cluster.name parameters. The ipam.mode parameter configures Cilium to operate in cluster-scope mode which assigns per-node PodCIDR to each node and delegates pod IP address allocation to each individual node in the cluster. The ipam.operator.clusterPoolIPv4PodCIDR and ipam.operator.clusterPoolIPv4MaskSize parameters are used to specify the CIDR for cluster’s pods and the CIDR size that should be allocated for each node. In this case, with the latter set to 24, each node will be able to accommodate up to 256 pods. The parameters kubeProxyReplacement, k8sServiceHost and k8sServicePort will install Cilium as a CNI plugin with the eBPF kube-proxy replacement to implement handling of Kubernetes services of type ClusterIP, NodePort, LoadBalancer, and services with externalIPs.
helm repo add cilium https://helm.cilium.io/
helm repo update
helm install cilium cilium/cilium --version 1.9.5 \
  --set cluster.id=1 \
  --set cluster.name=k8s-test-cluster \
  --set eni=false \
  --set tunnel=vxlan \
  --set ipam.mode=cluster-pool \
  --set ipam.operator.clusterPoolIPv4PodCIDR="10.1.0.0/16" \
  --set ipam.operator.clusterPoolIPv4MaskSize=24 \
  --set kubeProxyReplacement=strict \
  --set k8sServiceHost=3F03327575BBD58507B2585763830F0B.gr7.us-west-2.eks.amazonaws.com \
  --set k8sServicePort=443 \
  -n kube-system
6. After all the Cilium pods (agent and cilium-operator) have transitioned to a ready state, the CoreDNS deployment is scaled out.
kubectl scale deployment coredns --replicas=2 -n kube-system7. Following the above steps, Cilium will be set up to use Kubernetes Custom Resource Definitions (CRDs) to store and propagate cluster state between agents. For cluster mesh, we will have to update the deployment to use an etcd data store for storing cluster state.
helm upgrade cilium cilium/cilium --version 1.9.5 \
  --set etcd.enabled=true \
  --set etcd.managed=true \
  --set etcd.k8sService=true \
  --set identityAllocationMode=kvstore \
  -n kube-system
8. It takes a few of minutes for the cilium-etcd-operator to bring up the necessary number of etcd pods to achieve quorum. After the etcd pods transition to a Ready state, they must be exposed to other clusters in the mesh. This can be done by deploying a service of type LoadBalancer using the YAML manifest shown below. This will launch an internal-facing Network Load Balancer that is reachable over a VPC peering connection.
#
# The service is named "cilium-etcd-external" even though it provisions an internal load balancer
# A helper script used in a next step specifically looks for a service with that name.
# So it is best not to rename this service
#
---
apiVersion: v1
kind: Service
metadata:
  name: cilium-etcd-external
  namespace: kube-system
  annotations:
    service.beta.kubernetes.io/aws-load-balancer-internal: 0.0.0.0/0
    service.beta.kubernetes.io/aws-load-balancer-type: "nlb"
spec:
  type: LoadBalancer
  ports:
  - port: 2379
  selector:
    app: etcd
    etcd_cluster: cilium-etcd
    io.cilium/app: etcd-operator
9. The above steps 1-8 are repeated for the second cluster. Step 5 is the only one that needs to be modified with the corresponding cluster ID, name, PodCIDR and API server host name.
10. All that remains now is to make the Cilium agents communicate with the etcd data stores in the remote cluster. The agents will use the DNS naming convention {cluster.name}.mesh.cilium.io to connect to etcd. In order for DNS resolution to work, these virtual host names should be statically mapped to the IP addresses associated with the Network Load Balancer fronting the etcd pods. In order for TLS communication to work, the Cilium agent also needs access to the keys and certificates associated with the remote etcd. Cilium provides a set of helper scripts to facilitate these tasks. Running these scripts will generate a YAML manifest for a Kubernetes secret as well as a YAML fragment that can be used to patch the Cilium agent daemonset with the host aliases for DNS resolution, both show below.
#
# clustermesh.yaml
# File generated by running the helper scripts extract-etcd-secrets.sh and generate-secret-yaml.sh in that order
# This contains the keys and certificates for every Cilium etcd store in the cluster
#
apiVersion: v1
kind: Secret
metadata:
  creationTimestamp: null
  name: cilium-clustermesh
data:
  k8s-shared-cluster: ZW5kcG9pbnRzOgotIGh0dHBzOi8vazhzLXNoYXJlZC1jbHVzdGVyLm1lc2guY2lsaXVtLmlvOjIzNzkKdHJ1c3RlZC1jYS1maWxlOiAnL3Zhci9saWIvY2lsaXVtL2NsdXN0ZXJtZXNoL2s4cy1zaGFyZWQtY2x1c3Rlci5ldGNkLWNsaWVudC1jYS5jcnQnCmtleS1maWxlOiAnL3Zhci9saWIvY2lsaXVtL2NsdXN0ZXJtZXNoL2s4cy1zaGFyZWQtY2x1c3Rlci5ldGNkLWNsaWVudC5rZXknCmNlcnQtZmlsZTogJy92YXIvbGliL2NpbGl1bS9jbHVzdGVybWVzaC9rOHMtc2hhcmVkLWNsdXN0ZXIuZXRjZC1jbGllbnQuY3J0Jwo=
  k8s-shared-cluster.etcd-client-ca.crt: LS0tLS1CRUdJTiBDRVJUSUZJQ0FURS0tLS0tCk1JSUR4RENDQXF5Z0F3SUJBZ0lVSlZsa3gvMVJCZ2JmZ2o3Sm5WN0lITHV1Wm4wd0RRWUpLb1pJaHZjTkFRRUwKQlFBd2VqRUxNQWtHQTFVRUJoTUNWVk14RmpBVUJnTlZCQWdURFZOaGJpQkdjbUZ1WTJselkyOHhDekFKQmdOVgpCQWNUQWtOQk1SZ3dGZ1lEVlFRS0V3OU5lU0JEYjIxd1lXNTVJRTVoYldVeEV6QVJCZ05WQkFzVENrOXlaeUJWCmJtbDBJREV4RnpBVkJnTlZCQU1URGtOcGJHbDFiUzFsZEdOa0lFTkJNQjRYRFRJeE1EUXlNREF6TXprd01Gb1gKRFRJMk1EUXhPVEF6TXprd01Gb3dlakVMTUFrR0ExVUVCaE1DVlZNeEZqQVVCZ05WQkFnVERWTmhiaUJHY21GdQpZMmx6WTI4eEN6QUpCZ05WQkFjVEFrTkJNUmd3RmdZRFZRUUtFdzlOZVNCRGIyMXdZVzU1SUU1aGJXVXhFekFSCkJnTlZCQXNUQ2s5eVp5QlZibWwwSURFeEZ6QVZCZ05WQkFNVERrTnBiR2wxYlMxbGRHTmtJRU5CTUlJQklqQU4KQmdrcWhraUc5dzBCQVFFRkFBT0NBUThBTUlJQkNnS0NBUUVBdEN1a0tlcjhEMytlcFBRZm8zRUhIN1lyTmpjagppS016czZWYnJ6S1NrZmlXK1RVajc4aml0c2xHLzNwOFZNY1VBZ0VJSlkwaitxM3hwb0pMeVZrLzcwQUNxckxBCkMyZEdDQVJxdkNNek1kdTYxSXBFUFlFNEhpMkh1WnV2Rm53RzVGMVVhSzI3SnppenNSRWUwbi9LNnJVekRYK0oKMlpDNVI5d2kvN2hyS3FsSlZKWFN6TTYxL01FS2pNTERMcUdnNDdVZVZpYzcrUVVkQ0o0Q09sK2wyazN2eDNsNwo1VHNUU3NDbW1BK041UFhSN0ZYWXA1UjVrNGJyUXFXL0VYWVN2U0tFc1QrbjNVSXJnWUNSNW5XN1hOMHh2clhzCmZxczZuT0VLU1Bsd3JJQTNKWVNCRHpqdWRWRjlEbVlsOHdCM3g4TTVxSC9Da09uOHUzZVNDN1M1N1FJREFRQUIKbzBJd1FEQU9CZ05WSFE4QkFmOEVCQU1DQVFZd0R3WURWUjBUQVFIL0JBVXdBd0VCL3pBZEJnTlZIUTRFRmdRVQo4YytBU25yZzFIRkYwZ0d5T3B0UVRhcm96S1F3RFFZSktvWklodmNOQVFFTEJRQURnZ0VCQUpHNFJ6NXpuWUZQCnR0S2tMK3pud2NENWxNZGgyU2diVHM0RmMrR0hiNU1XaWdvVlA2N3VLRk5uTldzNk1XeDdxTDBiU1NQNzhTaFAKVHMzWGtjN0JsQkNBTjZYdzNNekd5WGduMmhJZElDd2p0bkswL2grditzeldIZlJuYnNPMnZ5N2p3ZlRleUtqMApLbzNiY0dSZWtmcXUwSFFtVDdvS3dPcE5TbVZPN1ZBanhpQW5OaHpqRnJaTC91VGhaR0oyUStKQ1ZSZG14TjJxClBiTTY2Zmw0M1hpbEVmOG5qN0hKblpXaEcya1FWREdpMGRwd3F0WGdFc0xNbHcrMzRHTmZONGNtM1JSekdqbWIKWm5TRmxyWjdoV3hQcUJTankvUkN5dTQxeGlIQjlUMGdwNlVNQnpjM3Ivc2pmV2xzZGkrK2twMjBJaUZjN3FrWApuaVNWZFk4UnJXcz0KLS0tLS1FTkQgQ0VSVElGSUNBVEUtLS0tLQo=
  k8s-shared-cluster.etcd-client.crt: LS0tLS1CRUdJTiBDRVJUSUZJQ0FURS0tLS0tCk1JSUQxRENDQXJ5Z0F3SUJBZ0lVQ2JLWXY3WmN5ZDVBMjViYlZ4ZHJXUnk5STlrd0RRWUpLb1pJaHZjTkFRRUwKQlFBd2VqRUxNQWtHQTFVRUJoTUNWVk14RmpBVUJnTlZCQWdURFZOaGJpQkdjbUZ1WTJselkyOHhDekFKQmdOVgpCQWNUQWtOQk1SZ3dGZ1lEVlFRS0V3OU5lU0JEYjIxd1lXNTVJRTVoYldVeEV6QVJCZ05WQkFzVENrOXlaeUJWCmJtbDBJREV4RnpBVkJnTlZCQU1URGtOcGJHbDFiUzFsZEdOa0lFTkJNQjRYRFRJeE1EUXlNREF6TkRBd01Gb1gKRFRJMk1EUXhPVEF6TkRBd01Gb3dTREVMTUFrR0ExVUVCaE1DVlZNeEZqQVVCZ05WQkFnVERWTmhiaUJHY21GdQpZMmx6WTI4eEN6QUpCZ05WQkFjVEFrTkJNUlF3RWdZRFZRUURFd3RsZEdOa0lHTnNhV1Z1ZERDQ0FTSXdEUVlKCktvWklodmNOQVFFQkJRQURnZ0VQQURDQ0FRb0NnZ0VCQUtIeUM1RTdkTGpEZzM1Mmk4amE0U2FkK09JbGdnS0MKU240VENzRlhUYXluNFM2enpaaVRVOHRQaFBRVUFEYUR6Y282U0JjNzhFMG9LeUo3eVI3eEhWc2U1dTJGTjY5awo0NmNqVGpnZkFzdXNzUlQ2Rnc2Rmx1djBCTjRNRzQyNzdqNkU2bzMyRzlhUHB6SjZaSld2L3pkdEYzZ3FUL2ZoCkpsdWZScGROVk52bGJrTHZmbW0zOVA2V2VGUFFGNzVNZURmZWswejU5VTlIYWUyNkR3Q1NZMjMvMGFpYVY1Qm0KYjVWVDFrOE4zcTVackFYa3BhWXhDT09yMDIzdEU1dlU4UW1zVTRWM24rREEyaHgxSk9hVGcvSTh2TE4yRVZ4WApqV0V6Wng2dzV5OXRxcVZWa0FQeExoTDY2T21QeFUxM1psOHFJcDFXZExSRHZhenJ3Zk5mOVVjQ0F3RUFBYU9CCmd6Q0JnREFPQmdOVkhROEJBZjhFQkFNQ0JhQXdFd1lEVlIwbEJBd3dDZ1lJS3dZQkJRVUhBd0l3REFZRFZSMFQKQVFIL0JBSXdBREFkQmdOVkhRNEVGZ1FVMkwyY0FXQzVuNFl1Z01Bc2RSVzlCcG9sN2h3d0h3WURWUjBqQkJndwpGb0FVOGMrQVNucmcxSEZGMGdHeU9wdFFUYXJvektRd0N3WURWUjBSQkFRd0FvSUFNQTBHQ1NxR1NJYjNEUUVCCkN3VUFBNElCQVFBVFNCekpjQlNEU2FadlE1eVJ6bEdjUzd4dDlSajMwamFNMlg1ZWpqRWFxOFF0UU40YUd2c2YKVnphbDB6TFhNbEo0QWs3QVMyS256cWk2VUlVS2ppMnFJZlRwb0oxMnJPTVZyWEREanFORnhrZWl3VHhlb2p1ZApCQnlycGM3Rlo0dXowSnAwMXpZbDNwUlpMZXZKM0Zld24yaVR6cHhoNDhwaXBOaXA0NlN1dzc2MDZnZk5HMUVDCmJFdXZIMVpJL3lEN1FLUGtnaHZsdDRRaHM5dkt4WGp6Q0NDWVJHOE1ybmJ2RG9RRXNsdlZJaVExUUtxQ1dnSVIKK1FDVWcrdHVqbkpxVjN2aVNOdXVrSFFTdnlDYllQR3BYQ2RVcCtlNUtCMHBlN3hFUThSd002VnV4dGFPNmFzZwpyTDh1L3JvMSsySXpmUDNTOVZpOUtFUkN4cDRodXc5TgotLS0tLUVORCBDRVJUSUZJQ0FURS0tLS0tCg==
  k8s-shared-cluster.etcd-client.key: LS0tLS1CRUdJTiBSU0EgUFJJVkFURSBLRVktLS0tLQpNSUlFb2dJQkFBS0NBUUVBb2ZJTGtUdDB1TU9EZm5hTHlOcmhKcDM0NGlXQ0FvSktmaE1Ld1ZkTnJLZmhMclBOCm1KTlR5MCtFOUJRQU5vUE55anBJRnp2d1RTZ3JJbnZKSHZFZFd4N203WVUzcjJUanB5Tk9PQjhDeTZ5eEZQb1gKRG9XVzYvUUUzZ3diamJ2dVBvVHFqZlliMW8rbk1ucGtsYS8vTjIwWGVDcFA5K0VtVzU5R2wwMVUyK1Z1UXU5KwphYmYwL3BaNFU5QVh2a3g0Tjk2VFRQbjFUMGRwN2JvUEFKSmpiZi9ScUpwWGtHWnZsVlBXVHczZXJsbXNCZVNsCnBqRUk0NnZUYmUwVG05VHhDYXhUaFhlZjRNRGFISFVrNXBPRDhqeThzM1lSWEZlTllUTm5IckRuTDIycXBWV1EKQS9FdUV2cm82WS9GVFhkbVh5b2luVlowdEVPOXJPdkI4MS8xUndJREFRQUJBb0lCQUV2ZnJGMjUvb0RHVVdoQgp3RkkxZ29GbVNBSWtVcG84VXd4b2ZZU0NFOGxOeW1ub0llNVhNRTQwRG5XUW5WenRPZENDcDk0QzNoNDRNS1Z5Clc1TmNva1ZiNEJQdWMxMkFwa3hiZFQxRUFqcE15WmFyYVh3TFNOOTVyNElkS0JlcXNmK21wSUlvaVhob1M0eVIKM1dob1VlbTArZWI1NUFlZC9DdTNId3FxVjVUQ1ZiQVFwYnUwZlFzaE1VMkZ6RlZ0R1kzQ05ldnNreUJuYmFVQQpKSng1U1M0RFpPT004ZHlwRnVTWXRWYXdmMDdHeGcxQnRjYlhxRzN3WU8zdk5VeXdmQ3NzV29CaXFRdGxQSnBlCklZdnhhcUZlaUI4amlzMkMwWjVJNEpJQlhKY0Vyak81V09zMEtVUUQ2R3ZuYzZIYjMwRkRZcUhzMDFaNjl4R04KQ3BFK0d4RUNnWUVBekdxb0JONmhjallCQkdlZmdCWHFPTm5yR3dqU2ZnYnkzaFJBWGVDUXdyb24vclFVTE9JUApXWE5LK1RaZjFhM2pZWWtlaHRZbHdZVHJBRTcxbFBvblEwdkw0ZVF3bzczYVNqdXQzS01Vb3JUelhGRVBibU5DClUvNUgxUkFUaTliYUE1bHhVdlhUMnk5cXpzeWZUazJtTjQxQWF0VE53aWgwNi96eG1MbWVVUGtDZ1lFQXlzKy8KU3hXWWF3WnR2eHAyS1RHUVZqellYaGdQMURoQ2E1MFFkZDJ1NCtaRmI4eURwMXAvNlAwUHdsMEYzSVQ4QkJwUApwMlpXdlFYSlVESXpOSWVSUmpvekl3OTYwS0djTTJMY1lHcWZsU3V6b2ZQVlJDQlFSTUg4eS95Qm8ybE94RjJnCmU3OXhMNUg0dTVmczZKeEtFT00zVUtPREY2OURxK3hKLzhERVNEOENnWUFNSzdXQlJMZ2NFcmNReWhLbkQ2YjQKWjVFbDlPcURjbXAzYW9GQ2xhSkkxY2lYMDZUMzN5WEd6NlNCSGdtcXNVVytndWw4WWJleHcvWXgrSUdLc3pJdgpRWTRNRHdnT1Y3bHRmZ3dsL05lM3NFcGxEclo2ZmhKdTZjN2hFcW4zUTMyTGhWRkgvVGIxNytiT0ZVVE81clNrCnpoWXR4aW5TQzVLYWtsN1lGd1VrRVFLQmdDMlBFWWZLYUJ6U3F1Q2REeUlkMGpDdEptV3N2aEdNT2M5Mnp2WEwKUUxoTlNCZmZOMHZtMW9qK0lBWW5ZMk93TS9Tdi9HaThZb3UvdXdOYTQ0blBVbUVXUGRxSVpheHNRV3lCcnNPeAo3L3RRZjkvSHFJYlBRM2pPb3YwbjBlOWxmcDQ1OGcwYWFsQ25WOXE4UENuY3dmNmRMQlhmUlZtU3MzN3hhNFlhClJYMTlBb0dBWFBTaHUzNWlDWHQwYldNaW1vU0pYTXZKcm5tMGxrRStvZ0o3SWJyWkpMcFJNSytPcUdHZEJnN0gKZE0vUFVWZGpRL2VJTWxGd2VLcWtCeWhuRFgyUmdZQVcrRXBlS2VBLzU2L0JkZGpOZG1iaG1YTWMwVWlST2t1Mwp4MHFKaURXSzNUSUUzd3doWWZTRlBiWGtiZkNxb2tNLzhJcUpNQVBvYTZYUnRZNnJSV0U9Ci0tLS0tRU5EIFJTQSBQUklWQVRFIEtFWS0tLS0tCg==
  k8s-test-cluster: ZW5kcG9pbnRzOgotIGh0dHBzOi8vazhzLXRlc3QtY2x1c3Rlci5tZXNoLmNpbGl1bS5pbzoyMzc5CnRydXN0ZWQtY2EtZmlsZTogJy92YXIvbGliL2NpbGl1bS9jbHVzdGVybWVzaC9rOHMtdGVzdC1jbHVzdGVyLmV0Y2QtY2xpZW50LWNhLmNydCcKa2V5LWZpbGU6ICcvdmFyL2xpYi9jaWxpdW0vY2x1c3Rlcm1lc2gvazhzLXRlc3QtY2x1c3Rlci5ldGNkLWNsaWVudC5rZXknCmNlcnQtZmlsZTogJy92YXIvbGliL2NpbGl1bS9jbHVzdGVybWVzaC9rOHMtdGVzdC1jbHVzdGVyLmV0Y2QtY2xpZW50LmNydCcK
  k8s-test-cluster.etcd-client-ca.crt: LS0tLS1CRUdJTiBDRVJUSUZJQ0FURS0tLS0tCk1JSUR4RENDQXF5Z0F3SUJBZ0lVVmxNRnZmclhodHUvVnpLaDUyUDlDdmF6U0w4d0RRWUpLb1pJaHZjTkFRRUwKQlFBd2VqRUxNQWtHQTFVRUJoTUNWVk14RmpBVUJnTlZCQWdURFZOaGJpQkdjbUZ1WTJselkyOHhDekFKQmdOVgpCQWNUQWtOQk1SZ3dGZ1lEVlFRS0V3OU5lU0JEYjIxd1lXNTVJRTVoYldVeEV6QVJCZ05WQkFzVENrOXlaeUJWCmJtbDBJREV4RnpBVkJnTlZCQU1URGtOcGJHbDFiUzFsZEdOa0lFTkJNQjRYRFRJeE1EUXlNREF5TVRRd01Gb1gKRFRJMk1EUXhPVEF5TVRRd01Gb3dlakVMTUFrR0ExVUVCaE1DVlZNeEZqQVVCZ05WQkFnVERWTmhiaUJHY21GdQpZMmx6WTI4eEN6QUpCZ05WQkFjVEFrTkJNUmd3RmdZRFZRUUtFdzlOZVNCRGIyMXdZVzU1SUU1aGJXVXhFekFSCkJnTlZCQXNUQ2s5eVp5QlZibWwwSURFeEZ6QVZCZ05WQkFNVERrTnBiR2wxYlMxbGRHTmtJRU5CTUlJQklqQU4KQmdrcWhraUc5dzBCQVFFRkFBT0NBUThBTUlJQkNnS0NBUUVBdXBYNUFhci9pVm1jMDNkOE53aGVmRHF3NkRrYQpxUGdJUU0vUFBYbjVBUVE1T1FzVS9neURGbkFPZGRVbncrcnpheUdRSTlEc2tEVjBKLzNBT0o1eU5pSlAvRklSCjdYQjJyMTg1Mit2aXBjNFp5aXNXSUNQc2FQS2pXc3lSbFAzY0ZmUXpROUxEeURSMXVxZ2Iwa1JuUDFCay9CeGwKa3ZCZkE3cjdJZ1dwZkxuT3dVTlVUandqRlRKVmJURUUyVGUxYzRoMkNiTTJGd0duR2JSRGM5YTE3Uk9pU2U5egowamRhSTNqLzFHZm1yVHNaZjVoanJRS242RzgvTFh1eFZqWERPYXN1eC8xdnVBVTMrRXhISnRpVXcxNnFzMjY5Cnl4ZDlhSGNnTVA1V2MyckttaG9PUFVuOG04OHZ3TTZiVnRiVWRnTHM1ZWExd2ZRZW8xUXU2MEpFT1FJREFRQUIKbzBJd1FEQU9CZ05WSFE4QkFmOEVCQU1DQVFZd0R3WURWUjBUQVFIL0JBVXdBd0VCL3pBZEJnTlZIUTRFRmdRVQptOGQyYzRoeCt3Qm1UdkE0NUJhV204VFJnTU13RFFZSktvWklodmNOQVFFTEJRQURnZ0VCQUUzUWZyQjV2TEpYCitQWE42dmhiWE5IN3N3Qzc3U3p0elBjMG02dm0vV1FqZHFBYlVxZmI5SHVnZENMSUlqb3NqWEt0ZEFoVjZCNXAKdGJOUFhuNGRLa3lIaXM3MEt1bFArMks2WjIrQldnR3FjeGk2YTh3RWZIREdBaE9tL1lhWC9IWUhldVF0WlprOApRWFBJclYyUHVER1VuYnRMc2NBNUNTRUs0cG5xelI3eklsNXZ6YnlxUXVxQWpKUXdVYXhldGk5Z0ZEem0raW5CCkhNNzJoY3VQUW1JZVlJSTQwU1hsbHFNb2ZQSjlzb3pDQk9vYkdPbHlPYVJ0Wk4zVlAyYjZVYmgrb01DcXZERVgKL29jNVZ2VXVoOEN0VUhiVGJPVnpjamhUSlA0YnZuNWdxcW5LUFdEZm9CVjlUSEgxYWtKV3pKT1lNK2FjRzNIYgpmTFdJQXJsdFg4RT0KLS0tLS1FTkQgQ0VSVElGSUNBVEUtLS0tLQo=
  k8s-test-cluster.etcd-client.crt: LS0tLS1CRUdJTiBDRVJUSUZJQ0FURS0tLS0tCk1JSUQxRENDQXJ5Z0F3SUJBZ0lVZmxZcWdCVzJyK1cvVTdCV0dycmplN0VuSVRNd0RRWUpLb1pJaHZjTkFRRUwKQlFBd2VqRUxNQWtHQTFVRUJoTUNWVk14RmpBVUJnTlZCQWdURFZOaGJpQkdjbUZ1WTJselkyOHhDekFKQmdOVgpCQWNUQWtOQk1SZ3dGZ1lEVlFRS0V3OU5lU0JEYjIxd1lXNTVJRTVoYldVeEV6QVJCZ05WQkFzVENrOXlaeUJWCmJtbDBJREV4RnpBVkJnTlZCQU1URGtOcGJHbDFiUzFsZEdOa0lFTkJNQjRYRFRJeE1EUXlNREF5TVRRd01Gb1gKRFRJMk1EUXhPVEF5TVRRd01Gb3dTREVMTUFrR0ExVUVCaE1DVlZNeEZqQVVCZ05WQkFnVERWTmhiaUJHY21GdQpZMmx6WTI4eEN6QUpCZ05WQkFjVEFrTkJNUlF3RWdZRFZRUURFd3RsZEdOa0lHTnNhV1Z1ZERDQ0FTSXdEUVlKCktvWklodmNOQVFFQkJRQURnZ0VQQURDQ0FRb0NnZ0VCQU4vNzdNa0Fxdm9yMDhseWZOQVdsbDk5R3lmdXBqdmYKaGJNSlhNeHVSNmZGdURIcm40RkFla0szM0FjMllOZW5SQ3BmMjJ1YVkvWnYxeUloZE8zVEdiUmZEZnRpNldmcQo4bWtmcThUelMzQTVJdVRDYkxFMWJKcG1WQURqTE9aRUI0ZWF1WVFPTmJpWVJ3UG9saitxc2RYNVcxbEczL2dPCjBGV0xWNk52cG15c3JXZ1FSUkNXeURydkcyZ0lpT2d5WEdKb3ZobVlLeGVYUndPZjlXL1B6bnN4Q092M1czb0wKTkVVd1IxM2hHTjd1UVVBL1JiTFNZaUxKY1Z6cFhEUFowWDZXYnFFUHB5R1FNT3pxZ0FNMVkvM0hjOUo2ZDNuUwpDYXduc2pxeno2TGdKQVljSlE1YklFSW9OWUhzRjRxb3RZZmNLb1BTY29lRm9tNHBpWENwR1U4Q0F3RUFBYU9CCmd6Q0JnREFPQmdOVkhROEJBZjhFQkFNQ0JhQXdFd1lEVlIwbEJBd3dDZ1lJS3dZQkJRVUhBd0l3REFZRFZSMFQKQVFIL0JBSXdBREFkQmdOVkhRNEVGZ1FVdGtFYm1EV2VMS3lRMTN1ZGRLSUlUOXhrTkkwd0h3WURWUjBqQkJndwpGb0FVbThkMmM0aHgrd0JtVHZBNDVCYVdtOFRSZ01Nd0N3WURWUjBSQkFRd0FvSUFNQTBHQ1NxR1NJYjNEUUVCCkN3VUFBNElCQVFDTlFLRUFpb2RPYnBMNmlZZkpaUkJNYnpJQ0QzRUpPc2NDWGxKZ0NrV0ZjM2FvM1FiMVp0RC8KUFVGWG43aFdVS3kzZ05BYVdXbFE5d1hrRll6V1huRENQN2JGMGVqcTBHc3ZNSkxyVjRYbmpVcnJzM1pPQ3NYMApoMFhDekdadDdqMjdjSmFwRVF5TklDb2VnUDJWOFN6NXdoenAwOWJlNkxTa3dwSzM3UFBpSWcvRVFUS0dPenFZCm1FNzlmNzNWNm84TW9STkJKaW1TTFlVaHd4NWpmeVVsN1JFRDM0UHpPMy9mVUxhb3JxWGdRdkhvWGxwemhJRVEKcXFPb0ZHQmx0cnVlS0NNLytFQzlXeHo4U2ZVaE5KSE5GU05Sbk1TL2pzRWNSaXlqaVpqakdqaFBYUnpwTXpSdwpkZnpsTDZHYkJIc29wWmtOV2FQSmtxTUFxRWhZODFwRAotLS0tLUVORCBDRVJUSUZJQ0FURS0tLS0tCg==
  k8s-test-cluster.etcd-client.key: LS0tLS1CRUdJTiBSU0EgUFJJVkFURSBLRVktLS0tLQpNSUlFb3dJQkFBS0NBUUVBMy92c3lRQ3EraXZUeVhKODBCYVdYMzBiSis2bU85K0Zzd2xjekc1SHA4VzRNZXVmCmdVQjZRcmZjQnpaZzE2ZEVLbC9iYTVwajltL1hJaUYwN2RNWnRGOE4rMkxwWityeWFSK3J4UE5MY0RraTVNSnMKc1RWc21tWlVBT01zNWtRSGg1cTVoQTQxdUpoSEEraVdQNnF4MWZsYldVYmYrQTdRVll0WG8yK21iS3l0YUJCRgpFSmJJT3U4YmFBaUk2REpjWW1pK0daZ3JGNWRIQTUvMWI4L09lekVJNi9kYmVnczBSVEJIWGVFWTN1NUJRRDlGCnN0SmlJc2x4WE9sY005blJmcFp1b1ErbklaQXc3T3FBQXpWai9jZHowbnAzZWRJSnJDZXlPclBQb3VBa0Jod2wKRGxzZ1FpZzFnZXdYaXFpMWg5d3FnOUp5aDRXaWJpbUpjS2taVHdJREFRQUJBb0lCQUVqQlpHREdQc09VaU83ZQpxWHhPV2ZvYWdUK3ZYWUFGVTBDY3dmQUZ3bkRVNE1nV2FYRnFxRXdUdlB6NnhPcElBdlJndnIxdElSdGpxTllGCldCNElmRWtDdDEvNCtTZ3dRUjIways4ZHVGdHpzOG5xL2JOeVR4eTRNSUU1U2RSaU5LL3ZxbU1pMm9CanRtMm0KbDJlRzRzMUdlazI5bi9MTG5SQ3Nlb00wT1RNREtFOWp1ZGRLWlVOdDhVa0FtYXQrWHpCQXB0eE1EMXZadm9VSgpXNUh0K05YVDcwSEtKTk5XTEFnOXdKSVNrenJzOTNsTmZqS21RU3V1M28zbDBiemIwZHUwUElBZEJ6WWJJaUlnCnRXQ3Erd1FjbFZGbXJ5MHB2bkRCS3MveDFSWEJyVnh6aEJSeWo1R3MwY0hHZ21tRWNpNk5KYmNzQWwzU2FFSkUKWkt0ZStVRUNnWUVBL3l5MXArQ0ZpZjRoYlJTSklrbUZObVN1V0ZtK1Q2b3BzL2w1YmZkU2Jrb0lYRDZaUkl4NwoxV2RXMWE4dzNTM3h2dnZSampEeUpXSkQxR1lGRFhvWU44Qk1Ndzc2NCtPQUZxcFdxYm5ZRDVjM2VPdDMvRnJDCkh6U3pZeHFsRDNLUUdUN0RqYVJwVXk1L0VLUEhYZml0dUI3OGtxTjRFS0RPQUtCaVZWaTBrTU1DZ1lFQTRMVmoKaTlXdU1ha3Y4ZmgzTVB3WElpalVZaUZkLzRGVVBuMlk2TEdkM0E3QnJMUmZwVDZmMUVGTnBqWk1nR2xQeXdUSApHTVN2T1N0TzhTNmpSeGZmb2J2b1kreVhVZmpkSElGMkJRWi9pTDhyNlFoWU1UQ29FV1k5QzNycU9wRFNFckNoCm1xOXJwTS81NmhxT2Y5amxsb2YwbkZpV2ZkL3M4ODlia0VLZ1RJVUNnWUVBZzZ4MGlJNUpHbTN5bmJFTkdvNUoKbVVuVzFXeHAwZjRDeXdZZTdPbkV0WGlxVzc5Sm81L0NmdHAyYW9tZWMyT3o3Vk5RVFVsZ2luM3NkbnUyZTcvWApJMTJ0ZEdOMGY0ZnpucjZEUGMzU2Vpa1R6T2ZrNEdtTTVrRnhsK0ExOElTemF2T0NRV0xubnE3TmpxNlV3QjhFCnRZLzMwVXRkTjJkakpkdWRJbUZGdTdVQ2dZQkpESTZjOGMwY0ZjMGhVMDJrSGYrRE9sUzR4ZkloMHJCSlZGazIKSkMrV1R6SEU3Q28vdE5rT2ptQW96WFFYTnFVYThhV3J0cHpqNytGTTVJVnQ0aVB3RnY4WUpOeVlhRmV4SWFEMQpSMFNFZHVsV2EwRUlWTEgrWGdjd1NUZ0Y2L2h1M1A3Y0kzVFI4azVqUFZqZjFPbm1BcktSZFBjUFdwRlVQUytkCitSclZaUUtCZ0hMTGdsWTV0R2wwV2ljbGlBRVNXK0FNWEk1bXVmb1A1K2xrUjlsOXBBZkRwS0oxbTg5b2RVeXMKODFWWlR0RVRiMjR0bXBwMWJsOENxcXJrd3VuQjlubWZYVW5MeEZ6eVpaUmxJVDNFTnpFaFdGY1prRHF3dGY5UwplN3JtYmZKSEJGMzRYL2QwU3ZIc0xyT1FoMjFLMmkxNmFxU1pqR01vNENSWllPNStTTDE5Ci0tLS0tRU5EIFJTQSBQUklWQVRFIEtFWS0tLS0tCg==
#
# cilium-ds.patch
# File generated by running the helper script generate-name-mapping.sh
# This contains the static mapping of DNS name to IP address for every Cilium etcd store in the cluster
#
spec:
template:
spec:
hostAliases:
- ip: "192.168.18.202"
hostnames:
- k8s-shared-cluster.mesh.cilium.io
- ip: "192.168.19.207"
hostnames:
- k8s-shared-cluster.mesh.cilium.io
- ip: "192.168.2.234"
hostnames:
- k8s-test-cluster.mesh.cilium.io
- ip: "192.168.3.250"
hostnames:
- k8s-test-cluster.mesh.cilium.io11. The following set of commands should be run against both clusters to create the cilium-clustermesh secret and to patch the Cilium agent
  kubectl -n kube-system patch ds cilium -p "$(cat cilium-ds.patch)"
  kubectl -n kube-system apply -f clustermesh.yaml
12. Restarting the agent and cilium-operator in both clusters now should establish connection between them.
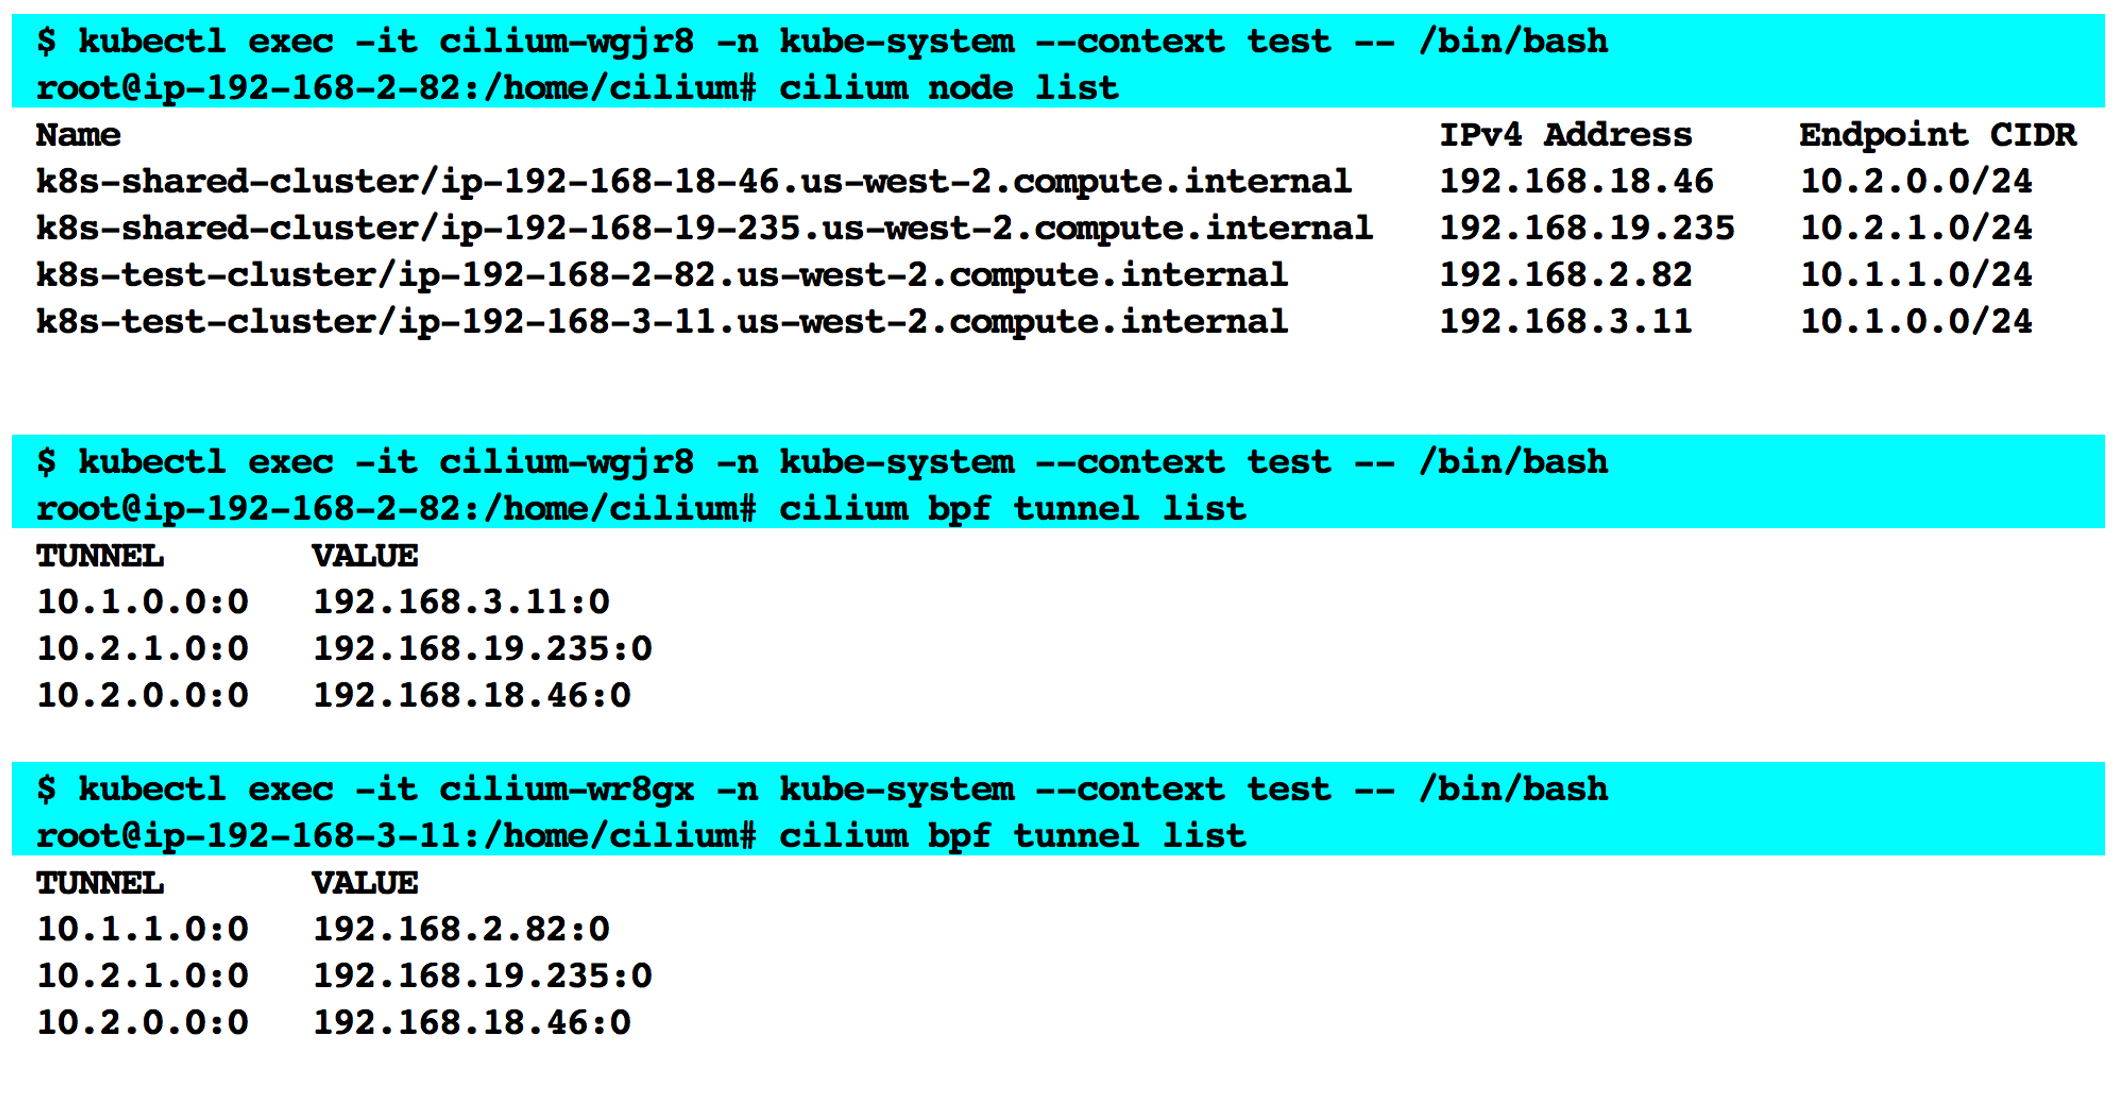
The worker nodes that make up the two clusters are shown below.
Running the cilium node list command from inside a Cilium agent pod on the test cluster shows that it has been able to discover all 4 nodes in the cluster. Running the cilium bpf tunnel list command from each agent pod on the test cluster shows the list of tunnels setup by Cilium to enable cross-cluster communication. A tunnel is set up for each PodCIDR and is mapped to the IP address of the node that hosts pods in that CIDR to enable pod IP routing across clusters.
Deploying workloads to the EKS ClusterMesh
We will use this mesh of two EKS clusters to demonstrate the use case of a shared services architecture where an application that connects to a backend database is deployed to the shared cluster and is made accessible to the frontend application deployed to the test cluster as shown below.

Load balancing with global services
This architecture is made possible by Cilium’s global service which is nothing but a standard Kubernetes clusterIP service with the annotation io.cilium/global-service: true. A global service is deployed to both clusters in the mesh but the backing pods are deployed only in the shared cluster. Here’s the YAML manifest used for deploying the backend global service.
---
apiVersion: v1
kind: Service
metadata:
  name: backend-svc
  namespace: testing
  annotations:
    io.cilium/global-service: "true"
spec:
  sessionAffinity: None
  type: ClusterIP
  ports:
  - port: 80
    protocol: TCP
    targetPort: 3000
  selector:
    app: backend
    role: database-service
Inspecting the cluster IP service that lands on both clusters with the above definition confirms that the service in the test cluster does not have any endpoints associated with it.
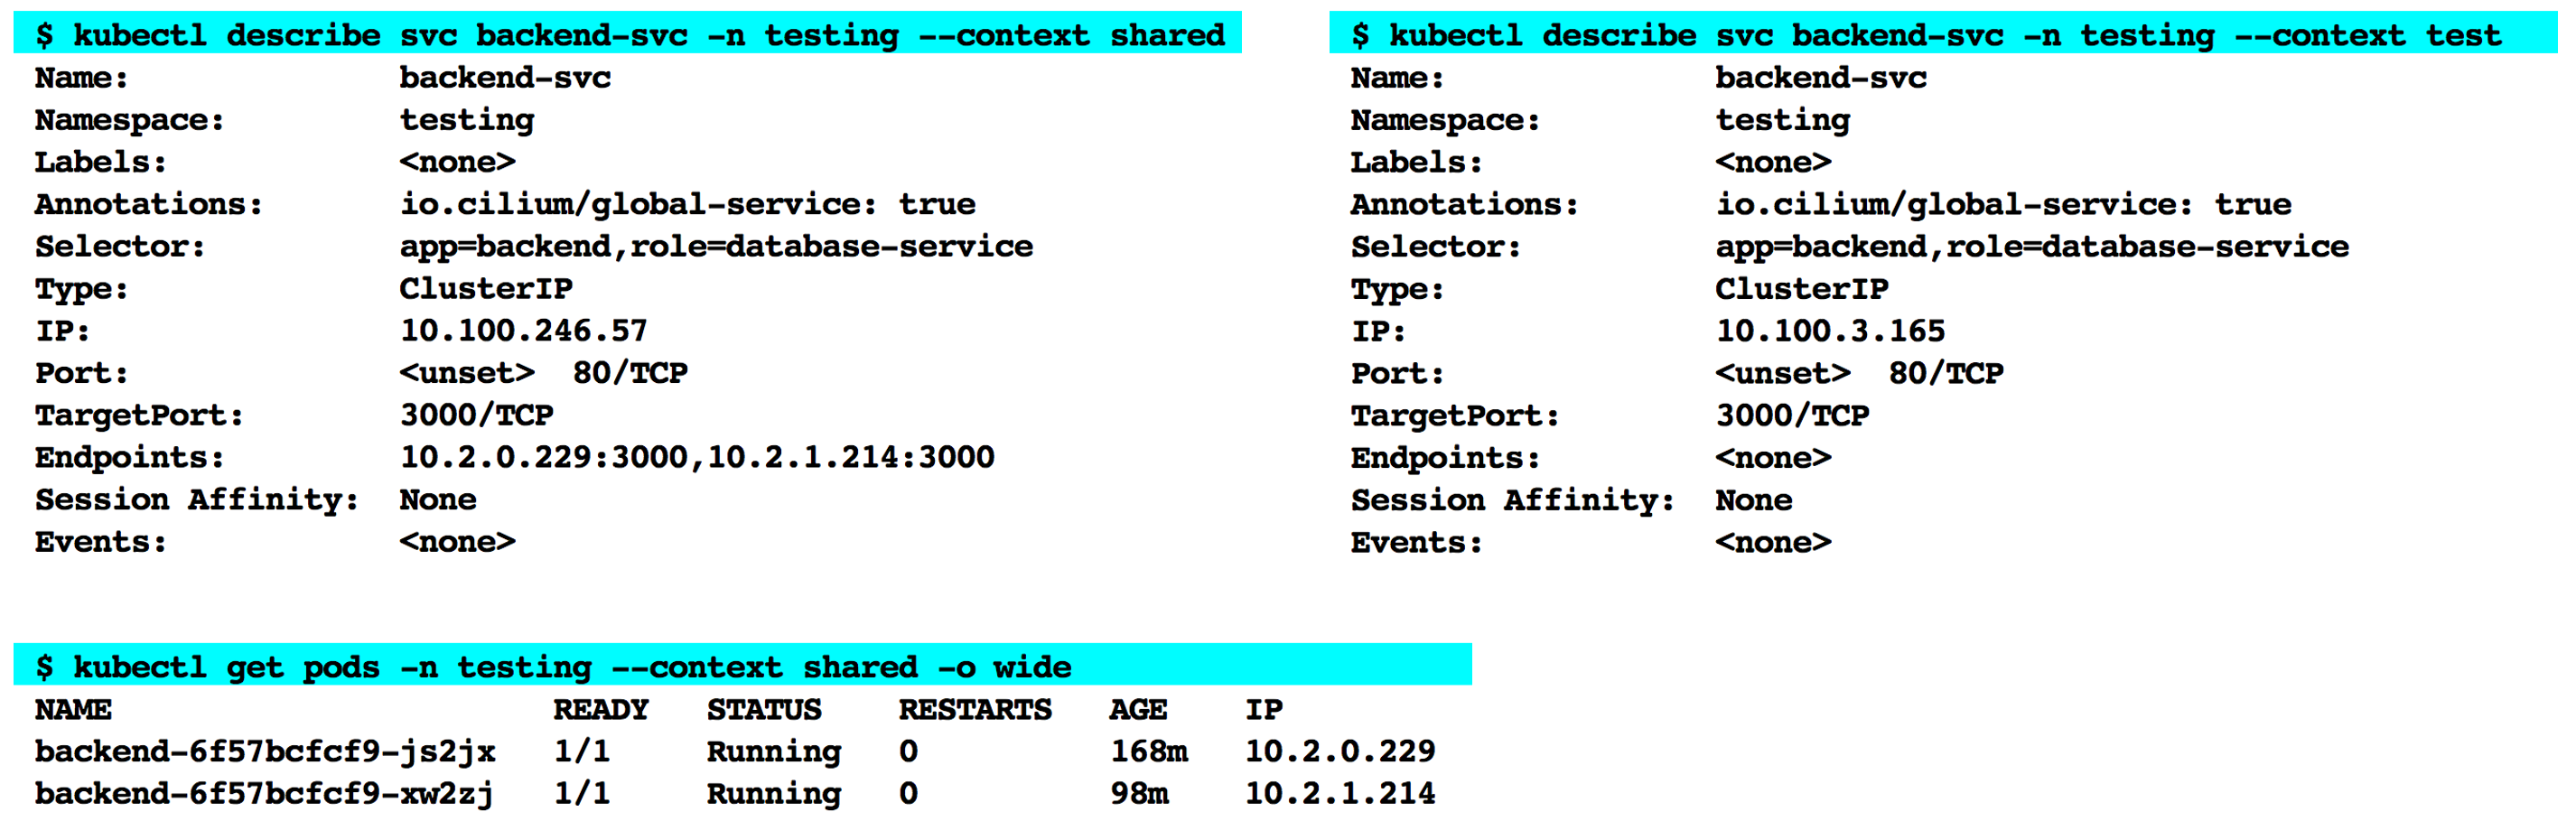
Cilium agent watches for services that are deployed with the io.cilium/global-service: true annotation. It then identifies pods across all clusters that match the label selectors specified in the global service definition and merges the corresponding endpoints together under the respective cluster IP in each cluster. Inspecting the output from running the cilium service list command on a Cilium agent pod in both clusters confirms that the pod IPs from the shared cluster are listed as the backing endpoints for the cluster IP in both clusters. Furthermore, running the cilium bpf lb list command confirms that Cilium also updates the eBPF map that provides load-balancing configuration with this information. Its is important to note that the Endpoint aggregation takes place only within the Cilium networking stack. The state of cluster IP service, which is maintained by the EKS control plane, remains unchanged on both clusters. We saw earlier that eBPF programs that are executed at various hook points look up the eBPF maps to make routing decisions. Thus, when client in the test cluster makes a request to backend-svc.testing.svc.cluster.local (IP = 10.100.3.165, endpoints = none), under the hood an eBPF program will DNAT that request to one of the pod IPs, namely, 10.2.1.214, 10.2.0.229, in the shared cluster.

The frontend service in the test cluster is deployed as a standard Kubernetes service of type cluster IP.
---
apiVersion: v1
kind: Service
metadata:
  name: frontend-svc
  namespace: testing
spec:
  sessionAffinity: None
  type: ClusterIP
  ports:
  - port: 80
    protocol: TCP
    targetPort: 3000
  selector:
    app: frontend
    role: web-service
Here is a sample output from a request-response sequence where a pod, 10.1.0.97, backing the above frontend-svc service in the test cluster makes a request using the backend-svc.testing.svc.cluster.local DNS name which resolves to the cluster IP 10.100.3.165 in the test cluster without any backing pods.

And, here is the log output from a backend pod in the shared cluster confirming that it receives and responds to the above request.

Controlling cross-cluster service access with network policy
Kubernetes network policies allow users to identify a set of pods using label selectors and then specify ingress/egress rules from/to other sources/destinations which are themselves identified using label selectors and/or CIDRs. The network policies are implemented by CNI plugins and they land on each worker node of the cluster as a set of IP address filter rules that will have to be continually updated across the cluster nodes as pods are started/stopped. Cilium network policies adopt an identity-based approach that decouples network policy enforcement from network addressing. Each distinct combination of labels assigned to pods gets an identity that is unique and shared across all clusters in a mesh. A pod’s security identity is embedded into network packets emitted from it and allows enforcement of security policies across cluster boundaries. Let’s see an example of this in action.
The YAML fragments below show the labels assigned to the frontend and backend pods that are deployed to the test and shared cluster respectively.
---
apiVersion: apps/v1
kind: Deployment
metadata:
  name: frontend
  namespace: testing
spec:
  replicas: 2
  selector:
    matchLabels:
      app: frontend
      role: web-service
  template:
    metadata:
      labels:
        app: frontend
        role: web-service

---
apiVersion: apps/v1
kind: Deployment
metadata:
  name: backend
  namespace: testing
spec:
  replicas: 2
  selector:
    matchLabels:
      app: backend
      role: database-service
  template:
    metadata:
      labels:
        app: backend
        role: database-service
Running the cilium identity list command from a Cilium agent pod on both clusters shows the unique identity created for each set of labels. Cilium adds additional labels, namely, k8s:io.cilium.k8s.policy.cluster, k8s:io.cilium.k8s.policy.serviceaccount and k8s:io.kubernetes.pod.namespace to each set in order to guarantee uniqueness across all namespaces in all clusters.

The pod/endpoint association with the respective identity is seen with the help of cilium endpoint list command from an agent pod on both clusters.

With the above configurations in place, policy enforcement for the backend pods in the shared cluster is enabled with a network policy definition similar to the one show below, which prevents access to those pods from the frontend pods in the test cluster.
---
apiVersion: "cilium.io/v2"
kind: CiliumNetworkPolicy
metadata:
  namespace: testing
  name: "allow-only-production-cluster"
spec:
  description: "Allow cross-cluster communications to backend pods only from cluster named k8s-production-cluster"
  endpointSelector:
    matchLabels:
      app: backend
      role: database-service
      io.cilium.k8s.policy.cluster: k8s-shared-cluster
  ingress:
  - fromEndpoints:
    - matchLabels:
        app: frontend
        role: web-service
        io.cilium.k8s.policy.cluster: k8s-production-cluster
Concluding remarks
Multi-cluster management in Kubernetes is a very broad and rapidly evolving topic. It means different things to different users based on what they want to ultimately accomplish with such a setup. A broad definition is that it is the capability to make multiple clusters work together. There is not much standardization in this area and clearly no one-size-fits-all solution. There are several active open source projects, each with its opinionated take on tackling this issue.
ClusterMesh leverages Cilium’s eBPF-based CNI plugin and provides multi-cluster connectivity that uses standard Kubernetes service discovery semantics. It requires that nodes in all clusters have IP connectivity between them and that the cluster environments support IPSec-compatible VPN Gateway. Therefore, it can be used for connecting together clusters deployed on-premises as well as across different cloud providers. This blog post demonstrated how ClusterMesh can be used in a shared services architecture where a cluster hosts common services that could be shared across multiple tenant clusters. ClusterMesh can also be used to provide high availability by deploying replicas of services to multiple clusters that operate in different failure domains and are configured to communicate with each other.