.NET on AWS Blog
Remote development on AWS using JetBrains Rider
Using .NET and Docker developers continue to write software on a familiar Windows environment deploying applications seamlessly on Linux servers. With virtualization, developers can write and run .NET code that is later deployed in different environments. However, there is another option-using remote development you can use your IDE, running on your machine to run, debug and test your code on a powerful backend server.
When using a remote development server, you scale your resources to meet your development needs and reduce costs by shutting down environments that are no longer needed. Work on multiple projects with different environments and tools, without worrying about conflicting project’s installations and configurations. Hosting your development environment on AWS allows you to enforce robust security and implement disaster recovery in your cloud infrastructure.
JetBrains Rider is a cross-platform .NET IDE for .NET and .NET Framework development. In this post, you will learn how to use JetBrains Rider and AWS to create remote development environments and connect to them securely.
| Time to read | 5 minutes |
| Time to complete | 15 minutes |
| Cost to complete (estimated) | USD $40 |
| Learning level | Intermediate (200) |
| Services used | Amazon EC2 |
Overview of solution
In this post, you will learn how to create a secure connection to an EC2 instance running Rider remote server. Then you will connect to the remote server from Rider client using SSH.
I recommend hosting your remote server in a private subnet. Establishing network connectivity between the client and the server can be done by hosting the client on AWS—for example, by using Amazon Workspaces, using a secure VPN connection, or using an EC2 Instance Connect endpoint as shown in the following diagram.
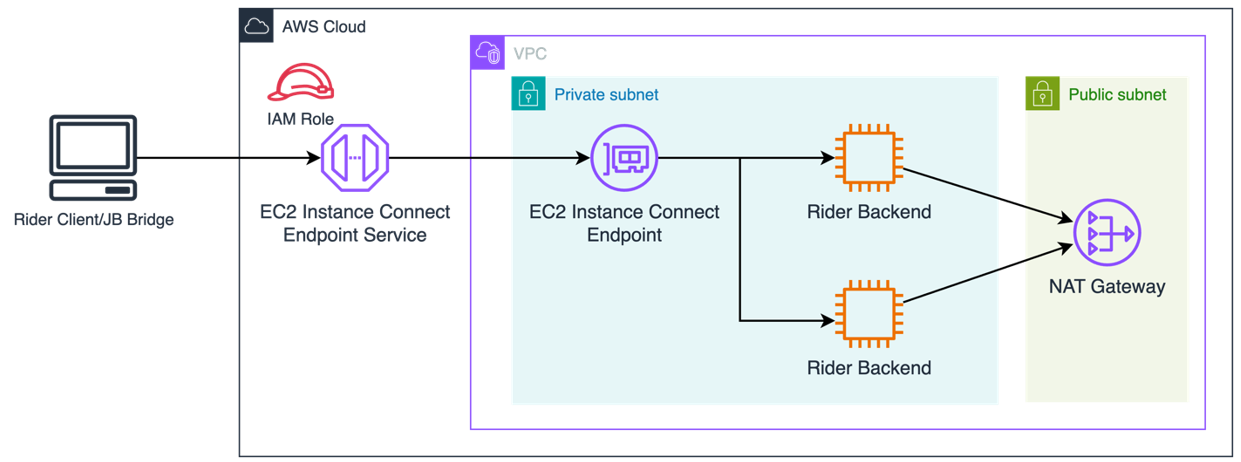
Figure 1: Hosting a remote server with an EC2 Instance Connect endpoint
Walkthrough
This walkthrough will show you how to create and setup your Rider remote development server on Amazon EC2 in 5 steps:
- Create an EC2 Instance Connect Endpoint.
- Create Linux EC2 instance with required prerequisites.
- Add startup script to install and configure .NET and Docker.
- Open SSH tunnel to your EC2 instance using AWS CLI.
- Connect JetBrains Rider (client) to EC2 instance and finish configuration.
The CDK code that deploys the solution described in this blog post can be found on the CDK Sample repository on GitHub.
Prerequisites
For this walkthrough, you should have the following prerequisites:
- An AWS account
- AWS CLI Installed on the client machine.
- Amazon Virtual Private Cloud (Amazon VPC) with at least one private subnet to host your remote server(s) and one public subnet with NAT Gateway to download dependencies and access source control if outside of AWS.
- IAM User with programmatic access and IAM policy that grants the ec2-instance-connect:OpenTunnel action (required if you are using EC2 instance connect endpoint to securely connect to your development server). More details are found in AWS Documentation: Grant IAM permissions for EC2 Instance Connect.
- JetBrains Rider license for the development server, you can download a 30-day trial version from Rider website.
Step 1: Create an EC2 Instance Connect Endpoint
This step is required only if your client machine is hosted outside of AWS and is not connected to your development server through a VPN.
EC2 Instance Connect Endpoint allows you to connect to an instance via SSH or RDP without requiring the instance to have a public IPv4 address.
Create a new instance connect endpoint by running
aws ec2 create-instance-connect-endpoint --subnet-id <subnet-id>
Running this command will create a new instance connect endpoint that will connect to EC2 instances in the subnet’s VPC. Check out AWS documentation for more information and details on how to create an EC2 Instance Endpoint using AWS Console.
Step 2: Create Linux EC2 instance with required prerequisites
Next, you will need to create a Linux VM to host the remote server. Currently supported versions include Ubuntu 18.04 LTS, 20.04 LTS, 22.04 LTS, 22.10, CentOS, Debian, and RHEL. System requirements for a remote server on JetBrains documentation.
To create a new EC2 instance
- Log in to the EC2 Console.
- Choose Launch Instance
- Enter a descriptive name for your instance and choose Ubuntu AMI
- Choose an instance type with at least 4 vCPUs and 8GB memory, for example t3a.xlarge/t3.xlarge or m5a.xlarge/m5.xlarge.
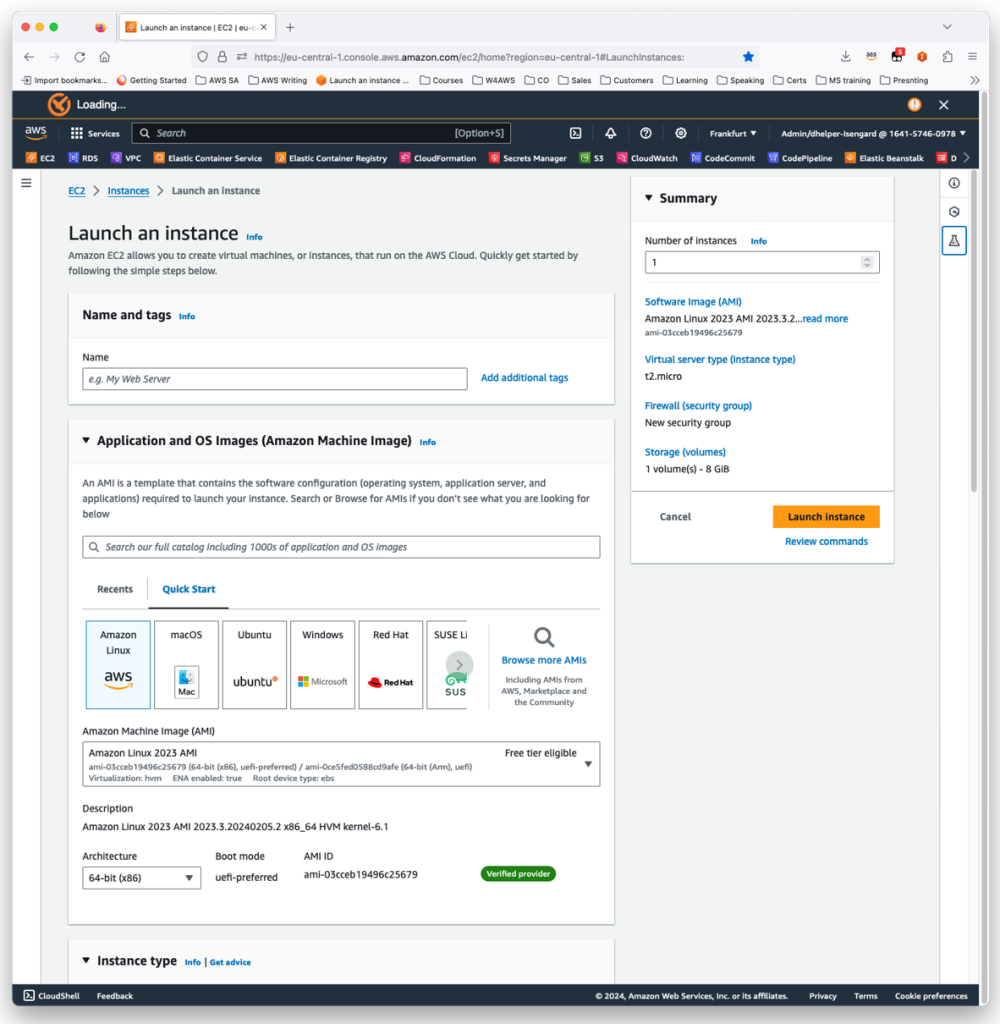
Figure 2: Launching an EC2 instance
- Select a key pair or create a new key pair. You will need this file to connect your client to the remote server.
- Edit network settings
- Select your dev VPC (same as the VPC of the EC2 Instance Endpoint)
- Select a private subnet on that VPC
- Create or use existing security group, make sure that you allow SSH traffic from your machine (in case endpoint configured with preserve client ip).
If you’ve created a new key pair, use the command chmod 400 <pem file> before using it.
- Increase storage to according for you needs. Keep in mind that building docker images can take additional disk space. Use gp2 or gp3 storage type.
Step 3: Add startup script to install and configure .NET and Docker
Open Advanced details and scroll down to user data and paste the following code:
#!/bin/bash

apt-get update
apt-get install -y dotnet-sdk-6.0
dotnet dev-certs https --trust

apt-get install -y apt-transport-https ca-certificates curl software-properties-common
curl -fsSL https://download.docker.com/linux/ubuntu/gpg | sudo apt-key add -
add-apt-repository \
   "deb [arch=amd64] https://download.docker.com/linux/ubuntu \
   $(lsb_release -cs) \
   stable"
apt-get update

apt-get install -y docker-ce docker-ce-cli containerd.io docker-buildx-plugin docker-compose-plugin

usermod -aG docker ubuntu
id ubuntu
newgrp docker
The code will run on the first startup and install the tools needed for modern .NET development:
- Install the .NET SDK (line 4)
- Create https certificate for ASP.NET Core debugging (line 5)
- Add official Docker repository
- Install Docker server and other Docker tools (line 15)
- Enable default user to use Docker without admin privileges (Lines 17-19)
Choose Launch instance to start the EC2 machine creation.
Step 4: Open SSH tunnel to your EC2 instance using AWS CLI
Open the command line or terminal and run the following command:
aws ec2-instance-connect open-tunnel –instance-id <instance id> –remote-port 22 –local-port <local port>
Replace <instance id> with the newly created instance id and <local port> with a free local port on your client machine (for example 1111)
You should see the following message: Listening for connections on port 1111. (in case you have used 1111 as your local port)
Step 5: Connect JetBrains Rider (client) to EC2 instance and finish configuration.
To start development you will need to connect JetBrains Rider to the remote server, clone your source code from a repository and open a new remote session.
To create a new remote development connection
- On the start screen, expend Remote Development and choose SSH
- Select the new Project button
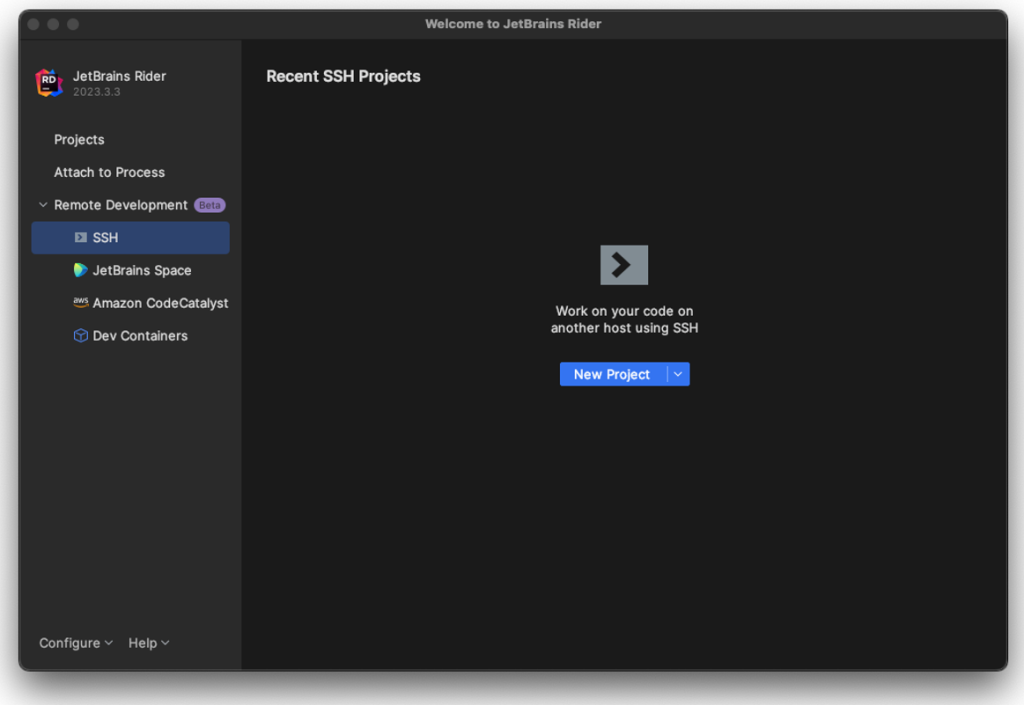
Figure 3: Creating a new SSH project in Rider
- In the next screen fill the connection details:
- Username: ubuntu
- Host: localhost
- Port: 1111
- Check Specify private key and provide the machine’s key pair file
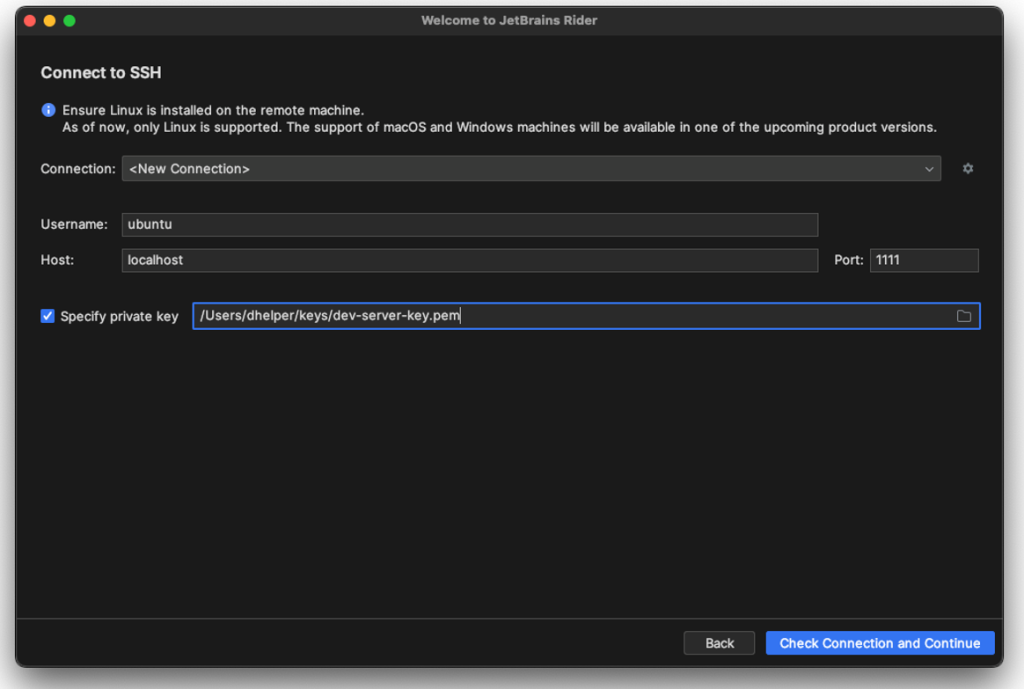
Figure 4: Configuring connection details
- Choose Check Connection and Continue.
At this stage you might see a dialog box claiming that the host identification has changed. This error will happen if you have been using the same port to connect to multiple EC2 machines with different key pairs. You can choose ‘Ok’ to continue, or remove localhost from the known ssh hosts file (in Linux/Mac) or registry (Windows), - A welcome dialog should appear. Choose open an ssh terminal.
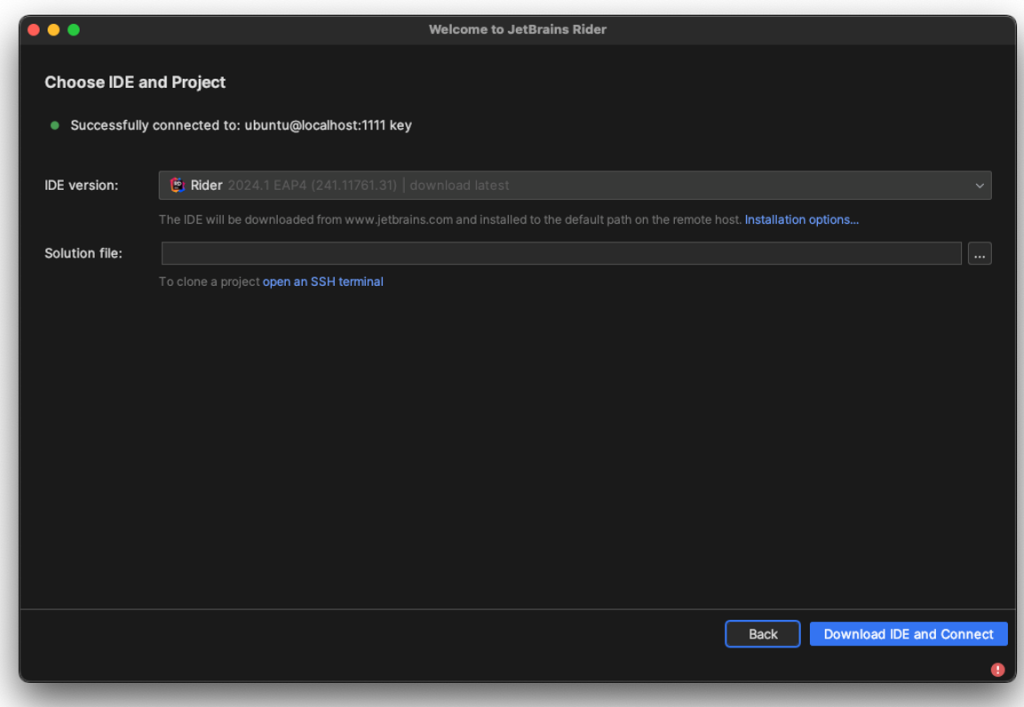
Figure 5: Welcome dialog
- A terminal screen will appear, use it to clone your code repository. For example, the code from https://github.com/aws-samples/aws-microservices-dotnet-test-samples

Figure 6: Cloning the code repository in a terminal screen
Close the SSH window once you’re done.
- Back in the welcome window, choose the newly cloned solution file and select Download IDE and Connect button.

Figure 7: Choosing the newly cloned solution file
- After Rider downloads and configures the backend server, the IDE window will open. And now using your local machine to write code, build your project, run tests and debug your services – either on IIS (proxied to your client machine) or within Docker.
If you need to access AWS services as part of you tests, you can attach a role to the EC2 instance of the server, instead of exposing them to your client machine.
Cleaning up
- Terminate the EC2 instance
- Remove the EC2 instance connect endpoint by using the following command:
aws ec2 delete-instance-connect-endpoint --instance-connect-endpoint-id <instance id>
or follow the instructions in the EC2 documentation.
Conclusion
This post covered how to create a remote server and connect to it using a secure endpoint. you can use the same server configuration without the endpoint if you are running the client on AWS (for example, using Amazon Workspaces) or have a secure VPN connection.
With multiple remote development servers, you can work on multiple pre-configured environments from within your local development machine.
I invite you to try out remote development as a way to increase your productivity avoiding costly installation and configuration of different projects.
If you’re interested in remote development for other programming languages I encourage you to check out CodeCatalyst’s dev environments, where you can create pre-configured remote servers on-demand.