AWS for Industries
How to Monitor, Alert and Remediate Non-Compliant HIPAA Findings on AWS
On the journey to the Cloud, it’s essential to maintain the Health Insurance Portability and Accountability Act (HIPAA) compliance for Healthcare organizations. However, your IT security team may lack insights on the HIPAA compliance status in your Amazon Web Services (AWS) accounts. They may not be certain how to efficiently identify non-compliant configurations and settings. They may also need tools to continuously monitor, alert, and remediate any non-compliant findings.
To overcome these challenges, this post shows how to leverage HIPAA-eligible AWS services to create simple security workflows to identify, alert, and remediate non-compliant HIPAA findings in your AWS Cloud accounts.
Overview of solution
To better help Healthcare customers meet the HIPAA compliance requirements on the AWS Cloud environment, in this solution, I will show how to build the following security controls or workflows:
First, deploy a group of pre-built, security professional verified HIPAA compliance rules on AWS Config to continuously monitor and evaluate deployed resources and identify non-compliant configurations inside your AWS accounts.
Second, after non-compliant findings are identified by AWS Config rules, leverage the Automation Runbook of AWS Systems Manager to set up a workflow to send out alerting notifications to subscribed communication channels (like email, SMS texting message, or a Slack Channel), so your IT security team will be alerted in near-real time.
Lastly, implement an automation workflow by creating another Automation Runbook to take automated remediation actions against the identified security or compliance findings, and bring the resources back to HIPAA compliant status. Meantime, sending out notifications in order to track and audit the remediation action.
Below is a high-level architecture diagram depicting the solutions:

Figure 1 – Overall architecture to monitor, alert and remediate
Walkthrough
In this walkthrough, we will build three workflows for this solution: Monitoring, Alerting, and Auto Remediation. Before building the workflows, you should have the following prerequisites.
Prerequisites
- AWS Config is enabled and Recording is turned on for the region you are working in.
With the prerequisites in place, we can now begin building the workflows in order to monitor, alert and remediate the non-compliant HIPAA findings in your AWS accounts.
Task 1: Deploy AWS Config Managed Rules
In this task we are going to deploy AWS Config Managed Rules to continuously monitor and evaluate the deployed resources and identity non-compliant configurations and setting inside your AWS account. For demo purpose we are going to deploy two example Managed Rules: one for Amazon Simple Storage Service (Amazon S3) server access logging, and one for Amazon Elastic Block Storage (Amazon EBS) volume encryption.
In a real-world deployment scenario, you could choose to deploy the rules which fit your organization’s compliance requirement. Or, deploy the HIPAA Conformance Pack, which is a collection of managed rules purpose-built to provide a mapping between HIPAA and AWS managed Config rules, as a compliance framework to align to a subset of the HIPAA compliance.
- Sign into the AWS Management Console and open the AWS Config console at https://console.aws.amazon.com/config/
- In the left navigation, choose Rules.
- On the Rules page, choose Add rule.
- On the Add rule page, select Add AWS managed rules.
- Type s3-bucket-logging-enabled in the search field and select this rule in the filtered rule list. Choose Next.

Figure 2 – Add an Amazon S3 bucket rule page
- Accept all default values of the settings by clicking through Next.
- Choose Add rule. The new rule will be displayed on the Rules page.
- Repeat step 4-7 above to add the ec2-ebs-encryption-by-default rule to the deployed rule list.
Now you should have two rules deployed in the AWS Config to monitor Amazon S3 logging and Amazon EBS volume encryption.
Task 2: Alerting on Non-compliant HIPAA Findings
In this task we are going to build a workflow to send out alert notifications once non-compliant findings are identified by the AWS Config rules, so that appropriate teams can be alerted and take proper remediation actions in near real-time. For demonstration, we are going to build the alerting flow around the s3-bucket-logging-enabled rule we deployed in the AWS Config in Task 1.
- Create an Amazon Simple Notification Server (Amazon SNS) topic.
- Sign in to the Amazon SNS console at https://console.aws.amazon.com/sns/home
- On the navigation panel, choose Topics.
- On the Topics page, choose Create topic.
- On the Create topic page, in the Details section, choose Standard as topic type. Enter a Name for the topic.
- For example: my-sns-topic.
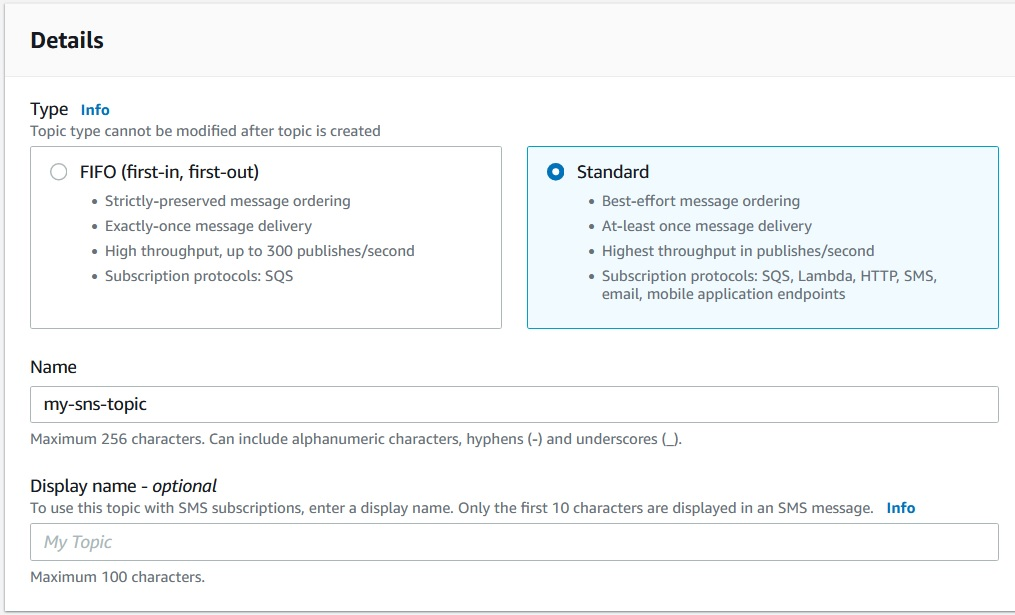
Figure 3 – Create an Amazon SNS topic page
- For example: my-sns-topic.
- Choose Create topic.
- Make a note of the Topic ARN.
- For example: arn:aws:sns:region:account-id:sns-topic-name.
- After you create the topic, subscribe to it by specifying an Endpoint. You can choose the Email protocol. The endpoint is the email address where you want to receive notifications. For more information about how to subscribe to a topic, see Subscribing to an Amazon SNS topic in the Amazon Simple Notification Service Developer Guide.
- Create a custom AWS Identity and Access Management (IAM) policy.
- Open the IAM console at https://console.aws.amazon.com/iam/
- In the navigation pane, choose Policies, and then choose Create Policy.
- Choose the JSON tab.
- Replace the default content with the following:
{ "Version": "2012-10-17", "Statement": [ { "Effect": "Allow", "Action": [ "sns:Publish" ], "Resource": "arn:aws:sns:region:account-id:sns-topic-name" } ] }- region represents the identifier for an AWS Region such as us-east-1.
- account-id represents the 12-digit identifier for your AWS account, in the format 123456789012.
- sns-topic-name represents the Amazon SNS topic name you created in step 1 of Task 2.
- For example: my-sns-topic.
- Choose Next all the way to the Review Policy page.
- On the Review policy page, for Name, enter a name for this custom policy.
- For example: my-hipaa-alerting-policy.
- Choose Create policy.
- Create an IAM role.
- Open the IAM console at https://console.aws.amazon.com/iam/
- In the navigation pane, choose Roles, and then choose Create role.
- Under Trusted entity type, choose AWS service.
- In the Use case section, choose Systems Manager. Then choose Next.

Figure 4 – Create a role in the IAM console page
- On the Add permissions page, select the box to the left of the name of the custom policy you created in Step 2 of Task 2. For example: my-hipaa-alerting-policy. Then Choose Next.
- On the Name, review and create page, for Role name, enter a name to identify the role.
- For example: my-hipaa-alerting-role.
- Choose Create role.
- On the Roles page, select and open the newly created role, and make a note of the role ARN.
- For example: arn:aws:iam::123456789012:role/my-hipaa-alerting-role.
- Create an AWS Systems Manager automation runbook.
- Open the AWS Systems Manager console at https://console.aws.amazon.com/systems-manager/
- In the navigation pane, choose Documents.
- Click Create document, then choose Automation.
- For Name, enter a descriptive name for the runbook.
- For example: my-hipaa-alerting-runbook.
- Choose the Editor tab, and choose Edit.
- Replace the default content with the following YAML code:
description: Publish SNS Notification schemaVersion: '0.3' assumeRole: '{{ AutomationAssumeRole }}' parameters: TopicArn: type: String description: (Required) The ARN of the SNS topic to publish the notification to. Message: type: String description: (Required) The message to include in the SNS notification. AutomationAssumeRole: type: String description: (Optional) The ARN of the role that allows Automation to perform the actions on your behalf. default: '' mainSteps: - name: PublishSNSNotification action: 'aws:executeAwsApi' inputs: Service: sns Api: Publish TopicArn: '{{TopicArn}}' Message: 'S3 Bucket {{Message}} server access logging is disenabled.' - Choose Create automation.
- Set up Remediation Action for AWS Config rule.
- Sign in to the AWS Management Console and open the AWS Config console at https://console.aws.amazon.com/config/
- Choose Rules on the left and then on the Rules page, select the s3-bucket-logging-enabled rule from the rule list and choose the Actions dropdown list.
- From the Actions dropdown list, choose Manage remediation.

Figure 4 – Create a role in the IAM console page
- On the Edit: Remediation action page, choose Automatic remediation.
- In the Remediation action details section, enter and choose the Automation Runbook we created in Step 4 of Task 2, for example: my-hipaa-alerting-runbook.
- In the Resource ID parameter section, choose Message.
- In the Parameters section:
- In the TopicArn value filed, enter the arn of the Amazon SNS topic we created and noted in Step 1 of Task 2.
- For example: arn:aws:sns:us-east-1:123456789012:my-sns-topic.
- In the AutomationAssumeRole value field, enter the arn of the IAM role we created and noted in Step 3 of Task 2. For example: arn:aws:iam::123456789012:role/my-hipaa-alerting-role.
- In the TopicArn value filed, enter the arn of the Amazon SNS topic we created and noted in Step 1 of Task 2.
- Choose Save changes.
Now we have set up a workflow to send out alert notifications when an Amazon S3 bucket doesn’t have server access logging enabled, which is a non-compliant event.
Task 3: Auto Remediation against Non-compliant HIPAA Findings
In this task we are going to build a workflow to trigger auto remediation actions against the identified non-compliant findings, so that we can bring the resources back to HIPAA compliant status without human involvement. For this demonstration we are going to build the remediation flow around the ec2-ebs-encryption-by-default rule we deployed in AWS Config services in Task 1.
- Create an Amazon SNS topic.
- For this task, we will re-use the Amazon SNS topic we created in Task 2.
- For example: arn:aws:sns:region:account-id:sns-topic-name.
- For this task, we will re-use the Amazon SNS topic we created in Task 2.
- Create a custom IAM policy.
- Open the IAM console at https://console.aws.amazon.com/iam/
- In the navigation pane, choose Policies, and then choose Create Policy.
- Choose the JSON tab.
- Replace the default content with the following:
{ "Version": "2012-10-17", "Statement": [ { "Effect": "Allow", "Action": [ "ec2:EnableEbsEncryptionByDefault" ], "Resource": "*" }, { "Effect": "Allow", "Action": [ "sns:Publish" ], "Resource": "arn:aws:sns:region:account-id:sns-topic-name" } ] }- region represents the identifier for an AWS Region such as us-east-1.
- account-id represents the 12-digit identifier for your AWS account, in the format 123456789012.
- sns-topic-name represents the Amazon SNS topic name you created in step 1.
- For example: my-sns-topic.
- Choose Next all the way to the Review Policy page.
- On the Review policy page, for Name, enter a name for this custom policy.
- For example: my-hipaa-remediation-policy.
- Choose Create policy.
- Create an IAM role.
- Open the IAM console at https://console.aws.amazon.com/iam/
- In the navigation pane, choose Roles, and then choose Create role.
- Under Trusted entity type, choose AWS service.
- In the Use case section, choose Systems Manager. Then choose Next.
- On the Add permissions page, select the box to the left of the name of the custom policy you created in Step 2 of Task 3. For example: my-hipaa-remediation-policy. Then Choose Next.
- On the Name, review and create page, for Role name, enter a name to identify the role.
- For example: my-hipaa-remediation-role.
- Choose Create role.
- On the Roles page, select and open the newly created role, and make a note of the role ARN.
- For example: arn:aws:iam::account-id:role/my-hipaa-remediation-role.
- Create an AWS Systems Manager automation runbook.
- Open the AWS Systems Manager console at https://console.aws.amazon.com/systems-manager/
- In the navigation pane, choose Documents.
- Click Create document, then choose Automation.
- For Name, enter a descriptive name for the runbook.
- For example: my-hipaa-remediation-runbook.
- Choose the Editor tab, and choose Edit.
- Replace the default content with the following YAML code:
description: enables EBS encryption by default and publish SNS notification schemaVersion: '0.3' assumeRole: '{{ AutomationAssumeRole }}' outputs: - ModifyAccount.EnableEbsEncryptionByDefaultResponse parameters: AutomationAssumeRole: type: String description: (Required) The ARN of the role that allows Automation to perform the actions on your behalf. allowedPattern: '^arn:(aws[a-zA-Z-]*)?:iam::\d{12}:role/[\w+=,.@/-]+$' TopicArn: type: String description: (Required) The ARN of the SNS topic to publish the notification to. mainSteps: - name: ModifyAccount action: 'aws:executeAwsApi' description: | ## ModifyAccount Enables EBS encryption by default for the account in the current region. ## Outputs * EnableEbsEncryptionByDefaultResponse: Response from the EnableEbsEncryptionByDefault API. timeoutSeconds: 600 isEnd: false inputs: Service: ec2 Api: EnableEbsEncryptionByDefault outputs: - Name: EnableEbsEncryptionByDefaultResponse Selector: $ Type: StringMap - name: PublishSNSNotification action: 'aws:executeAwsApi' inputs: Service: sns Api: Publish TopicArn: '{{TopicArn}}' Message: 'EBS encryption is enabled in this account.' isEnd: true - Choose Create automation.
- Set up Remediation Action for AWS Config rule.
- Sign in to the AWS Management Console and open the AWS Config console at https://console.aws.amazon.com/config/
- Choose Rules on the left and then on the Rules page, select the “ec2-ebs-encryption-by-default” rule from the rule list and choose the Actions dropdown list.
- From the Actions dropdown list, choose Manage remediation.
- On the Edit: Remediation action page, choose Automatic remediation.
- In the Remediation action details section, enter and choose the Automation Runbook we created in Step 4 of Task 3.
- For example: my-hipaa-remediation-runbook.
- In the Resource ID parameter section, choose Message.
- In the Parameters section:
- In the TopicArn value filed, enter the arn of the Amazon SNS topic we created and noted in Step 1 if Task 3.
- For example: arn:aws:sns:region:account-id:sns-topic-name.
- In the AutomationAssumeRole value field, enter the arn of the IAM role we created and noted in Step 3 of Task 3. For example: arn:aws:iam::account-id:role/my-hipaa-remediation-role.
- In the TopicArn value filed, enter the arn of the Amazon SNS topic we created and noted in Step 1 if Task 3.
- Choose Save changes.
Now we have set up a workflow to take a remediation action when the Amazon EBS volume encryption is disabled in your AWS account, and bring this setting back to the complaint status automatically.
Testing the Solution
We now have built workflows to identify, alert, and remediate non-compliant findings in your AWS account. We should perform the following steps in order to test the automatic alerting and remediation we just created:
- Auto alerting
- Create a new Amazon S3 bucket, or modify an existing bucket, and leave the Server access logging Properties as Disabled. This will trigger a non-compliant event and be identified by the s3-bucket-logging-enabled Config rule.
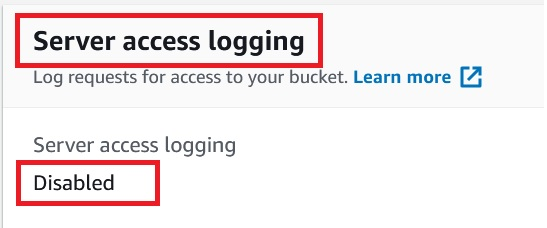
Figure 6 – Changing the Amazon S3 bucket server access logging property for testing purposes
- After a few minutes, you should receive a notification, for example an email if you subscribed to the Amazon SNS topic created in Task 2, Step 1. The notification would alert you that the Amazon S3 bucket has server access logging disabled. By receiving this alert, you should be able to log into the Amazon S3 console and take remediation actions on the identified bucket.
- You should also be able to subscribe to the topic with SMS, HTTP(S), or AWS services like AWS Lambda, Amazon Simple Que Service, and Amazon Kinesis Data Firehose to have the notification send to multiple communication channels, and even to third-party communication platforms like Slack.
- Create a new Amazon S3 bucket, or modify an existing bucket, and leave the Server access logging Properties as Disabled. This will trigger a non-compliant event and be identified by the s3-bucket-logging-enabled Config rule.
- Auto remediation
- Log into the Amazon EC2 console in your AWS account. Open the EBS encryption Setting screen. Then disable this setting to trigger a non-compliant event and be identified by the ec2-ebs-encryption-by-default Config rule.

Figure 7 – Changing the Amazon EBS volume encryption setting for testing purposes
- The evaluation of the ec2-ebs-encryption-by-default Config rule will be triggered every 24 hours by default. For our testing purpose, you can open this rule in the Config console. Select this rule on the rule list, then click the Actions dropdown list. Choose Re-evaluate to trigger an evaluation.

Figure 8 – Re-evaluate Config Rule for testing purposes
- After a few minutes, you should receive a notification, for example an email if you subscribed to the Amazon SNS topic created in Task 2, Step 1. The notification would notify you that the Amazon EBS encryption setting is enabled in your AWS account.
- You could further verify the result by logging back to the Amazon EC2 console, and open the EBS encryption setting. You should see that this setting is enabled by the auto remediation workflow you deployed in Task 3.
- Log into the Amazon EC2 console in your AWS account. Open the EBS encryption Setting screen. Then disable this setting to trigger a non-compliant event and be identified by the ec2-ebs-encryption-by-default Config rule.
Cleaning up
You can continue to build the HIPAA compliant monitor, alert, and remediation workflows on top of the works we have demonstrated in this post. If you have built this in a sandbox environment and want to continue the work in other environments, to avoid incurring future charges in the sandbox environment, you will want to delete the resources created in this demonstration, including the IAM policies, IAM Roles, SSM Automation Runbooks, SNS topics, Config rules, and the testing S3 buckets.
Conclusion
In this blog post, you learned how to leverage HIPAA-eligible AWS services to create security workflows to identify, alert, and remediate the non-compliant findings in your AWS Cloud accounts and help you better align to the HIPAA requirements.
For more information about monitoring HIPAA compliance with AWS Config, check out AWS Config Operational Best Practices for HIPAA Security. For more information about using AWS Systems Manager Automation Runbook to remediate non-complaint resources, check out AWS Config rule remediation setup and create AWS Systems Manager automation runbook scripts.