The Internet of Things on AWS – Official Blog
Empowering operations: A scalable remote asset health monitoring solution
Looking for ways to monitor the health of industrial remote assets and create a centralized dashboard? Perhaps your remote industrial assets are connected or ready to connect to AWS, but you haven’t decided on how to present the data to operators and maintenance teams. Industrial remote assets are many and from different technological eras. Industrial customers need ways to equally visualize and monitor the status of those assets. Operation teams can then rely on a comprehensive dashboard and alerts to activate maintenance teams or remote actions, improving uptime and efficiency. In this blog post, you will learn how to use the data ingested to AWS IoT Core to enable field teams with a centralized Grafana dashboard and alerts table.
Overview
This blog will work with a simulated dataset, the dataset will represent 10 remote pumping stations. You will build the end-to-end solution and running deployment scripts from the AWS Command Line Interface (AWS CLI). The goal of this post is to show the step-by-step process of building a remote asset monitoring solution in AWS. We have built an architecture which is scalable, completely serverless, and composed of an IoT data ingestion service. We are using AWS IoT Core for ingestion and simulation, AWS IoT SiteWise for asset modeling, and Amazon Managed Grafana for a centralized dashboard and alerts. In addition, you will interact with Amazon Simple Notification Service (Amazon SNS), where alarms assigned to different subscribers.
Scalable Architecture for Remote Asset health monitoring solution
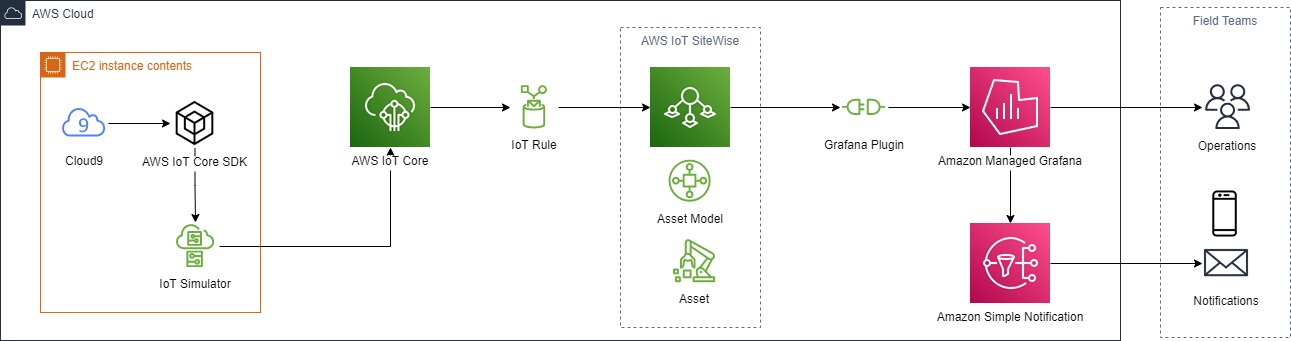
This is the scalable architecture you will build in this blog. (Note: the Amazon Elastic Compute Cloud (Amazon EC2) instance is a simulation environment only)
Prerequisites
An AWS account is required to setup and execute the steps in this blog, AWS service will be configured, and you must have the necessary Identity and Access Management (IAM) permission to do the following:
- Setup of an Amazon EC2 instance through Cloud9 environment for the IoT Device Simulator. The Amazon EC2 instance must have a role associated, which allows administrator access to the following services:
- AWS IoT Core
- AWS IoT SiteWise
- AWS Managed Grafana
- Amazon SNS
- Access to IAM to create a role (or pre-created role).
- An email box for the notification subscription.
- Work from a region which supports all the services pre-listed, we recommend us-east-1.
Getting the environment ready
Create AWS Cloud9 environment
- Log into the AWS Cloud9 console.
- Click Create environment.
- Enter the name IoT Simulator and click next.
- Select Create a new EC2 instance (direct access).
- Select Instance type t3.small.
- Select Amazon Linux 2 and click Next step.
- Click Create environment. The instance will start and the AWS Cloud9 environment will be ready for work. Note: You will execute commands from the AWS Cloud9 environment. Make sure the role attached to your Cloud9 provisioned instance has rights to execute AWS CLI commands for all services utilized in this blog. You can verify it from the Amazon EC2 console (go to AWS Cloud9 → your environments → select IoT Simulator → View details → Click on instances in EC2. From EC2 select the AWS Cloud9 instance → Actions → Security → and Modify IAM role. At this point, you can check which is assigned to the instance, select a pre-created role or create a new one).
- This step will clone the scripts and sample files we created for this blog post. From the terminal run the following commands:
git clone https://github.com/aws-samples/aws-iot-remote-asset-health-monitoring.git

 cd aws-iot-remote-asset-health-monitoring
chmod +x bootstrap.sh
./bootstrap.sh
Start Simulator for AWS IoT Core ingestion
We have prepared a script to create the IoT Thing with the required resources for the simulation.
- Now execute the following commands:
python create_thing.py
nohup ./start.sh > iotconnection.log 2>&1 & - Navigate to AWS IoT Core → Test → MQTT test client
- Got to Subscribe to a topic, type # and click Subscribe. You will see messages arriving under Topic as below:
The payload represents 10 pumping stations with different locations and anomalies. You will use part of the simulated values to build assets and dashboards.
Ingesting data into AWS IoT SiteWise
Creating IAM role for SiteWise ingestion rules
- Log into IAM (Identy Access managment) → Roles and click Create Role
- Select Custom trust policy and paste the below JSON snippet, click Next.
{ "Version": "2012-10-17", "Statement": [ { "Effect": "Allow", "Principal": { "Service": "iot.amazonaws.com" }, "Action": "sts:AssumeRole" } ] } - In Permissions search for SiteWise and select the policy AWSIoTSiteWiseFullAccess and click next.
- In Role Details, name the role with the following name “ iot_to_sitewise” and Create a Role.
- Click on View Role
- Copy and save the Role ARN, as you will need it to run the rule creation script.
Creating Rules to publish to AWS IoT SiteWise
You can find more on how to create IoT rules in AWS IoT Core Documentation and how to configure Actions to publish to AWS IoT SiteWise at AWS IoT SiteWise Documentation. In this blog, you will use the AWS CLI commands to create the rules from your AWS Cloud9 environment. We have prepared a python script which will create the rules using the previously created IAM role.
- Go to your AWS Cloud9 environment, from the ~/environment/aws-iot-remote-asset-health-monitoring directory. Now run the following command:
python create_iotrules.py -r <the Role Arn here>
This script creates the IoT rules to ingest the simulation data into AWS IoT SiteWise. (Note: The policy used for this demonstration is over permissive and shouldn’t be used in a production environment, for more information on scoping down policies check this AWS IoT policies overly permissive) - Now navigate to AWS IoT Core → Message Routing→ Rules
You will see the rules at the console as Active as below.

- Now navigate to AWS IoT SiteWise→ Data streams
AWS IoT SiteWise Data Streams is where ingested data, which is not yet assigned to an asset is automatically stored. For more information on Data Streams follow this link. Now verify the data arriving in AWS IoT SiteWise and being update periodically, you can also filter through all Alias prefix, use the /pumpingstation/{n} and All data streams to observe the data.

Asset model and Assets in AWS IoT SiteWise
Creating Asset Model
- Navigate to AWS IoT SiteWise→ Models and click on Create model
- Configure your model as following, note that it is important to respect the syntax (including upper case and lower case, we recommend coping and pasting through this section) as that will influence on the auto asset generation.
- Name: PumpingStation;
- Description: This is the digital model representation of all pumping station
- Measurement definitions:
- name: Temperature; Unit:F; Data type: Integer
- name: Humidity; Unit:%; Data type: Integer
- name: Pressure; Unit: PSI; Data type: Integer
- name: Vibration; Unit: Hz; Data type: Integer
- name: Flow; Unit: m3/s; Data type: Integer
- name: rpm; Unit: rpm; Data type: Integer
- name: Voltage; Unit: V; Data type: Integer
- name: Amperage; Unit: A; Data type: Integer
- name: Fan; Unit: on/off; Data type: Boolean
- name: Location; Unit: State; Data type: String
- Finish by clicking on Create model, you will have your mode available on the list.
- Now your model will show as follows, copy the model ID and save it for the next steps, as we will need as an input for the creation scripts.


Creating Assets
- The next step is creating Assets from the model PumpingStation, for this step you will be running a python script which will automatically create 10 pumping station and associate the available Data stream to its match asset measurement. For more information on how to create Assets from Asset model refer to the AWS IoT SiteWise Documentation.
- Navigate back to the AWS Cloud9 environment.
- From the ~/environment/aws-iot-remote-asset-health-monitoring directory, execute the following commands:
From your AWS Cloud9 terminal execute the following command:
python create_iotsitewise_assets.py -i <your model Id here>
The Script will run for about 5 minutes. You can watch the responses from the AWS CLI commands. - Go to AWS IoT SiteWise→ Assets and confirm that all pumping stations were created and are active as below.

- Select one of the Pumping Stations and go to measurements. Now confirm that your data is arriving in AWS IoT SiteWise and being updated periodically.

Creating Dashboards in Amazon Managed Grafana
Creating Amazon SNS notification
Before we work with Amazon Managed Grafana, we recommend that you create and configure the notification channel. Amazon Managed Grafana can directly send notifications to Amazon SNS given the ARN for the Amazon SNS Topic.
- Navigate to Amazon SNS (amazon.com) → Topics and click on Create Topic
Select Standard, Name it : All_Pumping_Stations - Go to Access policy, and Select Everyone in both options, publish and subscribe, and click Create.(Note: an over-permissive policy is not recommended beyond this simulation environment)
- Navigate to your newly create topic All_Pumping_Stations and click on Create subscription.
- Select Email, under Endpoint add your test email address, and click create subscription.
- The Subscription will show as Pending confirmation Status, within a minute you will receive a confirmation link in your test email, after accepting it the subscription is ready. (shown as below).
- Copy the ARN for the topic and save it for later on your clipboard.

Creating Amazon Managed Grafana workspace
-
- Navigate to AWS Grafana Console , click on Create workspace
- Name: all_pumping_stations, Click next
- Select AWS Single Sign-On (If AWS Single Sign-On is not enabled, you must enable it, follow this link for instructions. Amazon Managed Grafana also supports SAML authentication, you can find more information here)
- Select Service managed, Click next
- Select Current account
- Under Data sources select AWS IoT SiteWise
- Under Notification channels, select Amazon SNS, Click Next
- Click Create Workspace
- Once your workspace is ready status under Authentication, you must assign a new user to your workspace. Click on Assign new user or group.
- If you have enable AWS Single Sign-On (SSO), you will then see a user or group, select it and click Assign User, then Select the same user or group, and go to Actions and make Admin
Navigate back to AWS Grafana Console → All workspaces → all_pumping_stations, look for the Grafana workspace URL and click on it. - A new tab will open and you see the login page as below. Log in and you are ready for the next step.

Configuring Amazon Managed Grafana notification channel
- In your Grafana workspace Navigate to Alerting→ Notification channels.
- Click on Add Channel.
- Name : all_pumping_stations
- Type : AWS SNS
- Topic : <Paste the topic ARN from the previous section>. If you need to locate it again, Navigate to Simple Notification Service→ Topics→ all_pumping_stations, the ARN is located under details.
- Auth Provider: Workspace IAM Role
- Message Body Format: Text
- Under Notification setting, select Default
- Click Save. (Optionally, you can also click on the test to make sure your notification channel is correctly setup)
Configuring Grafana Data sources
- In your Grafana workspace Navigate to Configuration→ Data Sources
- Click on Add data Source.
- Search for AWS IoT SiteWise and click on it

- Under Connection Details keep the default except for Default Region. Select the region where you built your SiteWise assets.
- Click Save & test
Creating Dashboards in Amazon Managed Grafana
For the monitoring dashboards and alerts we have created a python script which will automatically deploy one dashboard for each pumping station.
- Navigate to AWS Grafana Console→ Workspaces→ all_pumping_stations
- Look for the Grafana workspace URL and copy the ID before .grafana, as shown below.

- Go to your AWS Cloud9 environment, from the ~/environment/aws-iot-remote-asset-health-monitoring directory, run the following command:
python create_grafana_dashboards.py -i <your workspace ID here> -r <your Model ID here> - After the script is finished, navigate to the Grafana Workspace→ Dashboards→ Browse, confirm that all dashboards have been successfully created and the simulation data is being ingested as shown below.

- Navigate to pumpingstation9/Status/Time_series dashboard and confirm the temperature is high, and the alert is active. For this simulation data set, the Pumping Station 9 presents the anomalous temperature and triggers an alert to the notification channel every 2 minutes. Optionally navigate to any other pumping station dashboard and compare them.

- Now navigate to Alerting→ Alert rules, and check that all the other alerts are healthy.

Conclusion
In this blog, you learned how to use AWS IoT SiteWise to collect and organize data from remote industrial assets. And with Amazon Managed Grafana operators can notified about key issues, with alarms and alerts delivered to them when equipment behaves anomalously or operates outside of expected operating limits. With the solution described in this blog, you can implement a reliable and scalable field-to-cloud Industrial IoT (IIoT) solution on AWS for use cases such as asset remote asset monitoring. Also, the architecture example provides further connectivity with other AWS services, allowing integration with automation services and data sources.
Clean Up
Be sure to clean up the work in this blog to avoid charges. Delete the following resources when finished in this order:
- AWS Manage Grafana → Workspace, and delete the workspace created for the work.
- Simple Notification Service → Topic, and delete the topic created for the work.
- AWS IoT SiteWise → Assets and delete Assets.
- AWS IoT SiteWise → Data Streams, and delete all data streams related to the work.
- AWS IoT SiteWise → Model, and delete the Model created for the work.
- AWS IoT → Message routing → Rules, and Delete rules created for the role.
- AWS Cloud9 → Your environments and delete the environment.
About the Authors
Yuri Chamarelli is an Amazon Web Services Solution Architect (AWS) based out of the United States. As an IoT specialist, he focuses on helping customers build with AWS IoT and accomplish their business outcomes. Yuri is a Controls engineer with over 10 years of experience in IT/OT systems and has helped several customers with Industrial transformation and Industrial automation projects throughout many industries.
 Seibou Gounteni is a Specialist Solutions Architect for IoT at Amazon Web Services (AWS). He helps customers architect, develop, operate scalable and highly innovative solutions using the depth and breadth of AWS platform capabilities to deliver measurable business outcomes. Seibou is an instrumentation engineer with over 10 years of experience in digital platforms, smart manufacturing, energy management, industrial automation and IT/OT systems across a diverse range of industries.