Front-End Web & Mobile
How to Use Cognito Pre-Token Generation trigger to Customize Claims In ID Tokens
This article was written by Matt Noyce, Cloud Application Architect at AWS, & Srihari Prabaharan, Cloud Application Architect at AWS
Amazon Cognito is a fully managed AWS service which lets you add user sign-up, sign-in, and access control to your web and mobile apps quickly and easily. Amazon Cognito scales to millions of users and supports sign-in with social identity providers, such as Facebook, Google, and Amazon, and enterprise identity providers via SAML 2.0. Cognito User Pool manages the overhead of handling the tokens that are returned from social sign-in through Facebook, Google, and Amazon, and from OpenID Connect (OIDC) and SAML IdPs. After successful authentication, Amazon Cognito returns user pool tokens to your app. You can use the tokens to grant your users access to your own server-side resources, or to the Amazon API Gateway. Or, you can exchange them for AWS credentials to access other AWS services.
Amazon Cognito user pools implements ID, access, and refresh tokens as defined by the OpenID Connect (OIDC) open standard:
- The ID Token contains claims about the identity of the authenticated user such as
name,email, andphone_number. - The Access Token grants access to authorized resources.
- The Refresh Token contains the information necessary to obtain a new ID or access token.
Using Cognito Pre Token Generator Lambda Trigger to add custom claims in ID Tokens
In this post we will talk about how to add custom JWT claims to an ID Token generated by a Cognito User Pool using the Pre token Generation Lambda Trigger. This Lambda trigger allows you to customize an identity token before it is generated. You can use this trigger to add new claims, update claims, or suppress claims in the identity token. In the below example, we will use Cognito Pre-token Generator Lambda Trigger to add a custom JWT claim called pet_preference to all incoming ID Token requests.

- User is redirected to AWS Cognito User Pool to perform authentication (AuthN).
- Lambda Pre Token Generator trigger is invoked
- Custom JWT claim pet_preference is added to ID Token.
- ID and Access Tokens are returned to the end-user for consumption.
Getting Started
To build the architecture described above, we will need a Cognito User Pool, Cognito App Client and a Pre Token Generation Lambda Trigger to add custom claims to Id Token.
Solution Overview:
Cognito User Pool
A user pool is a user directory in Amazon Cognito. With a user pool, your users can sign in to your web or mobile app through Amazon Cognito. Create a new Cognito User pool using the steps mentioned in the link. Note down the User Pool Id.

Cognito User Pool App Client
An App Client is a way to grant applications access to authenticate against a user pool and to generate ID and Access Tokens appropriately for end users. Create an App Client in your newly-created Cognito User Pool like the screenshot below. Note down the App Client id and App client secret.

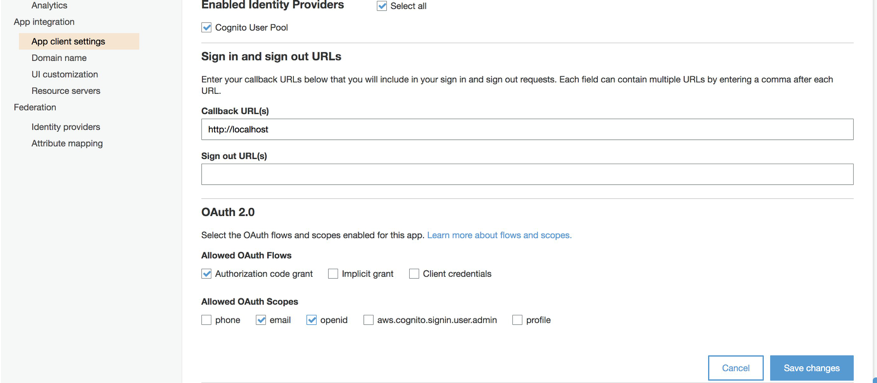
App Client Settings
Configure your app client in the App Client settings:
- Enable Cognito User Pool as an Identity Provider (IdP)
- Configure Callback URL’s and signout URL as per your app requirements. In this example, we have added a callback URL of localhost for application testing purposes.
- Enable Authorization Code Grant Flow with OAuth scopes as email and openid
- Save the changes
Pre token Lambda Function
Before we add the Pretoken generator trigger in Cognito User Pool, we would need to Create a Lambda Function for customizing the token. The below example lambda function uses Python 3.8 runtime.

Python Lambda Source:
Copy the following code to the Lambda function body.
def lambda_handler(event, context):
    """
    This function handles adding a custom claim to the cognito ID token.
    """

    # grab requestor's email address
    email = event['request']['userAttributes']['email']

    # placeholder variable
    pet_preference = ''

    # set preference to 'dogs' if email contains @amazon.com
    # otherwise preference is 'cats'
    if "@amazon.com" in email:
        pet_preference = 'dogs'
    else:
        pet_preference = 'cats'

    # this allows us to override claims in the id token
    # "claimsToAddOrOverride" is the important part
    event["response"]["claimsOverrideDetails"] = {
        "claimsToAddOrOverride": {
            "pet_preference": pet_preference
            }
        }

    # return modified ID token to Amazon Cognito
    return event
Code Walkthrough
- In the above example, The lambda handler event captures User Attribute Email.
- If the user has an email address from “amazon.com” then we set the pet_preference to ‘dogs’ .
- If the email address is not from “amazon.com”, we set the pet_preference to ‘cats’ .
- Through the event[‘response’][‘claimsOverrideDetails’] key, we can override or add custom ID token claims to the JWT token in this case pet_preference.
- Return the modified token back.
IAM Lambda Execution Role Trust Relationship Policy:
In order for Cognito to Trigger the Lambda function, the IAM Lambda Execution Role’s Trust Relationship must be updated to include the cognito-idp.amazonaws.com service principal. This allows Cognito the access to assume the Lambda Role so that it can invoke the Pre Token generator.
{
  "Version": "2012-10-17",
  "Statement": [
    {
      "Effect": "Allow",
      "Principal": {
        "Service": "lambda.amazonaws.com"
      },
      "Action": "sts:AssumeRole"
    },
    {
      "Effect": "Allow",
      "Principal": {
        "Service": "cognito-idp.amazonaws.com"
      },
      "Action": "sts:AssumeRole"
    }
  ]
}
Cognito Pre token Generation Trigger
After creating the above Lambda function, Add a Trigger in the Cognito User Pool
- Navigate to Triggers under the newly-created Cognito User Pool (this is found on the left side of the screen).

- Scroll down on this page and choose Pre Token Generation as a Trigger option.
- Select the Lambda function created in the previous step and save the changes.

Creating user accounts
Create a test-user in Cognito User Pool like below and verify the user email address

Configuring User Pool Domain(optional)
Create a custom Cognito domain for our application to redirect our users for performing authentication.

OpenID Connect Discovery URL:
After you configure a domain for the user pool, Amazon Cognito automatically provisions a hosted UI that enables you to easily add a federated, single sign-on experience to your website. Behind the scenes, the hosted UI accesses HTTPS endpoints (also provisioned by Amazon Cognito) that implement parts of the OAuth 2.0 framework. You can use the following OpenID Connect Discovery URL endpoint for more information about which endpoints to call:
https://cognito-idp.<AWS-Region>.amazonaws.com/<Cognito-User-PoolId>/.well-known/openid-configuration
This is an example output of the OPENID CONNECT DISCOVERY URL ENDPOINT. The Discovery URL will provide the necessary URLs required to perform OIDC Auth Code Grant.
{
"authorization_endpoint": "https://my-pet-app.auth.us-east-1.amazoncognito.com/oauth2/authorize",
"id_token_signing_alg_values_supported": ["RS256"],
"issuer": "https://cognito-idp.us-east-1.amazonaws.com/us-east-1_*****",
"jwks_uri": "https://cognito-idp.us-east-1.amazonaws.com/us-east-1_*****/.well-known/jwks.json",
"response_types_supported": ["code", "token", "token id_token"],
"scopes_supported": ["openid", "email", "phone", "profile"],
"subject_types_supported": ["public"],
"token_endpoint": "https://my-pet-app.auth.us-east-1.amazoncognito.com/oauth2/token",
"token_endpoint_auth_methods_supported": ["client_secret_basic", "client_secret_post"],
"userinfo_endpoint": "https://my-pet-app.auth.us-east-1.amazoncognito.com/oauth2/userInfo“
}
Validating custom JWT Claims In ID Tokens
The below steps detail how to use Authorization Code grant method for authorizing end users. Authorization Code grant method does not provide user pool tokens directly to an end user upon authentication, instead an authorization code is provided. This code is then sent to a custom application that can exchange it for the desired tokens.
Step 1: Building the Authentication endpoint
Build the following HTTP GET request by providing Cognito User Pool Id and App client Id created above to retrieve authorization code.
# HTTP GET request (in browser)
https://<Cognito User Pool Domain>/login?response_type=code&scope=openid%email&client_id=<Cognito App Client ID>&redirect_uri=http://localhost
Step 2: Getting the Authorization Code
Paste the URL formed above in a browser, you should see the sign in page like below.

Provide the test-user username, password created above and sign in. After Amazon Cognito verifies the user pool credentials it receives, the user is redirected to the URL that was specified in the original redirect_uri query parameter. The redirect also sets a code query parameter that specifies the authorization code that was vended to the user by Amazon Cognito.
Example:

Step 3: Getting the user Pool Tokens
Now that we have authenticated the user and got the authorization code Query parameter, the next step is to exchange it for user pool tokens. The exchange occurs by submitting a POST request with code Query parameter, client Id and Authorization Header like below.
# HTTP Request (including valid token with "email" scope)
$ curl -X POST \
  'https://<Cognito User Pool Domain>/oauth2/token?
  grant_type=authorization_code&
  code=8a24d2df-07b9-41e1-bb5c-c269e87838df&
  redirect_uri=http://localhost&
  client_id=55pb79dl8gm0i1ho9hdrXXXXXX&scope=openid%20email' \
  -H 'Accept-Encoding: gzip, deflate' \
  -H 'Authorization: Basic NTVwYj......HNXXXXXXX' \
  -H 'Content-Type: application/x-www-form-urlencoded'
We would need to set the Authorization header for this request as Basic BASE64(CLIENT_ID:CLIENT_SECRET), where BASE64(CLIENT_ID:CLIENT_SECRET) is the base64 representation of the app client ID and app client secret, concatenated with a colon.
Once the POST Request is successful we should get a response with id_token, access_token and refresh_token.
{
    "id_token":"XXXXXXx.....XXXXXXX",
    "access_token":"XXXXXXx.....XXXXXXX",
    "refresh_token":"XXXXXXx.....XXXXXXX",
    "expires_in": 3600,
    "token_type": "Bearer"
}
Decoding the JWT ID Token will yield the following results with custom claim pet_preference added to the Id Token.
{
    "at_hash": "4FNVgmQsm5m_h9VC_OFFuQ",
    "sub": "472ff4cd-9b09-46b5-8680-e8c5d6025d38",
    "aud": "55pb79dl8gm0i1ho9hdre91r3k",
    "token_use": "id",
    "auth_time": 1576816174,
    "iss": "https://cognito-idp.us-east-1.amazonaws.com/us-east-1_qyS1sSLiQ",
    "pet_preference": "dogs",
    "cognito:username": "test-user",
    "exp": 1576819774,
    "iat": 1576816174,
    "email": "test-user@amazon.com“
}
You can see that the pet_preference has been set to dogs since the email address of the requestor contains “amazon.com”
This example can be extended to various other use-cases where you may need non-standard JWT claims included in the requestor’s ID Token.