AWS Cloud Operations Blog
Configure Amazon EC2 Instances in an Auto Scaling Group Using State Manager
When you are managing instances at scale, it’s important to be able to define and apply software configurations as well as ensuring that the instances don’t deviate from the expected state. That way, you can make sure that your applications and infrastructure operate as you’d expect.
State Manager, which was launched as part of Amazon EC2 Systems Manager, helps you define and maintain consistent configuration of operating systems and applications. Using State Manager, you can control configuration details such as instance configurations, anti-virus definitions, firewall settings, and more. Based on a schedule that you define, State Manager automatically reviews your fleet and compares it against the specified configuration policy. If your configuration changes and does not match the wanted state, State Manager reapplies the policy to bring it back to the wanted state.
Auto Scaling helps you ensure that you have the correct number of Amazon EC2 instances available to handle the load for your application. You create collections of EC2 instances, called Auto Scaling groups. You can specify the maximum or minimum number of instances in each group, and Auto Scaling ensures that your group never goes above or below the values you set.
In this post, I discuss how you can use State Manager to define how to configure your instances in an Auto Scaling group. As new instances are added, State Manager automatically configures them to bring them to their wanted state. In addition, State Manager can also periodically reapply the configuration to your instances, minimizing configuration drift.
Walkthrough
In this walkthrough, I demonstrate how to create an Auto Scaling group, create a configuration that defines how to set up your instances, and then use State Manager to configure instances. I also show how to use the State Manager console and CLI to verify that all the instances are in their wanted state.
Step 1: Create a launch configuration and group
To get started with Auto Scaling, create a launch configuration and a group. For step-by-step instructions, see Getting Started with Auto Scaling.
Launch configuration
To use State Manager, instances that you launch must install the Amazon SSM agent and have an appropriate IAM role attached. The SSM agent is the software component that communicates with the Systems Manager and performs actions on the instances.
In the screenshot below, I’ve specified an IAM role and am using User data to install the agent during instance launch.

Here is the User data I used to install the agent on Instance launch.
Auto Scaling group
In the Auto Scaling group wizard, specify how many instances to start with and a tag for each instance launched as part of this group. You use this tag later on when using State Manager.
The Auto Scaling group is created and launches the instances as specified by the settings.

You can also perform the same operations with the AWS CLI:
Step 2: Create a configuration document
State Manager uses documents to specify configuration. Here is an example that configures all instances in the Auto Scaling group. I install Apache on the target and configure Clam, an open source antivirus engine that is already present in the Amazon Linux repo. If Clam is already installed, it skips and does nothing.
Store the JSON in a local file and then call the CreateDocument API to create the document:
Step 3: Create an association using tag queries
The next step is to use State Manager and create an association. An association is a binding of the intent (described in the document) to a target specified by either a list of instance IDs or a tag query.
Use the following command to create an association. The document name is from the previous step – “StateManagerDemo”. Note that you are specifying a tag query in the target parameter and using the Auto Scaling group name.
After you create an association, you can view details using either the CLI or the console. You can easily drill down and find out which instances were targeted as part of this State Manager association, and their status.
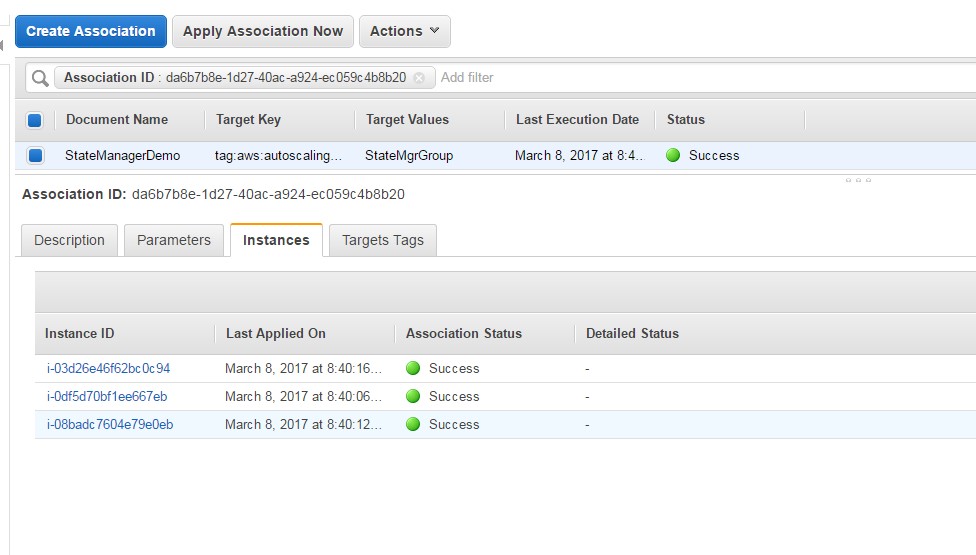
Step 4: Verify instance state
After an association is created in State Manager, the status is the overall status. If the overall association status is Success, all instances that were targeted in that association were successful in applying the configuration. If even a single instance failed to apply, the overall status is Failed. You can then drill down, figure out which instances failed, and troubleshoot.
The following example describes the association that was just created:
To find out if a particular instance is up to date and troubleshoot, find the association status for a given instance.
Conclusion
In this post, I showed one example of how you can use State Manager, along with other AWS services, to manage and configure your EC2 instance fleet. With State Manager, customers can easily define software configuration, apply against a target set of instances, and then find out if the target fleet is in the expected state. In addition, because State Manager can target tag queries, it allows you to use Auto Scaling groups and ensure that as instances scale up and down, software configuration is applied consistently to all the instances in the group.
About the Author
 Amjad Hussain is a Sr. Software Development Manager for Amazon EC2 Systems Manager. Systems Manager is a management service that helps you automatically collect remotely administer, software inventory, apply OS patches, create system images, and configure Windows and Linux operating systems. These capabilities help you define and track system configurations, prevent drift, and maintain software compliance of your EC2 and on-premises configurations. By providing a management approach that is designed for the scale and agility of the cloud but extends into your on-premises data center, Systems Manager makes it easier for you to seamlessly bridge your existing infrastructure with AWS.