AWS Cloud Operations Blog
Microsoft SCCM admins: Get started with AWS Systems Manager Patch Manager
As organizations migrate their traditional data centers and applications into the AWS cloud, they also want to modernize their patching mechanisms in order to reap the benefits of operating in the cloud. We find that many customers are looking to move away from Microsoft System Center Configuration Manager (SCCM) for patching, and move towards an AWS-native solution using AWS Systems Manager Patch Manager. This post is a primer on Patch Manager for systems administrators who are familiar with the SCCM product. We walk you through setting up your first Patch Manager configuration to patch your Windows-based Amazon Elastic Compute Cloud (Amazon EC2) instances that you have already deployed.
How Patches Are Deployed
About Patch Manager
Patch Manager is a cloud-native managed service, meaning that organizations no longer have to deal with the scalability issues and complex application management associated with operating a complex configuration management solution. Instead, an organization can focus on what makes their situation unique and deploy patching more easily without all of the undifferentiated heavy lifting of traditional configuration management software.
Patch Manager allows you to deploy patches on a schedule of your choosing, and view compliance status. Patch Manager acts as a trigger to initiate patching or compliance activities, and uses the built-in patching mechanisms for your client operating system. Patch Manager can be used to apply updates to both your cloud systems hosted in Amazon EC2 and (in hybrid environments) your on-premises systems.
Patch Manager is part of the larger AWS Systems Manager product, which offers many other features for managing your systems in the AWS cloud and on-premises. Here are just a few of the features of Systems Manager:
- Automation
- Compliance
- Session Manager
- Maintenance Window
- Run Command
- State Manager
- Distributor
- OpsCenter
- Parameter Store
- Inventory
Prerequisites for this walkthrough
For the purposes of this Patch Manager walkthrough, we assume the following about your AWS environment:
- You have one or more EC2 instances running a Windows operating system that you would like to patch.
- These EC2 instances were launched from an Amazon Machine Image (AMI) or an AMI that you created from an Amazon AMI.
- These EC2 instances have internet access, either through a network address translation (NAT) gateway or an internet gateway.
- You have administrator access to the AWS account via an IAM user or IAM role.
Patch Manager architectural components
AWS Systems Manager Agent
Similar to SCCM, Patch Manager uses an agent for AWS Systems Manager to communicate between managed clients and the AWS Systems Manager service. The AWS Systems Manager agent generally performs tasks by running AWS Systems Manager documents against the managed systems. For Windows clients, these documents are usually PowerShell scripts.
In the scope of Patch Manager, these documents carry out evaluations for needed updates or apply updates using PowerShell commands. Once the execution is complete, the document reports the status of the task back to AWS Systems Manager.
The AWS Systems Manager agent is included on all public AMIs that are provided by AWS. The AWS Systems Manager agent does have two prerequisites:
- An IAM instance profile role is required to enable the AWS Systems Manager agent running on your EC2 systems to communicate with AWS Systems Manager. For on-premises systems in a hybrid model, you register the AWS Systems Manager agent using a hybrid activation code.
- All managed systems need to be able to communicate with the AWS Systems Manager endpoints. In a VPC, this can be facilitated via direct internet access or a NAT Gateway. If you want your systems not to have internet access, you can use VPC endpoints for Systems Manager, EC2, and Amazon Simple Storage Service (Amazon S3).
All managed systems also need to be able to communicate with an update repository. For this walkthrough, we use the default repository (Microsoft’s native Windows Update services) via the internet.
Check the Systems Manager prerequisites documentation for Systems Manager agent prerequisites.
Let’s configure your Systems Manager agents:
- Since you have launched your Windows EC2 instances from Amazon AMIs, the Systems Manager agent is already installed. If you are not using an Amazon AMI, refer to agent installation documentation for installation instructions.
- Next, create a role to grant your EC2 instances the permissions they need to interact with AWS Systems Manager. Select IAM service in the AWS Management Console, and select Roles. Click Create role.

- Select EC2 under Common use cases, then click Next: Permissions.

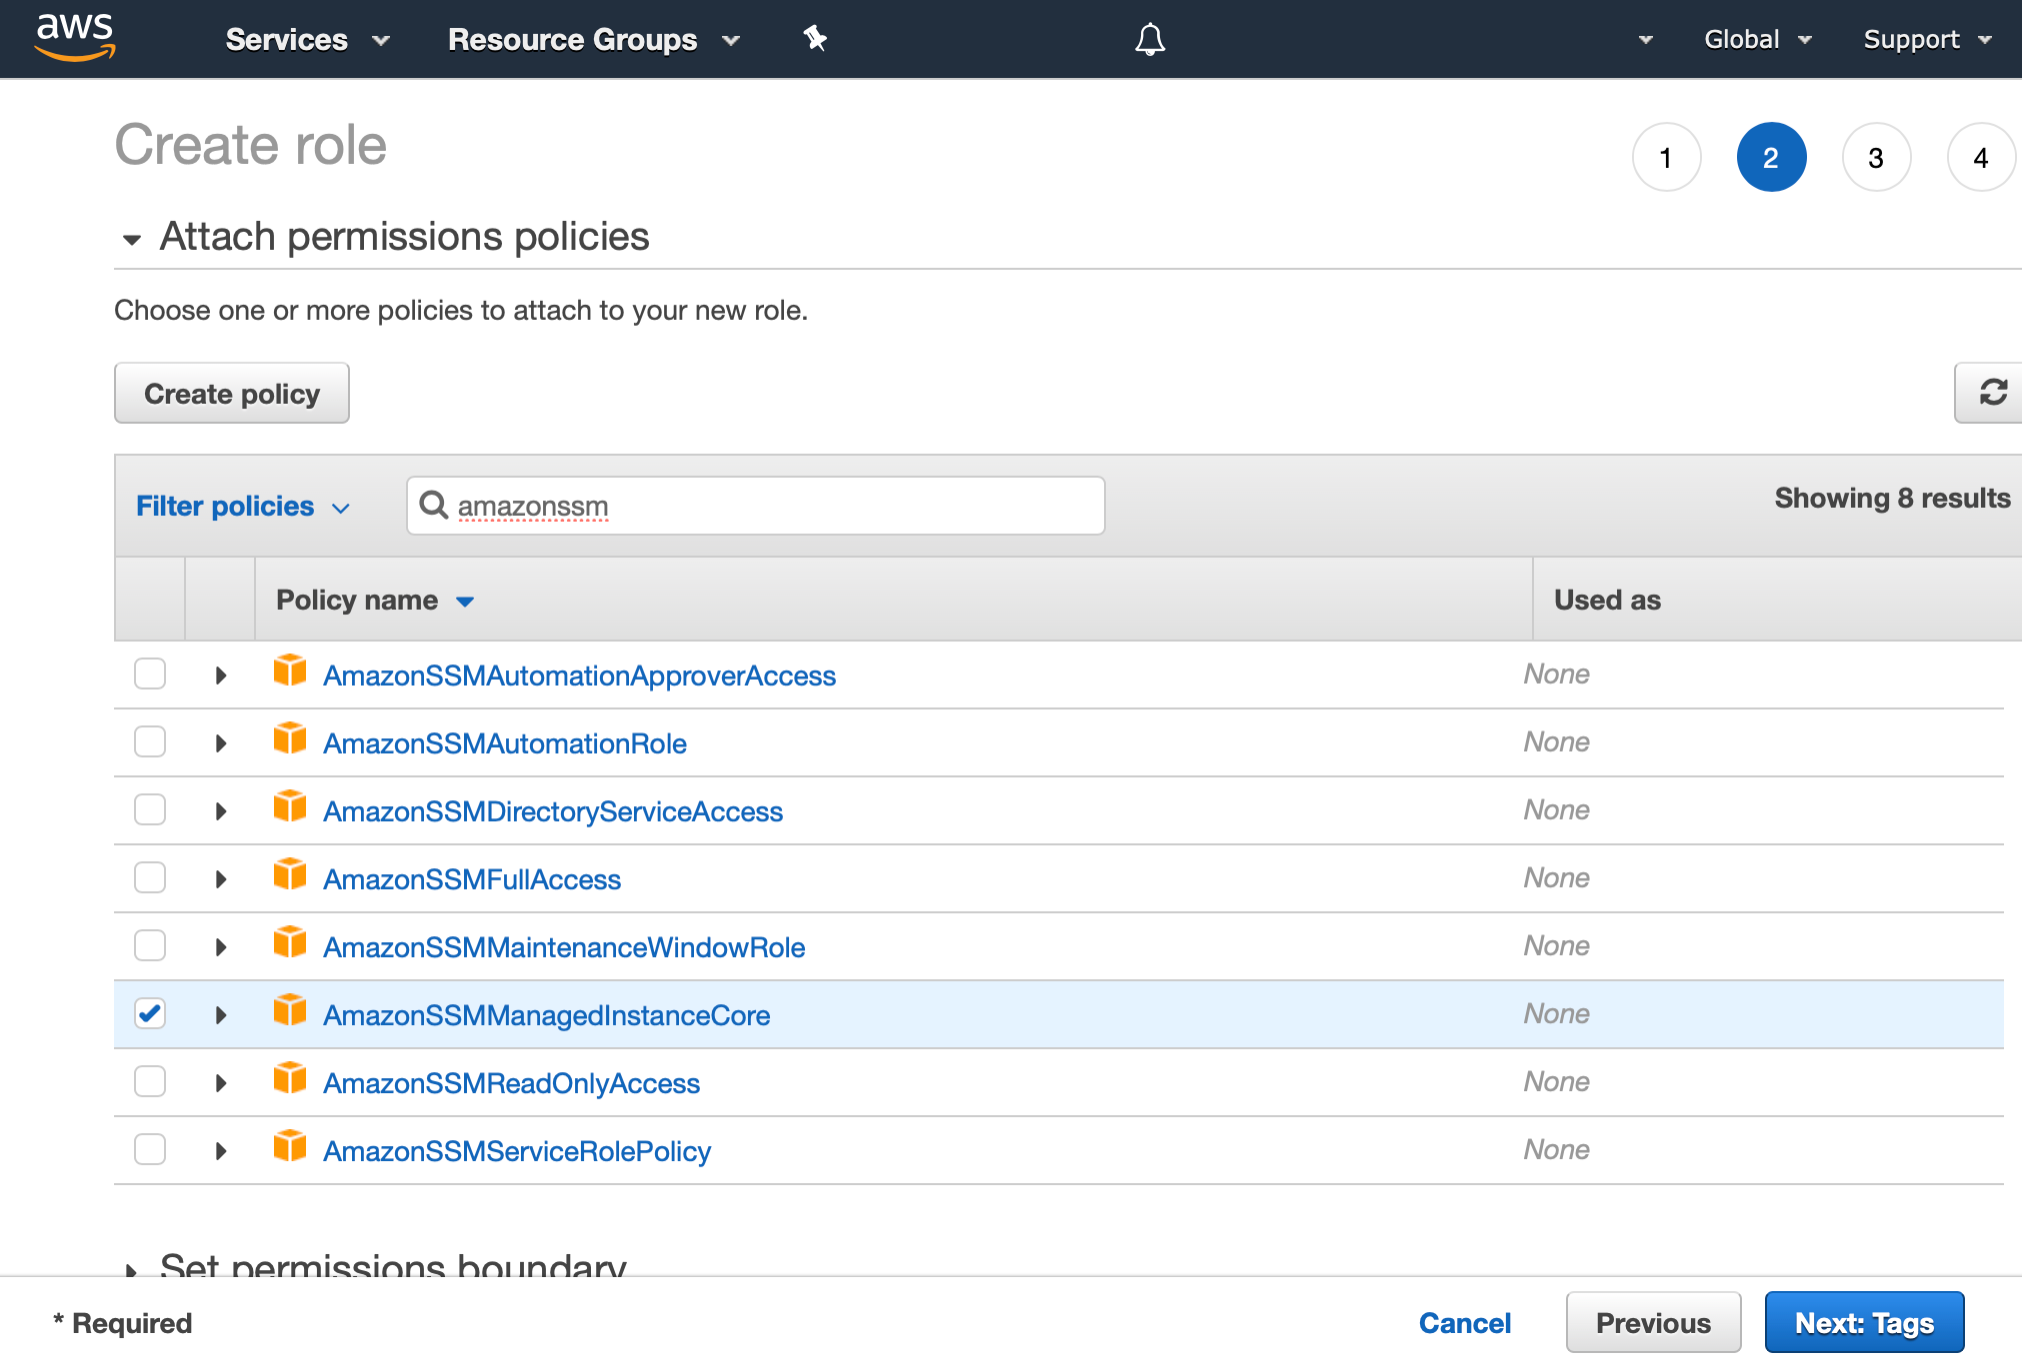
- Select the AmazonSSMManagedInstanceCore policy and click Next: Tags.
- Optionally, add any tags that you would like to apply to this role, and click Next: Review.

- Give your role a name using the Role name field, such as
EC2-SSMCore, and an optional role description. Click Create Role.
- Next, head to the EC2 service in the AWS Management Console, and click Instances on the left pane. Find an instance to which you would like to apply patches. Right-click on the instance, and under Instance Settings locate Attach/Replace IAM Role.

- Select the role that you created and click Apply.

You have now configured prerequisites for your AWS Systems Manager agent.
For information on setting up the Systems Manager agent in hybrid deployments, please check Systems Manager hybrid environment documentation.
Update repository
Patch Manager uses OS-native mechanisms for deploying updates. For Microsoft Windows clients, this means that your managed systems get their updates from Microsoft Update services over the internet or a Windows Server Update Services (WSUS) instance that you host. For Windows clients, you can specify the location where your systems look for updates using Local Policy or Group Policy. Whenever a Patch Manager task to scan or install updates is executed, the managed system uses this source location for update data.
You may choose to run your own WSUS instance for a few reasons:
- To apply updates to managed systems that do not have access to the internet.
- To reduce edge network traffic by caching updates locally inside your VPC or on-premises.
- To synchronize patch approval for your systems. Patch Manager also provides this functionality.
For our walkthrough, we are going to use Microsoft’s Windows Update service on the internet, so no further configuration is required here.
Access Permissions for Patch Manager administrators
You need to delegate permissions to administrators whom you want to have access to the Patch Manager Console and APIs. Please see our documentation on Systems Manager with IAM.
For our walkthrough, we are assuming that you have Administrator access to the AWS account via an IAM user or IAM role, so no further steps are required here.
Targeting systems for updates
As you deploy updates to systems in your enterprise environment, you likely want to apply updates to different groups of systems in different ways. For example, perhaps you want to patch your development, test/QA, and production systems differently. You may also want to patch your systems according to which application they are part of (for example, Active Directory, file shares, web applications, etc.). As you transition to Patch Manager, now is a good time to evaluate these strategies to see if you’d like to adjust your strategy going forward. Patch Manager targets systems in a slightly different way than SCCM. Let’s take a look.
In SCCM, you target systems for updates by grouping the systems into Collections. Memberships for Collections are determined either explicitly by manually adding individual systems, or by selecting systems based on metadata attributes that are stored in the SCCM database.
In Patch Manager, you target systems for updates explicitly by manually targeting individual systems, targeting an assigned tag, or by targeting Patch Groups. Patch Groups are groups of systems that have been tagged with a tag with key “Patch Group” and a value that determines which patch baseline the systems receive. The tag key “Patch Group” is case-sensitive.
Let’s configure your Patch Group tags:
- Picking up where we left off in the EC2 service of the AWS Management Console, select the instance that you just added the role to, click the Tags tab on the lower pane, then click Add/Edit Tags.

- Click Create Tag and then enter Patch Group for the Key and Test for the Value. Then click Save.

Your instance is now configured to be part of the Patch Group “Test”.
When registering new hybrid activations, you can apply tags including for Patch Group. For more information, check the documentation for create a managed instance activation for a hybrid environment.
Tags can also be added, or removed, from existing hybrid activations using the AWS Console, or AWS CLI.
Grouping updates
While configuring update deployment, you want to define which updates should be applied to the systems in your environment. Patch Manager’s Patch Baseline feature provides a mechanism to control which updates are applied to your systems. Transitioning to Patch Manager eliminates the administrative overhead required to maintain SCCM distribution points, and removes the need to clean up Software Update Groups.
In SCCM, Software Update Groups are configured to automatically add software updates using automatic deployment rules to identify and assign updates, which match the defined criteria. Alternatively, Software Update Groups are created by specifying updates manually.
In Patch Manager, a Patch Baseline defines which patches are approved for installation using auto-approval rules to identify which updates should be included. Patch Baselines are assigned to individual Patch Groups, or a single Patch Baseline can be assigned as default for the Windows platform.
Patch Baselines contain up to ten approval rules to specify which updates are applied based on product name, classification, severity, and release date. You can explicitly identify a patch to be rejected, even if it matches the criteria within an auto-approval rule. This feature should be considered when you have identified a specific update that conflicts with your Windows systems.
Similarly, explicit approval rules are available and should be considered when you have a specific update to install but do not want to add an approval rule to install other updates by classification/severity.
Let’s configure your Patch Baseline:
- Go to the AWS Systems Manager service in the AWS Management Console and select Patch Manager on the left pane. Click View predefined patch baselines.

- Click Create patch baseline.

- Enter a name for your patch baseline, such as Windows-Test, and an optional Description. You can also check the box to Set this patch baseline as the default patch baseline for Windows Server instances, if you wish.

- Scroll down to the Approval rules for operating systems section and select the Products you want to patch with this baseline. You can select all or select one or more specific Windows versions. Select the Classification types that you would like to include in this baseline. You can select all, or one or more specific classifications. Select the Severity of the updates that you would like to include in this patch baseline. You can select all, or select one or more severities. Optionally, you can adjust the Auto-approval type and number of days or a specific cutoff date for patches to fall within this baseline. Also optional is the Compliance reporting If a patch that is approved in this baseline is reported as missing, the option you choose here determines the severity of the compliance violation (Critical or Medium, for example).

- Scroll down a bit more and optionally add Approval rules for applications. If you want to add auto-approval for Microsoft application patches as well, choose Add rule.
- Scroll down until you see the Patch exceptions heading and click the arrow to expand. Here is where you can optionally override this baseline to include or exclude specific updates. Optionally, specify the Compliance reporting if a patch that is approved is reported as missing; the option you choose here determines the severity of the compliance violation (Critical or Medium, for example).

- Click Create patch baseline at the bottom of the page.

- You are redirected to the Patch Baselines. Scroll to the bottom and click on the ID of your new baseline (in this case pb-0a148b746ca11b920).

- Click the Actions dropdown and then select Modify patch groups.

- Enter the value that you assigned to the Patch Group tag on your EC2 instance, in this case, Test. Click Add.

You have now associated your new Patch Baseline that contains your chosen updates with your Patch Group that contains your targeted systems.
Deploying updates
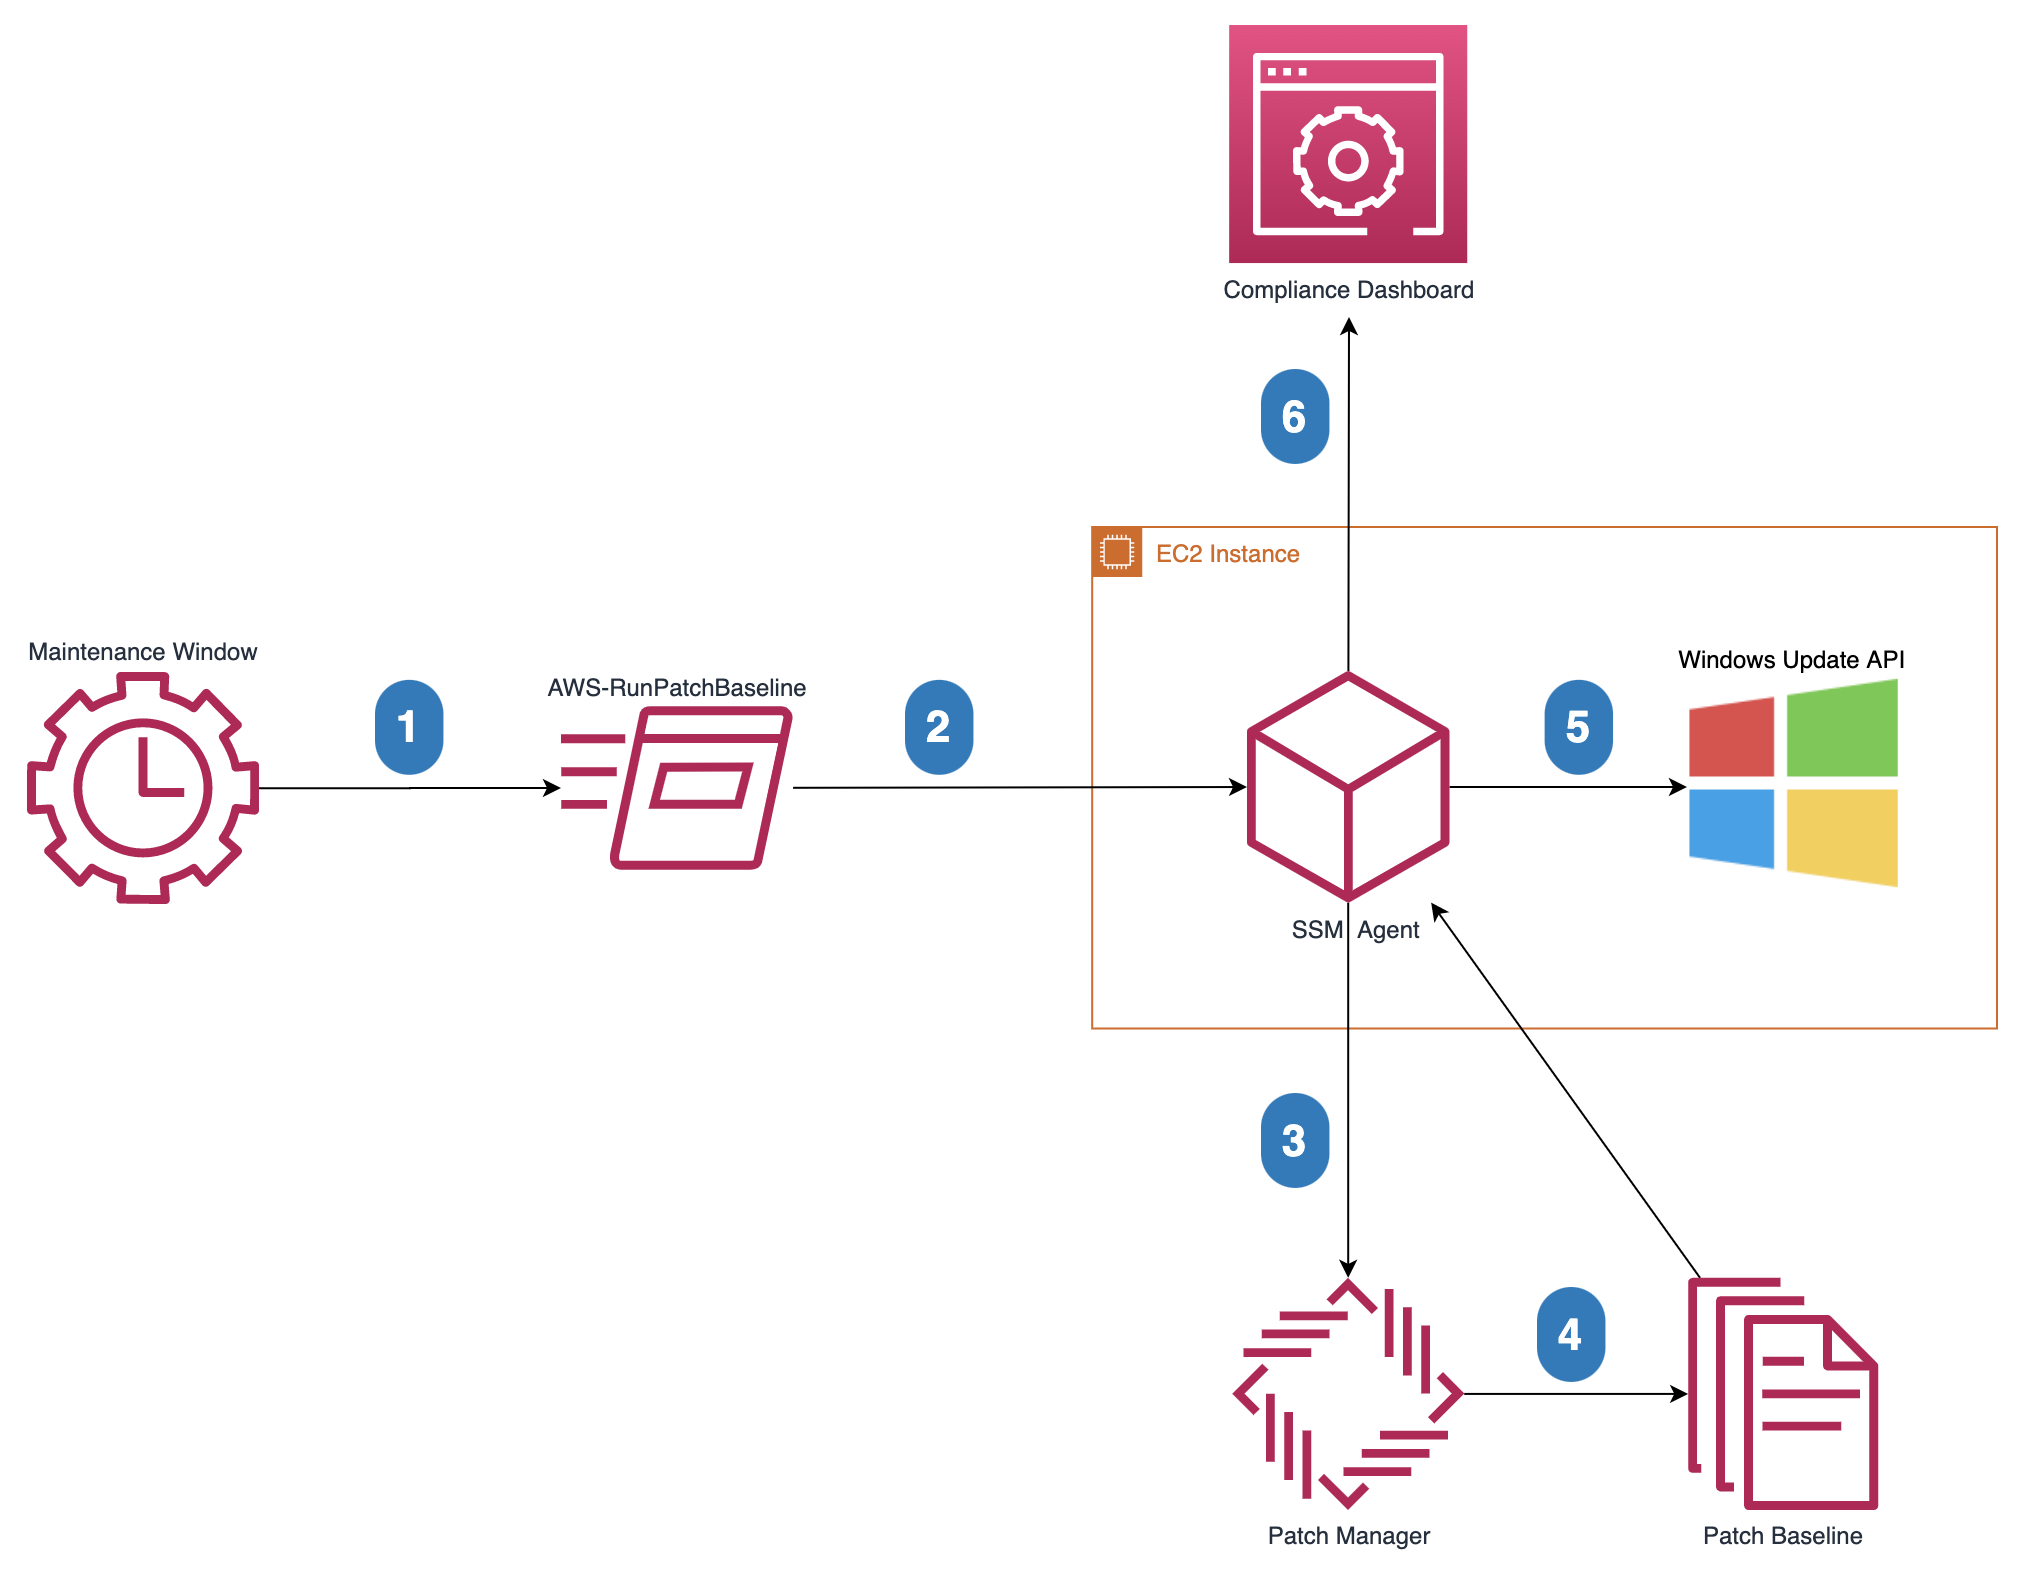
AWS Patch Manager uses AWS Systems Manager’s Run Command feature and performs patching operations through the use of the AWS-RunPatchBaseline document. You can schedule patching activity through the use of Maintenance Windows to deliver patches to your systems during defined maintenance periods. AWS Systems Manager Automation features can be used to create multi-step workflows, which include patching operations.
In SCCM, auto deployment rules are used to deliver updates to target collections and are applied to collections according to the evaluation schedule that you create. Additionally, schedule evaluations are configured to determine the time that an update starts being available and the deadline for when the installation must be completed.
In Patch Manager, the AWS-RunPatchBaseline document is executed to trigger the native Windows Update API on your systems. The document scans for available updates and installs the updates that meet the Patch Baseline rules assigned to the Patch Group. Updates are available as soon as they are presented by Microsoft’s Windows Update service, or by your self-managed WSUS. One scenario where you may want to consider WSUS instead of Windows Update Online is to control premature updates by using Group Policy in your domain.
AWS Systems Manager Maintenance Windows are created with a schedule, maximum duration, set of registered target systems, and a set of registered tasks. The maintenance window schedule controls how often the maintenance window runs using a Cron or Rate expression. Alternatively, you can specify a date range for when the Maintenance Window is allowed to run. AWS Maintenance Windows also include values to specify the total duration of the maintenance execution and a cutoff time for initiating new tasks.
Let’s configure your patch deployment:
- From the AWS Systems Manager service in the AWS Management Console, select Patch Manager, then select Configure patching.
- Under Instances to patch, choose the Select a patch group radio button, and then click the Select patch group drop-down box and choose Test.

- Next, configure your patching schedule. Select Schedule in a new Maintenance Window. Select Use a CRON schedule builder. Configure the Maintenance Window run frequency to every Saturday at 02:00 (2:00am). Note that this time is entered in UTC format, and that you can modify this setting later, if needed. Set the Maintenance Window duration to 2. Set the Maintenance Window name to Patching-Test.

- Make sure that the Patching operation is set to Scan and install. Click Configure patching.

You have now configured patching for your first systems. Patching occurs during the maintenance window that you specified. To change the schedule or execution options, you can edit the Maintenance Window object under the Maintenance Windows section of the AWS Systems Manager Console.
Multiple Patch Groups can be registered to a single maintenance window using the EC2 Patch Group tags that you have defined. This feature enables you to patch systems with different patching requirements on the same schedule, reducing the overhead of managing multiple deployment schedules. For more information, check Maintenance Windows documentation.
Patch compliance
The AWS Systems Manager Compliance dashboard is a one-stop location to view current patching compliance for your systems. Patching results are reported to the compliance dashboard immediately upon completion of the AWS-RunPatchBaseline execution.
The dashboard enables you to see compliance counts to quickly identify the number of systems that are non-compliant. From the counter you can easily filter the results to determine the patch installation status for specific KBs.
Let’s check your patch compliance results:
- Wait for your maintenance window to pass. In this example, we installed updates on Saturdays at 2:00am.
- Navigate to the AWS Systems Manager service in the AWS web console. Select Compliance in the left column.
- The Compliance resources summary section will aggregate the compliance status of your systems, under Compliance type – Here you should see that your newly patched systems are compliant.

- Scroll down to the next section, Details overview for resources. Click on the ID of the instance that you patched for instance details. Select the Configuration compliance tab to see which patches were installed.

To provide a detailed view of patching history and changes for your systems, AWS Systems Manager integrates with AWS Config. For more information about how to choose and configure AWS Config, check selecting which resources AWS Config records in the AWS Config Developer Guide.
AWS Config can also be used to remediate non-compliant instances manually, or through an automated process. For more details check the AWS Config Developer Guide.
Systems Manager integrates with Amazon CloudWatch Events to perform automatic configuration compliance remediation for non-compliant patch events. For more information about how to configure these Amazon CloudWatch Events, check remediating compliance issues documentation.
AWS Systems Manager Explorer enables you to extend patch compliance monitoring to include Multiple AWS accounts, providing a centralized dashboard to view total patch compliance figures.
Conclusion
In this blog post, we have shown you how to migrate from your existing SCCM infrastructure to automate Windows patching through the equivalent features of AWS Systems Manager Patch Manager. By using Patch Manager, you can reduce the overhead of maintaining patching infrastructure while deploying operating system and software updates to your Windows systems at scale.
About the authors

Benjamin Trunnell is a Solutions Architect with AWS’s Higher Education team. He has been working with the AWS Cloud for more than three years and Microsoft platforms for more than twenty. Benjamin enjoys working with customers to understand the customer’s challenges and collaborating with the customer to build optimal solutions. Outside of work, he enjoys travel and the outdoors.

Brian Sullivan is a Cloud Support Engineer in AWS Premium Support. He specializes in AWS Systems Manager and Amazon EC2 Windows. Outside of work, he enjoys playing guitar and saltwater fish-keeping.