Networking & Content Delivery
Using AWS SSO with AWS Client VPN for authentication and authorization
AWS Client VPN is a simple solution that allows users to connect from anywhere to their AWS environments, a capability that has become important to almost every organization over the last year. Single sign-on (SSO) is used widely across organizations of all sizes to authenticate and authorize their users’ access to enterprise applications and IT services from a single identity provider (IdP).
While many organizations use Microsoft Active Directory or Azure AD, some organizations do not use those IdPs and would prefer a simpler solution. This is where AWS SSO can help. AWS SSO provides single sign-on capabilities with a built-in IdP, meaning that we can manage user identities and provide SSO all from a single managed service. This post will focus on leveraging AWS SSO as an identity provider with AWS Client VPN service.
AWS Client VPN can leverage AWS SSO to both authenticate users and authorize them to use one or more segments of the network. This post will outline the process of configuring AWS Client VPN with AWS SSO using authorization to specific network subnets.
There have been previous blog posts about integrating AWS Client VPN with other IdP’s like Okta and AzureAD but this article is focused on using AWS SSO which is available to AWS customers at no cost. While AWS SSO has a built-in IdP, it can also be used with an external IdP such as Microsoft Active Directory. For this walkthrough, we will be using the built-in IdP.
Solution Overview
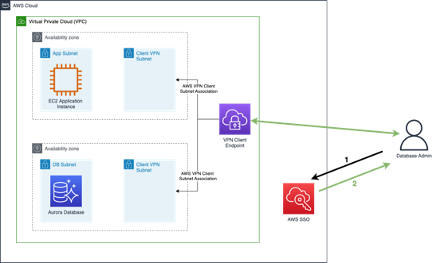
Figure 1: High-level AWS Client VPN architecture
In this post, we will show how authorizations can be used with AWS Client VPN to allow a database admin to connect to the VPN to communicate with services in the DB subnet, while not being allowed to connect to the subnet in which the EC2 application server is running. Authorization to the different subnets based on user group membership is possible using ingress authorizations based on the group id (GID) of the AWS SSO user groups. Figure 1 above illustrates the high-level architecture.
The prerequisites to achieve the above are listed below:
- An AWS Account
- AWS Organizations for which AWS SSO is a prerequisite. An AWS Account can only be a member of one Organization.
- An AWS Certificate Manager certificate for use when configuring the AWS Client VPN.
Deploy and Configure AWS SSO
In this section, we will configure AWS SSO and create a new custom SAML 2.0 application for AWS Client VPN. We will also create one user group which will be used for the ingress authorization to show network ingress rule capabilities.
- In the AWS Console, navigate to the AWS SSO Page. Enter “sso” in the search bar at the top of the console page. Refer to Figure 2.

Figure 2: Navigating to the AWS Single Sign-On console page
- Click the “Enable AWS SSO” button

Figure 3: Enabling AWS Singe Sign-On
- After a few moments you should see a message saying “You have successfully enabled AWS SSO”
- Next, we have to create a new SSO Application. On the left-hand column of the page, navigate to “Applications”, then click the “Add a new application” button, then click “Add a custom SAML 2.0 application”. Refer to Figure 4.

Figure 4: Creating a new Single Sign-On Application
- Give the SAML application a name, and a useful description

Figure 5: Providing a name and description for the new SSO Application
- You can leave all the AWS SSO metadata and Application properties as default. We do not have a metadata file, so we will add the Application metadata manually. To do this, click the link below the browse button. Your configuration should look similar to Figure 6 below.
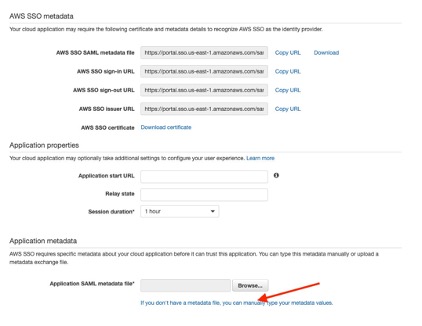
Figure 6: Configuring the AWS SSO Application
- Click the link to download the “AWS SSO metadata file”. You will need this metadata file when you create the IAM identity provider.
- Enter
http://127.0.0.1:35001as the Application ACS URL andurn:amazon:webservices:clientvpnas the Application SAML audience, and then click “Save changes” - Next, we need to set up attribute mappings. In this case we only need two mappings. The first being the
Subjectwhich needs to have a string value of${user:email}and should have the formatemailAddress. The second attribute ismemberOfand has a value of${user:groups}and should have a format ofunspecified. ThememberOfattribute will be important as this is how AWS SSO will pass which groups a user is a member of. It’s also important to note that AWS SSO will pass this information as a group ID (GID) which we will use later on when configuring the AWS Client VPN endpoint. Your attribute mapping configuration should look similar to Figure 7, below.
Figure 7: Configuring the attributes that will be part of the SAML assertion
- Next, we have to create two groups. In our case we will create a group called
VPN_DB_Adminsand another group calledVPN_DevOps. To create a group, click the “Group” link in the left-hand column and click the “Create group” button. You will need to give each group a name and a useful description. Do this for the two groups. When you have created the two groups, and assigned them to the SSO application, it should look similar to Figure 8, below.
Figure 8: Assigning groups to the SSO application
- Once you have created the group, assign a user to the
VPN_DB_Adminsgroup, which we will use for testing later on. Refer to the documentation for more information on creating groups in AWS SSO.
- From the “Group” page, click on the
VPN_DB_Adminsgroup and click the “Add users” button, and select the user you want to add to the group. - Once you have added the user, make a note of the “Group ID”. It will be a long GUID string. You will need this Group ID later on when we create the Client VPN Endpoint authorizations.
- To ensure any user in the group has access to the VPN, you will need to assign the group to the SSO Application.
Create an IAM Identity provider
The IAM identity provider bridges the gap between your identity provider, which in this case is AWS SSO, and IAM which helps you assign the appropriate IAM permissions to users. Following the steps below, your configuration should look similar to Figure 9, below.
- Navigate to the IAM page in the AWS console, and click in the left navigation column for “Identity providers”.
- Click the blue “Add provider”.
- Select “SAML” for the Provider type, and give the provider a name.
- Upload the metadata file you downloaded previously when creating the SSO Application
- Click “Add provider”

Figure 9: Configuring a new IAM Identity provider
Configure AWS Client VPN
The next step is to configure AWS Client VPN installed client. You will need the ARN of the certificate that should already be provisioned in ACM. You will also need to select a CIDR range that is between /12 and /22 that can be used to assign IP addresses to VPN clients.
- Navigate to the VPC page on the AWS Console.
- Scroll down the navigation column on the left until you find the section called “VIRTUAL PRIVATE NETWORK(VPN)”, and click “Client VPN Endpoints”, as in Figure 10, below.

Figure 10: Navigating to the Client VPN Endpoints landing page from the VPC console page
- Click the blue “Create Client VPN Endpoint”
- Optional – Name Tag:
AWS Client VPN - Optional – Description:
Something useful that describes your VPN Client Endpoint - Client IPv4 CIDR:
192.168.0.0/22 - Server certificate ARN : Select
your ACM Certificate from the dropdown - Authentication Options: Select
Use User-based authentication- Select
Federated authentication
- Select
- SAML provider ARN: use the IAM ARN created earlier, for example
arn:aws:iam::00112233445566:saml-provider/SSOVPN
Refer to the notes below - Do you want to log the details on client connections?:
No - Do you want to enable Client Connect Handler?:
No - DNS Server 1 IP address:
1.1.1.1 - DNS Server 1 IP address:
1.0.0.1 - Transport Protocol:
UDP - Enable split-tunnel:
Check - VPC ID: use your VPC identifier, for example
vpc-xyz12300
For information on creating VPC, refer to this tutorial to create a VPC with both public and private subnets.
- Security Group IDs: Select the security groups you want to associate with your VPN endpoint
- VPN Port:
443
Figure 11: Configuring the Client VPN Endpoint
Your configuration should look similar to Figure 11, above. We do want to call out the a few things about the above settings. We have chosen a “split tunnel” configuration. What this means is that only traffic intended for the VPC will traverse the VPN tunnel. All other traffic, such as internet traffic would not traverse the tunnel. In many cases, this is preferred since it reduces the overall traffic over the VPN, but in some cases you may prefer to have all traffic traverse the tunnel. An example is if you have a virtual appliance or service that needs to inspect internet traffic before forwarding it on to the internet. In this example you would simply not check the “Enable split-tunnel” option. ” on the left navigation pane, as below in Figure 12.
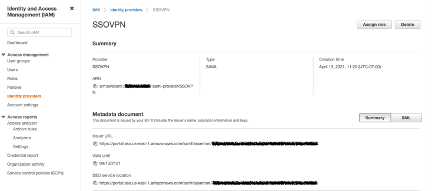
Figure 12: Find the SAML provider ARN by navigating to IAM Identity Providers
Lastly, for the purpose of this blog, we used public DNS servers 1.1.1.1 and 1.0.0.1 which do work, but will only resolve public internet addresses, so these would likely not be useful for your specific use case. You should switch these values with your own DNS servers.
Associating the VPN Endpoint with your VPC and creating authorizations
Before your VPN Client Endpoint can be used, it needs to be associated with your VPC. We also need to create authorizations. Ideally, you will create 2 VPC associations (in separate availability zones) for the VPN Endpoint for high availability. Configuring the associations is simple, follow the steps below, and compare your configuration with Figure 13, below:
- On the VPC Console, click the “Client VPN Endpoints” link, and select your Client VPN Endpoint
- Select the Client VPN Endpoint for which you want to create the association
- Select the “Associations” tab in the lower window
- Click the “Associate” button.

Figure 13: Navigating the Client VPN Endpoint page to associate subnets to the Client VPN Endpoint
- Select the VPC for which you are creating the association
- Select the subnet you want to associate. If you refer back to the architecture diagram above, you should be selecting the private subnet that is dedicated for Client VPN Endpoint association
- Click the “Associate” button. (This may take 2-5 minutes to show Available/Associated)
- For production deployments you would ideally want at least 2 associations for high availability.

Figure 14: Associating subnets to the Client VPN Endpoint
Figure 14, above depicts the process of associating subnets with the Client VPN Endpoint. With the associations created, we now need to create the authorizations. Authorizations govern which segments of the network a VPN client has access to. Since we are leveraging AWS SSO, we will need a Group ID from AWS SSO to allow DBA’s access to the network segment(s) that contain databases. Your configuration should look similar to Figure 15, below.
- Navigate to the Client VPN console page, and select the “Authorization” tab.
- Click the “Authorize Ingress” button
- Destination network to enable:
192.168.10.0/24(CIDR notation for the subnet you are creating an authorization rule for - Grant access to: select
Allow access to users in a specific access group - Access group ID*:
guid for the group ID obtained from the AWS SSO Console(this is the Access Group ID for VPN_DB_Admins created above) - Description:
DBA Access to database subnets - Click the “Add authorization rule”

Figure 15: Creating an authorization rule for SSO groups that can use this Client VPN Endpoint
VPN Client Setup
- First, you’ll need to download the Client VPN for your platform. Currently, Windows, MacOS and Ubuntu Linux are supported.
- Once downloaded, installing the client on your workstation is as simple as running the installer.
- With the client installed, you should now download the Client Configuration file.
- Navigate to the Client VPN Endpoints section on the VPC page.
- Select the Client VPN Endpoint for which you want to download the configuration file and then click the “Download Client Configuration” button.
- Next, you will need to add a new connection profile to the client
- Click File > Manage Profiles
- Click the “Add Profile” button
- Provide a name for your VPN Connection and select the configuration file you downloaded in step 3.
- Click “Add Profile”
- With the profile created, you should now be able to connect to the Client VPN Endpoint by selecting the profile you have just created.
- The client will make a connection to AWS SSO in the browser. If you have already authenticated to AWS SSO, you will see a message “Authentication details received, processing details. You may close this window at any time.”. See Figure 16.

Figure 16: Browser output confirming that SSO authentication has been completed
- The VPN Client should now show “Connected”

Figure 17: VPN Client confirming connection
Testing
A simple way to test that your VPN connection is indeed working is to use the Route53 resolver that is available in every VPC. For example if your VPC CIDR is 10.10.0.0/16 your Route53 resolver IP address will be 10.10.0.2. You can query the resolver. using the command nslookup 10.10.0.2 10.10.0.2. This command tries to resolve the IP address 10.10.0.2 with the resolver at 10.10.0.2. This command can be used as is on both Mac and Windows, and while the outputs will be slightly different, it will be easy to verify whether or not your command has worked (meaning your VPN is properly connected).
Figures 18 and 19 show example outputs from a DNS lookup that uses private DNS servers only available over the VPN.
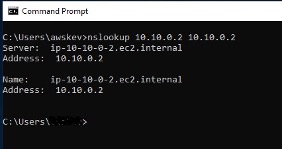
Figure 18: Windows command prompt confirming connectivity to private DNS within the VPC
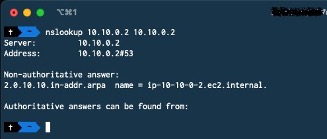
Figure 19: MacOS terminal confirming connectivity to private DNS within the VPC
In the event that you are not using the default Amazon DHCP options set, feel free to test against any AWS resource deployed in your VPNs associated subnet(s).
Common Issues
If you experience issues connecting after installing the client and downloading the configuration file from the Client VPN Endpoints Download Client Configuration link there may be a certificate issue. Open the configuration file in a text editor and copy and paste the root PEM file below which is from AWS at the bottom and save and reimport the configuration.
Summary
In this post, we have shown how you can easily deploy a secure VPN solution using AWS SSO to perform both the IdP and single sign-on functions. We have shown you how to do this while giving you the flexibility to provision users using least privilege principles and locking the user down to the segments of the network they need access to. You can do all of this using native AWS services.

Kevin Epstein
Kevin Epstein is a solutions architect for the US state and local government public sector team at Amazon Web Services (AWS). Kevin has focused on exclusively on AWS since 2013, helping customers adopt and migrate to the cloud. He specializes in using automation to enable migrations and cloud operations post-migration.

Grant Joslyn
Grant Joslyn is a solutions architect for the US state and local government public sector team at Amazon Web Services (AWS). He specializes in end user compute and cloud automation. He provides technical and architectural guidance to customers building secure solutions on AWS. He is a subject matter expert and thought leader for strategic initiatives that help customers embrace DevOps practices.