AWS Public Sector Blog
Use Landing Zone Accelerator on AWS customizations to deploy Cloud Intelligence Dashboards

In this post, you will learn how to deploy Amazon Web Services (AWS) Cloud Intelligence Dashboards (CID) using the Landing Zone Accelerator on AWS (LZA) solution. In doing so, you will learn how to customize your LZA deployment using the customizations-config.yaml file. This post builds on the core concepts of LZA so a basic understanding of LZA is necessary to implement the solution. By utilizing the LZA and CID together, you can streamline the deployment process, ensure compliance with best practices, and gain valuable insights into your cloud environment, ultimately leading to improved operational efficiency, enhanced security, and better-informed decision-making. To learn about LZA, check out the AWS Solutions Library and Implementation Guide.
What is the LZA solution
The LZA solution deploys a foundational set of capabilities designed to align with AWS best practices and multiple global compliance frameworks. With LZA, you can better manage and govern your multi-account environments that have highly regulated workloads such as those in the public sector.
LZA includes seven configuration files that you can use to customize the solution. The solution orchestrates the creation of resources and configurations based on the input from the configuration files. Sample configurations are provided in the GitHub repository as a starter to help meet specific regional and industry requirements. These configurations are frequently updated as AWS services and features evolve. Six of the files are mandatory. The customizations-config.yaml file is for optional extensions of the core solution. This will be the configuration file used to deploy the CID.
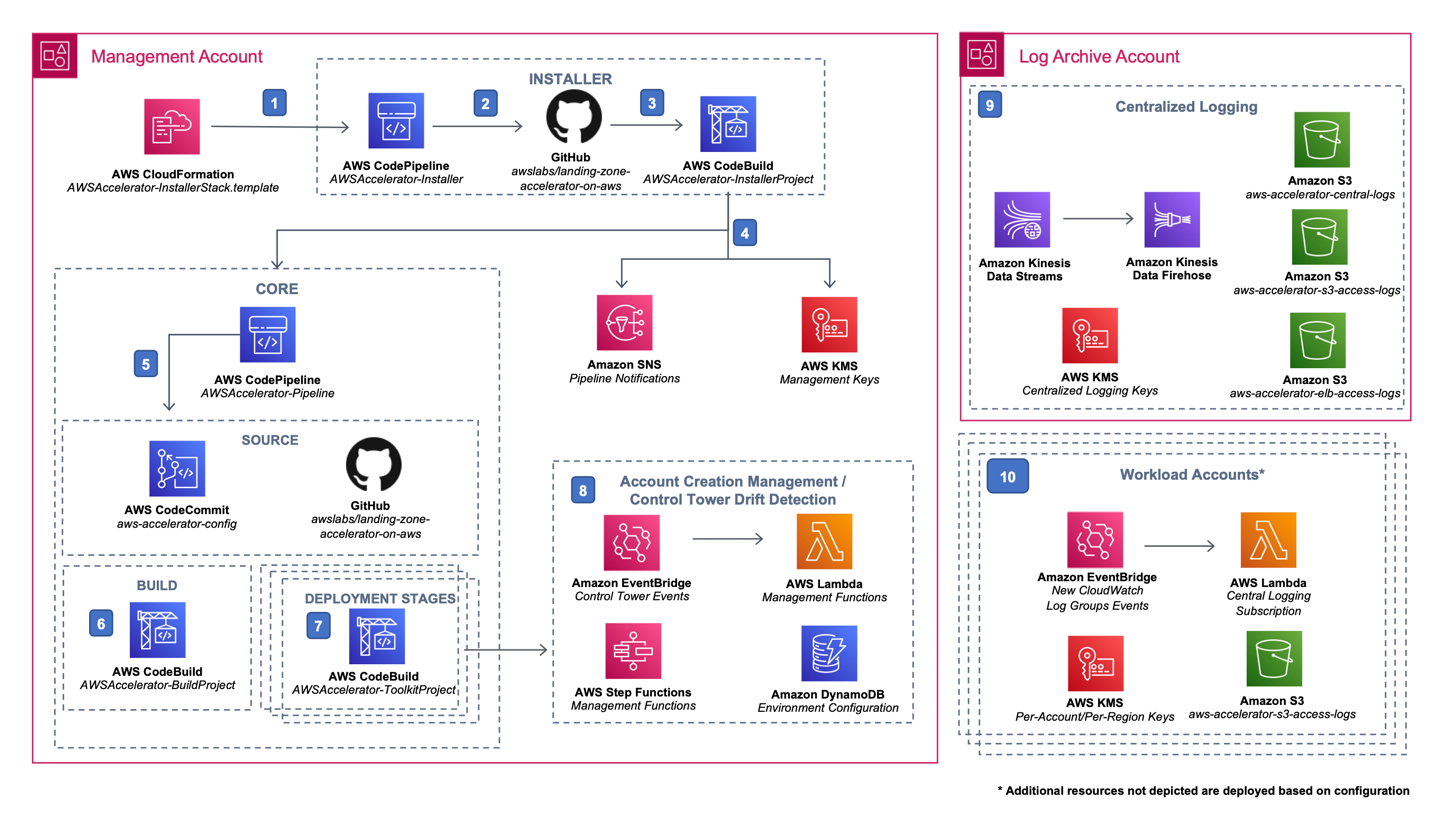
Figure 1. An architectural diagram of the LZA. The major components are the management account pipeline resources, the log archive account centralized logging resources, and your workload accounts.
What are the Cloud Intelligence Dashboards?
Cloud Intelligence Dashboards is an open source framework, maintained by AWS, that provides customers actionable insights and optimization opportunities at scale of organization. These dashboards help customers drive financial accountability, optimize cost, track usage goals, implement best practices for governance, and achieve operational excellence across all pillars of the AWS Well-Architected Framework. The following Figure 2 is an example of billing details found in one of the CIDs: The Cost and Usage Dashboards Operations Solution (CUDOS) Dashboard. This is the specific dashboard we will be deploying from the CID.

Figure 2. The Billing Summary tab of the CUDOS dashboard, which displays data on three months of invoices, number of accounts and services, invoice and amortization trends, savings and discounts, cost savings opportunities, and more.
Customizing the LZA
As previously mentioned, you can create an optional seventh configuration file (customizations-config.yaml) to define customizations to the core LZA solution. You can customize the YAML configuration files to deploy additional resources and infrastructure to the solution environment. Refer to Using configuration files for more information and to our TypeDocs for the versioned specification of our LZA YAML configuration syntax. As of the time of writing, we will be using v1.6.0 of the TypeDocs.
Customizing the LZA should be used to extend the capabilities of your landing zone solution and provide additional resources for your cloud foundations. This can be used to deploy shared and supporting services for your workloads, additional security or audit tooling, network appliances, and more.
Note: The purpose of customizing the LZA is to extend your landing zone and cloud foundations capabilities, not to deploy your actual workloads.
Prerequisites
This post assumes you have experience using LZA already. You should be familiar with deploying the LZA and updating the configuration files.
IAM prerequisites
Ensure you have the appropriate permissions required for the CUDOS dashboard deployment. Review the Permissions sections of the CUDOS workshop for guidance on granting the necessary access.
LZA prerequisites
- To proceed with the intended deployment, it is essential to have an LZA framework preconfigured within the target environment. Please follow the Implementation Guide to get started with LZA.
- For the purpose of this blog, we will use the SharedServices account as the Data Collection Account. Be sure to deploy a SharedServices The CUDOS dashboard will be deployed within that Shared Services account. To learn more about the Shared Services and other core accounts, see our LZA guidance on Organization and Account Structure and our LZA sample configs.
Amazon QuickSight prerequisites
Follow Step 2 of the deployment steps to set up Amazon QuickSight for hosting the dashboards. Remember the AWS Identity and Access Management (IAM) user that you used to subscribe to QuickSight. You’ll need it later.
Setup
Using the customization-config.yaml file, you will deploy the CUDOS dashboard by defining the AWS CloudFormation templates within the cloudFormationStacks key of the configuration file.
Stage the CloudFormation templates
Download the two templates required to deploy the CUDOS dashboard. These links can be found on the Deployment page of the Cloud Intelligence Dashboards Framework and are linked here for your convenience.
Next, edit your configuration files. The simplest way is to do this directly from AWS CodeCommit. However, you can also do this in your favorite integrated development environment (IDE) and push the changes into CodeCommit.
- Create a new folder at the root of your configs named cloudformation.
- Copy the two CloudFormation templates into this new folder.
Create the customizations configuration file
- Create a new file at the root of your configs named customizations-config.yaml.
- Edit the file. For now, you need only create the root customizations key.
customizations:
  cloudFormationStacks: []
This is the bare minimum required for this to be a valid customizations-config.yaml file. In the next steps, you will update the configuration to deploy the solution.
Configuring the customizations
In this section, you’ll learn how to configure the customization-config.yaml file to deploy three separate CloudFormation templates that are required to generate your Cost and Usage Report (CUR) and deploy the CUDOS dashboard.
Create destination Amazon S3 bucket for CUR aggregation
This step deploys a CloudFormation template that creates the Amazon Simple Storage Service (Amazon S3) bucket in your Shared Services account. This will serve as the destination for the CUR files and the ingestion point for the CUDOS dashboards.
1. Edit your customizations-config.yaml file to include the following code.
customizations:
  cloudFormationStacks:
    - deploymentTargets:
        accounts:
          - SharedServices
      description: Create Destination S3 Bucket for CUR Aggregation
      name: CID-CUR-Destination
      regions:
        - us-east-1
      runOrder: 0
      template: cloudformation/cur-aggregation.yaml
      parameters:
        - name: CreateCUR
          value: "False"
        - name: DestinationAccountId
          value: "<SharedServices account ID>"
        - name: SourceAccountIds
          value: "<Management Account ID>"
      terminationProtection: true
2. Replace <SharedServices account ID> with your AWS account ID for your Shared Services account. Be sure to keep the double quotes around your AWS account ID.
3. Replace <Management account ID> with your AWS account ID for your Management account. Be sure to keep the double quotes around your AWS account ID.
4, Save your changes. If you are working in an IDE, push your changes to CodeCommit.
5. Go to your LZA pipeline and release the changes.
Review
You added the cloudFormationStacks key, which defines a list of custom CloudFormation stacks to run. A single entry was added named “CID-CUR-Destination” based on the cur-aggregation.yaml file that we staged earlier. It also defines the parameters of the template. Importantly, this stack is configured only to deploy in the SharedServices account, as specified in the deploymentTargets key.
Note: It is recommended to wait until this step is completed before moving on. This allows you to troubleshoot issues more easily if there should be an error. However, you may continue to the next step without waiting for the previous step to complete.
Create CUR and replication rules
This step deploys a CloudFormation template that creates an Amazon S3 bucket in your Management account and configures your CUR file. It then sets up bucket replication policies to move your CUR into the Shared Services Amazon S3 bucket that you previously created.
1. Edit your customizations-config.yaml file. Add another stack directly after the first one within the same cloudFormationStacks key.
customizations:
  cloudFormationStacks:
 # [...] previous stack. Do not add prior two lines.
    - deploymentTargets:
        accounts:
          - Management
      description: Create CUR and Replication Rules
      name: CID-CUR-Replication
      regions:
        - us-east-1
      runOrder: 1
      template: cloudformation/cur-aggregation.yaml
      parameters:
        - name: CreateCUR
          value: "True"
        - name: DestinationAccountId
          value: "<SharedServices account ID>"
      terminationProtection: true
2. Replace <SharedServices account ID> with your AWS account ID for your Shared Services account. Be sure to keep the double quotes around your AWS account ID.
3. Save your changes. If you are working in an IDE, push your changes to CodeCommit.
4. Go to your LZA pipeline and release the changes.
Review
You added another member to the cloudFormationStacks key. This entry will deploy a template named “CID-CUR-Replication” based on the same cur-aggregation.yaml file, but with different parameters and, this time, targeting the Management account.
Note: It is recommended to wait until this step completes before moving on. This allows us to troubleshoot issues easier if there should be an error. However, you may continue to the next step without waiting for the previous step to complete.
Deploy CUDOS dashboards
This step deploys the last CloudFormation template, which will deploy and configure the CUDOS dashboard.
1. Edit your customizations-config.yaml file. Add a third stack directly after the first two within the same cloudFormationStacks key.
customizations:
  cloudFormationStacks:
 # [...] previous stacks. Do not add prior two lines.
    - deploymentTargets:
        accounts:
          - SharedServices
      description: Deploy Dashboards
      name: Cloud-Intelligence-Dashboards
      regions:
        - us-east-1
      runOrder: 2
      template: cloudformation/cid-cfn.yml
      parameters:
        - name: DeployCUDOSv5
          value: "yes"
        - name: PrerequisitesQuickSight
          value: "yes"
        - name: PrerequisitesQuickSightPermissions
          value: "yes"
        - name: QuickSightUser
          value: <IAM User>
      terminationProtection: true
2. Replace <IAM User> with the IAM user you used to subscribe to QuickSight. If you did not subscribe to QuickSight yet, please review the prerequisites section before proceeding.
3. Save your changes. If you are working in an IDE, push your changes to CodeCommit.
4. Go to your LZA pipeline and release the changes.
Review
You added the final member to the cloudFormationStacks key. This entry will deploy a template named “Cloud-Intelligence-Dashboards” based on the cif-cfn.yml file into the Shared Services account. It will build the required resources to create the CUDOS dashboard and consume the CUR data we prepared in the previous stacks.
Confirm deployment
After the pipeline completes, you will grab your URL for the CUDOS dashboard from the Outputs of the final CloudFormation template and then confirm that the data is populating.
- Sign in to the Shared Services account.
- Open the CloudFormation service, select Stacks, and select the stack named Cloud-Intelligence-Dashboards.
- Select the Outputs The URL to your dashboard is the output value for the key named CUDOSv5DashboardURL. Copy this and open it in a new tab.
- Review the dashboard and confirm that data is populating into the boxes. Explore the different tabs and pages to discover insights about your AWS usage.
Note: It may take up to 24 hours for data to populate. Data related to the current spend may appear quickly, but historical data may not be available. This will populate over time. If data does not populate after 24 hours, review the Troubleshooting section of the CUDOS Workshop.
If you want to explore what a fully populated CUDOS dashboard will look like, check out the CUDOS demo link on the Cloud Intelligence Dashboards page.
Updates
When you want to update CUDOS to the newest version, you must manually trigger the LZA to redeploy the updated Cloudformation template. Increment the runOrder property in the customization-config.yaml. This action will prompt the stack to perform the update.
Summary
In this post, you learned how to customize the Landing Zone Accelerator on AWS solution using the customizations-config.yaml file. You extended the capabilities of your cloud foundations by adding a Cost Intelligence Dashboard called CUDOS to provide cost and usage insights for your AWS accounts. Now that you understand these concepts, you can extend your LZA to add additional capabilities.