AWS Storage Blog
Deploying a LAMP-based multi-tier web application on AWS Snowball Edge
Imagine you are building an application at a remote location where you must process and make decisions based on locally generated data, say from surveillance cameras or from detection systems. If there is high network latency, you cannot run these applications in the cloud and process data in real time.
Other times, you may be working on a disaster recovery situation. In this case, there may not be sufficient bandwidth to support transferring data and processing data in the cloud. You are also under constraints to deploy the compute, storage, network, and applications in a short time. If internet connectivity is not available, you should be able to run in a disconnected fashion and be able to sync data with the cloud when the network connection is available.
AWS Snowball Edge is a ruggedized shippable edge compute solution used for running compute instances in intermittently connected or even disconnected environments. Snowball Edge requires minimal infrastructure to operate, and specifically does not require a dedicated data center. With Snowball Edge, you can create Amazon Elastic Compute Cloud (Amazon EC2) instances with a range of vCPU and memory options, to host applications. These unique features make Snowball Edge an ideal solution for the use cases we previously mentioned.
In this blog post, I explore how to launch EC2 instances and bring up a web application on a Snowball Edge. I install Apache, MySQL, PHP (LAMP), and Drupal, a popular content management system (CMS). You can leverage Drupal’s video module to implement some of the media workflows we discussed. This module allows you to upload video in any format, transcode video to H.246, Theora, VP8 (web compatible formats), and create thumbnails. The video module uses either Zencoder, which is a cloud transcoding service that leverages Amazon Simple Storage Service (Amazon S3), or the open source FFMPEG project on your server.
AWS Snowball Edge capabilities
With Snowball Edge, you can create EC2 instances with a range of vCPU and memory options to host applications. Local storage is included, via the Amazon Elastic Block Storage (Amazon EBS) volumes. Snowball Edge supports data ingestion with Amazon S3 endpoints along with network file service (NFS). Snowball Edge is also capable of running serverless AWS Lambda functions using the built-in AWS IoT Greengrass framework.
The following guest operating systems (OS) versions are currently supported for the EC2 instances on Snowball Edge:
We are continuing to add support for other OS versions. Unlike Amazon EC2 instances in the cloud, Snowball Edge does not provide a license server and we cannot manage your licenses. For this reason, to use any OS that requires license management, you must bring your own license.
Snowball Edge ordering process
To use a compute instance on a Snowball Edge, create a job and specify your AMIs. You can do this from the AWS Snowball console, with the AWS Command Line Interface (AWS CLI), or with one of the AWS SDKs. Typically, below are the steps you should follow:
- Log in to the AWS Management Console. Use the documented procedure to create an Amazon Machine Image (AMI) and add the same to the Snowball Edge order. AMIs also can be created using the VM Export/Import.
- Receive your Snowball Edge device from the shipping provider.
NOTE: If your location lacks sufficient internet connectivity, you must preinstall all necessary software packages. Example packages include, Apache, MySQL, PHP, Drupal, etc. You need a software package before creating the AMI.
Overall architecture
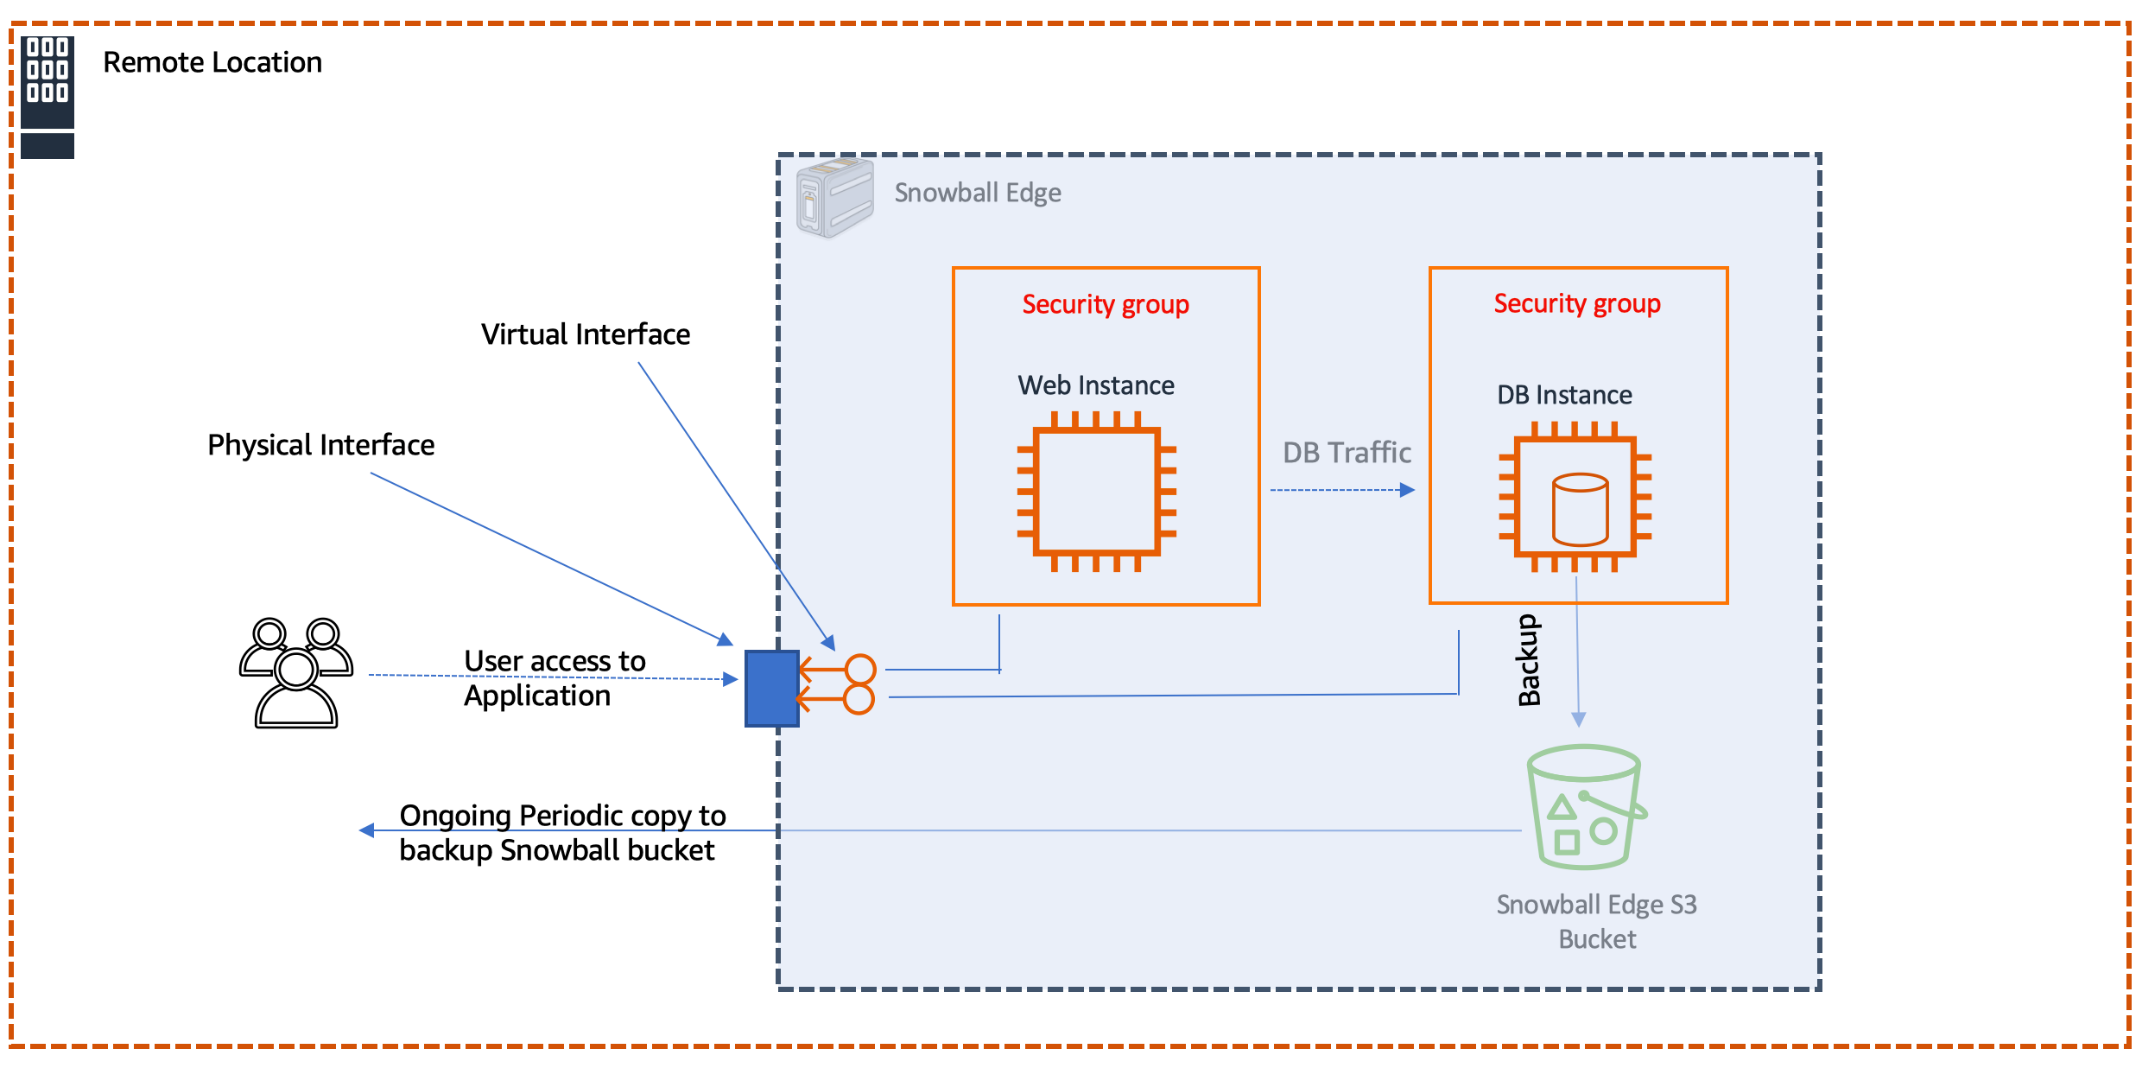
The following illustration depicts the overall architecture of the deployment. Snowball Edge runs a web server and a database server. These have their own security groups to separate the backend database tier from the web tier. You can run a periodic backup job through cron to dump the database and copy to the S3 bucket on the Snowball Edge. This data can be copied to a S3 bucket on a second Snowball Edge device acting as a standby unit for disaster recovery.
Snowball Edge site preparation
1. Install Snowball Edge in your desired location, and connect the power cable and the network cable. For network connections, the built-in RJ45 or SFP can be used.
2. Network ports must be opened from your workstation to the Snowball Edge device. Additional ports may be necessary to access the applications you deploy on Snowball Edge:
| # | Port (TCP) | Service |
| 1 | 8080 | HTTP endpoint for S3 |
| 2 | 8443 | HTTPS endpoint for S3 |
| 3 | 8243 | HTTPS endpoint for EC2 |
| 4 | 8008 | HTTP endpoint for EC2 |
| 5 | 22 | Administration/Diagnostics |
| 6 | 9091 | Activation |
3. Access the front panel of the Snowball Edge where the management display is located. Press the power button. The device may take 15–20 minutes to self-validate. At this time, the device is ready to respond to management commands like unlock, configure, and deploy.
4. From the Snowball Edge control panel select:
-
- Connection, then select DHCP or Static.
- For static IP selection, enter the IP address, Netmask, and Default Gateway.
- Apply the changes once done.
Preparing your workstation
A Linux, Mac, or Windows workstation is used for performing common administrative tasks such as unlocking, service configuration, and monitoring of Snowball Edge.

Configuration
Before configuring the Snowball Edge device, you have to obtain the manifest file and unlock code from your AWS Management Console.
You can grant granular permissions to perform operations on AWS Snowball resources using the IAM feature. This feature is helpful if you are planning to control individual services using roles, policies, and users.
You can use AWS OpsHub or the AWS CLI to manage the Snowball Edge. Once you install OpsHub, you can unlock, configure network interfaces, and launch EC2 instances with just a few clicks. AWS OpsHub is available at no charge wherever Snowball Edge is available. Check out this demo video to see AWS OpsHub in action:
To learn more and to get started with AWS OpsHub, visit the Snowball resources page.
We recommend using OpsHub, however in cases where you do not use OpsHub, you can follow the CLI procedure below to configure the Snowball Edge device and launch EC2 instances. To run these steps, you must download and install the Snowball Edge client and the AWS CLI.
Unlocking the Snowball Edge
In this section, I am unlocking the Snowball Edge device and configuring the EC2 service after obtaining the secret key and access key.
1. Log in to your administrative workstation and create a Snowball Edge profile. A profile makes the management easy when multiple Snowball Edge devices are in use.
workstation> snowballedge configure –profile snow1
Configuration will stored at /home/user1/.aws/snowball/config/snowball-edge.config
Snowball Edge Manifest Path:/home/user1/SNOW/JID14b41651-57e6-17ba-72d9-a56a5143a59f_manifest.bin
Unlock Code: 7a2f2-cab39-5b01c-597e4-a2b99
Default Endpoint: https://192.168.1.116
workstation>
2. Unlock the Snowball Edge.
workstation> snowballedge unlock-device --profile snow1
The Snowball Edge unlock status is: UnlockSnowballResult(status=UNLOCKING)
prompt>
3. Confirm that the Snowball Edge device is unlocked. Also, note down the physical network interface ID that you have used for connecting.
workstation> snowballedge describe-device --profile snow1
  "DeviceId" : "JID14b41651-57e6-17ba-72d9-a56a5143a59f",
  "UnlockStatus" : {
    "State" : "UNLOCKED"
  },
  "ActiveNetworkInterface" : {
    "IpAddress" : "192.168.1.170"
  },
  "PhysicalNetworkInterfaces" : [ {
    "PhysicalNetworkInterfaceId" : "s.ni-89d7e5s698a07d62e",
    "PhysicalConnectorType" : "RJ45",
    "IpAddressAssignment" : "STATIC",
    "IpAddress" : "192.168.1.170",
    "Netmask" : "255.255.255.0",
    "DefaultGateway" : "192.168.1.2",
    "MacAddress" : "aa:bb:cc:11:dd:de"
  },
--lines removed --
}
prompt>
4. Get the access key and secret key used for authentication to the local EC2 and S3 service endpoint.
workstation> snowballedge list-access-keys --profile snow1
{
  "AccessKeyIds" : [ "KKKKKKKKKKKKKKK" ]
}
prompt>
workstation> snowballedge get-secret-access-key --access-key-id KKKKKKKKKKKKKK –profile snow1
[snowballEdge]
aws_access_key_id = KKKKKKKKKKKKKK
aws_secret_access_key = SSSSSSSSSSSSSSSSSSSSSSSSSSSSS
prompt>5. Create a new service profile using the AWS configure command.
workstation> aws configure –profile compute1
AWS Access Key ID [None]:KKKKKKKKKKKKKKKKK
AWS Secret Access Key [None]:SSSSSSSSSSSSSSSSSSSSSS
Default region name [None]: snowball
Default output format [json]:
[vinod1@oecent SNOW]$
Launching the EC2 instances
In this section, I am creating two virtual network interfaces, and launching two EC2 instances. The first instance is used as the web server and the second instance as the database server.
1. Create a virtual network interface that will be attached to the web server.
workstation> snowballedge create-virtual-network-interface --physical-network-interface-id s.ni-89d7e5c698a07d62e --ip-address-assignment STATIC --static-ip-address-configuration IpAddress=192.168.1.144,Netmask=255.255.255.0 –profile snow1
{
  "VirtualNetworkInterface" : {
    "VirtualNetworkInterfaceArn" : "arn:aws:snowball-device:::interface/s.ni-8c184704e9c0b1872",
    "PhysicalNetworkInterfaceId" : "s.ni-89d7e5c698a07d62e",
    "IpAddressAssignment" : "STATIC",
2. Repeat the previous step and create a virtual network interface for the database server.
workstation> snowballedge create-virtual-network-interface --physical-network-interface-id s.ni-89d7e5c698a07d62e --ip-address-assignment STATIC --static-ip-address-configuration IpAddress=192.168.1.145,Netmask=255.255.255.0 –profile snow1
{
  "VirtualNetworkInterface" : {
    "VirtualNetworkInterfaceArn" : "arn:aws:snowball-device:::interface/s.ni-8c184704e9c0b1872",
    "PhysicalNetworkInterfaceId" : "s.ni-89d7e5c698a07d62e",
    "IpAddressAssignment" : "STATIC",
3. Get the Amazon Machine Images (AMIs) IDs on the Snowball Edge.
workstation>aws ec2 describe-images --endpoint http://192.168.1.116:8008 --profile compute1

"State": "AVAILABLE",
            "Description": "Image for building EC2 compute instance",
            "ImageId": "s.ami-00c87a13a73b0bc06"
4. Launch the first EC2 instance that is used as a web server. Note the instance-id from the output.
workstation> aws ec2 run-instances --image-id s.ami-09a13c1583275d1a6 --endpoint http://192.168.1.116:8008 --instance-type sbe-c.medium --profile compute1
{
    "Instances": [
        {
            "SourceDestCheck": false,
            "InstanceId": "s.i-84f09ff791b68",
            "EnaSupport": false,
5. Launch the second EC2 instance that is used as a database server and note the instance-id from the output. Make sure that the new instances are in a running state.
workstation> aws ec2 run-instances --image-id s.ami-09a13c1583275d1a6 --endpoint http://192.168.1.116:8008 --instance-type sbe-c.medium --profile compute1
{
    "Instances": [
        {
            "SourceDestCheck": false,
            "InstanceId": "s.i-84f09ff791b6828b0",
            "EnaSupport": false,


workstation> aws ec2 describe-instances –instance-id s.i-84f09ff791b68 --endpoint http://192.168.1.116:8008 --profile compute1

                        "Code": 16,
                        "Name": "running"
                    },
                        ]
}
workstation>
6. Associate the virtual-interfaces (public IP addresses) to the web server and the database server.
workstation> aws ec2 associate-address --public-ip 192.168.1.144 --instance-id s.i-84f09ff791b68 --endpoint http://192.168.1.116:8008 --profile compute1
workstation>
workstation> aws ec2 associate-address --public-ip 192.168.1.145 --instance-id s.i-84f09ff791b6828b0 --endpoint http://192.168.1.116:8008 --profile compute1
workstation>
7. Connect to the new instances using the public IP addresses and make sure you are able to log in.
workstation> ssh ubuntu@192.168.1.144 -i MySshKey1.pem
webserver>$
Configuring the web server
In this section, I am installing the updates, installing the software packages, and configuring the web server.
1. Log in to the web server, and update /etc/resolv.conf with your domain name server (DNS) or a public DNS.
webserver>vi /etc/resolv.conf2. Update the web server OS, install Apache2, PHP, MySQL client, and the PHP libraries. If you have completed these steps before creating the Snowball AMIs, then you can skip them here.
webserver> apt-get updatewebserver>apt install apache2 php mysql-client php libapache2-mod-php php-mysql
Reading package lists... Done3. Install these additional PHP modules.
webserver>sudo apt-get install php7.0-gd php7.0-mysql php7.0-dom php7.0-cli php7.0-json php7.0-common php7.0-mbstring php7.0-opcache php7.0-readline php7.0-xml
Reading package lists... Done
4. Enable the newly installed PHP modules.
webserver>phpenmod xml gd dom5. Enable the Apache and PHP modules.
webserver>a2enmod php7.0
Considering conflict php5 for php7.0:
Module php7.0 already enabled
6. Edit /var/www/html/index.php and add the following lines:
<?php
phpinfo() ;
?>
7. Open a browser and point to the web server root (http://192.168.1.144/index.php) and you should see the following page:

Configuring the database server
In this section, I am installing MySQL, creating the database, creating a database user, and restricting database access from only the web server.
1. Log in to the database server.
dbserver> ssh ubuntu@192.168.1.145 -i MySshKey1.pem 2. Install operating system updates on the database server instance.
dbserver>apt update3. Install MySQL server. The installation steps prompt you for a new MySQL root password. Provide a strong password for the database root access.
dbserver> apt-get install mysql-server
Reading package lists... Done
Building dependency tree
Reading state information... Done
The following additional packages will be installed:
4. Once the MySQL installation is complete, connect to the database as root.
dbserver> mysql -u root -p
Enter password: 2Tier@@
Welcome to the MySQL monitor.  Commands end with; or \g.
Your MySQL connection id is 4
Server version: 5.7.29-0ubuntu0.16.04.1 (Ubuntu)

Copyright (c) 2000, 2020, Oracle and/or its affiliates. All rights reserved.

Oracle is a registered trademark of Oracle Corporation and/or its
affiliates. Other names may be trademarks of their respective
owners.

Type 'help;' or '\h' for help. Type '\c' to clear the current input statement.

mysql> show databases ;
+--------------------+
| Database           |
+--------------------+
| information_schema |
| mysql              |
| performance_schema |
| sys                |
+--------------------+
4 rows in set (0.00 sec)

mysql>
5. Go to the command prompt. Run vi/etc/mysql/mysql.conf.d/mysqld.cnf and update the IP address with the private IP address of the DB server. This is the private IP address of the database server.
Note: You can obtain this address from your management workstation by running command aws ec2 describe-instances –instance-id s.i-84f09ff791b68 --endpoint http://192.168.1.116:8008 --profile compute1
# localhost which is more compatible and is not less secure.
bind-address            = 34.223.14.197
#
# * Fine Tuning
6. Create a new database and a new database user. In this example, you use the database name myapp1, and user name myapp1user. You also grant permissions to the new user.
dbserver> mysql -u root -p
Enter password:
Welcome to the MySQL monitor.  Commands end with ; or \g.
Your MySQL connection id is 5
Server version: 5.7.29-0ubuntu0.16.04.1 (Ubuntu)

Copyright (c) 2000, 2020, Oracle and/or its affiliates. All rights reserved.

Oracle is a registered trademark of Oracle Corporation and/or its
affiliates. Other names may be trademarks of their respective
owners.

Type 'help;' or '\h' for help. Type '\c' to clear the current input statement.

mysql> create database myapp1;

Query OK, 1 row affected (0.00 sec)

mysql> create user myapp1user IDENTIFIED BY 'myapp1user';
Query OK, 0 rows affected (0.00 sec)

mysql>

GRANT ALL ON myapp1.* TO myapp1user@'192.168.100.144' IDENTIFIED BY 'myapp1user';
Query OK, 0 rows affected, 1 warning (0.00 sec)

mysql>
7. Now, if you log on to the web server, you should be able to access the database server using the MySQL client.
dbserver> mysql -u myapp1user -p -D myapp1 -h 192.168.17.145
Enter password: myapp1user
---- ---
Type 'help;' or '\h' for help. Type '\c' to clear the current input statement.

mysql>
Configuring Drupal
In this section, I am installing Drupal, and configuring a new user.
1. Log on to the web server and download the Drupal install package.
webserver>cd /tmp
>wget https://ftp.drupal.org/files/projects/drupal-8.7.11.tar.gz
2. Untar the tar ball. Copy the default sites configuration.
3. Go to the web browser (http://192.168.1.144/drupal/core/install.php) and start the Drupal installation.

4. Click next and verify the installation, and then at the database Advanced Options, specify the MySQL database, user, and password information.

5. Once the Save and continue option is selected, Drupal begins installation.

6. The next screen will prompt you to configure the new site and ask you for a new Drupal user that has the right to edit the new site. This is the last step to configure Drupal.

7. Open up your browser and point to the new site. If the documented process was followed, you see the following page:

Optional steps
- You can install and configure the Video module on Drupal and perform transcoding and playback.
- Configure Snowball Edge security groups to limit a specific type of network traffic and secure the deployment.
- Secure the application using Drupal deployment best practices.
Conclusion
In this blog, you have completed the deployment of a multi-tier application running Drupal leveraging a Snowball Edge. You have seen how the device is ordered, installed, and unlocked, along with how the application is deployed.
You have seen how Snowball Edge supports architectures that enable you to process and transform media locally, and move it to the cloud for further processing or archival. Snowball Edge enables you to run applications in a disconnected or bandwidth constrained location. You have achieved this all without having a major built-up infrastructure or without incurring capital expense.
To learn more, read the AWS documentation. Please let us know if you have any feedback or questions by leaving a comment in the comments section.
Additional references: