AWS for Industries
Predicting protein structures at scale using AWS Batch
Proteins are large biomolecules that play an important role in the body. Knowing the physical structure of proteins is key to understanding their function. However, it can be difficult and expensive to determine the structure of many proteins experimentally. One alternative is to predict these structures using machine learning algorithms. Several high-profile research teams have released such algorithms, including AlphaFold2, RoseTTAFold, and others. Their work was important enough for Science magazine to name it the 2021 Breakthrough of the Year.
Both AlphaFold2 and RoseTTAFold use a multitrack transformer architecture trained on known protein templates to predict the structure of unknown peptide sequences. These predictions are heavily GPU-dependent and take anywhere from minutes to days to complete. The input features for these predictions include multiple sequence alignment (MSA) data. MSA algorithms are CPU-dependent and can themselves require several hours of processing time.
Running both the MSA and structure prediction steps in the same computing environment can be cost-inefficient because the expensive GPU resources required for the prediction sit unused while the MSA step runs. Instead, using a high-performance computing (HPC) service like AWS Batch allows us to run each step as a containerized job with the best fit of CPU, memory, and GPU resources.
In this post, we demonstrate how to provision and use AWS Batch and other services to run AI-driven protein folding algorithms like RoseTTAFold.

Previous blog posts have described how to install and run the AlphaFold 2 workload on AWS using Amazon Elastic Compute Cloud (Amazon EC2) instances. This is a great solution for researchers who want to interact with protein-folding algorithms in a long-running, highly customizable environment. However, teams who wish to scale their protein structure predictions may prefer a service-oriented architecture.
This project uses a pair of AWS Batch computing environments to run the end-to-end RoseTTAFold algorithm. The first environment uses c4, m4, and r4 instances based on the vCPU and memory requirements specified in the job parameters. The second environment uses g4dn instances with NVIDIA T4 GPUs to balance performance, availability, and cost.
A scientist creates structure prediction jobs using one of the two included Jupyter notebooks. AWS-RoseTTAFold.ipynb demonstrates how to submit a single analysis job and view the results. CASP14-Analysis.ipynb demonstrates how to submit multiple jobs at once using the CASP14 target list. In both of these cases, submitting a sequence for analysis creates two AWS Batch jobs. The first job uses the CPU computing environment to generate the MSA data and other features. The second job uses the GPU computing environment to make the structure prediction.
The data preparation and structure prediction jobs use the same custom Docker image, based on the public Nvidia CUDA image for Ubuntu 20. It includes the v1.1 release of the public RoseTTAFold repository as well as additional scripts for integrating with AWS services. AWS CodeBuild will automatically download this container definition and build the required image during stack creation. You can make changes to this image by pushing to the AWS CodeCommit repository included in the stack.
Walkthrough
Deploy the infrastructure stack
- Choose Launch Stack:

- For Stack name enter a value unique to your account and Region.
- For Stack Availability Zone choose an Availability Zone.
- Select I acknowledge that AWS CloudFormation might create IAM resources with custom names.
- Choose Create stack.
- Wait approximately 30 minutes for AWS CloudFormation to create the infrastructure stack and AWS CodeBuild to build and publish the AWS-RoseTTAFold container to Amazon Elastic Container Registry (Amazon ECR).
- Load model weights and sequence database files.
Option 1: Mount the FSx for Lustre file system to an EC2 instance
- Sign in to the AWS Management Console and open the Amazon EC2 console at https://console.aws.amazon.com/ec2.
- In the navigation pane, under Instances, select Launch Templates.
- Choose the Launch template ID for your stack, such as aws-rosettafold-launch-template-stack-id-suffix.
- Choose Actions, Launch instance from template.
- Launch a new EC2 instance and connect using either SSH or SSM.
- Download and extract the network weights and sequence database files to the attached volume at/fsx/aws-rosettafold-ref-data according to installation steps 3 and 5 from the RoseTTAFold public repository.
Option 2: Load the data from an S3 data repository
- Create a new S3 bucket in your Region of interest.
- Download and extract the network weights and sequence database files as described above and transfer them to your S3 bucket.
- Sign in to the AWS Management Console and open the Amazon FSx for Lustre console at, https://console.aws.amazon.com/fsx.
- Choose the File System name for your stack, such as aws-rosettafold-fsx-lustre-stack-id-suffix.
- On the file system details page, choose Data repository, Create data repository association.
- For File system path enter /aws-rosettafold-ref-data.
- For Data repository path enter the S3 URL for your new S3 bucket.
- Choose Create
Creating the data repository association will immediately load the file metadata to the file system. However, the data itself will not be available until requested by a job. This will add several hours to the duration of the first job you submit. However, subsequent jobs will complete much faster.
Once you have finished loading the model weights and sequence database files, the FSx for Lustre file system will include the following files:
Submit structure prediction jobs from Jupyter
- Clone the CodeCommit repository created by CloudFormation to a Jupyter Notebook environment of your choice.
- Use the AWS-RoseTTAFold.ipynb and CASP14-Analysis.ipynb notebooks to submit protein sequences for analysis.
Discussion
Data storage requirements
File system performance is one of the key challenges to running MSA algorithms in parallel. To address this, we use an Amazon FSx for Lustre file system to store the necessary sequence databases. When AWS Batch launches a new compute instance, it mounts the FSx file system in seconds. FSx then provides high-throughput access to the necessary data.
Please note that the template linked above creates a file system with 1200 MB/s total throughput, which can support dozens of simultaneous jobs. However, if your use case only requires one or two jobs at a time, you can modify the template to save cost. In this case, we recommend decreasing the throughput per unit of storage on the FSx for Lustre resource from 1000 to 500 MB/s/TiB.
Prediction performance
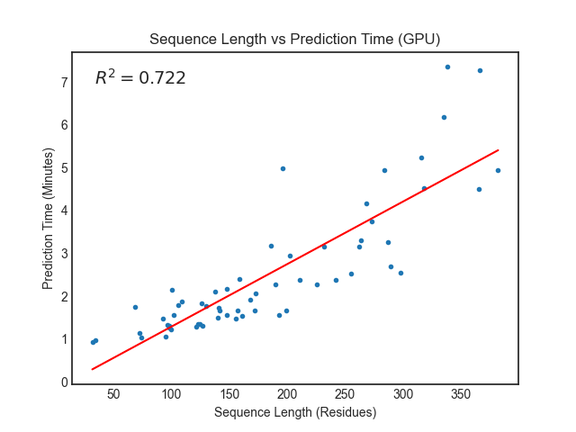
The RoseTTAFold paper reports requiring around 10 minutes on an RTX2080 GPU to generate structure predictions for proteins with less than 400 residues. We saw similar or better performance using Amazon EC2 G4dn instances with NVIDIA T4 GPUs.
For proteins with more than 400 residues, we recommend running the prediction jobs on instance types without GPUs. You can do this in the linked notebooks by updating the predict_job_definition and predict_queue fields parameters from this:
To this:
Support for other algorithms
Splitting the analysis workload into two separate jobs makes it easier to incorporate other algorithms for generating features and predicting structures. For example, you can replace hhblits with an alternative alignment algorithm like MMSeqs2 by updating the run_aws_data_prep_ver.sh script. The ParallelFold project is a good example of how to apply a similar multistep approach to the AlphaFold2 workflow. In this case, the featurization and prediction steps could each be containerized and run as AWS Batch jobs.
Cleaning up
- Sign in to the AWS Management Console and open the CloudFormation console at https://console.aws.amazon.com/cloudformation.
- Choose the Stack name associated to your stack.
- Choose Delete.
Conclusion
In this post, we demonstrated how to use AWS Batch and Amazon FSx for Lustre to improve the performance efficiency and cost of protein folding algorithms like RoseTTAFold. A template for deploying the AlphaFold2 algorithm on AWS Batch is now available at https://github.com/aws-samples/aws-batch-architecture-for-alphafold.
To learn more about how AWS supports life science organizations with high-throughput modeling and screening visit, aws.amazon.com/health/biopharma/solutions/