Networking & Content Delivery
How to use AWS PrivateLink to secure and scale web filtering using explicit proxy
Many customers use web filtering proxy solutions to monitor and control web traffic from their VPCs. When you have many accounts and VPCs, you will need to deploy multiple stacks of these solutions. This increases the complexity and overhead of managing these solutions. By centralizing the web filtering proxy service, you can easily and securely host, manage and scale the solution for cost savings in both man hours and costs of running the service.
In this blog post, we will show you how you can use AWS PrivateLink to centralize your web filtering solution without using VPC Peering, VPNs or EIP. We will take you step-by-step through an example that shows you how to configure this solution.
There are two ways to deploy proxy solutions – explicit mode and transparent mode. This blogpost covers only deploying the proxy in explicit mode. In explicit mode, each of your instances must be configured with an explicit proxy configuration so instances can send the traffic destined for the internet to the proxy servers. If your application doesn’t support explicit proxy, this solution will not work for you.
Solution Overview
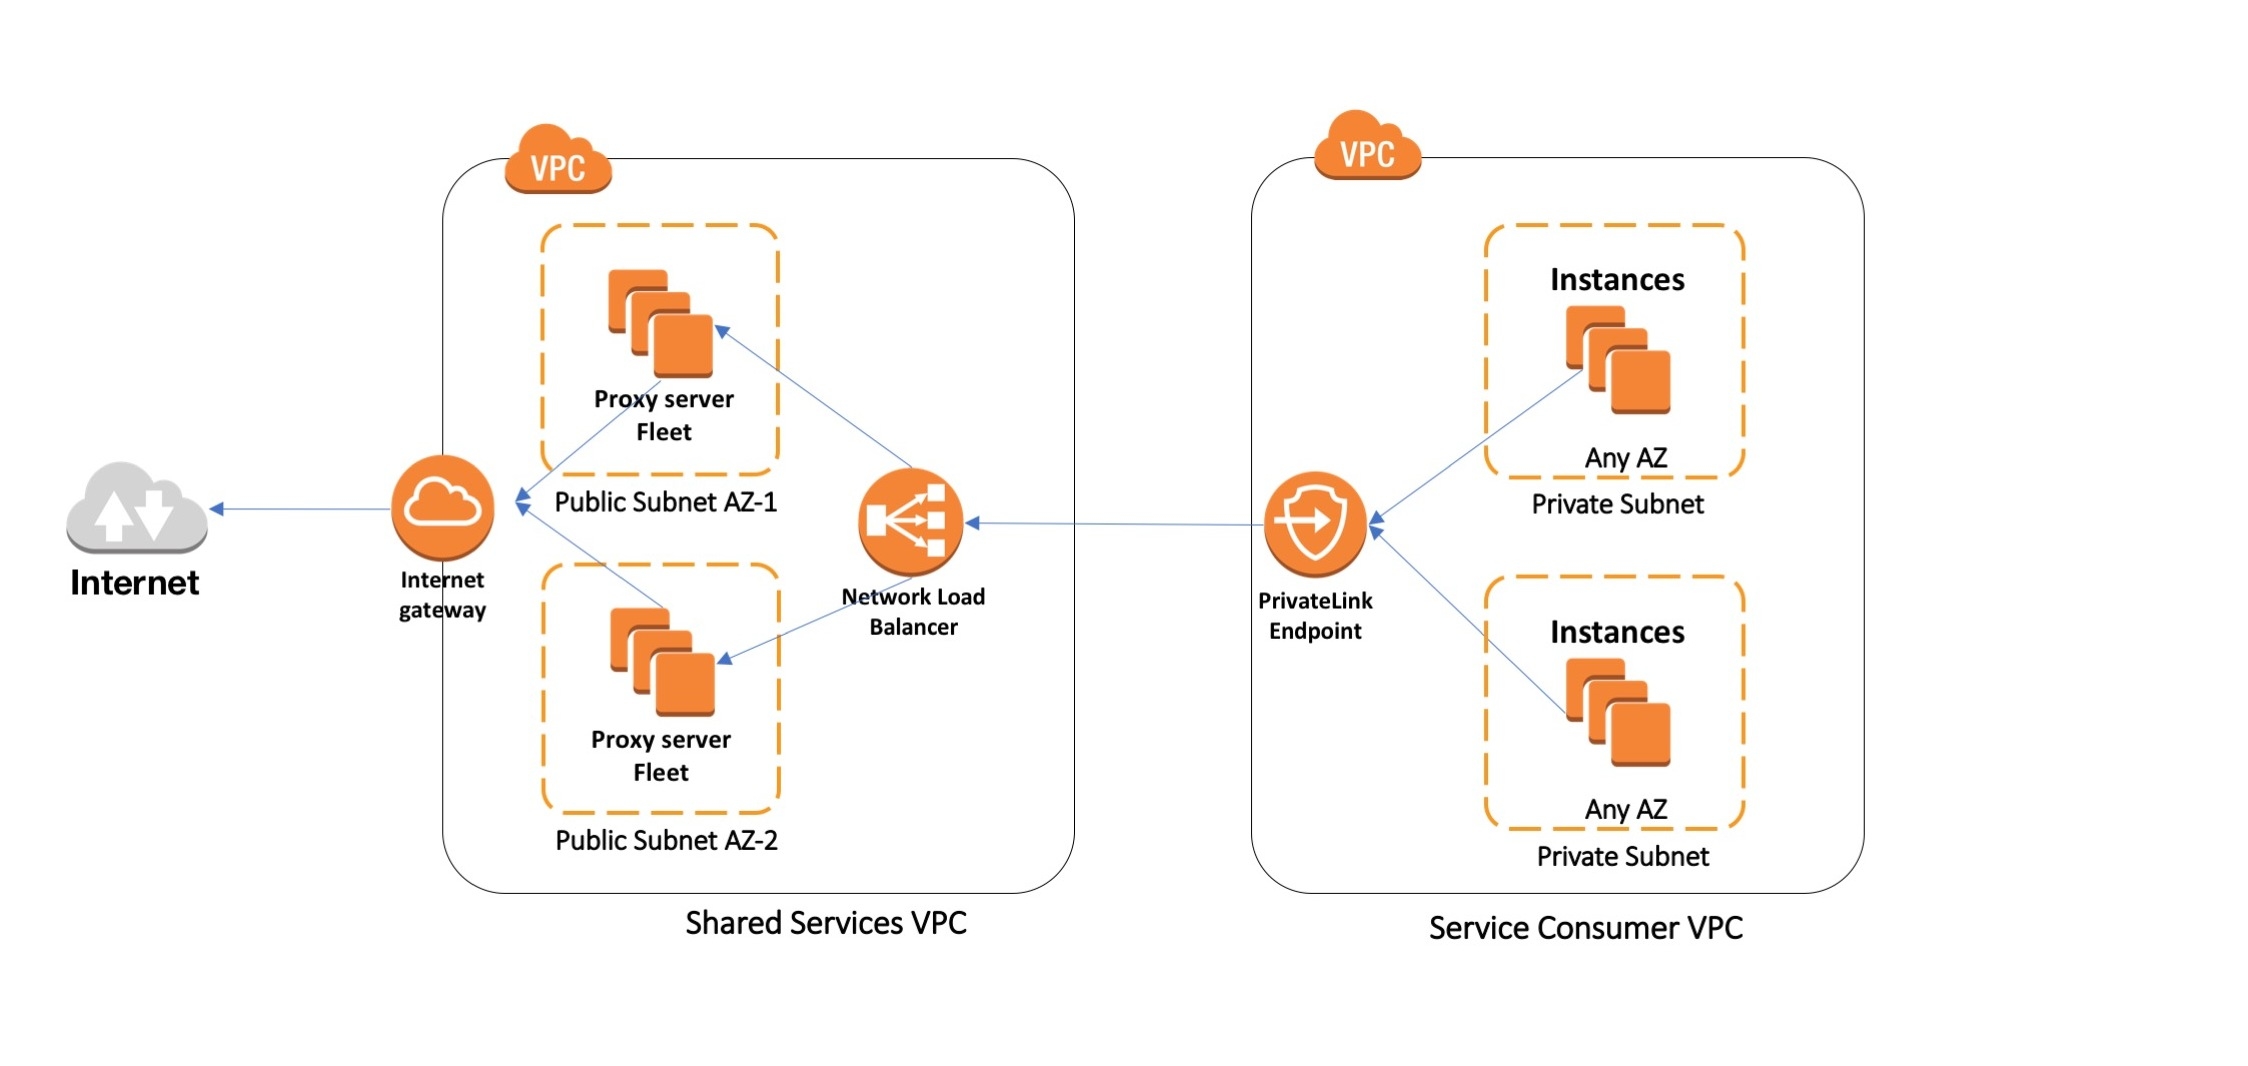
This simplified architecture describes how we can use AWS PrivateLink to allow instances in one VPC (consumer VPC) to privately use the web proxy fleet in another VPC (shared services VPC). This architecture can be expanded further to allow many consumer VPCs (in the same or different AWS accounts) in the same Region to use the centralized web proxy solution.
Deploying the example
To demonstrate how AWS PrivateLink can be used across VPCs that are not peered, we are going to deploy two Squid proxy servers in a service provider VPC, and we’ll deploy a test instance in the service consumer VPC. We’ll then configure PrivateLink between the two VPCs for this service and configure the test instance to use the Squid proxy in explicit mode. Finally, we’ll do some curl tests from the test instance to show that connectivity and filtering is working as expected in this scenario.
1. Setting up the VPC, subnets, route tables, IGW etc.
The first step in deploying this example is to set up the VPCs, subnets, internet gateway, and necessary network components.
Click here to create a stack and deploy all the components using a CloudFormation template in US West (Oregon) region. If you prefer to deploy this in another region, you can download the CloudFormation template here.
You can also follow the step-by-step guidance below, if you choose to create them manually.
1. Create the Service Provider VPC. (See Getting Started with Amazon VPC, if you need help with this step.) Provide the following inputs:
Name Tag: Service Provider VPC
IPv4 CIDR Block: 10.0.0.0/16
Leave the rest of the values at the default.
2. Create two subnets (see Creating a Subnet): one called “Provider Public Subnet1” and another called “Provider Public Subnet2.” Provide the following values:
Create the first subnet - Provider Public Subnet1.
Name Tag: Provider Public Subnet1
VPC: Select Service Provider VPC
Availability Zone: Select the first AZ <region_name>
IPv4 CIDR block: 10.0.0.0/24
Create the second subnet: Provider Public Subnet2.
Name Tag: Provider Public Subnet2
VPC: Select Service Provider VPC
Availability Zone: Select the second AZ <region_name>
IPv4 CIDR block: 10.0.1.0/24
3. Create and attach an internet gateway to the VPC – Service Provider (see Internet Gateways).
NameTag: ServiceProviderIGW
4. Add a rule to the default route table of the Service Provider VPC that sends traffic destined outside the VPC (0.0.0.0/0) to the internet gateway (see Adding and Removing Routes from a Route Table).
5. Create two security groups in the Service Provider VPC (see Security Groups).
NameTag: BastionHost-SG
GroupName: BastionHost-SG
Description: Accepts traffic on port 22 from on-premises network into the Service Provider VPC
Add inbound rule:
Type: SSH
Protocol: TCP(6)
Port Range:22
Source: 0.0.0.0/0 or your on-premises or machine-specific IP address in the form x.x.x.x/32
Description: Accept Only SSH traffic
VPC: Service Provider
NameTag: SquidProxySG
GroupName: SquidProxySG
Description: Accepts traffic on incoming port 3128 from Consumer VPCs- 172.16.0.0/16
VPC: Service Provider
Add inbound rule:
Type: Custom TCP Rule
Protocol :TCP(6)
Port Range: 3128
Source: 172.16.0.0/16
Description: Accept Only Squid proxy traffic from Service Consumer VPC - 172.16.0.0/16
Type: Custom TCP Rule
Protocol :TCP(6)
Port Range:3128
Source: 10.0.0.0/16
Description: Rule is required for Network Load Balancer health check to pass.
6. Create a second VPC in the same Region as follows. Leave rest of the values at the default.
Name Tag: Service Consumer
IPv4 CIDR Block: 172.16.0.0/16
7. Create two subnets: one called “Consumer Public Subnet1” and another called “Consumer Private Subnet1.” Provide the following values:
Create the first subnet -Consumer Public Subnet1.
Name Tag: Consumer Public Subnet1
VPC: Select Service Consumer
Availability Zone: Select the first Availability Zone <region_name>
IPv4 CIDR block: 172.16.0.0/24
Create the second subnet: Consumer Private Subnet1.
Name Tag: Consumer Private Subnet1
VPC: Select Service Consumer VPC
Availability Zone: Select the second AZ <region_name>
IPv4 CIDR block: 172.16.1.0/24
8. Create and attach an Internet Gateway to the VPC – Service Consumer VPC (see Attaching an Internet Gateway).
NameTag: ServiceConsumerIGW
9. Create a new Route Table called “Consumer Public RT” and associate a default route to send traffic to the Internet Gateway.
NameTag: Consumer Public RT
VPC: Service Consumer
Add a rule for 0.0.0.0/0 pointing to the internet gateway (see Adding and Removing Routes from a Route Table). Associate Consumer Public Subnet1 to the route table.
10. Create two security groups in the Service Consumer VPC.
NameTag: BastionHost-SG-ConsumerVPC
GroupName: BastionHost-SG-ConsumerVPC
Description: Accepts traffic on port 22 from on-premises network
VPC: Service Consumer VPC
Add inbound rule:
Type: SSH
Protocol :TCP(6)
Port Range: 22
Source: 0.0.0.0/0 or your on-premises or machine-specific IP address in the form of x.x.x.x/32.
Description: Accept only SSH traffic
NameTag: ProxyTraffic-SG-ConsumerVPC
GroupName: ProxyTraffic-SG-ConsumerVPC
Description: Accepts traffic on incoming port 3128 from Service Provider VPC - 10.0.0.0/16
VPC: Service ConsumerAdd inbound rule:
Type: Custom TCP Rule
Protocol :TCP(6)
Port Range: 3128
Source: 172.16.0.0/16
Description: Accept Only Squid proxy traffic from Service Consumer VPC – 172.16.0.0/16
Type: SSH
Protocol :TCP(6)
Port Range: 22
Source: 172.16.0.0/24
Description: Accepts only SSH traffic from bastion host subnet
11. Launch one Amazon Linux t2.micro instance in Consumer Public Subnet1 and 1 Ec2 instance in Consumer Private Subnet1 (see Launching Your Instance).
Create an EC2 instance and name it ServiceConsumerBastionHost in the Consumer Public Subnet1 subnet.
Select a Free-Tier-eligible Amazon Linux Amazon Machine Image (AMI).
Select a general-purpose t2.micro Free-Tier eligible instance.
Network: Select Service Consumer
Subnet: Consumer Public Subnet1
Auto-assign Public IP: Enable
Tag: Key: Name Value="ServiceConsumerBastionHost"
Security Group: BastionHost-SG-ConsumerVPC
Select a valid key pair
Create a ServiceConsumer Instance in the Consumer Private Subnet1.
Select a Free-Tier eligible Amazon Linux AMI.
Select a general purpose t2.micro Free-Tier-eligible instance.
Network: Select Service Consumer
Subnet: Consumer Private Subnet1
Tag: Key: Name Value="ServiceConsumer Instance"
Security Group: ProxyTraffic-SG-ConsumerVPC & default VPC security group
Select a valid key pair.
2. Deploying and configuring a Squid proxy fleet
1. Launch one Amazon Linux t2.micro instance in each public subnet created in the Service Provider VPC. (See Launching an Instance.)
Create Squid instance-1 in Provider Public Subnet1.
Select a Free-Tier eligible Amazon Linux AMI.
Select a general-purpose t2.micro Free-Tier-eligible instance.
Network: Select Service Provider VPC
Subnet: Provider Public Subnet1
Auto-assign Public IP: Enable
Tag: Key: Name Value="Squid Instance-1"
Security Group: BastionHost-SG
Select a valid key pair.
Create Squid instance-2 in Provider Public Subnet2.
Select a Free-Tier eligible Amazon Linux AMI.
Select a general-purpose t2.micro Free-Tier-eligible instance.
Network: Select Shared Services VPC
Subnet: Provider Public Subnet2
Auto-assign Public IP: Enable
Tag: Key: Name Value="Squid Instance-2"
Security Group: BastionHost-SG
Select a valid key pair.
2. After the instances start running, disable the source/destination check on both instances (see Disabling Source/Destination Checks).
3. To Deploy and configure Squid, the following steps need to be performed for both of the EC2 instances created in Step 1. Log in to the EC2 instance using the public IP address and key pair used in Step 1 and execute the following commands:
sudo yum install squid
sudo chkconfig squid on
sudo service squid start
sudo service squid status ==> Ignore the warning
Performing these steps installs the Squid proxy software. You can check the default configuration of the Squid proxy by typing “sudo cat /etc/squid/squid.conf”. The default configuration is good for our test case. It allows https port 443 and http port 80. The Squid proxy is configured to listen at port 3128.
4. Attach SquidProxySG to both EC2 instances.
5. Configure Network Load Balancer in the Service Provider VPC. Create a Network Load Balancer. – Refer to this link to get started.
Name: ServiceProviderLB
Schema: Internal
Load Balancer Protocol: TCP
Load Balancer Port: 3128
VPC: Select Service Provider VPC
Select both Availability Zones - Provider Public Subnet1 and Provider Public Subnet1
Tag: Name , Value => ServiceProviderLB
Target Group: New Target Group
Name: SquidProxyServerTG
Protocol: TCP
Port: 3128
Register Targets: Select both of the Squid EC2 instances.
3. Setting up PrivateLink
1. To create PrivateLink endpoint Services, refer to the following link.
Associate Network Loadbalancers: Select ServiceProviderLB
2. Copy the Service Name of the endpoint from the console. Create the endpoint in Service Consumer VPC. Refer to this link.
Service Category: Select Find Service by Name
Paste the Service ID copied in Step 1.
VPC: Select Service Consumer
Subnet: Select both Availability Zones in the drop-down list.
Select ProxyTraffic-SG-ConsumerVPC security group
3. Accept the request on the Endpoint Services page.
Endpoint Connections: Action=> Accept Endpoint Connection Request
4. Copy the DNS name from the Endpoint page. You will use this DNS name in the step 4 below.
Testing the deployment
We are going to test the setup by logging into the test instance that was launched in the private subnet, configuring the proxy, and performing curl to several websites to confirm that connectivity is working and that Squid is working as expected.
However because the instance we want to perform the test from is in a private subnet, we are going to use SSH to connect to a bastion host (created in step 1) and then use SSH to connect to the test instance from the bastion host.
1: Use SSH to connect to the bastion host.
ssh -i <path to key> ec2-user@<Public IP of the Bastion Host>
2: Copy the SSH key to the bastion host to log in to the test instance.
vi sshkey.pem
Press i for putting vi in insert mode.
Copy the private key you downloaded earlier and paste it into vi.
Press Esc
Type :wq to save and exit.
3: Use SSH to connect to the test instance from the bastion host.
ssh -i ./sshkey.pem ec2-user@<Private IP of Test Instance>
4: Configure proxy settings.
$ export HTTP_PROXY="http://<DNS name of PrivateLink>:3128"
$ export HTTPS_PROXY="http://<DNS name of PrivateLink>:3128"
$ export NO_PROXY="169.254.169.254"
5: Test URL access through proxy.
curl http://www.amazon.com
curl https://www.amazon.com
curl http://calculator.s3.amazonaws.com/index.html
curl https://calculator.s3.amazonaws.com/index.html
After you are done testing, you can clean up the resources you created. If you used AWS CloudFormation to provision the resources, you can delete the stack, which will delete corresponding instances that were created.
Summary
In this blog post, we showed how to use the AWS PrivateLink feature to centralize deployment of proxy servers. Note that this example works for proxy servers running in explicit mode. The squid proxy that is shown in this blog post is an example; you can deploy any proxy server that operates in explicit mode in this manner. We also invite you to think about running other services using PrivateLink to reap its benefits: use the services as if they run in your own VPC, at scale, securely, with minimal network configurations.
We are working on another blog post about how you can use AWS PrivateLink and an Application Load Balancer to centralize internet application publishing. We will post a link here after that post is published.
If you have any questions or suggestions, please leave a comment.
-Vinod & Sahil
| Blog: Using AWS Client VPN to securely access AWS and on-premises resources | ||
| Learn about AWS VPN services | ||
 |
Watch re:Invent 2019: Connectivity to AWS and hybrid AWS network architectures |