IBM & Red Hat on AWS
Save Costs with Single Node OpenShift Deployments of IBM Maximo on AWS
IBM Maximo Application Suite (MAS), when paired with Red Hat Single Node OpenShift (SNO) on AWS offers an agile, cost-effective solution for asset management within SME (Small and Medium scale) settings. This simplified OpenShift configuration converges control and worker functionalities into a single Amazon Elastic Compute Cloud (Amazon EC2) node, fostering a lightweight, streamlined Kubernetes environment.
Although primarily designed for non-critical workloads such as development and testing, it retains full feature parity with larger deployments, promising ideal utility for small to medium-sized operations where uptime is less critical.
In this Blog, we will explore into the benefits of deploying MAS on a single node OpenShift on AWS. We’ll provide a detailed, step-by-step guide on how to efficiently set up MAS, ensuring you meet all the necessary requirements for successful deployments.
Key Advantages of Maximo Application Suite (MAS) on Single Node OpenShift
Single Node OpenShift (SNO) architecture reduces hardware requirements and simplifies cluster management, lowering operational costs, making it ideal for small to mid-sized businesses and remote site deployments.
The one-node model simplifies installation, configuration, and works well in a resource=restricted environment, beneficial for locations with limited IT resources. Running Maximo Application Suite (MAS) on SNO enables efficient data processing and analysis close to its generation points, which makes it ideal for remote facilities where response times and bandwidth are critical.
Despite its lean nature SNO does not support horizontal scaling; however, it allows for vertical scalability. This means customers can enhance their capacity to meet growing demands, ensuring that SNO remains a beneficial solution.
Important Considerations for SNO Utilization
SNO is specifically designed to handle the Maximo Manage Module from the Maximo Application Suite. This setup, where a single node functions as both the control and worker, is streamlined for environments where the demands for Application Workload high availability and low recovery point objectives (RPO) are not essential.
If you are not using IBM’s Db2 for your database, or need more database functionality than the containerized IBM Db2 provided with MAS, you can leverage Amazon Relational Database Service (RDS). Amazon RDS for Db2 offers database management that focuses on application-specific utilization, integrating seamlessly with AWS’s native backup solutions.
Use Cases that may be suitable for SNO:
- Small MAS and Manage-only implementations that range under 70 concurrent users
- Satellite/Disconnected deployments, possibly connected to a larger central MAS
- Upgrading small Maximo customers to MAS
- Demo & Proof of Concept
Use Cases that are not as suitable for SNO:
When the requirements extend beyond the Maximo Manage Module to include other modules such as Health, Predict, or Monitor, it is advisable to consider using a full OpenShift Cluster with separate control and worker nodes. Also, for scenarios that demand high availability within application workloads across multiple zones, deploying on a single-node configuration is not advisable.
Prerequisites
To effectively deploy and manage your resources on AWS using the Maximo Application Suite on Single Node OpenShift, ensure you have the following prerequisites arranged:
AWS Account: An active AWS account is necessary to access and deploy the required services.
AWS Credentials: Secure your deployment by having AWS Access Keys and Secret Keys ready for use.
AWS CLI: Configure the AWS CLI with your Access Keys and specify your preferred AWS Region to streamline the deployment process.
OpenShift Pull Secret: Obtain the Pull Secret from the Red Hat customer portal, which is essential for authentication with OpenShift services.
IBM License File: Access IBM License Key Center to the Get Keys menu select IBM AppPoint Suites. Select IBM MAXIMO APPLICATION SUITE AppPOINT LIC. more details can be found in here
IBM Entitlement Key: Log in to the IBM Container Library with a user ID that has software download rights for your entitlement to get the entitlement key.
Domain on Amazon Route 53: Set up a domain in Amazon Route 53 to enable automated DNS record creation, facilitating smoother operations and connectivity. A public host zone will work for this exercise.
Installation Blueprint
Our guide divides into two comprehensive sections: Installing a Single-Node OpenShift (SNO), then deploying MAS on AWS.
Maximo application suite on Single Node requires deploying an Amazon EC2 instance with at least 16 vCPU and 64GB of memory. The default Maximo installer selects the M5.4xlarge instance. If you need to change the instance type to a larger (or smaller) size after adding workload, you can change the instance type through AWS console after installation is completed. AWS supports changing compatible instances types once created, allowing for vertical scaling of the instance.
Figure 1 below, illustrates the architecture that will be established by the OpenShift installer. This setup involves the creation of a Single Node OpenShift (SNO) instance within a dedicated Amazon Virtual Private Cloud (Amazon VPC), complete with the necessary network configuration. Additionally, the installer will configure Application Load Balancers and map domain routes according to the specified requirements.
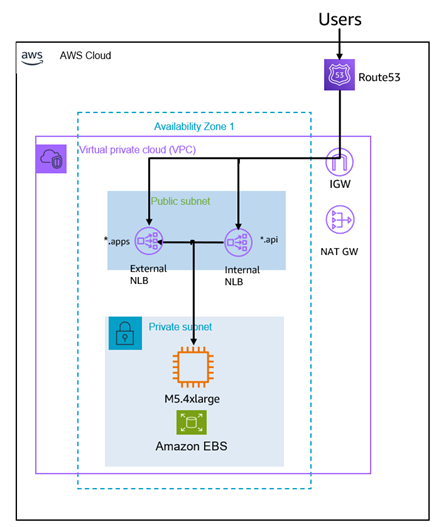
Figure 1. Architecture diagram for deployed MAS SNO system.
Step-by-Step OpenShift Installation
To proceed with the installation, it is necessary to configure and install Docker on Bastion Host on EC2 or User Machine.
Download and configure the Docker Container
1. Pull the Docker image from the Quay Container Repository ( Container Registry for IBM Official Images)
$ docker pull quay.io/ibmmas/cli
2. Create a Docker container using the latest IBM MAS CLI. This container is named ‘sno’ and initializes with a bash shell.
$ docker run -dit --name sno quay.io/ibmmas/cli:latest bash
3. Log into the container ‘sno’ and create a directory named ‘masconfig’ to store configuration files and secrets.
$ docker exec -it sno bash
$ mkdir masconfig
$ exit
4. Copy the secret files to the Docker container. ‘pull-secret’ and ‘license.dat’ are copied into the ‘masconfig’ directory inside the container. Please note the full pathnames of the two files, they will be needed later in the process.
$ docker cp pull-secret sno:/mascli/masconfig/pull-secret
$ docker cp license.dat sno:/mascli/masconfig/license.dat
SNO Installation
1. Login to the Docker container named ‘sno’ using an interactive terminal and Bash shell. This command provides access to the container’s command line interface.
$ docker exec -it sno bash
2. Configure AWS credentials within the container. These environment variables are necessary for authorizing access to your AWS account.Replace ‘<Access Key>’ and ‘<Secret Key>’ with your actual AWS credentials.
$ export AWS_ACCESS_KEY_ID=<Access Key>
$ export AWS_SECRET_ACCESS_KEY=<Secret Key>
3. Execute the IBM MAS provision command for AWS. This command initializes the provisioning process on AWS using the previously set credentials. It configures and deploys necessary resources automatically according to the defined specifications in the IBM MAS CLI environment.
$ mas provision-aws
This last command will have several questions about how and which parts of MAS that you wish to deploy, as shown in the figure below. Be sure to wait for them all as the command progresses.
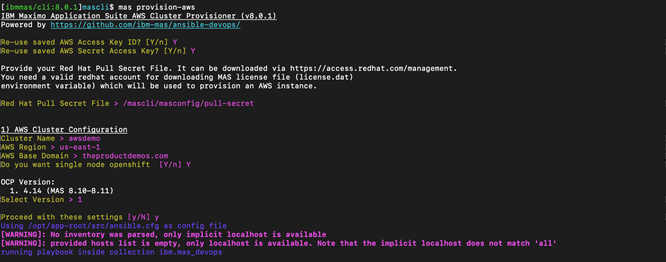
Figure 2. Inputs for the provision-aws step. The pull secret location must the full pathname.
After installing, the terminal outputs the required Username and Password for the cluster. You will need to scroll back to find “kubeadmin”. You can copy the entire output into a file and search within it for an easier alternative, we recommend doing this or redirecting to a file from the command line. The URL of the Red Hat Openshift Admin console will be displayed at the end of the terminal output. When you access the console, you may receive warnings from your browser that the URL is insecure due to certificate issues; use the options provided by your browser to ignore the warning and continue. It should navigate to the admin console which user can deploy, modify and monitor the cluster.
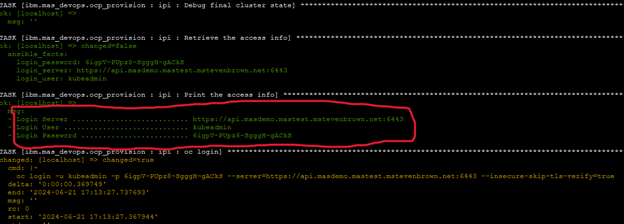
Figure 3. Console Login info as listed in outputs.
Once you have reached this point and can successfully access the OpenShift console for your deployment, we recommend that you wait at least one hour before moving to the next step. The OpenShift deployer will be downloading other material such as service catalogs in background in the meantime.
Maximo Application Suite Deployment
Following container configuration, the MAS installer initiates a pipeline within the OpenShift cluster to monitor installation progress, taking approximately 1 to 1.5 hours.
During this deployment, the MAS Pipeline will install all necessary components, including MAS Manage, Common Services, licensing, and the DB2 database, which is included in the product entitlement by default. For the standard installation, users do not need to purchase a separate database or provision a different database within their servers.
Should you be planning for a larger deployment, we recommend deploying the minimum MAS setup first. Then you can use the Consoie to move to a larger EC2 instance sizing, and then use the MAS console to add the extra modules that you desire.
# MAS Install Command Within the Docker SNO
$ mas install
During the execution of the MAS install command, the user is prompted to specify which components of the IBM Maximo Application Suite (MAS) they wish to deploy on their OpenShift cluster. This involves making selections—such as ‘Y’ (Yes) or ‘N’ (No)—for various MAS components like Manage, Health, Predict, and Monitor. Additional configuration choices include the installation of DB2, customization of the Manage component, and setup of entitlement and license keys necessary for the installation. Users will also provide details such as the application name, cluster name, and other customization options.
You should be prepared to cut and paste the Entitlement Key string into one of the prompts. Another prompt will want the full pathname of the License (AppPoints) file.
Once all required information is input, the MAS installer will verify the settings and initiate a pipeline to deploy MAS on OpenShift, as shown in the images below. Users can monitor the installation progress through a provided pipeline URL. The Installations logs and Task details can be seen within the Pipeline.

Figure 4. Screenshot of the displayed URL created for this SNO deployment.
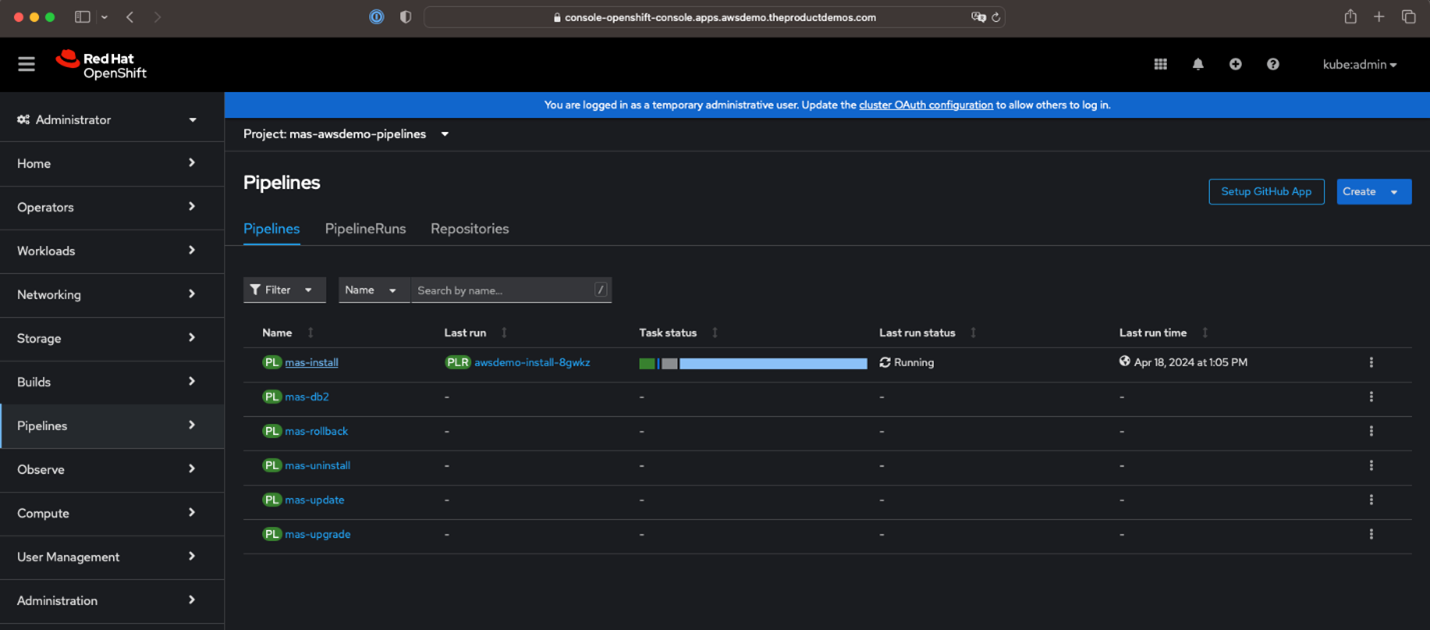
Figure 5. Capture the SNO console URL to access it and visualize the MAS Installation Pipeline.
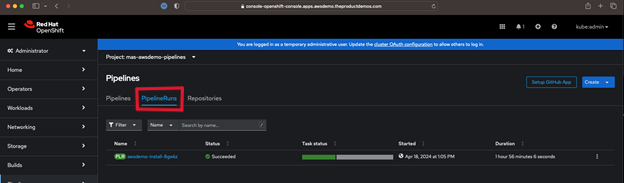
Figure 6: Viewing the status of the installation pipeline in the OpenShift Console.
Should the install pipelines register a failure due to service checks and/or time out errors waiting for other sub-processes to start running, you can re-run the install pipeline step from the RedHat OpenShift console after waiting 30 minutes for resolution. This re-run should avoid any of the timing issues that may have caused the failures.
Post-deployment, the suite is accessible through network routes with credentials secured in the secret store. The Secret Store in Red Hat OpenShift is a centralized storage solution for managing sensitive information. It leverages Kubernetes Secrets to encrypt and protect this data, ensuring that only authorized applications and users can access it.
Accessing MAS Application Post Installation:
To find the Maximo Admin URL and Super Admin credentials in OpenShift, follow these steps.
Log in to the OpenShift console and navigate section by clicking on Networking and select Routes from the dropdown. In the Routes section, search using deployment ID used earlier in MAS (Maximo Application Suite). Look for the route that corresponds to the Maximo Admin application in the list and the URL listed under the location column is the Maximo Admin URL you need, as shown in the diagram below:

Figure 7: Viewing the Maximo Admin URL listing.
Next to find the Super Credentials, navigate to the Secrets section by clucking on Workloads and Secrets from drop down. In the Secrets Section, use the search bar with `Superuser` as shown in the diagram below. Locate the secret containing the `superuser` credentials in filtered list, click on the name to open it. Under the Data tab, you will find the key-value pair and click on the “eye” icon next to each key to reveal values.
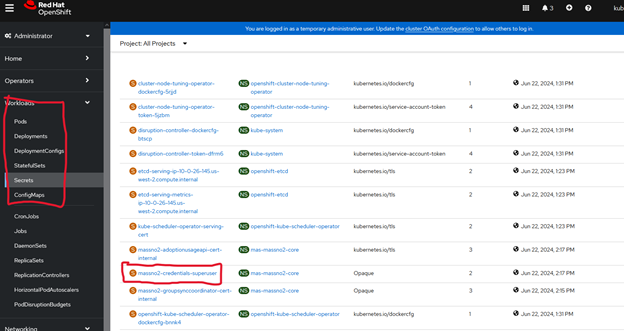
Figure 8: Viewing the Maximo Admin superuser secret listing.
Figure 9 below provides an example where the username and password are masked:
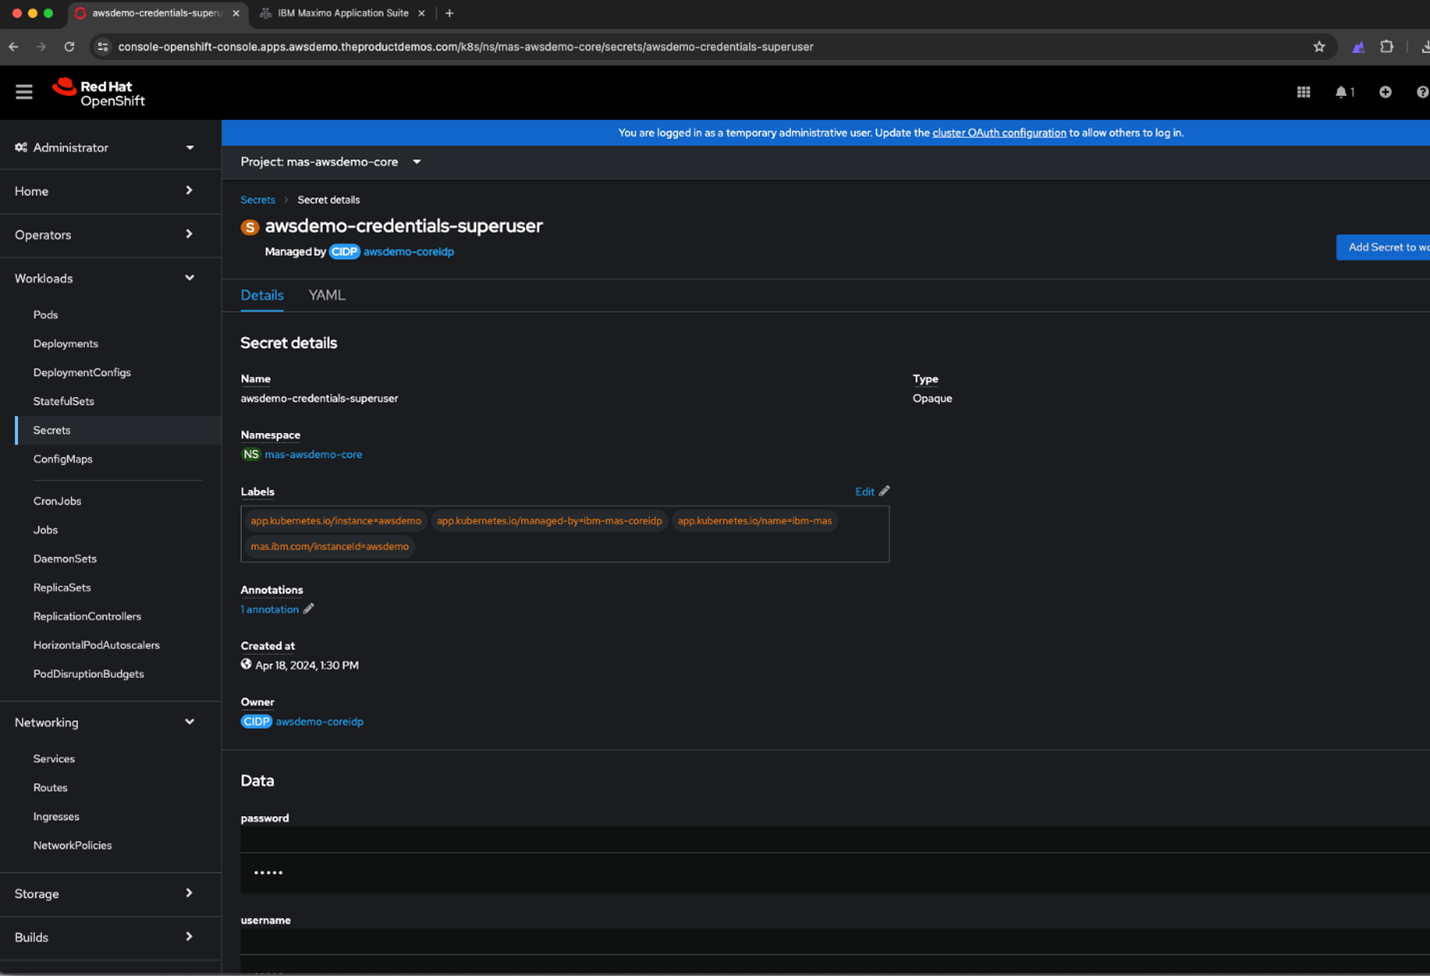
Figure 9. Accessing the MAS Super Admin Credentials.
Maximo Dashboard Page:
During the setup process, configure a Workspace ID and a domain for OpenShift. The URL structure is formed as follows: https://home.<Workspace_ID>.apps.<OpenShiftBaseDomain>. For example, in the provided scenario, the complete URL would be https://home.awsdemo.apps.awsdemo.theproductdemos.com.
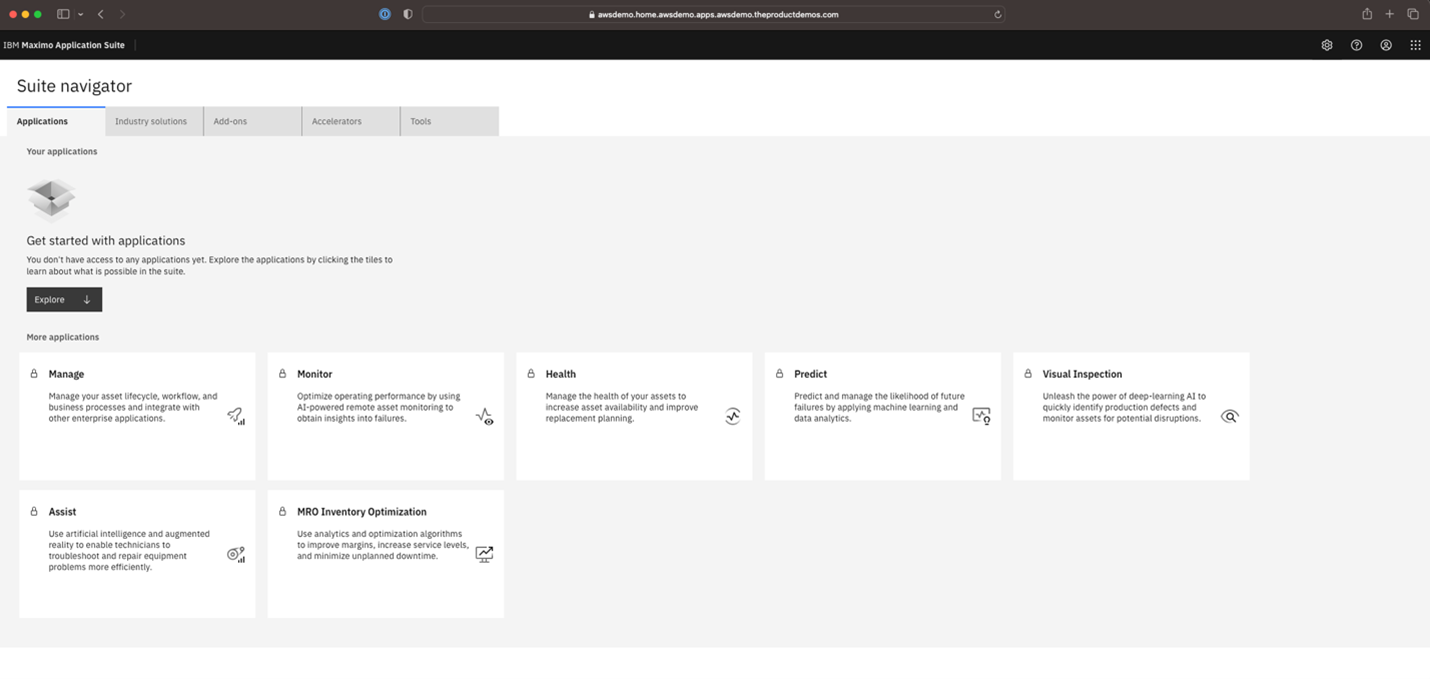
Figure 10. The Maximo console and Suite navigator.
MAS Uninstallation and OpenShift Decommisioning
To uninstall the Maximo Application Suite on the OpenShift Cluster and decommission OpenShift on AWS, run the following command in the MAS docker container:
# Login to the container 'sno'
$ docker exec -it sno bash
This command will initiate the uninstallation process for the Maximo Application Suite and decommission the OpenShift cluster on AWS
Maximo Application Suite Uninstallation
After logging into the container, you need to run the uninstallation command. Since the OpenShift CLI is already configured with the OpenShift cluster, simply confirm with Yes/Y in the interactive CLI. Once you execute the command, the MAS CLI will create a pipeline to uninstall the resources provisioned within the OpenShift cluster.
# MAS Uninstall Command
 $ mas uninstall
OpenShift Decommissioning
The Docker container includes the OpenShift Uninstaller utility, which decommissions all the infrastructure created for the SNO. This includes NAT gateways, subnets, compute resources, load balancers, and other infrastructure linked with the environment.
To run the decommission command, change to the configuration directory and execute the OpenShift installer destroy command. Provide the directory on the SNO cluster name as a parameter to select the specific cluster.
# Change Directory to Configuration Folder
 $ cd /opt/app-root/src/masconfig/sno/config
# Command to Decommision the SNO
 $ /opt/app-root/src/masconfig/sno/installer/latest-4.14/openshift-install destroy cluster --dir ./<SNO Cluster Name>
After decommissioning, navigate to the AWS console to validate the deletion of resources related to SNO.
Summary
IBM Maximo Application suite (MAS) is as a leader in asset management, and can be especially cost-effective for smaller deployments when deployed on Single node OpenShift. SNO reduces the infrastructure requirements but also can add flexibility for small to medium sized deployments.
We’ve shown how deploying MAS on SNO can show benefits such’s as reduced costs, complexity, simplified deployment, and reduced maintenance. However, it is important to consider potential operation challenges such as risk of single point of failure which can lead to downtime. By proactively preparing for potential failures and having a recovery strategy, you can minimize the downtime and ensure smoother operations for your MAS( Maximo Application Suite) on SNO
In Conclusion, MAS on Single Node OpenShift is ideal for a variety of specific use cases. It supports small Manage-only deployments, making it perfect for satellite or disconnect deployments with central MAS Data Center. Additionally, SNO can also serve as an excellent platform for upgrading Maximo customers to MAS and can be highly cost effective for demonstrations and proof of concepts as well, with minimal infrastructure requirements.
What’s next?
To explore more blog content related to IBM and Red Hat, visit the AWS Blogs page.
To learn more about the Single Node OpenShift , Please visit the RedHat Website.
To learn more about Maximo and view industry use cases , visit the IBM Maximo website.
Connect with Envision Enterprise Solutions Limited, IBM partner, to address your IBM Maximo implementation requirements and challenges. Visit our Maximo page to learn more and get in touch.
About Envision Enterprise Solution Limited
Envision has been a trusted Maximo partner since 2003, and is an AWS Select Partner. We specialize in setting up tailored asset management systems for various fields such as manufacturing, energy, healthcare, transport, and more. Our team knows each industry well and designs Maximo solutions to meet your specific needs. With a track record of over 150 Maximo projects, including work on metros, oil & gas companies, power plants, and seaports, we are dedicated to bringing innovative and proven solutions to our customers.