


.8b3525e9b9f3a446fc3be936048eded5397ad67f.svg)
.55ac7ee73be34b4fa3aba610b7378902284d5f06.svg)
.99b9f4778e25691260e882e7c65fe124c2652f32.svg)
.cf16032f3f2987a078d9cc200536841dd2b37129.svg)
.55255afa7e8689e23d80a76e32001ae4d9011a06.svg)
.863b4c3ca2d724266153d309542b6169e0662d8a.svg)
.c72c724441b9f9467473174895cc925f0db62553.svg)

Leveraging Multiple IP Addresses for Virtual IP Address Fail-over in 6 Simple Steps
Learn how you can leverage multiple IP addresses to implement a virtual IP (VIP) address high availability failover solution in six simple steps. This article provides all the necessary resources, including an easy-to-use script and instructions on how to create a VIP solution with two self-monitoring high availability (HA) instances.
Submitted By: Jinesh Varia
AWS Products Used: Amazon VPC, Amazon EC2
Created On: March 13, 2013
By Steve Morad, AWS Solutions Architect
Learn how you can leverage multiple IP addresses to implement a virtual IP (VIP) address high availability failover solution in six simple steps. This article provides all the necessary resources, including an easy-to-use script and instructions on how to create a VIP solution with two self-monitoring high availability (HA) instances.
This article assumes you already have an AWS account. If
not, go to https://aws.amazon.com
and click Sign Up Now.
(There is no charge for creating an account.) Follow the on-screen
instructions. Part of the sign-up process involves
receiving a phone call and entering a PIN using the phone keypad.
We recommend you review Floating
IP Cloud Design Pattern, which describes this pattern in
detail. This article explains how you can launch a pair of
highly available Linux Amazon EC2 instances that implement
this
design
pattern. We provide all the necessary resources, including an
easy-to-use HA monitor script and instructions on how to leverage this
script across two self-monitoring Amazon EC2 instances.
- Create an Amazon Virtual Private Cloud (VPC).
- Create an Amazon EC2 AWS Identity and Access Management (IAM) role.
- Launch two Linux Amazon EC2 instances into your the public subnet of your virtual private cloud.
- Configure Elastic IP addresses for your instances.
- Download and configure the vip_monitor.sh script.
- Test your configuration, for example, by using a sample web server configuration.
This will launch a fully functional sample stack as shown in the animated diagram below:

Figure 1: VIP HA Scenario
For the purpose of this article, we will deploy the following:
- A VPC with a public subnet and Internet gateway.
- An Amazon EC2 role authorizing the Amazon EC2 instances to take over the VIP on a partner failure.
- Two self-monitoring Linux Amazon EC2 instances with a VIP to share between them.
- Three Elastic IP addresses, one for each instance and one as a virtual public IP address.
1. Create an Amazon Virtual Private Cloud
We will start by provisioning our networking infrastructure. To do this, navigate to the VPC console in the AWS Management Console and use the VPC Wizard to create a VPC with a Single Public Subnet Only. For detailed instructions, see the Amazon VPC Getting Started Guide.
Click Security Groups in the navigation pane and create a VPC security group to control traffic in and out of your HA EC2 instances. For additional information about creating VPC security groups, see the Amazon VPC documentation. In the following example, an HA_Monitor security group was created allowing SSH traffic for remote administration and ICMP between the members of the security group. It also allows HTTP traffic to support the optional portion of this guide that tests the VIP using web servers.
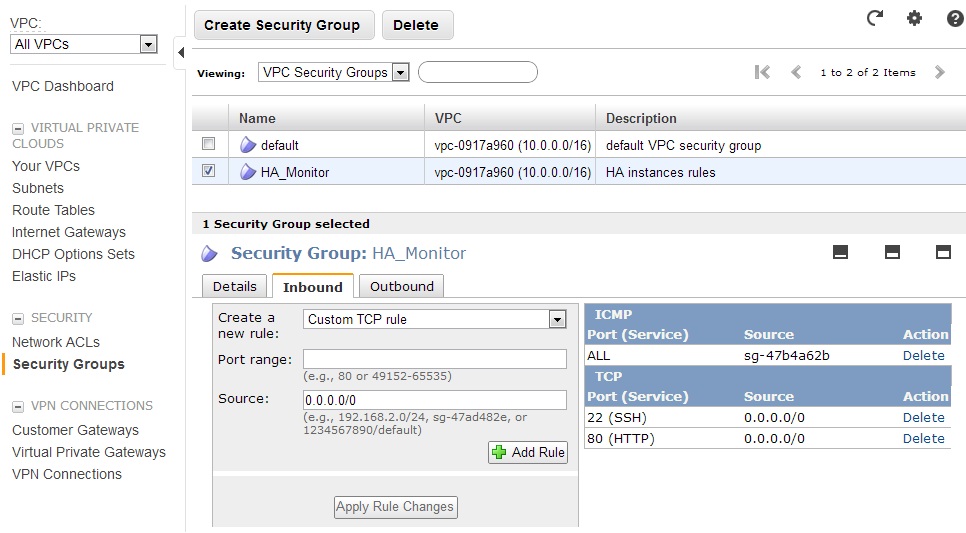
Figure 2: Amazon VPC HA_Monitor security group for HA nodes
2. Create an Amazon EC2 IAM Role
Next we need to create an EC2 AWS Identity and Access Management (IAM) role that will authorize our EC2 instances to be able to take over the VIP in the event that the other EC2 instance fails. Navigate to the IAM console in the AWS Management Console, click Roles in the navigation pane, and click Create New Role. Give the new role a descriptive name (HA_Monitor in this example) and click Continue.
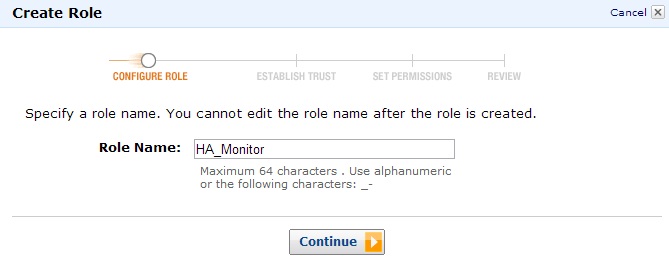
Figure 3: Role HA_Monitor
Click AWS Service Roles and select Amazon EC2. Click Custom Policy and then click Select. Provide a Policy Name (HA_Monitor_Policy in this example) and enter the following for Policy Document:
{
 "Version": "2012-10-17",
 "Statement": [
 {
 "Action": [
 "ec2:AssignPrivateIpAddresses",
 "ec2:DescribeInstances"
 ],
 "Effect": "Allow",
 "Resource": "*"
 }
 ]
}
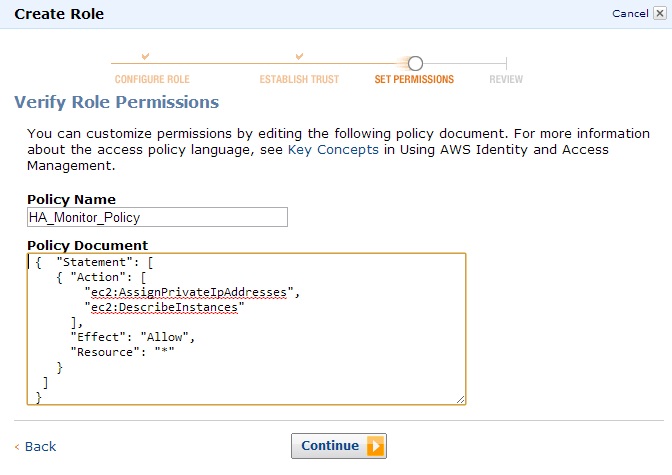
Figure 4: Role Policy Document
Click Continue and then Create Role to finish creating the EC2 role.
3. Launch Two Linux Amazon EC2 instances into Your VPC's Public Subnet
Now that you have an Amazon VPC, we will launch two Linus Amazon EC2 instances into the VPC. These instances will serve as our HA instances.
Navigate to the EC2 console in the AWS Management Console and click Launch Instances. We will use the Quick Launch Wizard. Provide a name for your instance (HA Node #1 in this example). Select an existing AWS key pair or create a new one. An AWS key pair is a public/private key pair that lets you securely connect to your instance after you launch it. For a short tutorial on how to create a new key pair, watch the Amazon EC2 - Creating a Key Pair video.

Figure 5: Launching HA Node #1
Next click Instance Details, check Launch into a VPC, and select the subnet you created in the previous step.

Figure 6: Editing HA Node #1 VPC details
Click the Security Settings section and select the security group you created in the previous section (HA_Monitor in this example).
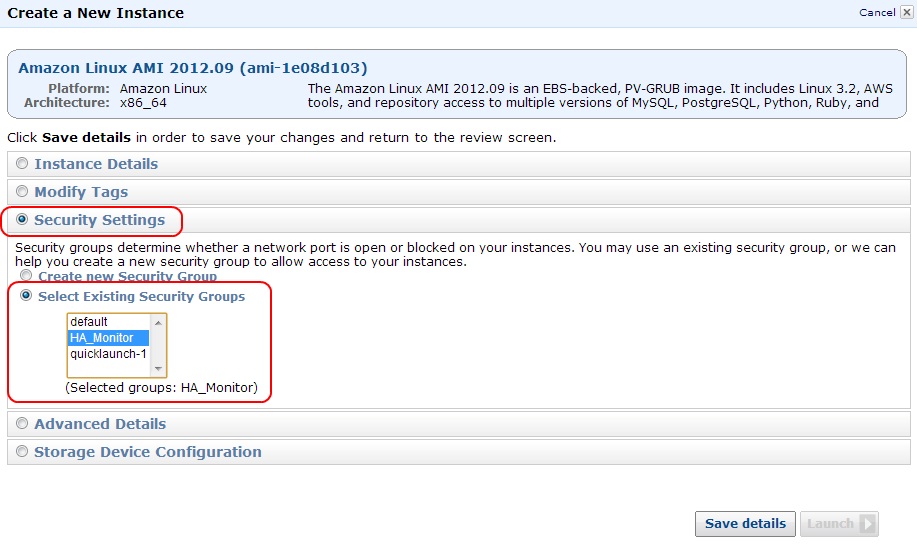
Figure 7: Editing HA Node #1 Security Settings
Click the Advanced Details section and for IAM Role, select the role you created in the previous step (HA_Monitor in this example). Then scroll down to add an IP address (10.0.0.11 in this example). Click Add and enter a Secondary IP Address. This will be your Virtual IP address (10.0.0.10 in this example), and click Save details.
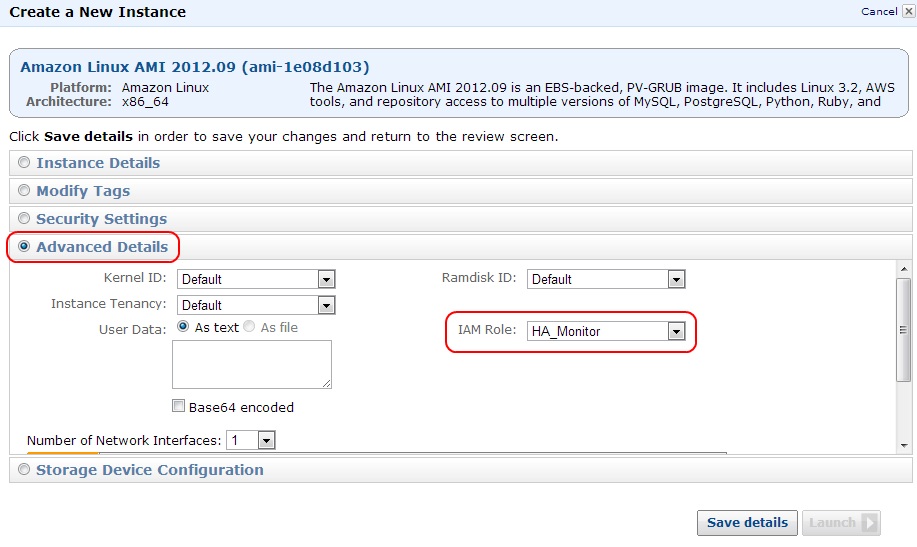
Figure 8: Editing HA Node #1 Advanced Details—IAM Role
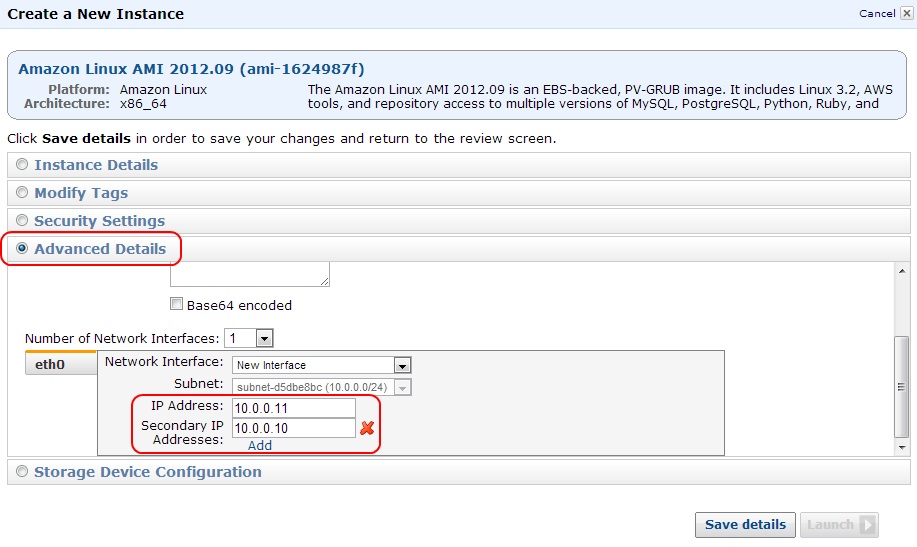
Figure 9: Editing HA Node #1 Advanced Details—IP Addresses
Click Launch and then Close after the instance has been launched.
Launch a second instance using the same settings as the first instance, with the following changes:
- Provide an appropriate name for the second instance (HA Node #2 in this example).
- Under Advanced Details, only provide a single IP address (10.0.0.12 in this example) and no secondary IP address. You will still need to check Launch into a VPC and select your subnet (under Instance Details), select your HA security group (under Security Settings), and select your IAM role (under Advanced Details).
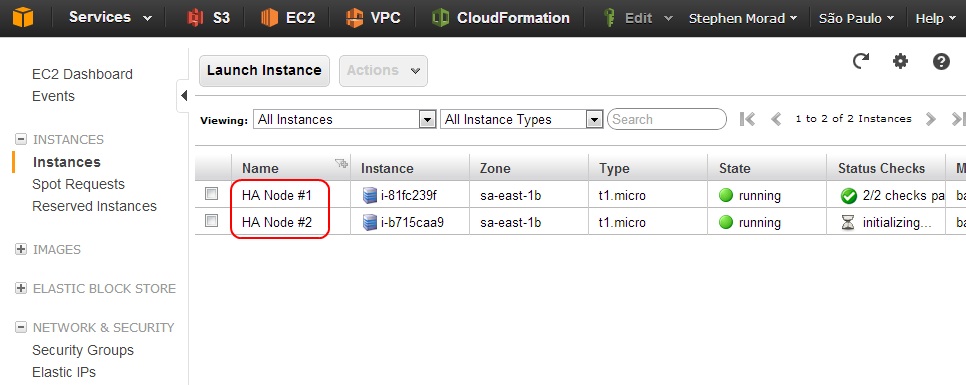
Figure 10: EC2 console after HA instances launched
4. Configure Elastic IP Addresses for Your Instances
After the Amazon EC2 instances have launched, you will need to create Elastic IP addresses (EIPs) for each EC2 instance and the VIP. You will use the individual EIP addresses for each instance to connect to each HA instance individually, and you will use the third EIP to connect to the VIP that will float between your EC2 instances.
In the EC2 console, click Elastic IPs in the navigation pane (under Network & Security). Allocate three new VPC EIPs by clicking Allocate New Address.
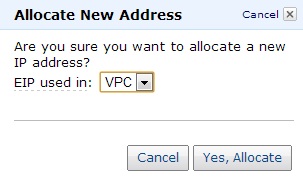
Figure 11: Allocate VPC EIP dialog box
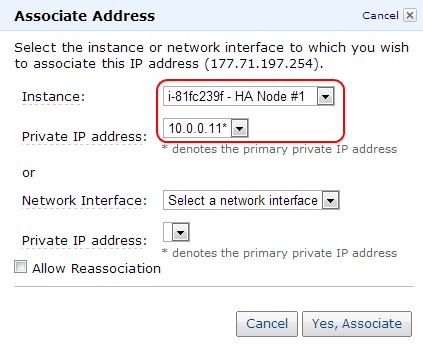
Associate the first EIP to HA Node #1. By default the association should map to the primary private IP address of HA Node #1 (10.0.0.11 in this example; notice the asterisk next to the IP denoting the address as the primary private IP). Associate the second EIP to HA Node #2. Associate the third EIP to HA Node #1, but make sure to select the HA Node #1's secondary IP address (10.0.0.10 in this example) as the private IP address.
 |
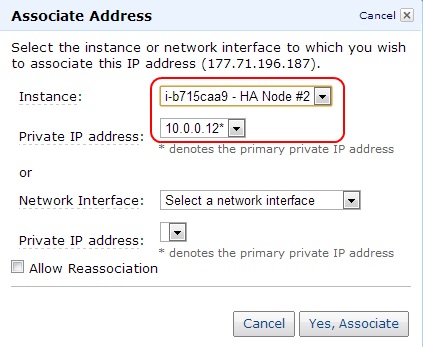 |
Figure 12: Associating EIPs to primary private IPs

Figure 13: Associating EIP to secondary private IP on HA Node #1
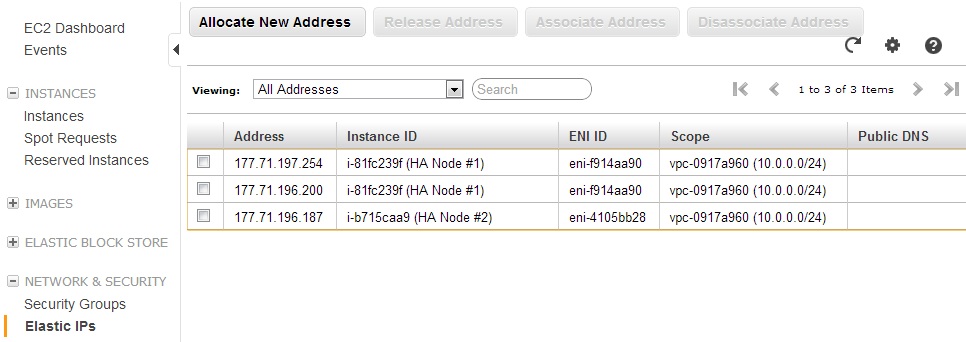
Figure 14: Associated EIPs
5. Download and Configure the vip_monitor.sh Script
Connect to HA Node #1. Change to the root user, navigate to the root user's home directory, download the vip_monitor.sh script, and make it executable with the following commands:
[ec2-user@ip-10-0-0-11 ~]$ sudo -s
[root@ip-10-0-0-11 ec2-user]# cd /root
[root@ip-10-0-0-11 ~]# wget https://media.amazonwebservices.com/articles/vip_monitor_files/vip_monitor.sh
[root@ip-10-0-0-11 ~]# chmod a+x vip_monitor.sh
Edit the following variables to match your settings for HA Node #1:
- HA_Node_IP - This should point to HA Node #2's primary private IP address (10.0.0.12 in this example).
- VIP - This should point to private virtual IP address that will float between the two HA Nodes (10.0.0.10 in this example).
- REGION - This should point to region where your HA nodes are running (us-west-2 in this example).
Configure vip_monitor.sh to be started by cron at boot and start vip_monitor.sh:
[root@ip-10-0-0-11 ~]# echo '@reboot /root/vip_monitor.sh >> /tmp/vip_monitor.log' | crontab
[root@ip-10-0-0-11 ~]# ./vip_monitor.sh >> /tmp/vip_monitor.log &
[root@ip-10-0-0-11 ~]#
Verify that the script is running by viewing the log file:
[root@ip-10-0-0-11 ~]# tail /tmp//vip_monitor.log
Wed Dec 26 14:23:41 UTC 2012 -- Starting HA monitor
[root@ip-10-0-0-11 ~]#
Now connect to HA Node #2 and issue the same commands as you did previously on HA Node #1. However, in this case, configure vip_monitor.sh with the following settings:
- HA_Node_IP - This should point to HA Node #1's primary private IP address (10.0.0.11 in this example).
- VIP - This should point to private virtual IP address that will float between the two HA Nodes (10.0.0.10 in this example).
- REGION - This should point to region where your HA nodes are running (us-west-2 in this example).
6. Test Your Configuration
You are done! You may now test your configuration. Watch the vip_monitor.log file on HA Node #2 while you restart HA Node #1 and observe the script take over the VIP.
HA Node #2
[root@ip-10-0-0-12 ~]# tail -f /tmp//vip_monitor.log
Wed Dec 26 14:28:18 UTC 2012 -- Starting HA monitor
Wed Dec 26 14:29:03 UTC 2012 -- HA heartbeat failed, taking over VIP
RETURN true
Wed Dec 26 14:29:06 UTC 2012 -- Restarting network
HA Node #1
[root@ip-10-0-0-11 ~]# shutdown -r now
[root@ip-10-0-0-11 ~]#
Broadcast message from ec2-user@ip-10-0-0-11
 (/dev/pts/0) at 14:28 ...

The system is going down for reboot NOW!
There are multiple additional ways that you can test this configuration, including continually pinging the virtual EIP while you restart HA Node #1. Your pings should be briefly disrupted and then resume after HA Node #2 takes over the VIP.
For a more visual test, perform the following steps on your two HA Nodes. These instructions assume you have proceeded directly from the previous step without disconnecting from your HA Nodes. If you need to reestablish a connection with your HA Nodes, don't forget to become root by issuing the sudo -s command.
HA Node #1
[root@ip-10-0-0-11 ~]# yum -y install httpd
[root@ip-10-0-0-11 ~]# chkconfig httpd on
[root@ip-10-0-0-11 ~]# service httpd start
[root@ip-10-0-0-11 ~]# echo 'HA Node #1
' > /var/www/html/index.html
[root@ip-10-0-0-11 ~]#
HA Node #2
[root@ip-10-0-0-12 ~]# yum -y install httpd
[root@ip-10-0-0-12 ~]# chkconfig httpd on
[root@ip-10-0-0-12 ~]# service httpd start
[root@ip-10-0-0-12 ~]# echo 'HA Node #2
' > /var/www/html/index.html
[root@ip-10-0-0-12 ~]#
Now you should be able to connect to the virtual EIP using your web browser. The HA Node currently using the VIP will display its number. Reboot this node and refresh your browser to see the VIP switch to the other node.
Resources
- AWS re: Invent CPN 207: Virtual Networking in the Cloud
- Floating IP Cloud Design Pattern
- vip_monitor.sh
- VIP Monitor CloudFormation Template
Script
#!/bin/sh
# This script will monitor another HA node and take over a Virtual IP (VIP)
# if communication with the other node fails

# High Availability IP variables
# Other node's IP to ping and VIP to swap if other node goes down
HA_Node_IP=10.0.0.11
VIP=10.0.0.10

# Specify the EC2 region that this will be running in
REGION=us-west-2

# Run aws-apitools-common.sh to set up default environment variables and to
# leverage AWS security credentials provided by EC2 roles
. /etc/profile.d/aws-apitools-common.sh

# Determine the instance and ENI IDs so we can reassign the VIP to the
# correct ENI. Requires EC2 describe-instances and assign-private-ip-address
# permissions. The following example EC2 roles policy will authorize these
# commands:
# {
# "Version": "2012-10-17",
# "Statement": [
# {
# "Action": [
# "ec2:AssignPrivateIpAddresses",
# "ec2:DescribeInstances"
# ],
# "Effect": "Allow",
# "Resource": "*"
# }
# ]
# }

Instance_ID=`/usr/bin/curl --silent https://169.254.169.254/latest/meta-data/instance-id`
ENI_ID=`/opt/aws/bin/ec2-describe-instances $Instance_ID --region $REGION | grep eni -m 1 | awk '{print $2;}'`

echo `date` "-- Starting HA monitor"
while [ . ]; do
 pingresult=`ping -c 3 -W 1 $HA_Node_IP | grep time= | wc -l`
 if [ "$pingresult" == "0" ]; then
 echo `date` "-- HA heartbeat failed, taking over VIP"
 /opt/aws/bin/ec2-assign-private-ip-addresses -n $ENI_ID --secondary-private-ip-address $VIP --allow-reassignment --region $REGION
 pingresult=`ping -c 1 -W 1 $VIP | grep time= | wc -l`
 if [ "$pingresult" == "0" ]; then
 echo `date` "-- Restarting network"
 /sbin/service network restart > /dev/null 2>&1
 fi
 sleep 60
 fi
 sleep 2
done