AWS News Blog
Configuration Persistence and Support for URL Swapping with AWS Elastic Beanstalk
We just released two new capabilities for AWS Elastic Beanstalk that help you save your preferred environment settings and deploy changes to your applications with minimal downtime.
Configuration Persistence

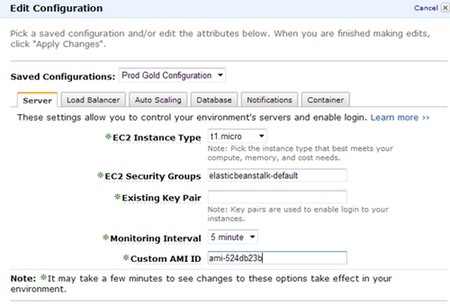
Using the AWS Management Console, you can now save an environments configuration, launch a new environment with a saved configuration, and apply a saved configuration to an existing environment. This allows you to seamlessly launch multiple environments with your preferred settings. For more details, go to the Managing Your Application Environments section in the AWS Elastic Beanstalk Developer Guide.
URL Swapping

Many customers have asked us for a way to eliminate downtime when rolling out new versions of their applications or when they are modifying their environments configuration. By using the URL swapping functionality, end users of your web application should not experience downtime when you deploy a new application version. You can stage your new application version on a test environment and swap the URLs with the production environment.
You can even integrate this functionality into your build process using the Elastic Beanstalk Command-Line Tool. For more details about this functionality and how to integrate it into your build process, go to Deploying New Versions with Zero Downtime in the AWS Elastic Beanstalk Developer Guide.
Working Together
The following example demonstrates how we get these two new features to work together when you deploy, test and launch new versions of a web application. Lets assume that you have your production environment running at myapp-prod.elasticbeanstalk.com.
- Save the configuration of myapp-prod.elasticbeanstalk.com by going to the AWS Management Console and selecting Save Configuration on the Actions menu.
- Type a name for the configuration settings and click Save Configuration. Now you can launch environments that look and behave the same as the production environment.
- In the console, click Launch New Environment and type the name, the description and the URL for the new environment. Lets assume the URL for the new environment is myapp-staging.elasticbeanstalk.com.
- Select Upload and use a new application version and use the Browse button to locate the new version of your application.
- Choose the container type and click Continue.
- On the Configuration Details pane of the Launch New Environment wizard, you can select your saved configuration from the drop down. This will populate the settings for your environment.
- Complete the wizard and wait for the environment to launch. Now you can test your new version at myapp-staging.elasticbeanstalk.com.
- You can continue to upload new versions of your application to the staging environment until youre ready to go live.
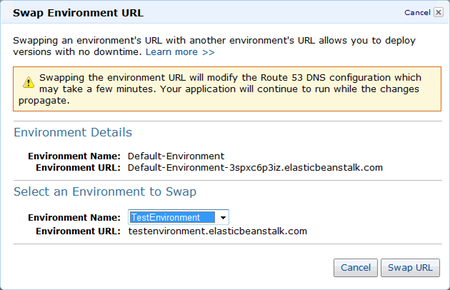
- When youre ready, click on the Actions menu for your production environment and select Swap Environment URL.
- Select the staging environment from the drop-down and click Swap URL.
- After you swap the URLs, all traffic to myapp-prod.elasticbeanstalk.com will now be sent to the new version of your application.
For more information about this release, check out the AWS Elastic Beanstalk Release Notes.
~ Matt