AWS News Blog
Customize Elastic Beanstalk Using Configuration Files
Saad Ladki of the Elastic Beanstalk team is back with another guest post. Today, Saad talks about a customization feature that will allow you to customize the run-time configuration of your applications by installing packages and libraries, running commands, and editing files.
— Jeff;
A few weeks ago, we announced Python support for AWS Elastic Beanstalk, including the ability to customize the Python environment using a declarative configuration file and integrating with Amazon RDS DB Instances.
Today, Im excited that were adding more customizations through the configuration files. The configuration files now allow you to declaratively install packages and libraries, configure software components (such as Apache Tomcat or the Apache Web Server), and run commands on the Amazon EC2 instances in your Elastic Beanstalk environment. You can also set environment variables across your fleet of EC2 instances, create users and groups, and start or stop daemons.
So why is this big news? In the past, to make changes to an Elastic Beanstalk environment, you had to create and maintain custom Amazon Machine Images (AMIs). Now, a change as small as adding a font library or as involved as installing and configuring an agent entails only a few lines of YAML.
Example: Customize a Tomcat 7 configuration
Lets look at an example of customizing the Tomcat server.xml to increase the number of concurrent threads:
- Using the AWS Toolkit for Eclipse, create a new AWS Web Project:
- Create a new directory .ebextensions in the WebContent directory of your application. This ensures that the .ebextensions directory is at the root of your .war file.
Tip: By default, the Eclipse Project Explorer view will hide files that start with a .. You can modify this setting by clicking on the menu at the top of the Project Explorer, then click on Customize View and uncheck the .* resources box on the Filters tab. - Add a file called server-update.config to the .ebextensions directory. The contents of the file should look like this:
container_commands:
replace-config:
command: cp .ebextensions/server.xml /etc/tomcat7/server.xml
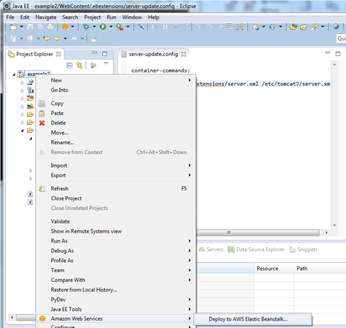
- Right-click the project, click Amazon Web Services, and then click Deploy to Elastic Beanstalk.
For more details on how to deploy applications from Eclipse, visit the AWS Elastic Beanstalk Developer Guide. For more details on the configuration system, read our new Customizing and Configuring Elastic Beanstalk Containers documentation.
Once the environment is up and running, your Tomcat installation on the EC2 instances will now be using the updated server.xml. Any new instances that are launched within the environment will have the same customizations applied.
Note: Configuration files can be used only with newly created Python and Java environments. If you have existing environments, heres how you can migrate them.
You can include multiple .config files inside the .ebextensions directory. This allows you to separate customizations into different files and allow you to share your favorite customizations with your co-workers.
You can also leverage the Amazon CloudWatch custom metrics example to easily setup monitoring through CloudWatch.
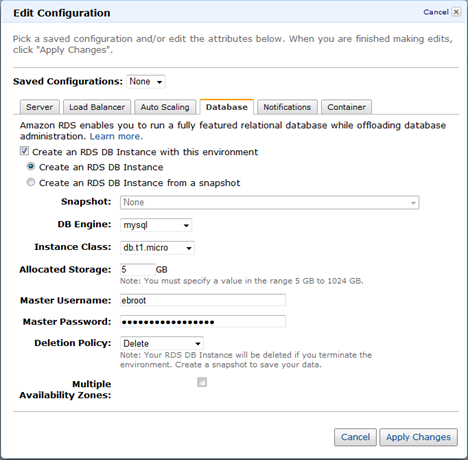
Add an Amazon RDS Database Instance
Additionally, you can now easily create a new Amazon Relational Database Service (RDS) database Instance with your Elastic Beanstalk Tomcat environment. Simply log into to the Elastic Beanstalk console, select your application, and on the Actions menu for the environment, click Edit/Load Configuration. The Database tab allows you to add a new Amazon RDS DB Instance.
Once the database is created, you can retrieve the connection information and build the connection string using Java system properties:
String dbName = System. getProperty ( “RDS_DB_NAME” ) ;
String userName = System. getProperty ( “RDS_USER” ) ;
String password = System. getProperty ( “RDS_PASSWORD” ) ;
String hostname = System. getProperty ( “RDS_HOSTNAME” ) ;
String port = System. getProperty ( “RDS_PORT” ) ;
For more information on how to set up an RDS database Instance in the Elastic Beanstalk environment, visit the AWS Elastic Beanstalk Developer Guide.
— Saad