AWS News Blog
Using AWS ElastiCache for Redis With AWS OpsWorks
To build on the recent launch of AWS ElastiCache for Redis, Development Manager Enno Brehm sent me a guest post to show you how to set it up for use in AWS Opsworks.
— Jeff;
With the launch of Amazon ElastiCache for Redis it is now easier than ever to use Redis with your AWS OpsWorks applications. Within minutes you can have this powerful persistent key-value store up and running, fully managed.
In this post we will describe how to make an ElastiCache Redis cluster available to an existing OpsWorks Rails application stack. While these instructions assume a Rails application layer, only a small part is specific to Rails, namely the format and location of the generated configuration file. It should be easy to adapt these instructions to other application architectures (e.g. Node.js or PHP). Furthermore, only the first step is specific to Amazon ElastiCache for Redis, so this tutorial can also serve as a blueprint on how to make any kind of custom configuration information available to your application.
The tutorial consists of 5 steps:
- Set up an ElastiCache Redis cluster, obtain access information (hostname and port) for it and allow network communication from your Rails instances
- Add the access information to your stacks configuration data via custom JSON
- Create a Chef cookbook with a custom recipe to generate a configuration file config/redis.yml in your applications folder.
- Add this custom cookbook to your AWS OpsWorks stack.
- Add the custom recipe to your stacks Ruby layer and deploy the application.
So, lets dive in. We assume you already have an existing Rails application on AWS OpsWorks and know the basic operations, like editing your applications settings, deploying your applications, and logging into your instances via SSH.
Step 1. Create an Amazon ElastiCache Redis Cluster
Go to the Amazon ElastiCache console and check the region in the top right corner it should be the same region that you use for your existing AWS OpsWorks stack; if necessary change it. Click the Launch Cache Cluster button and in the following dialog, enter a name for your cache cluster and make sure to select Redis as the cluster engine. As we dont need SNS notifications, you can turn it off. All other settings can be left at their default.
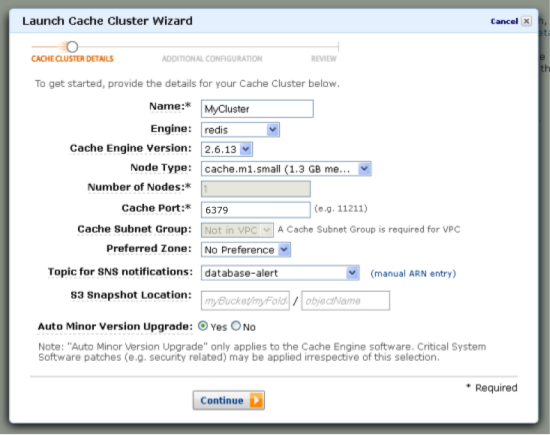
On the next page of the wizard, you will have to select a security group for your cluster. In a production environment you would properly setup security groups, but for the purposes of this tutorial, choosing the default security group will suffice (depending on the EC2 region of your cluster, the option will be called VPC Security Group or just Cache security group). Leave all other options as they are, and click Continue. On the next screen, review your information and launch the cluster.
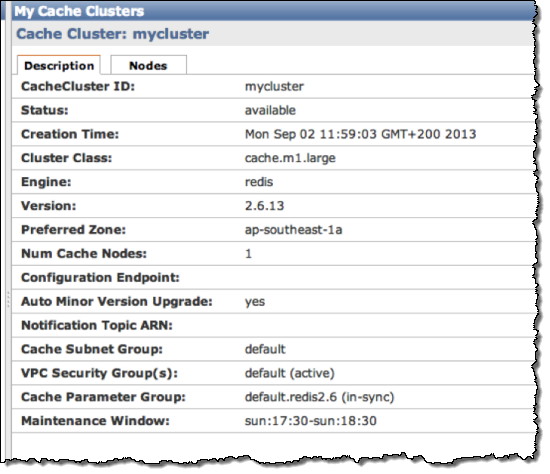
Once the cache cluster is created, you will see it as available in the list of your cache clusters:

Click the cluster name to see details on the cluster:
In the Nodes tab you will find information on how to access your new ElastiCache Redis instance:
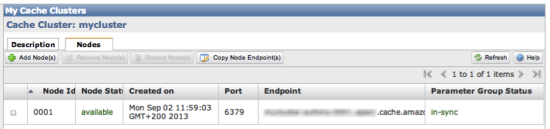
You now have an ElastiCache Redis instance running and you should write down the Endpoint and Port values as we will need to them in the next step, when you enter custom JSON for your stack in the AWS OpsWorks console. For more information on how to setup an Amazon ElastiCache for Redis see the Amazon ElastiCache User Guide.
Before we do this, we have to make sure that your OpsWorks application servers can open network connections to your ElastiCache Redis cluster by placing them in the same default security group. Once again, this is a simplified setup for the purposes of this tutorial; for a production environment you should consult the documentation on ElastiCache, Amazon EC2 Security Groups and Security for Your VPC, to enable communication and secure your actual setup.
Go to the AWS OpsWorks console and choose your stack. In the navigation pane choose Layers and edit your Rails App Server layers settings. Scroll down to the Security Groups section:
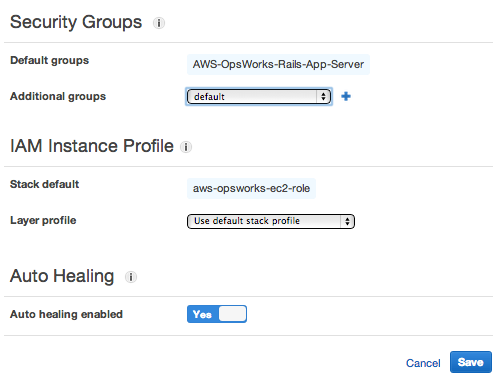
Choose default from the Additional groups select box, and click the small plus sign. Then click Save.
Next, stop your running Rails instances and start them again, as changes to security groups will only be applied on launch.
Your app server instances are now ready to talk to your ElastiCache Redis instance. In the next steps we will let your application know on which hostname and port to connect.
Step 2. Add custom JSON to Your Stack
You could of course hardcode this access information in your application code to access your newly created Redis server, but it is better to keep application and configuration separated. AWS OpsWorks and Chef let you provide your application with a dynamically created configuration file instead. However, first you should let your stack know about the configuration values from step 1:
{
  "deploy":
   {
     "elasticacheredisexample":
     {
      "redis":
        {
          "host": "mycluster.XXXXXXXXX.amazonaws.com",
          "port": "6379"
        }
      }
    }
}
What happens with this custom JSON? Whenever an instance is configured or an application is deployed, AWS OpsWorks pushes a JSON hash to your instance containing information on the stack, its layers and applications. This hash will in turn be used by a Chef run on your instance.
In particular, this configuration hash contains deployment information for each of your applications, stored under the key deploy. (It is quite instructive to see what this hash looks like if you are curious, ssh into one of your Rails app servers, where you can find JSON files from previous Chef runs in /var/lib/aws/opsworks/chef).
Adding custom JSON to your stack like you did above lets you extend this hash – you can add arbitrary information to it or even overwrite existing values. But right now, we are just adding a new section containing the Redis hostname and port. While this doesnt do much by itself, it ensures that these values are available on your instances during deployment. You can verify this by deploying your application now and inspecting the most recent JSON file in /var/lib/aws/opsworks/chef an easy way to do exactly this is to issue the command opsworks-agent-cli get_json as the root user on one of your app server instances, which will print the latest JSON nicely formatted.
For more information on custom JSON, see Use Custom JSON to Modify the Stack Configuration JSON.
In the next steps we will show how to actually make use of this information by creating a custom Chef recipe.
Step 3. Create a Custom Chef Cookbook
Our goal is to generate a YAML configuration file redis.yml in your applications configuration folder and fill it with your Redis access information during deployment.
The redis.yml file we want is very simple, it looks like this:
host: your-cache-cluster-hostname
port: your-cache-cluster-port
To create a cookbook with a recipe for this task, we first will need to create a new directory structure with two files as follows:
  mycookbooks
  |- redis-config
  |- recipes
  |  |- generate.rb
  |- templates
  |- default
  |- redis.yml.erb
This is a folder with one cookbook (it could contain multiple, but for our purposes one will suffice) called redis-config, with a single generate recipe. A Chef cookbook can contain a lot more files and sometimes look a little intimidating, but it doesnt have to in our case, it is very simple and we actually only need two files: a template for the configuration file and a Ruby file telling Chef when and where to generate it.
Here is the ERB template for our configuration file, redis.yml.erb:
host: port:
The variable @redis in this template will be set by the recipe generate.rb, which contains the code that will hook into the deployment process:
node[:deploy].each do |appname, deployconfig|
  # determine root folder of new app deployment
  approot = "#{deployconfig[:deployto]}/current"

  # use template .redis.yml.erb. to generate 'config/redis.yml'
  template "#{approot}/config/redis.yml" do
    source "redis.yml.erb"
    cookbook "redis-config"

    # set mode, group and owner of generated file
    mode "0660"
    group deployconfig[:group]
    owner deployconfig[:user]

    # define variable .@redis. to be used in the ERB template
    variables(:redis => deployconfig[:redis] || {})

    # only generate a file if there is Redis configuration
    notif do
      deploy_config[:redis].blank?
    end
  end
end
The node object is the hash we mentioned in step 2, containing information on your stack , layers, applications etc. We already saw that deployment information for our apps is found under the key deploy, so for example node[:deploy][<app_name>][:deploy_to] contains the folder into which your application got deployed. In the recipe this is used to determine the location for the generated file.
The recipe will loop over configuration information for all your applications in this stack (in your case probably only one), and trigger the generation of redis.yml from the ERB template redis.yml.erb. It initializes the variable redis to pass the information we provided in step 2 (via custom JSON) to the template. However, the not_if block will ensure this is only done if actual values are present – this way you can add information for multiple applications to your custom JSON, but you are also free to leave it out completely.
(Note that the recipe contains the cookbook name redis-config; if you named your cookbook differently, change the recipe accordingly).
This is all thats needed. In the next step we will make this cookbook available to our stack.
Step 4: Install Custom Cookbook
You can choose from different options how to make your custom cookbooks folder available to your AWS OpsWorks stack:
- By creating an internet accessible Git or SVN repository for your cookbooks.
- By creating a zip archive out of the folder and uploading it to Amazon S3.
- By creating a zip archive out of the folder and uploading it to a web server.
See Installing Custom Cookbooks for more information. Since custom cookbooks are active assets, we recommend putting them into version control and making them accessible to AWS OpsWorks via a repository URL.
Once you have uploaded your cookbooks folder, open your stacks Settings dialog:
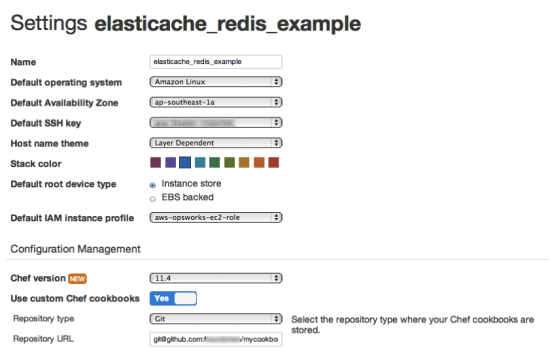
In the lower section, enable Use custom Chef cookbooks. Then select your Repository type and where to find your custom cookbooks. If necessary add authentication information, and click Save.
The last thing to do in this step is to make AWS OpsWorks deploy your cookbooks to each instance you are running. In the navigation pane, click Stack, then click Run Command.
In the following dialog select Update custom cookbooks from the Command select box and confirm by clicking the Update custom cookbooks button. In the following page you can track the progress of this command on each instance and inspect logs if something went wrong, e.g. if there were problems accessing your cookbook repository:
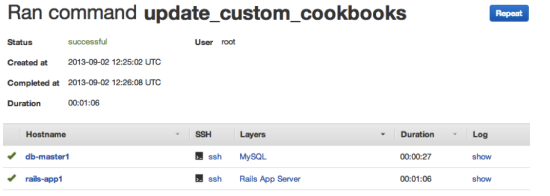
During this command a copy of your cookbooks was downloaded to each instance. When you make changes to your cookbooks, you need to run this command again, so your running instances get the latest cookbooks. You dont have to do this if you start a new instance, as it will get the latest copy automatically.
As your instances now have access to your cookbook, we can integrate them in your applications configuration.
Step 5: Add the Custom Recipe to Your Application and Deploy
The final step is to hook the recipe into the application deployment. To do this, in the navigation pane, click Layers and then edit the Rails App Server layer settings:
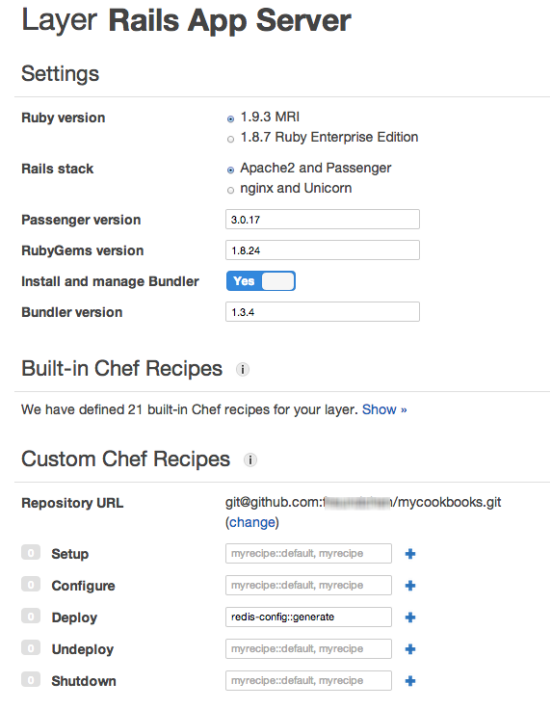
In the section Custom Chef recipes enter redis-config::generate in the Deploy text field and click the Plus symbol. Then click Save. This tells AWS OpsWorks that during deployment you want this recipe to be run. The pattern for recipe names is <cookbook_name>::<recipe_name>, so if you named your cookbook or your recipe differently in Step 3, make sure this matches the names you used.
This completes the setup within your AWS OpsWorks stack and you can now deploy your application by selecting Apps in the navigation pane, and clicking the Deploy link next to your app.
Once the deployment has completed, you can ssh into one of your Rails app servers to inspect the directory /srv/www/<your_app_name>/current/config and you should find the generated redis.yml.
You can now access this file from your application code. One way to do this would is to add the redis gem to your Gemfile and create a Rails initializer in config/initializers/redis.rb as follows:
REDIS_CONFIG = YAML::load_file(Rails.root.join('config', 'redis.yml')) $redis = Redis.new(:host => REDIS_CONFIG['host'], :port => REDIS_CONFIG['port'])
This would make the Redis instance accessible throughout your application code in the variable $redis, but the actual code you would use of course depends on what you want to do with Redis or which gem you plan to use.
Conclusion
In this blog post we demonstrated how you integrate a service like Amazon ElastiCache Redis into an AWS OpsWorks stack by making use of custom JSON and a custom Chef recipe. The basic approach of generating a custom configuration file, dynamically created during deployment, is easily transferable to other services you might want to integrate. If you are not using Rails, it should be easy to adapt the recipe to e.g. generate a different file format by changing the ERB template, or, if your application expects configuration in a different place, you can easily change that in the recipe.
Some Resources
Here are some resources to help you to get the most from AWS OpsWorks and Amazon ElastiCache:
- Amazon ElastiCache documentation
- Amazon ElastiCache – Now With a Dash of Redis
- Customizing AWS OpsWorks
- AWS OpsWorks community forum
- Redis documentation
- Opscode Chef documentation
— Enno Brehm