AWS Big Data Blog
Implement a slowly changing dimension in Amazon Redshift
Amazon Redshift is a fully managed, petabyte-scale data warehouse service in the cloud. A star schema is a database organization structure optimized for use in a data warehouse. In a star schema, a dimension is a structure that categorizes the facts and measures in order to enable you to answer business questions. The attributes (or columns) of the dimension table provide the business meaning to the measures of the fact table. Rows in a dimension table are identified using a unique identifier like a customer identification key, and the fact table’s rows have a referential key pointing to the dimension table’s primary key. Dimension and fact tables are joined using the dimension table’s primary key and the fact table’s foreign key.
Over time, the attributes of a given row in a dimension table may change. For example, the shipping address for a customer may change. This phenomenon is called a slowly changing dimension (SCD). For historical reporting purposes, it may be necessary to keep a record of the fact that the customer has a change in address. The range of options for dealing with this involves SCD management methodologies referred to as type 1 to type 7. Type 0 is when no changes are allowed to the dimension, for example a date dimension that doesn’t change. The most common types are 1, 2 and 3:
- Type 1 (No history) – The dimension table reflects the latest version; no history is maintained
- Type 2 (Maintain history) – All changes are recorded and versions are tracked with dates and flags
- Type 3 (Previous value) – The [latest – 1] value for specific columns in maintained as a separate attribute
Prerequisites
For this walkthrough, you should have the following prerequisites:
- An AWS account
- An Amazon Redshift cluster
Overview of solution
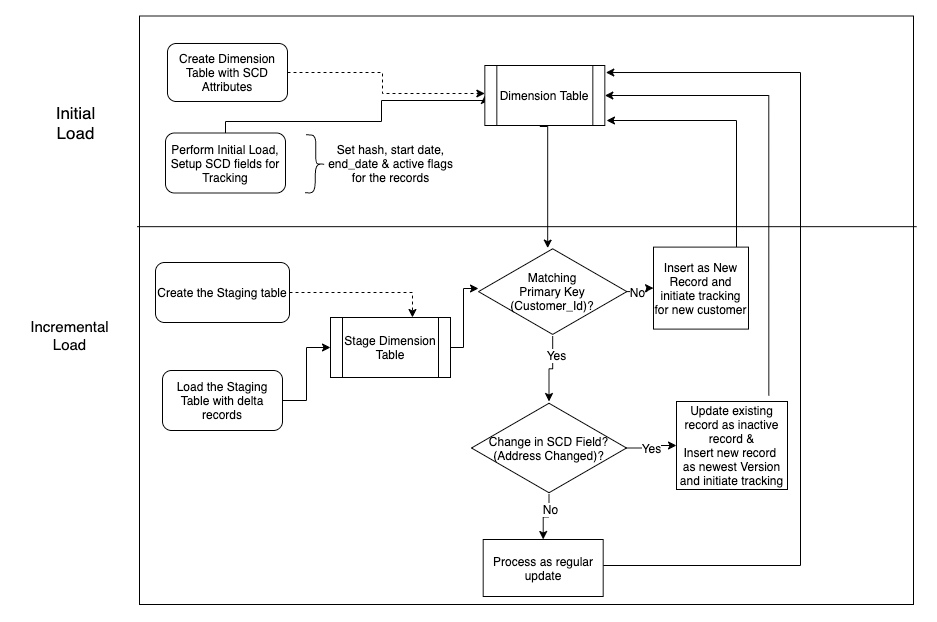
This post walks you through the process of implementing SCDs on an Amazon Redshift cluster. We go through the best practices and anti-patterns. To demonstrate this, we use the customer table from the TPC-DS benchmark dataset. We show how to create a type 2 dimension table by adding slowly changing tracking columns, and we go over the extract, transform, and load (ETL) merge technique, demonstrating the SCD process.
The following figure is the process flow diagram.
The following diagram shows how a regular dimensional table is converted to a type 2 dimension table.

Implement slowly changing dimensions
To get started, we use one of two AWS CloudFormation templates from Amazon Redshift Labs:
- lab2.yaml – Loads TPC data into an existing cluster
- lab2_cluster.yaml – Creates a new cluster and loads TPC data
In this post, we only show the important SQL statements; the complete SQL code is available in scd2_sample_customer_dim.sql.
The first step to implement SCD for a given dimension table is to create the dimension table with SCD tracking attributes. For example, record effective date, record end date, and active record indicator are typically added to track if a record is active or not. These fields are collectively referenced as the SCD fields (as shown in the following code) going forward in this post.
These SCD fields are added so that when a field is changed, for example, a customer’s address, the existing record in the dimension table is updated to indicate that the record isn’t active and a new record is inserted with an active flag. This way, every change to an SCD field is stored in the table and business users can run queries to see historical performance of a dimension for a given change that is being tracked.
We also introduce the following:
- Record hash value to easily track if the customer data fields have changed their values. This hash column is computed over all the customer fields. This single hash column is compared instead of comparing multiple individual columns to determine if the data has changed.
- Record insert and update timestamps to capture when the actual dimension row was added to the table and updated.
The following code shows the SCD fields added to the dimension table:
Next, we perform the initial load to the dimension table. Because this is the first time that the dimension records are loaded, the SCD tracking attributes are set to active. For example, record start date is set to a low date, like 1900-01-01, or to a business date value to reflect when a particular change became effective. The record end date is set to a high date, like 2999-12-31, and active record indicator is set 1, indicating these rows are active.
After the initial load is complete, we create a staging table to load the incremental changes that come from the source system. This table acts as temporary holding place for incoming records. To identify if a change has occurred or not for a given record, we left outer join the customer staging table to the customer dimension table on the customer primary key (c_cust_key). We use left outer join because we want to flag matching records for the update process and unmatched records for the insert process. Left outer joining the staging table to the customer table projects both matched and unmatched rows. Matched rows are treated as updates and unmatched rows are treated as inserts.
In our data warehouse system, let’s assume we have to meet the following criteria:
- Track changes on the address and phone fields only—type 2 with start and end timestamps
- Other attributes are required to be kept up to date without creating history records—type 1
- The source system provides incremental delta change records
If your source systems can’t provide delta change records and instead provides full load every time, then the data warehouse needs to have logic to identify the changed records. For such a workload, we build a second, uniquely identifiable value by using a built-in Amazon Redshift hash function on all the dimension columns to identify the changed rows.
The customer address and phone are being tracked as slowly changing dimensions. We use FNV_HASH to generate a 64-bit signed integer that accommodates 18.4 quintillion unique values. For smaller dimension tables, we can also use CHECKSUM to generate a 32-bit signed integer that accommodates 4.4 billion unique values.
We determine if the dimension row is a new record by using new_ind, or if the dimension row is changed by comparing the record hash and using track_ind for the change indicator.
Changes are identified by joining the staging table and target table on the primary key. See the following code:
For rows that aren’t matched (for example, completely new records such as new_ind = 1), the rows are inserted into the dimensional table with SCD tracking attributes set as new and an active record flag indicating Active = 1.
For matched records, two possibilities could happen:
- SCD type 2 field has changed – For this category, we use a two-step process to retain the previous version of the customer record and also record the latest version of the customer record for type 2 fields in our data warehouse. This satisfies our first business requirement. The steps are as follows:
- Step 1 – Update the existing record in the target customer dimension table as inactive by setting the record end date to the current timestamp and active record indicator to 0.
- Step 2 – Insert the new rows from the customer staging table into the customer target table with the record start date set to the current timestamp, record end date set to a high date, and the record active flag set to 1.
- SCD type 1 field has changed – For this category, the row in the customer target table is updated directly with the latest rows from staging table. While doing so, we don’t update any SCD tracking date fields or flags. With this step, we retain only the latest version of the record for type 1 fields in our data warehouse. This satisfies our second business requirement.
Apply changes to the dimension table with the following code:
Best practices
The Amazon Redshift cloud data warehouse can process a large number of updates efficiently. To achieve this, have a staging table that shares the same table definition as your target dimension table. Then, as shown in the earlier code snippet, you can join the staging and the target dimension tables and perform the update and insert in a transaction block. This operation performs bulk updates and inserts on the target table, yielding good performance.
The Amazon Redshift shared nothing architecture typically performs at its peak when operations can be run by each node independently with minimal data movement between nodes. The target customer dimension table and the intermediate staging table created with matched distribution keys provide the best performance because all operations can be completed within the node.
Anti-patterns
You can also approach this method by comparing dimension records in a row-by-row fashion using cursors and then updating or inserting a particular row on the target table. Although this method works on smaller tables, for larger tables, it’s advised to use the bulk operations method explained in this post.
Clean up
To avoid incurring future charges, you can delete all the resources created by the CloudFormation template by deleting the CloudFormation stack.
Conclusion
In this post, you learned about slowly changing dimensions, implementing SCDs on Amazon Redshift, best practices for running the ETL operations against the target table by using intermediate staging tables, and finally anti-patterns to avoid.
Refer to Amazon Redshift data loading best practices for further materials and additional best practices, and see Updating and inserting new data for instructions to implement updates and inserts.
About the Authors
 Milind Oke is a Data Warehouse Specialist Solutions Architect based out of New York. He has been building data warehouse solutions for over 15 years and specializes in Amazon Redshift. He is focused on helping customers design and build enterprise-scale well-architected analytics and decision support platforms.
 Bhanu Pittampally is an Analytics Specialist Solutions Architect based out of Dallas. He specializes in building analytical solutions. His background is in data warehouses—architecture, development, and administration. He has been in the data and analytical field for over 13 years.