AWS Compute Blog
Automating your lift-and-shift migration at no cost with CloudEndure Migration
This post is courtesy of Gonen Stein, Head of Product Strategy, CloudEndure
Acquired by AWS in January 2019, CloudEndure offers a highly automated migration tool to simplify and expedite rehost (lift-and-shift) migrations. AWS recently announced that CloudEndure Migration is now available to all customers and partners at no charge.
Each free CloudEndure Migration license provides 90 days of use following agent installation. During this period, you can perform all migration steps: replicate your source machines, conduct tests, and perform a scheduled cutover to complete the migration.
Overview
In this post, I show you how to obtain free CloudEndure Migration licenses and how to use CloudEndure Migration to rehost a machine from an on-premises environment to AWS. Although I’ve chosen to focus on an on-premises-to-AWS use case, CloudEndure also supports migration from cloud-based environments. For those of you who are interested in advanced automation, I include information on how to further automate large-scale migration projects.
Understanding CloudEndure Migration
CloudEndure Migration works through an agent that you install on your source machines. No reboot is required, and there is no performance impact on your source environment. The CloudEndure Agent connects to the CloudEndure User Console, which issues an API call to your target AWS Region. The API call creates a Staging Area in your AWS account that is designated to receive replicated data.
CloudEndure Migration automated rehosting consists of three main steps :
- Installing the Agent: The CloudEndure Agent replicates entire machines to a Staging Area in your target.
- Configuration and testing: You configure your target machine settings and launch non-disruptive tests.
- Performing cutover: CloudEndure automatically converts machines to run natively in AWS.
The Staging Area comprises both lightweight Amazon EC2 instances that act as replication servers and staging Amazon EBS volumes. Each source disk maps to an identically sized EBS volume in the Staging Area. The replication servers receive data from the CloudEndure Agent running on the source machines and write this data onto staging EBS volumes. One replication server can handle multiple source machines replicating concurrently.
After all source disks copy to the Staging Area, the CloudEndure Agent continues to track and replicate any changes made to the source disks. Continuous replication occurs at the block level, enabling CloudEndure to replicate any application that runs on supported x86-based Windows or Linux operating systems via an installed agent.
When the target machines launch for testing or cutover, CloudEndure automatically converts the target machines so that they boot and run natively on AWS. This conversion includes injecting the appropriate AWS drivers, making appropriate bootloader changes, modifying network adapters, and activating operating systems using the AWS KMS. This machine conversion process generally takes less than a minute, irrespective of machine size, and runs on all launched machines in parallel.
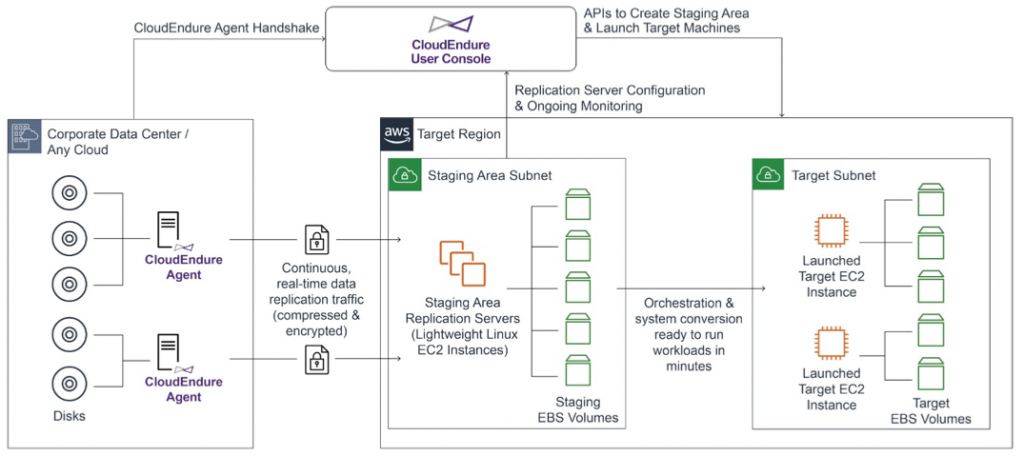
CloudEndure Migration Architecture
Installing CloudEndure Agent
To install the Agent:
- Start your migration project by registering for a free CloudEndure Migration license. The registration process is quick–use your email address to create a username and password for the CloudEndure User Console. Use this console to create and manage your migration projects.
After you log in to the CloudEndure User Console, you need an AWS access key ID and secret access key to connect your CloudEndure Migration project to your AWS account. To obtain these credentials, sign in to the AWS Management Console and create an IAM user.Enter your AWS credentials in the CloudEndure User Console.
- Configure and save your migration replication settings, including your migration project’s Migration Source, Migration Target, and Staging Area. For example, I selected the Migration Source: Other Infrastructure, because I am migrating on-premises machines. Also, I selected the Migration Target AWS Region: AWS US East (N. Virginia). The CloudEndure User Console also enables you to configure a variety of other settings after you select your source and target, such as subnet, security group, VPN or Direct Connect usage, and encryption.
After you save your replication settings, CloudEndure prompts you to install the CloudEndure Agent on your source machines. In my example, the source machines consist of an application server, a web server, and a database server, and all three are running Debian GNU / Linux 9.

- Download the CloudEndure Agent Installer for Linux by running the following command:
wget -O ./installer_linux.py https://console.cloudendure.com/installer_linux.py - Run the Installer:
sudo python ./installer_linux.py -t <INSTALLATION TOKEN> --no-promptYou can install the CloudEndure Agent locally on each machine. For large-scale migrations, use the unattended installation parameters with any standard deployment tool to remotely install the CloudEndure Agent on your machines.
After the Agent installation completes, CloudEndure adds your source machines to the CloudEndure User Console. From there, your source machines undergo several initial replication steps. To obtain a detailed breakdown of these steps, in the CloudEndure User Console, choose Machines, and select a specific machine to open the Machine Details View page.

Data replication consists of two stages: Initial Sync and Continuous Data Replication. During Initial Sync, CloudEndure copies all of the source disks’ existing content into EBS volumes in the Staging Area. After Initial Sync completes, Continuous Data Replication begins, tracking your source machines and replicating new data writes to the staging EBS volumes. Continuous Data Replication makes sure that your Staging Area always has the most up-to-date copy of your source machines.
- To track your source machines’ data replication progress, in the CloudEndure User Console, choose Machines, and see the Details view.
When the Data Replication Progress status column reads Continuous Data Replication, and the Migration Lifecycle status column reads Ready for Testing, Initial Sync is complete. These statuses indicate that the machines are functioning correctly and are ready for testing and migration.
Configuration and testing
To test how your machine runs on AWS, you must configure the Target Machine Blueprint. This Blueprint is a set of configurations that define where and how the target machines are launched and provisioned, such as target subnet, security groups, instance type, volume type, and tags.
For large-scale migration projects, APIs can be used to configure the Blueprint for all of your machines within seconds.
I recommend performing a test at least two weeks before migrating your source machines, to give you enough time to identify potential problems and resolve them before you perform the actual cutover. For more information, see Migration Best Practices.
To launch machines in Test Mode:
- In the CloudEndure User Console, choose Machines.
- Select the Name box corresponding to each machine to test.
- Choose Launch Target Machines, Test Mode.

After the target machines launch in Test Mode, the CloudEndure User Console reports those machines as Tested and records the date and time of the test.
Performing cutover
After you have completed testing, your machines continue to be in Continuous Data Replication mode until the scheduled cutover window.
When you are ready to perform a cutover:
- In the CloudEndure User Console, choose Machines.
- Select the Name box corresponding to each machine to migrate.
- Choose Launch Target Machines, Cutover Mode.
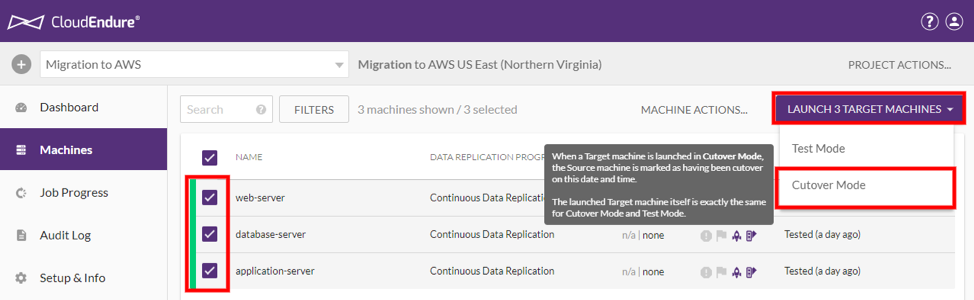
To confirm that your target machines successfully launch, see the Launch Target Machines menu. As your data replicates, verify that the target machines are running correctly, make any necessary configuration adjustments, perform user acceptance testing (UAT) on your applications and databases, and redirect your users. - After the cutover completes, remove the CloudEndure Agent from the source machines and the CloudEndure User Console.
- At this point, you can also decommission your source machines.
Conclusion
In this post, I showed how to rehost an on-premises workload to AWS using CloudEndure Migration. CloudEndure automatically converts your machines from any source infrastructure to AWS infrastructure. That means they can boot and run natively in AWS, and run as expected after migration to the cloud.
If you have further questions see CloudEndure Migration, or Registering to CloudEndure Migration.
Get started now with free CloudEndure Migration licenses.