AWS Compute Blog
Setting Up an Envoy Front Proxy on Amazon ECS
NOTICE: April 17, 2023 – This post no longer reflects the best guidance for configuring a service mesh with Amazon ECS and its examples no longer work as shown. Please refer to newer content on Amazon ECS Service Connect or AWS App Mesh instead.
This post was contributed by Nare Hayrapetyan, Sr. Software Engineer
Many customers are excited about new microservices management tools and technologies like service mesh. Specifically, they ask how to get started using Envoy on AWS. In this post, I walk through setting up an Envoy reverse proxy on Amazon Elastic Container Service (Amazon ECS). This example is based on the Envoy front proxy sandbox provided in the Envoy documentation.
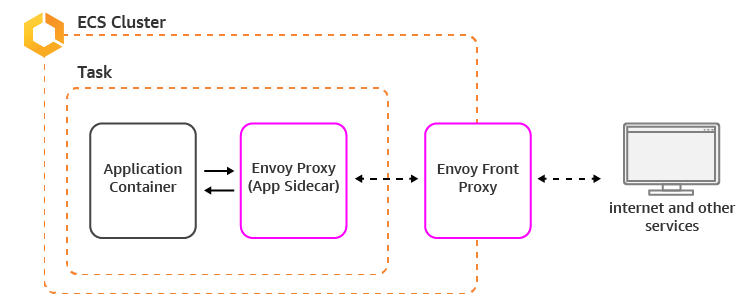
The Envoy front proxy acts as a reverse proxy. It accepts incoming requests and routes them to ECS service tasks that can have an envoy sidecar themselves. The envoy sidecar then redirects the request to the service on the local host.
The reverse proxy provides the following features:
- Terminates TLS.
- Supports both HTTP/1.1 and HTTP/2
- Supports full HTTP L7
- Supports gRPC and end-to-end encryption between tasks
- Talks to ECS services via an envoy sidecar, which means that the reverse proxy and the service hosts are operated in the same way and emit the same statistics because both are running Envoy.
To get started, create the following task definitions:
- One contains an envoy image acting as a front proxy
- One contains an envoy image acting as a service sidecar and an image for the service task itself
The envoy images are the same. The only difference is the configuration provided to the envoy process that defines how the proxy acts.
Service + Envoy Sidecar
Create a simple service that returns the hostname that it’s running on. This allows you to test the Envoy load balancing capabilities.
Create the following:
- A simple service running on Amazon ECS
- A script to start the service
- A Dockerfile that copies the service code and starts it
- The envoy configuration
- A Dockerfile to download the envoy image and start it with the provided configuration
- Images from both Dockerfiles, pushed to a registry so that they can be accessed by ECS
- An ECS task definition that points to the envoy and service images
First, write the service code:
#service.py
from flask import Flask
import socket

app = Flask(__name__)

@app.route('/service')
def hello():
    return ('Hello from behind Envoy! hostname: {}\n'.format(socket.gethostname()))

if __name__ == "__main__":
    app.run(host='127.0.0.1', port=8080, debug=True)
#start_service.sh

#!/usr/bin/env bash
python3 /code/service.py
To start the service, create a Dockerfile.
Here’s the configuration for Envoy as a service sidecar. Use the awsvpc networking mode to allow Envoy to access the service on the local host (see the task definition below).
#service-envoy.yaml
static_resources:
  listeners:
  - address:
      socket_address:
        address: 0.0.0.0
        port_value: 80
    filter_chains:
    - filters:
      - name: envoy.http_connection_manager
        config:
          codec_type: auto
          stat_prefix: ingress_http
          route_config:
            name: local_route
            virtual_hosts:
            - name: service
              domains:
              - "*"
              routes:
              - match:
                  prefix: "/service"
                route:
                  cluster: local_service
          http_filters:
          - name: envoy.router
            config: {}
  clusters:
  - name: local_service
    connect_timeout: 0.25s
    type: strict_dns
    lb_policy: round_robin
    hosts:
    - socket_address:
        address: 127.0.0.1
        port_value: 8080
admin:
  access_log_path: "/dev/null"
  address:
    socket_address:
      address: 0.0.0.0
      port_value: 8081
The envoy process is configured to listen to port 80 and redirect to local host:8080 (127.0.0.1:8080), which is the address on which the service is listening. The service can be accessed on the local host because the task is running in awsvpc mode, which allows containers in the task to communicate with each other via local host.
Create the envoy sidecar image that has access to the envoy configuration.
And here’s the task definition containing the service and envoy images.
The task definition is used to launch an Amazon ECS service. To test load balancing in Envoy, scale the service to a couple of tasks. Also, we’ll add ECS service discovery to the service so that the front proxy can discover the service endpoints.
Envoy Front Proxy
For the front proxy setup, you need a Dockerfile with an envoy image and front proxy envoy configuration. Similar to the task definition earlier, you create a Docker image from the Dockerfile and push it to a repository to be accessed by the ECS task definition.
Front proxy envoy configuration:
#front-envoy.yaml
static_resources:
  listeners:
  - address:
      socket_address:
        address: 0.0.0.0
        port_value: 80
    filter_chains:
    - filters:
      - name: envoy.http_connection_manager
        config:
          codec_type: auto
          stat_prefix: ingress_http
          route_config:
            name: local_route
            virtual_hosts:
            - name: backend
              domains:
              - "*"
              routes:
              - match:
                  prefix: "/service"
                route:
                  cluster: testservice
          http_filters:
          - name: envoy.router
            config: {}
  clusters:
  - name: testservice
    connect_timeout: 0.25s
    type: logical_dns
    lb_policy: round_robin
    http2_protocol_options: {}
    hosts:
    - socket_address:
        # this is the ecs service discovery endpoint for our service
        address: testservice.ecs
        port_value: 80
admin:
  access_log_path: "/dev/null"
  address:
    socket_address:
      address: 0.0.0.0
      port_value: 8001
The differences between the envoy configurations are the hosts in the cluster. The front proxy envoy uses ECS service discovery—set up when the service was being created—to discover the service endpoints.
After you push the front proxy image to ECR and create an ECS task definition, launch both services (using the front proxy and the service task definitions) in the same VPC. Now the calls to the front proxy are redirected to one of the service envoys discovered by ECS service discovery.
Now test Envoy’s load balancing capabilities:
$ curl (front-proxy-private-ip):80/service
Hello from behind Envoy! hostname: 6ae1c4ff6b5d
$ curl (front-proxy-private-ip):80/service
Hello from behind Envoy! hostname: 6203f60d9d5c
Conclusion
Now you should be all set! As you can see, getting started with Envoy and ECS can be simple and straight forward. I’m excited to see how you can use these technologies to build next-gen applications!
– Nare