AWS Compute Blog
Using Okta as an identity provider with Amazon MWAA
This post is written by Henry Robalino, Solutions Architect.
Amazon Managed Workflows for Apache Airflow (Amazon MWAA), is a fully managed service that allows data engineers and data scientists to run data processing workflows in the cloud. Okta is a third-party identity provider (IdP) that allows customers to use AWS Single Sign-On (AWS SSO) for their employees to be able to log in quickly and securely.
This blog post shows how to integrate Okta with AWS SSO to access Amazon MWAA using single sign-on.
Overview
Customers use Amazon MWAA to run workflows at scale on the cloud. They want to use their existing login solutions and investments the business made on their current IdP, in this case Okta.
AWS SSO does not yet provide APIs to automate creation and configuration of custom SAML 2.0 applications. As a result, many of the steps in this blog are manual and require using the AWS Management Console.
Prerequisites
Deploying this solution requires:
- Okta:
- Okta account
- Okta user account to be used with Amazon MWAA
- AWS Identity and Access Management (IAM):
- AWS SSO:
- Amazon MWAA:
Creating an Amazon MWAA application in AWS SSO
Create a custom SAML 2.0 application for Amazon MWAA
- Sign into the AWS Management Console, using an account with the appropriate permissions to modify AWS SSO.
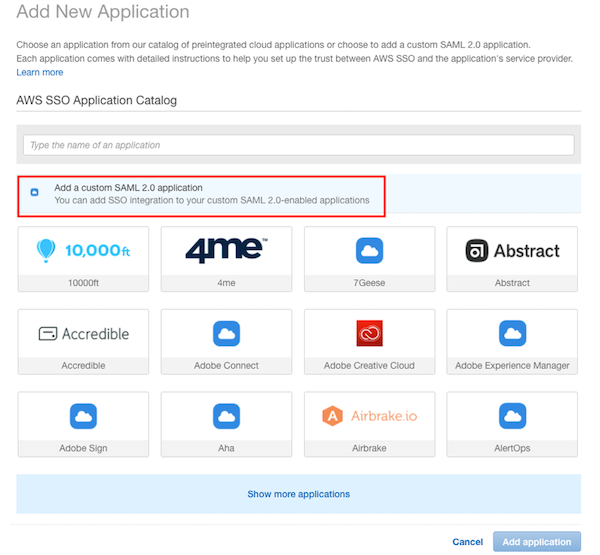
- In the AWS SSO console, navigate to Applications. Select “Add a new application”.

- On the Add New Application page, select “Add a custom SAML 2.0 application”:
- On the Configure Custom SAML 2.0 application:
- For Display name, enter AWS_SSO_Amazon_MWAA.
- For Description, enter AWS SSO Application for Amazon MWAA.

- In the Application metadata section, select the option to manually type in the metadata values.
Before:

After:

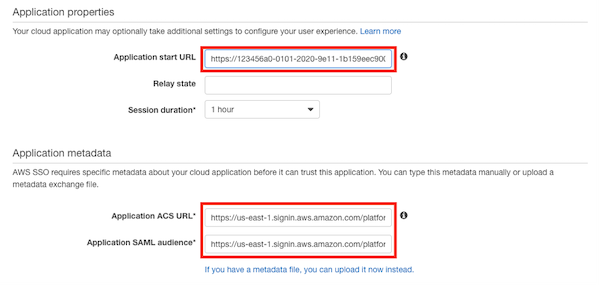
- Enter the Application properties and Application metadata sections:
- Application start URL: This is the Amazon MWAA WebLogin URL, which you can locate in the Amazon MWAA console.
- For example:
https://123456a0-0101-2020-9e11-1b159eec9000.c2.us-east-1.airflow.amazonaws.com
- For example:
- Application ACS URL: This is the Assertion Consumer Service (ACS) URL that AWS SSO provides.
- For example:
https://us-east-1.signin.aws.amazon.com/platform/saml/acs/012345678-0102-0304-0506-EXAMPLE01
- For example:
- Application SAML audience: This is the SAML audience that AWS SSO provides.
- For example:
https://us-east-1.signin.aws.amazon.com/platform/saml/d-012345678E
- For example:
- Application start URL: This is the Amazon MWAA WebLogin URL, which you can locate in the Amazon MWAA console.
- The Application properties and Application metadata now look like this:
- Choose Save changes. A custom SAML 2.0 application for Amazon MWAA is created. You are now redirected to the AWS_SSO_Amazon_MWAA application page.
- On the Attribute mappings tab, modify the existing Subject attribute to “${user:subject}” and a Format of “unspecified.” Choose Save changes.

- On the Assigned users tab, add the previously created Amazon MWAA Okta user. Select Assign users and the user. Choose Save changes.

You have now created a custom application for Amazon MWAA in AWS SSO. You have added a user and configured the attribute mappings.
Configuring an Amazon MWAA Permission Sets in AWS SSO
Assign IAM permissions to the newly created Amazon MWAA application by using a permissions set. A permission set is a collection of administrator-defined policies that AWS SSO uses to determine a user’s effective permissions to access a given AWS account.
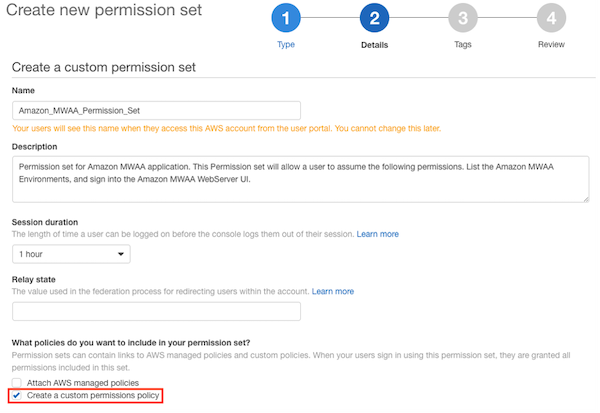
- Navigate to the AWS SSO console. Select on AWS accounts on the left-hand side. Select the Permission sets tab and choose the Create permission set button.

- Select the Create a custom permission set option.

- Provide a name for the Custom Permission Set and an optional description. Choose the Create a custom permissions policy check box.
- In the new text field, add the IAM policy below. This set of permissions is associated with the AWS_SSO_Amazon_MWAA application. Make sure to use the correct Amazon Resource Names (ARN) for your Amazon MWAA environment in the below sample text.Sample IAM policy:
{
    "Version": "2012-10-17",
    "Statement": [
        {
            "Effect": "Allow",
            "Action": [
                "airflow:GetEnvironment",
                "airflow:CreateCliToken"
            ],
            "Resource": "arn:aws:airflow:us-east-1:111222333444:environment/MY-MWAA-ENV"
        },
        {
            "Effect": "Allow",
            "Action": "airflow:CreateWebLoginToken",
            "Resource": "arn:aws:airflow:us-east-1:111222333444:role/MY-MWAA-ENV/viewer"
        }
    ]
}
The policy enables the following permissions:
-
- GetEnvironment – retrieves the details of an Amazon MWAA environment
- CreateCLIToken – creates a CLI token request for an MWAA environment.
- CreateWebLoginToken – creates an Airflow web UI login token request for the Amazon MWAA environment.
- /viewer – level of access for the user of the web token, see Apache Airflow roles.
5. Follow the prompts to fill out tags as necessary. Choose Proceed to AWS accounts.

You have now finished configuring the Amazon MWAA application inside of AWS SSO.
Testing and validation
To test and validate the configuration:
- Navigate to your Okta SSO portal. Sign in with the appropriate account that is assigned to the Amazon MWAA application.

- To access Amazon MWAA, select the AWS Account application. This opens up the AWS Management Console in another window. Once this window opens, close it. As of this writing Amazon MWAA does not support “Auth Mode: SSO”, hence this workaround.
- Next, select the AWS_SSO_Amazon_MWAA application. You are redirected to the Amazon MWAA SSO Page.
- Choose the Sign in with AWS Management Console SSO.

- You are redirected to the Amazon MWAA web server UI.


In this page, you can see all the DAGs available to you and view the DAG history. In the top-right corner, you can see that you are logged in using the AWS SSO assumed role.
Conclusion
This blog post shows you how to integrate Amazon MWAA with Okta as your managed AWS SSO implementation. You can use this solution for your own use cases and enable Okta SSO and Amazon MWAA.
To stay up to date with AWS Identity launches, see: https://aws.amazon.com/blogs/security/highlights-from-the-latest-aws-identity-launches/.
For more serverless learning resources, visit Serverless Land.