Containers
Addressing latency and data transfer costs on EKS using Istio
Data transfer charges are often overlooked when operating Amazon Elastic Kubernetes Service (Amazon EKS) clusters; understanding these charges would help reduce cost while operating your workload on Amazon EKS at production scale.
Common scenarios for data transfer charges on EKS
Understanding general data transfer charges on AWS will help you better understand the EKS networking costs. The Overview of Data Transfer Costs for Common Architectures blog post will walk you through some of the scenarios for data transfer charges on AWS.
Data transfer charges across worker nodes and control plane
To better understand data transfer costs, we need to understand the different network topologies that EKS supports. The documentation page on Creating a VPC for your Amazon EKS cluster provides you with a better understanding of those network topologies.
In any EKS network topology, worker nodes communicate to the control plane either through the public endpoint or through the EKS-managed elastic network interfaces that are placed in the subnets that you provide when you create the cluster. The route that worker nodes take to connect is determined by whether you have enabled or disabled the private endpoint for your cluster. Depending on how you have configured your EKS cluster and VPC, there will be data transfer out charges and NAT gateway data transfer charges. Even actions that originate from the Kubernetes API server, such as kubectl exec and kubectl logs may result in cross-AZ data transfer charges. However these charges should be negligible and should not drive up your data transfer costs.
Data transfer charges related to Kubernetes Services in a EKS cluster
A significant driver for data transfer costs within Kubernetes clusters are calls to Kubernetes services objects. The data transfer costs when calling services occur in the following scenarios:
- In an EKS cluster, two replicas of CoreDNS pods will be running by default. Hence, the DNS lookup may result in cross-AZ calls as the node from which DNS lookup is made and the node where the CoreDNS is running may be in different Availability Zones. However, this cost is very minimal, but there may be latency implications for traversing across Availability Zones.
- By default, services are exposed through ClusterIP, which distributes the traffic to the pods that may be spread across multiple Availability Zones, will result in significant cross-AZ data transfer costs.
Data transfer charges related to Load Balancers in a EKS cluster
Traffic from the load balancers (ALB/NLB/CLB) can result in significant cross-AZ charges within EKS clusters in addition to the regular load balancer charges.
AWS Load Balancer Controller supports provisioning Load Balancer in two traffic modes:
- Instance mode
- IP mode
For more details on the implementation, please refer to the official documentation on AWS Load Balancer Controller.
By default, instance mode is used, which will incur cross-AZ data transfer costs as the traffic is routed using Kubernetes NodePort and ClusterIPs, as shown in the following diagram. The same is the case when using in-tree service controller to create CLBs or NLBs, albeit with less control since IP mode cannot be configured with in-tree service controllers. One additional option to consider here is setting the “externalTrafficPolicy” to “Local,” which avoids creating ClusterIPs. However, this requires pods to be present in all nodes, which may result in imbalances in traffic routing.

Data transfer charges related to calls made to external services from a EKS cluster
Pods running inside the EKS cluster will often depend on connecting to AWS services such as Amazon S3 or services running outside of VPC. Calls to these services may result in NAT gateway charges or egress out charges. VPC endpoints can be used to avoid NAT charges when communicating with AWS services. Even if VPC endpoints are used, these VPC endpoints may also incur cross-AZ charges unless Availability Zone specific VPC endpoints are used in communicating with these services from within the EKS cluster.
Best practices to address data transfer costs
- Use VPC endpoints to avoid NAT gateway charges, as data processing charges for VPC endpoints are considerably lower than NAT gateway data processing charges. If possible, use Availability Zone-aware VPC endpoints to avoid cross-AZ charges.
- Use “IP mode” of ALB and NLB load balancers to minimize cross-AZ data transfer costs.
- For clusters with large numbers of worker nodes, consider using the Kubernetes NodeLocal caches feature to reduce calls to CoreDNS.
- Optimize your image sizes to reduce data transfer charges related to downloading images from the container registry. For example, consider building your images from Linux Alpine base images.
Addressing cross-AZ data transfer costs in EKS clusters
Following the best practices specified in the earlier section will help reduce data transfer costs, but will not be able to address cross-AZ data transfer costs, which may be significant for your EKS clusters. For addressing cross-AZ data transfer costs, pods running in the cluster must be capable of performing topology-aware routing based on Availability Zone.
There are two mechanisms that can help pods route to endpoints in their local Availability Zone:
- Topology Aware Hints is a Kubernetes feature currently in beta in v1.23 and will be available as part of EKS in the future. Using this feature will allow Kubernetes cluster to route to local Availability Zone specific endpoints. But this feature addresses only the inter-cluster communication and does not address where pods have to communicate with external entities. An additional factor to consider here is that some portion of traffic may still get routed cross-AZ even with Topology Aware Hints being enabled to ensure fair distribution of endpoints between Availability Zones.
- Use of service meshes to control egress traffic from pod to use endpoints that are available in the local Availability Zone.
With respect to service mesh, Istio is one such service mesh built on Envoy proxy that currently provides a topology-aware routing feature as part of its mesh implementation.
Addressing inter-AZ data transfer costs in EKS clusters with Istio
In general, service mesh sits on top of your Kubernetes infrastructure and is responsible for making communications between services over the network safe and reliable. Service mesh manages the network traffic between services. AWS App Mesh and Istio are some of the many service mesh options available for EKS.
In this blog, we will be using Istio because topology-aware routing is natively supported, which enables routing traffic to the pods or services within the same Availability Zone. To learn more about Istio architecture and how to deploy it on EKS, please refer to the EKS Workshop links Download and Install Istio CLI and Installing Istio.
For this demonstration, we need to create a three-node EKS cluster where the nodes span across multiple Availability Zones and then set up Istio for the cluster.
1. Copy the following snippet onto a file named “eksdtoanalysis.yaml”.
2. Create an EKS cluster and install Istio as part of the cluster.
a. Create an EKS cluster using the config file defined in step 1.
eksctl create cluster -f eksdtoanalysis.yaml
b. Set up Istio controller, ingress, and egress gateways
Once the cluster is created and Istio has been properly set up, we need to install our application onto the EKS cluster.
3. To deploy the application, follow these steps:
a. Create the following Kubernetes manifest files:
b. Deploy the app to the EKS cluster.
4. Once our sample application is deployed, the next step is to deploy a test container from where we can call our services and validate if there are any inter-AZ calls involved.
a. Deploy a curl container for calling services.
b. Expose the test container as a service.
kubectl expose deploy curl-debug -n octank-travel-ns --port=80 --target-port=8000
c. Install a test script that calls the backend service, print the Availability Zone of the pod that responded to the service call, and execute the script.
d. The execution of the script should produce the following output:
As you can see from the output of the test script execution, the calls to the backend services are distributed across the Availability Zones using the default ClusterIP-based service call mechanism to reach to the pods behind the service, as illustrated in the following diagram.

In order to enable topology-aware routing, we need to first enable Istio for our app and configure a destination rule object, and associate with our app services. This would enable Istio to use Availability Zone information to route calls to the Pods running in the same Availability Zone.
1. To enable Istio, first we need to enable envoy side-car injection and restart the pods.
a. Enable side-car injection by updating the namespace.yaml file with the following information:
b. Apply the changes.
kubectl apply -f namespace.yaml
kubectl get po -n octank-travel-ns
c. Restart the app pods to have the envoy side-car proxies injected.
e. Next, we restart the test container pod so that it also has envoy side-car injected.
f. Finally, we reinstall the test script once again in the newly created test container pod.
Once both app and test container pods have envoy side-car proxies injected, we need to enable topology-aware routing by creating a destination rule object. In Istio, DestinationRule defines policies that apply to traffic intended for a service after routing has occurred. It specifies how to talk to the workloads, such as pods, comprising the service. Examples of rules include strategies for load balancing between the pods, the maximum connections to allow to any one pod, and so on.
a. Create a destination rule object by copying the following content onto a file name “destinationrule.yaml”. A key thing to remember is to have traffic policy section with outlier detection defined in the destination rule object, else topology aware routing will not work.
b. Next, deploy the object as part of the cluster.
kubectl apply -f destinationrule.yaml
2. Finally, we run the test again, and this time we can see the calls to services being routed to the pods in the same Availability Zone where the test container is running, avoiding cross-AZ data transfer charges.
a. Log back in to the test container.
b. Run the test.
c. The console output should show all the calls going to the same pod in the same Availability Zone. For example, refer to the following:
As the demonstration shows, enabling Istio and deploying a destination rule targeting our app services will enable topology-aware routing and avoid significant cross-AZ costs. Istio will also failover to pods running in other Availability Zones in case the pod running in the same Availability Zone is not available, ensuring high availability as illustrated in the following diagram.
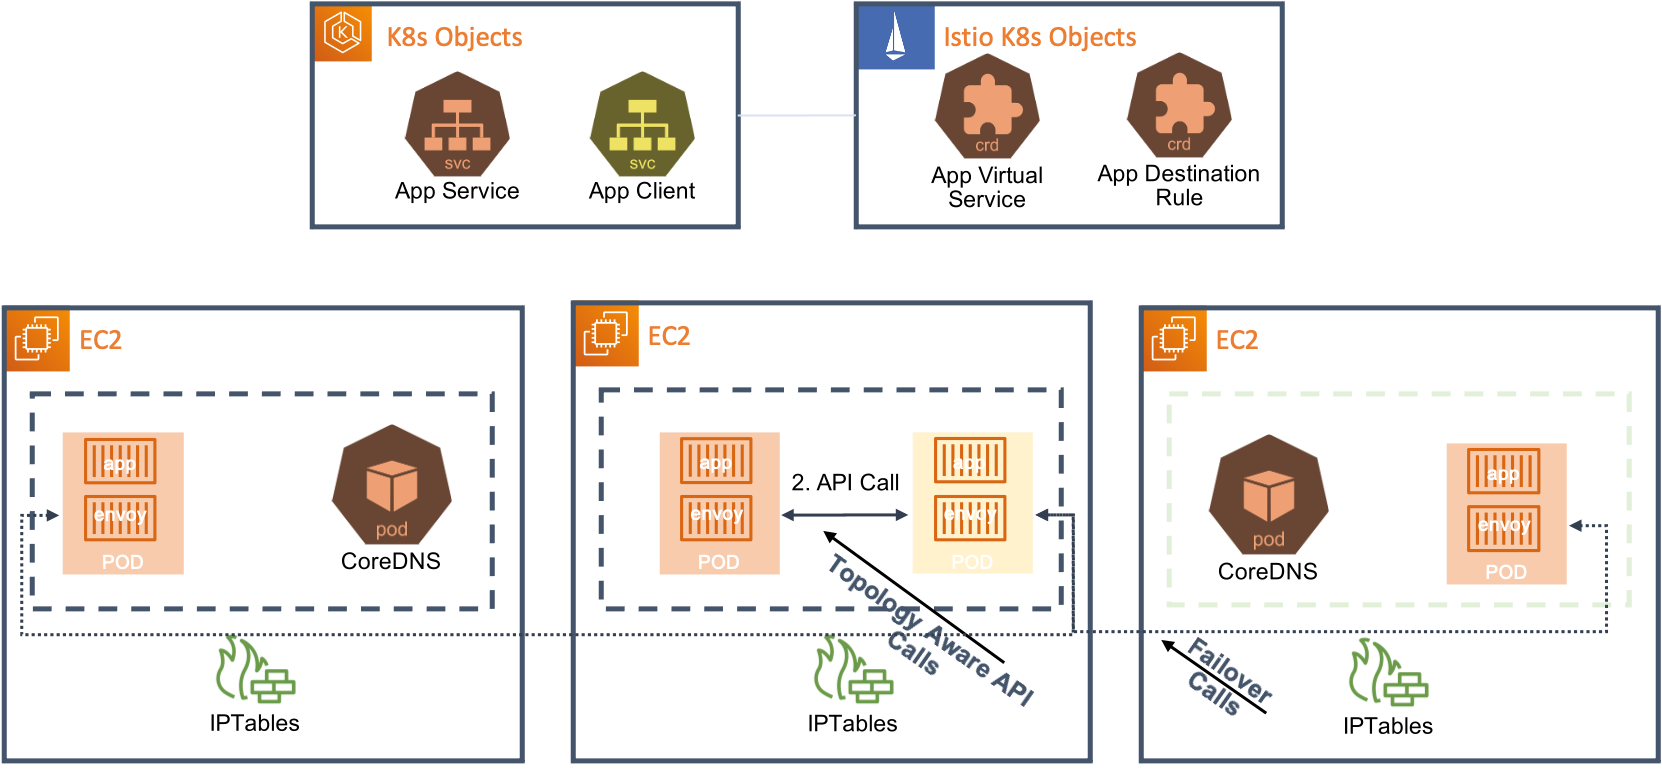
Addressing cross-AZ data transfer costs with Istio when calling AWS services
Cross-AZ data transfer costs can occur when calling AWS services such as Amazon RDS, Amazon MSK, Amazon OpenSearch Service, and Amazon S3. For example, in the case of Amazon RDS, the primary database may be in a different Availability Zone than nodes where the pods are running. In the case of Amazon MSK, the broker instance may be in a different Availability Zone, or we may be calling an AWS service through a VPC endpoint that may resolve to a network interface in a different Availability Zone.
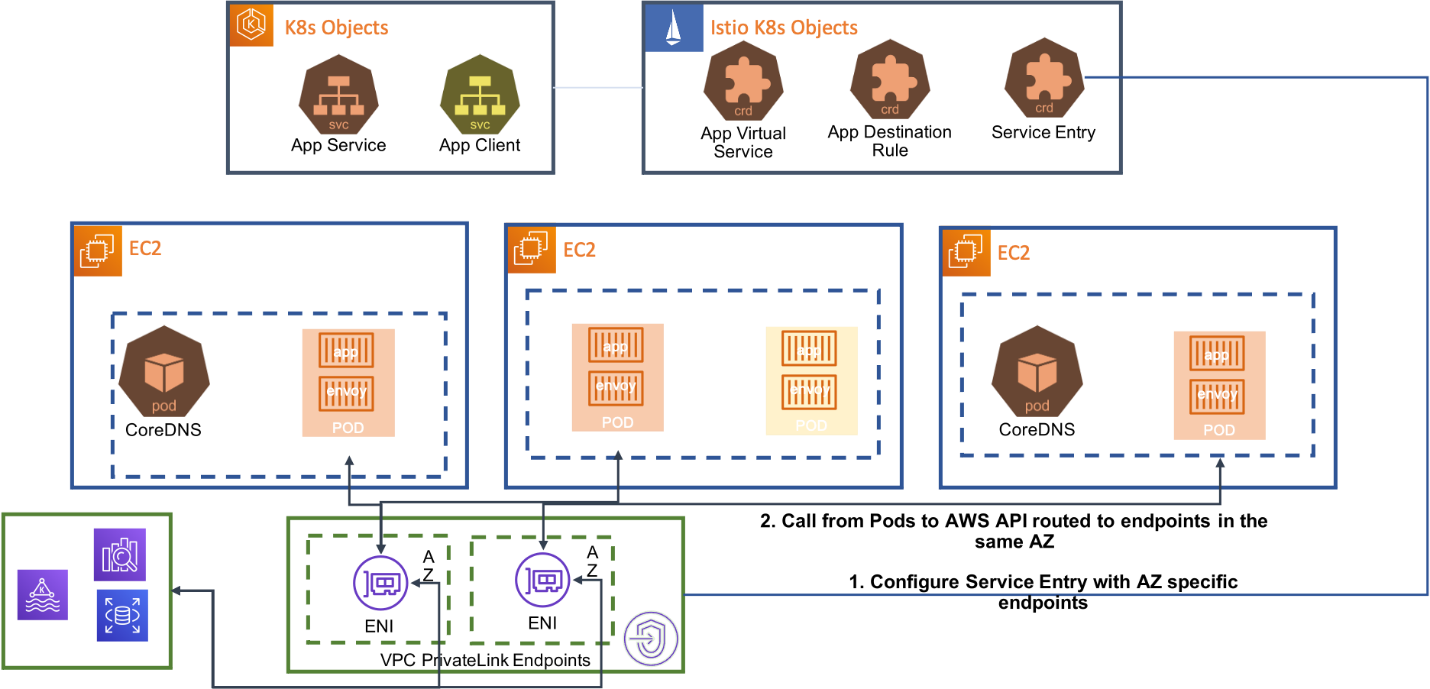
In such scenarios, Istio provides a service entry object that can be configured to intercept calls to the external AWS service and route to endpoint in the same Availability Zone as illustrated in the following diagram:
We can demonstrate with an Amazon RDS example:
1. Create an Amazon RDS Aurora MySQL database and a read replica. For information on how to set up an Aurora MySQL database, refer to the documentation Creating and Connecting to Aurora MySQL DB cluster. For creating a read replica, refer to the documentation Creating Read Replica for Aurora MySQL.
2. Once the database and read replica are created, run the following commands to export the endpoint URLs into shell env variables.
3. Next, we define a service entry and destination rule object and deploy them to the cluster. When defining the service entry object, we specify a primary endpoint for the service and link the Availability Zone-specific endpoints to the primary endpoint, as shown below.
4. Next, we monitor Envoy proxy logs for an app pod running in a Oregon region us-west-2b Availability Zone. Choosing an app pod in us-west-2b is important as the reader endpoint is in us-west-2b.
kubectl logs <<replace with podname running in 2b>> -n octank-travel-ns -c istio-proxy -f
5. Finally, we log in to the same pod for which we are monitoring logs and then connect to the database instance through the primary endpoint that we specified in the service entry object under “hosts.”
6. You should be able to confirm in the logs that the connection happens to the reader endpoint though we are connecting to the primary endpoint URL from within the application.
Using service entry objects, we can control traffic to any external service and ensure that the calls to the external service are also topology-aware.
Conclusion
To recap, if your data transfer costs with EKS clusters are high, we recommend the following steps:
- First, ensure that you are following the best practices outlined in the section “Best practices to address data transfer costs”.
- Next, enable VPC flows and create dashboards to monitor what are the key drivers of the data transfer costs.
- Once key drivers are identified, evaluate if those drivers can be addressed by adopting a service mesh architecture. Then implement the service mesh to address the data transfer costs as outlined in this blog. A key caveat to implementing service meshes is the additional complexity they bring to the overall architecture. Hence, complexity should be weighed against cost savings before making the decision.
- One additional option we can consider once EKS support for Kubernetes 1.23 is available is that of Topology Aware Hints that can reduce inter-AZ data transfer costs for inter-cluster traffic and with much less complexity. To learn more, refer to the documentation Topology Aware Hints.
- When implementing topology-aware routing, it is important to have pods balanced across the Availability Zones using Topology Spread Constraints to avoid imbalances in the amount of traffic handled by each pod. To know more about Topology Spread Constraints, refer to Pod Topology Spread Constraints.
Data transfer costs can be a significant driver of costs within your EKS cluster. However, by following the best practices and strategies outlined in this blog, you can significantly reduce these costs.