Containers
Designing a secure container image registry
As organizations move to containers, there can be a sense that they are losing control or visibility of the software that is deployed to their environments. Historically, once a server is in production, a scanning tool runs on a regular basis to detect vulnerabilities on the operating system. Once a vulnerability is detected, an operations engineer or automated process will apply the patches required to remediate the vulnerability. This process can take weeks and require scheduled maintenance windows in order to accomplish. Famously, there are cases where the patching never occurs or is too late.
Containers enable organizations to develop, deploy, and iterate on software faster than ever before. Services such as Amazon Elastic Container Service (Amazon ECS) and Amazon Elastic Kubernetes Service (Amazon EKS) help customers manage their container deployments. Before customers can deploy containers, they need a scalable, fault tolerant, and secure container registry to store their container images. Amazon Elastic Container Registry (Amazon ECR) enables customers to store images, secure their images using AWS Identity and Access Management (IAM), and scan their containers for vulnerabilities. AWS also has a community of partners that offer container registries and container scanning tools.
When working with organizations moving to containers, we are often asked “how do we patch our containers; can we SSH into them and run yum update?” or “how do we ensure my containers are hardened according to my corporate policies before being deployed to production?” In the public sector, these concerns are heightened by NIST 800-53 controls, FedRAMP, and Department of Defense (DoD) Cloud Computing Security Requirements Guide (SRG) requirements. These are common questions and can be addressed with a three-tier registry design and by integrating security into your CI/CD pipelines. At a high level, you can think about the container pipeline in four phases: build, test, scan, deploy, and monitor.
This post outlines a design that can be used or modified to fit the requirements of your organization.
Structuring the image hierarchy
Before we start building images or deploying software, we need to design a structure that will enable developers to move quickly while remaining secure. When we think about the container image registry, we think about a three-tier hierarchy. It is critical that customers control all images within their environment, store Dockerfiles in an internal source code repository, and continuously scan their images for vulnerabilities.
Customers who rely on third party registries, lack the ability to control scanning, patching, and hardening guidelines across the organization. These images are not inherently bad and often include many security best practices. We recommend using these images as the foundation for building your internal registry.
The following image tiers lay out how you can leverage open source container images and Dockerfiles while meeting your security and compliance requirements.

Tier 1: base images
Base images are the foundation for all images across your organization and are equivalent to your base level operating system. Base images should be owned by the cloud team, security team, and/or operations team within the organization. These images should be ready to use off the shelf by developers.
Typically, base images will be an operating system such as Amazon Linux 2, Alpine Linux, Red Hat Universal Base Image, CentOS, etc. Often, your registry will have multiple versions of the same underlying operating system.
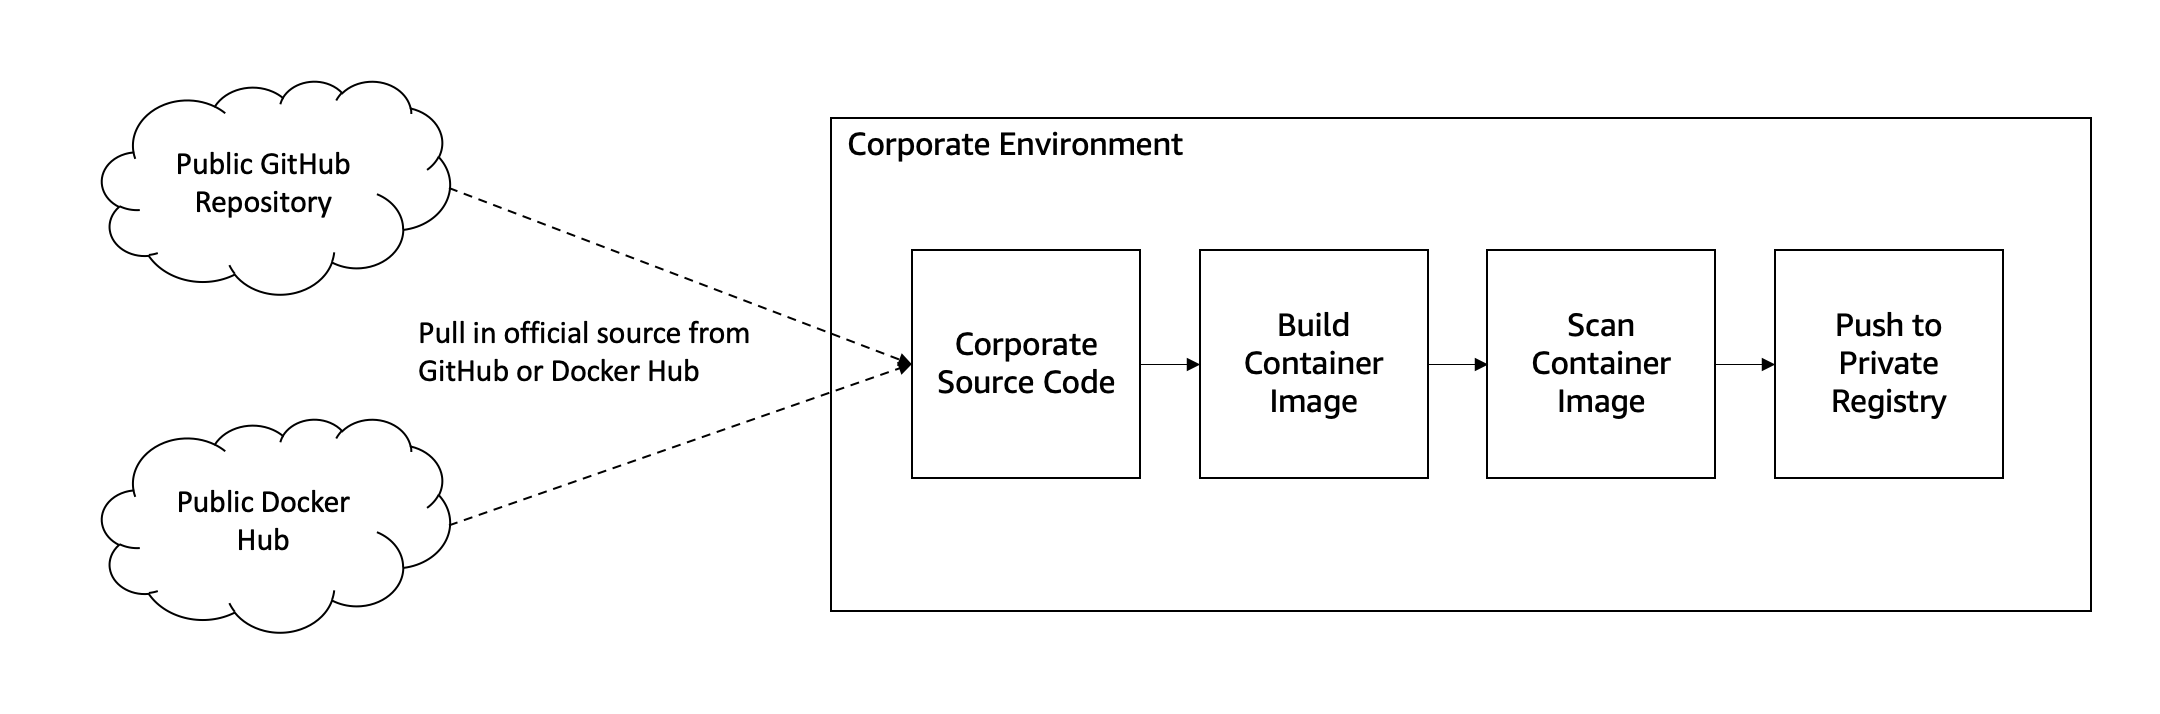
We recommend pulling in these images from verified official repositories on Docker Hub and pushing them into your registry (a registry is a collection of repositories). This will enable you to control things like patching and hardening. For example, you may have the following Dockerfile for an Amazon Linux 2 base image that installs the FIPS 140-2 modules and OpenSSL:
FROM amazonlinux:2

RUN yum update -y \
    yum install -y dracut-fips openssl

ENTRYPOINT [ "/bin/bash" ]
Base images are also where you can apply OS level hardening guidelines such as the CIS Benchmark or Security Technical Implementation Guide (STIG). It is important to note that only a subset of these hardening guides apply to containers due to their limited access to the host.
Tagging images are important for managing multiple versions of containers and can make consuming images easier across the organization by making images easier to find. If images are made readily available and easy to use, more teams will consume the images enabling a better security posture. For base images, we recommend using the same tagging structure that the upstream project uses. This will require that tag immutability is turned off within your registry, so that you can continuously update an image. Continuing our example from above, we would run the following commands to build the image and push it into the registry.
docker image build -t registry.example.com/library/amazonlinux:2 .
docker image push registry.example.com/library/amazonlinux:2
Tier 2: platform images
Platform images are the foundation for your applications and will be what most developers will consume in their day-to-day building of containers. Like the base images, platform images should be owned centrally by the cloud team, security team, and/or operations team within the organization. These images can be contributed by development teams but should be reviewed and owned by centralized teams.
Platform images include, Node.js, PHP, Java, Python, Ruby, Tomcat, Go, etc. Your registry does not need to include all possibilities, only the ones that are in use within your organization. Platform images are critical to increasing velocity of development and security within the organization. Platform images should provide stable versions of these platforms built on top of the hardened base images created earlier. They should also ensure best practices including providing an unprivileged user to the application within the container, hardening the platform based on any benchmarks available, and exposing any relevant configuration items using environment variables.
Platform images should be based on the verified official Dockerfile found in the corresponding official GitHub repository or the official installation instructions from the project. These Dockerfiles should be pulled from the open source repository into your own repository and built on top of one of the official base images within your environment. The official Dockerfiles will already have many of the language best practices built-in. For example, below is the official Node.js Dockerfile that has been modified to be built on the internal Alpine Linux base, rather than the public Alpine Linux image.
FROM library.example.com/library/alpine:3.12

ENV NODE_VERSION 14.6.0

# install commands redacted

# create a directory for code and install latest version of npm
RUN mkdir -p /usr/src \
    && chown node:node /usr/src \
    && npm install npm@latest -g

# change the current directory
WORKDIR /usr/src

# switch to an unprivileged user for application code
USER node

ENTRYPOINT ["docker-entrypoint.sh"]

CMD [ "node" ]
Similar to base images, platform images should be tagged using the upstream version of the platform. For example, Node.js images would be tagged as 14, 14.9, and 14.9.0. We recommend that downstream applications pin their images from the least specific version as possible. In the case of Node.js, that would be tag 12. This enables the downstream images to easily get the latest patches and version of Node.js without having to update their Dockerfile.
docker image build -t registry.example.com/library/node:14 .
docker image push registry.example.com/library/node:14
Tier 3: application images
Finally, we need to build our application images. Application images are typically owned by the development or engineering team that supports the application. These images will usually copy in their source code or compile binaries for distribution.
Application images should be based on platform images where possible, falling back to a base image if a full operating system is required. If your language supports distroless or scratch containers, that is the preferred path because it will produce the smallest possible package. Application images should aim to make the least number of modifications to their underlying image as possible to reduce potential bugs. The below example installs a Node.js application into the Node.js platform container we created in Tier 2.
FROM library.example.com/library/node:14
COPY package*.json /usr/src/
RUN npm install --no-optional \
&& npm cache clean --force
COPY . .
EXPOSE 8080
ENTRYPOINT ["node"]
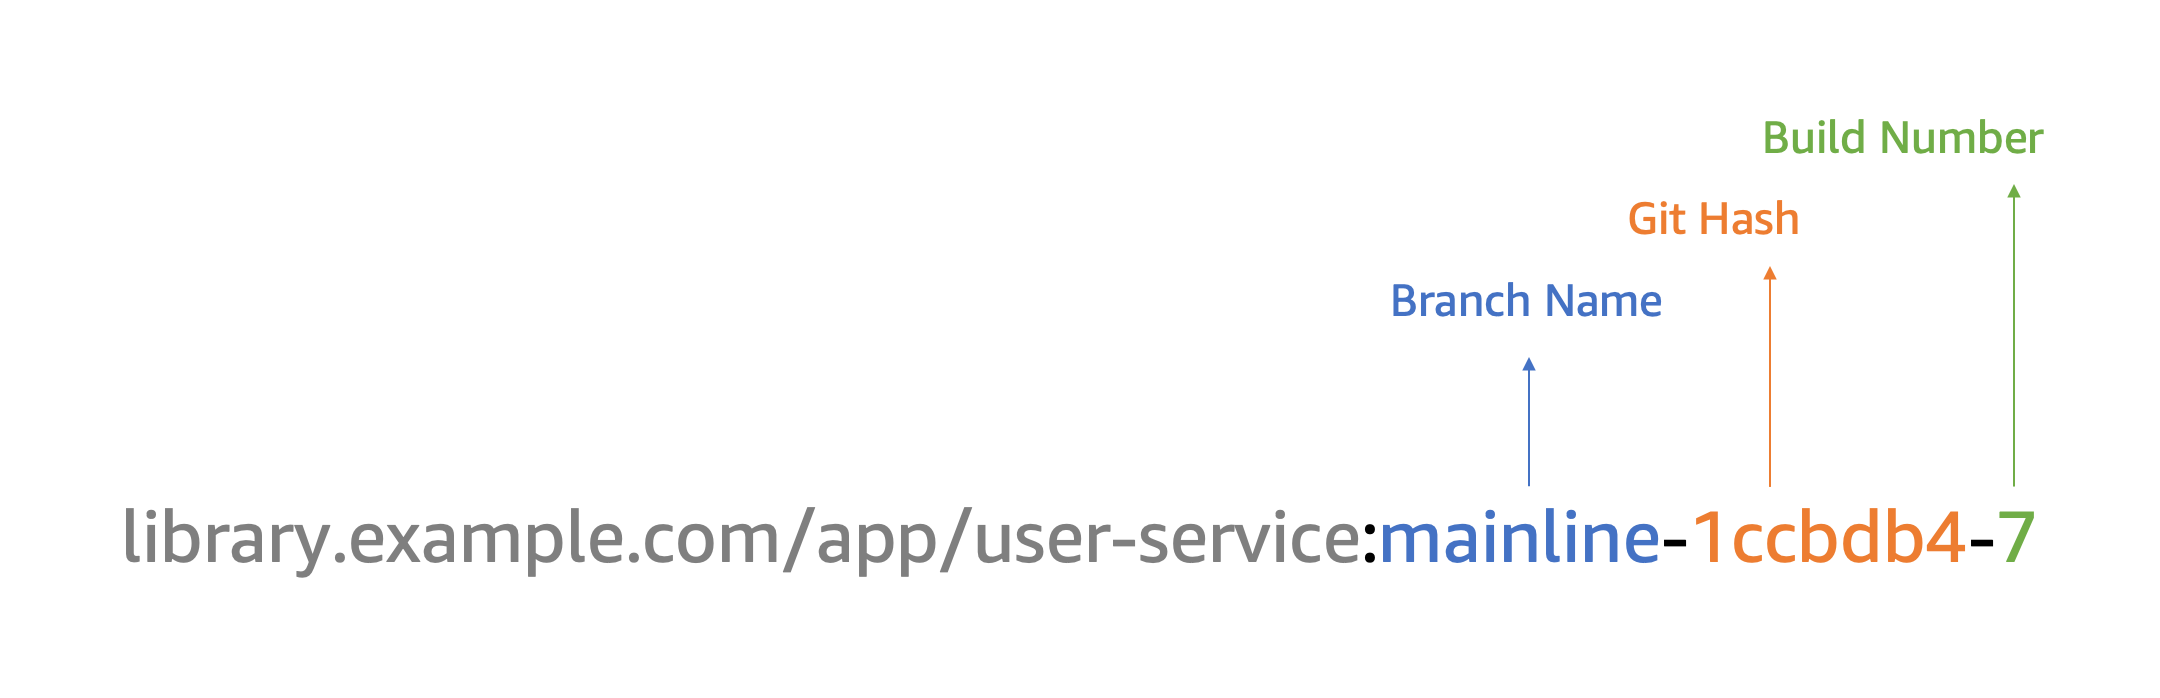
CMD [ "server.js" ]Unlike base and platform images, application images should be tagged using the Git Hash, Build Number, and/or Branch. This ensures that image tags are unique, can be built multiple times without code changes, and the resulting image can be easily traced to the source code if needed. The result tag will resemble the following:
Vulnerability scanning
Software will inevitably have vulnerabilities no matter how slim or pretty the Dockerfile is authored. Vulnerabilities can be found at the operating system (OS), application dependencies, and/or application code layer. We need a way to automatically detect these vulnerabilities and understand how they impact our container landscape.
It starts by having a scanning tool in place, such as the Clair Scanner, which is built into Amazon ECR. The Clair Scanner supports scanning for OS level vulnerabilities. This can be combined with application and application dependency scanning tools such Snyk, AquaSec, Prisma, StackRox, and Anchore to build a complete vulnerability scanning solution. Amazon ECR can scan containers on push or on demand. There are third-party container scanning solutions available from our partners that cover all three layers of scanning.
Once the results are available you can determine the best course of action, such as patching the base image or patching the platform image. Tools such as Docker Desktop and Snyk can provide developers suggestions on how to resolve vulnerabilities within their containers. Typically, this will be to rebuild the image where the vulnerability is found so that new patches are installed and can be consumed by application images. This process can be automated when a critical or high vulnerability is detected to automatically trigger a rebuild of the image. For example, when a scan is triggered and a result is available from Amazon ECR, a Lambda function could analyze the results against your internal policy and trigger an AWS CodePipeline to rebuild that image to address the vulnerability.
Additionally, there are partners solutions such as AquaSec, Prisma, and StackRox that support a concept called runtime security. Runtime security is the process of analyzing the behavior of containers in production and taking automated actions based on the detected behavior. These tools can block malicious behavior in real time. Runtime security is an advanced topic and outside the scope of this post, but it is something to be aware of as you mature in your container journey.
Continuous patching
Now that images are built using a hierarchy and image scanning in place, we can start to build our patching strategy. We recommend building all base images at a minimum every 30 days or more often based on your organization’s policies. Platform images based on the base images should be automatically rebuilt when the underlying base image is built. This can be setup in Jenkins or in AWS CodePipeline using CloudWatch Events. The same method should be applied to application images. The master or mainline branch of the source code should be able to be built at any time and treated as production ready. This enables the continuous patching process. Once a platform image has been rebuilt, the application image should be rebuilt as well.
This process of continuous patching ensures that container images can be patched at any level in the stack at any time and that images in the environment are not older than 30 days. This greatly increases the security posture of the environment. The scanning process could be implemented with a scheduled AWS Lambda function that runs once a day to inventory all the images running on the Amazon ECS or Amazon EKS cluster and triggering a vulnerability scan on those images. When a vulnerability is found on those images, the rebuild process can be triggered.
Deployment policies
The above design helps development teams move faster and more securely, but we need to ensure that these practices are being followed. Enforcement can be done on the cluster or at deployment time to ensure that images are only being pulled from our internal registry.
Open Policy Agent (OPA) is an open source project focused on codifying policy such as the approved image registries. OPA is integrated with Kubernetes via Gatekeeper, an admission controller that checks if the image is from an approved registry prior to allowing it to be deployed on the cluster. For more information on Gatekeeper, we have posted about deploying Gatekeeper to Amazon EKS. Customers can also write custom policies using tools like Cloud Custodian to ensure images are only pulled from approved sources for Amazon ECS or using serverless admission web hooks with Amazon EKS. Using the above methods we can prevent unapproved images from being deployed into our environments.
Conclusion
To summarize, we have designed a three-tier container image registry with a tagging policy, configured vulnerability scanning, and integrated continuous patching into your existing CI/CD pipelines. With this architecture, customers can ensure their teams are using approved, hardened, and best practice base images for their applications.