Containers
Building serverless admission webhooks for Kubernetes with AWS SAM
Authors:
Simon Woldemichael, Associate Solutions Architect, WWPS Solution Architecture
Josh Jiang, Associate Cloud Developer, Professional Services Shared Delivery Teams
Learning Level: 300
Controlling resource deployments in your Kubernetes cluster can become a difficult challenge. For instance, pushing changes to a production environment can run the risk of installing an incompatible package or vulnerable dependency that crashes your services. By creating custom admission webhooks for Kubernetes, we can define strict regulations to exclusively launch approved resources in our cluster.
This diagram shows the architecture of our example webhook:

In this blog, we’ll teach Kubernetes developers and cluster administrators how to create serverless admission webhooks using AWS Serverless Application Model (SAM). To demonstrate their usefulness, we will configure a webhook to validate deployments in Amazon Elastic Kubernetes Service (EKS) against an image in Amazon Elastic Container Registry (ECR).
Serverless admission webhooks fit this use case well. However, we can also extend their functionality to the creation, deletion, or update of a Kubernetes resource (e.g. a Pod). First, we’ll look at what types of webhooks you can create in Kubernetes. Next, we’ll deploy a pre-built webhook. Finally, we’ll walk through how you can create custom webhooks.
Background
Kubernetes cluster dynamic admission control
Understanding how Kubernetes internally regulates new cluster resources is important for building our own rules. Kubernetes uses several admission controllers to ensure that resources inside a cluster match certain expectations. These admission controllers guarantee that you can only run valid create, update, and delete operations. For example, if you attempt to create a Deployment in a cluster namespace that does not exist, the NamespaceExists admission controller will deny the creation.
Starting in Kubernetes version 1.9, two code packages were introduced that allow you to write custom plugins: ValidatingAdmissionWebhook and MutatingAdmissionWebhook. These plugins let you integrate directly into the resource admission process.
A ValidatingAdmissionWebhook allows you to validate if a resource fits expected criteria. For example, does the Pod being created have the correct labels and request a constrained amount of CPU and memory? If it doesn’t, then you can deny the Pod admission to the cluster and it will not be created.
A MutatingAdmissionWebhook allows you to not only validate if a resource meets specific criteria, but also mutate or change that resource so that it meets the criteria before it is admitted into the cluster’s data plane. For example, does the Ingress resource being created enforce HTTPS only? If it doesn’t, the webhook can change the resource so that it does! For more context, the AWS App Mesh sidecar injector for EKS is a mutating webhook that injects the envoy proxy container into EKS pods using AWS App Mesh for observability and application-level networking. The managed kube-apiserver in EKS has both of these admission controllers enabled by default.
In both cases, the Kubernetes API will make a POST request to your webhook with an AdmissionReview in the body and your webhook will also respond with an AdmissionReview. The AdmissionReview type has a request field and a response field. When processing the incoming AdmissionReview, you’ll read the request. When responding with an AdmissionReview, you’ll populate the response and include the unique identifier (UID) that was generated by the cluster. The cluster uses this UID as a versioning mechanism and is present in the request.
The body of the incoming review will contain the raw JSON specification for the object being created, updated, or deleted. As a result, you can view the same data that the Kubernetes API will see when performing the requested API action. These details will be important for us when we create our webhook.
Solution overview
So far we have covered what admission controllers do, what types of webhooks are available, and how the ValidatingAdmissionWebhook and MutatingAdmissionWebhook admission controllers interact with custom webhooks. Next, we’ll take a look at an example of how they can be useful.
For this blog, we’ll be using a cluster managed by EKS, but you can use any Kubernetes cluster version 1.9 or greater with the ValidatingAdmissionWebhook admission controller enabled. To see if your cluster has this controller enabled, visit the official Kubernetes documentation found here.
Our webhook is implemented as an AWS Lambda function in the Go programming language. This function runs a ValidatingAdmissionWebhook and confirms that all pods created in our EKS cluster come from a valid container repository in ECR. It also checks if the Pods have a good baseline security posture. The Kubernetes cluster connects to this function through an Amazon API Gateway endpoint. All of our webhook’s infrastructure and permissions are defined in an AWS SAM template.
Walkthrough
Here, we will launch an AWS SAM template from the AWS Serverless Application Repository (SAR) to deploy the services for our webhook.
Prerequisites
To implement this architecture, you will need the following:
- An AWS account with access to Amazon ECR, AWS Serverless Application Repository, AWS CloudFormation, AWS Lambda, and Amazon API Gateway
- A Kubernetes Cluster. For help deploying a cluster, see instructions in the EKS workshop
- kubectl for deploying our webhook’s configuration and adding some test applications to the Kubernetes cluster
- The git CLI for cloning the example GitHub repository
Deploying and testing the serverless admission webhook
Before we dive into the implementation of the webhook, let’s deploy the prepared example from AWS SAR into your Kubernetes cluster.
First, we’ll deploy the validating webhook into our AWS account. To do this, click the the “Launch Stack” button below to be taken to the AWS SAR Management Console in the us-east-2 Region.
![]()
After the deployment is complete, click on the “View CloudFormation Stack” button to go to the CloudFormation console and copy the WebhookURL stack output value from the “Outputs” section.
Our security rules defined in the Lambda function we just launched will validate four things. If any of these criteria are not met, then the Pod being created will be denied admission to the cluster. Container images must:
- Come from ECR
- Have image tag immutability enabled
- Have image scan on push enabled
- Contain no
CRITICALsecurity vulnerabilities, as reported by ECR image scanning
Next, we’ll configure the validating webhook admission controller in our cluster to communicate with API Gateway and Lambda:
- Clone the example webhook to your local machine and change your working directory into it
git clone https://github.com/aws-samples/amazon-ecr-repository-compliance-webhook.git && cd amazon-ecr-repository-compliance-webhook- Edit deploy/validatingwebhook.yaml by updating the key in
webhooks[0].clientConfig.urlwith your API Gateway endpoint. All webhooks are required to use an HTTPS endpoint. Make any necessary additions to match namespaces and labels for resources that are deployed. Then run the following command to deploy theValidatingWebhookConfiguration
kubectl apply -f deploy/validatingwebhook.yaml
The caBundle used by webhook comes from Amazon Trust Services (ATS), a certificate authority created and operated by Amazon Web Services. It is the Base-64 encoding of a PEM formatted root certificate and can be found here. Do not change this value as it will allow your cluster to make a secure connection to API Gateway in the event that it does not already trust certificates signed through ATS. For example, when operating a self-managed cluster on EC2.
Now, we will test the webhook we just deployed using an example deployment that references containers from outside of ECR (from DockerHub).
- Apply the sample deployment into your Kubernetes cluster. Choose an image you would like to test. If you would like to test an ECR image that is available in both your AWS and in your configured Region, ensure your nodes have permission to pull from the ECR repository. Optionally, modify the namespace of the deployment. The deployment is located at deploy/mydeployment.yaml:
kubectl create ns test-namespace && kubectl apply -f deploy/mydeployment.yaml- This deployment attempts to pull
nginx:latestfrom DockerHub inmydeployment.yaml. Change the deployment to an ECR image that exists within your AWS account to test its compliance as well.
- As soon as the deployment is sent to the Kubernetes API, our webhook will be invoked by the validating webhook admission controller. The webhook will parse the body of the deployment and check that the container images present in the request meet the four specified requirements that we have. Let’s verify that events are admitting or denying the pods that our deployment
kubectl get events -n test-namespaceBecause both of the Pods we are creating, in the case of the default nginx:latest value, come from DockerHub and not ECR, they will both be denied. You should see an event similar to this:
Error creating: admission webhook "admission.ecr.amazonaws.com" denied the request: webhook: no ecr images found in pod specification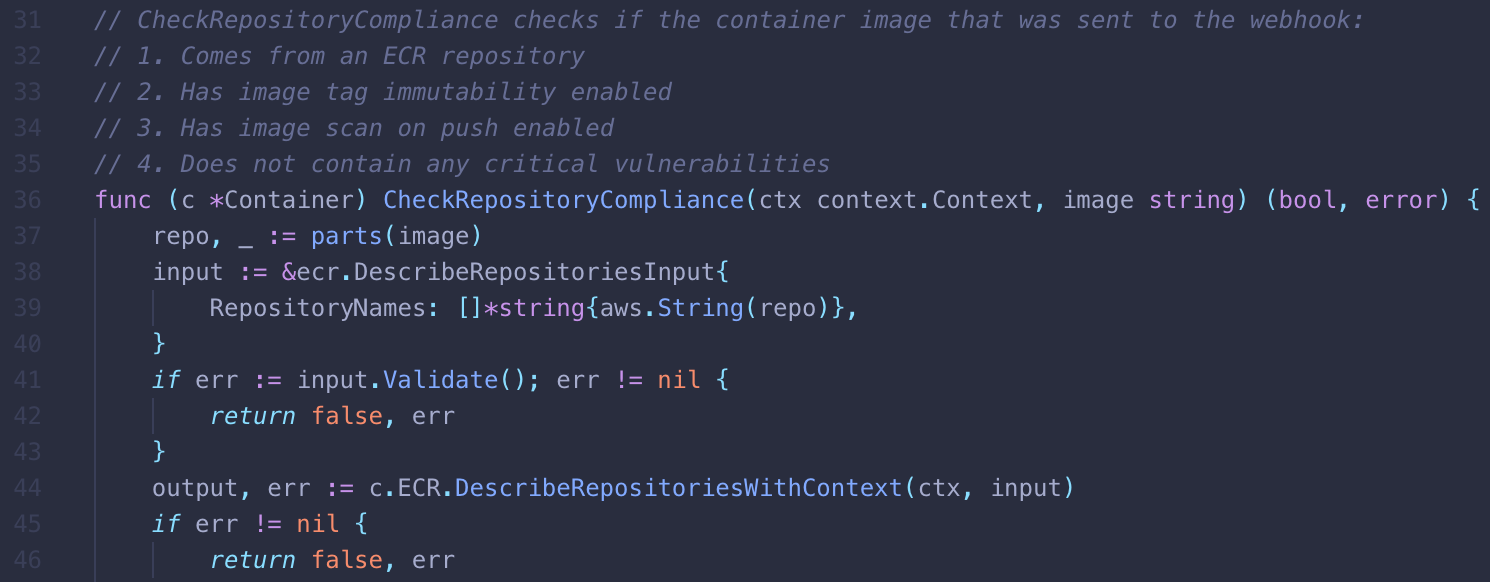
The deployment fails because the ecr-repository-compliance-webhook Lambda function denies non-ECR images in the CheckRepositoryCompliance function.
If you plan to create a custom webhook, delete this CloudFormation stack before proceeding to avoid a naming collision by running the following command:
aws --region us-east-2 cloudformation delete-stack --stack-name serverlessrepo-amazon-ecr-repository-compliance-webhookFinally, let’s look at what the Lambda function does to accomplish this.
Implementation: Creating your webhooks
In this section, we’ll explain how to develop your webhooks. We’ll be using the Go programming language, but you can use any language supported by Lambda or use a custom runtime. The general flow of development is as follows:
- Write the business logic for the webhook
- Set up the Lambda handler
- Deploy the webhook for use with AWS SAM
You can follow along with by referencing our example webhook from its GitHub repository.
1. Write the business logic for the webhook
Before we detail the handler for the Lambda function, we’ll take a look at the main components that drive its business logic. We split up the logic into two Go packages. First, pkg/webhook contains methods and types that assist in extracting pod information. Second, pkg/function will process the pod’s contents for compliance and define the handler for the Lambda function.
We’ll follow the data as it enters this process starting with pkg/webhook/request.go. Once the Lambda function is triggered by API Gateway, it will receive an AdmissionReview from the ValidatingWebhookConfiguration admission controller. Thus, the first responsibility of this function is to translate that AdmissionReview into native Go types; a process known as unmarshalling. Navigate to pkg/webhook/request.go to see implementation details:
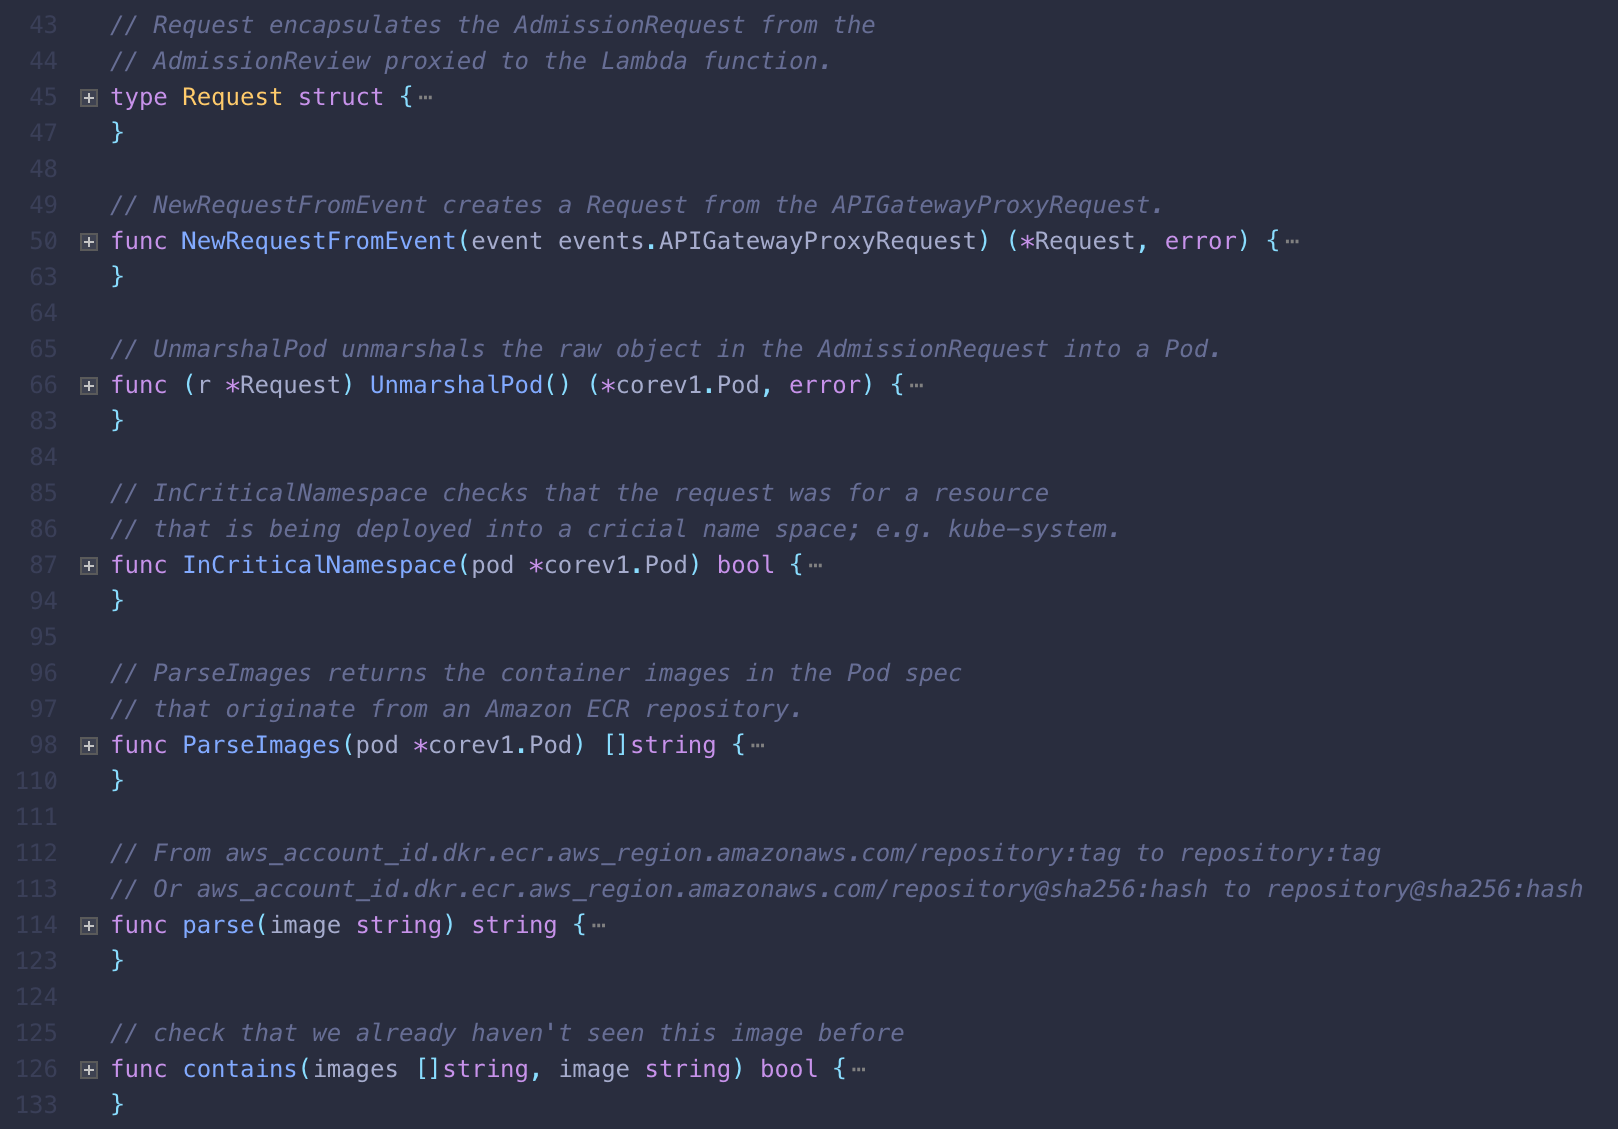
pkg/webhook/request.go is the entry point for our processing, validating, and extracting data from the request.
Now that we can read the pod specification data from the deployment, we can check if its container images match our expectations. Our functions are concerned with checking four specific aspects of container images in a pod. However, your webhooks could inspect any aspect of a deployment. In this case, we use the helpers located at pkg/function/ecr.go to see if our four requirements are met. The functions in pkg/function/ecr.go will make requests to the ECR API to verify that the ECR image exists, has image tag immutability enabled, and does not contain any critical security vulnerabilities.
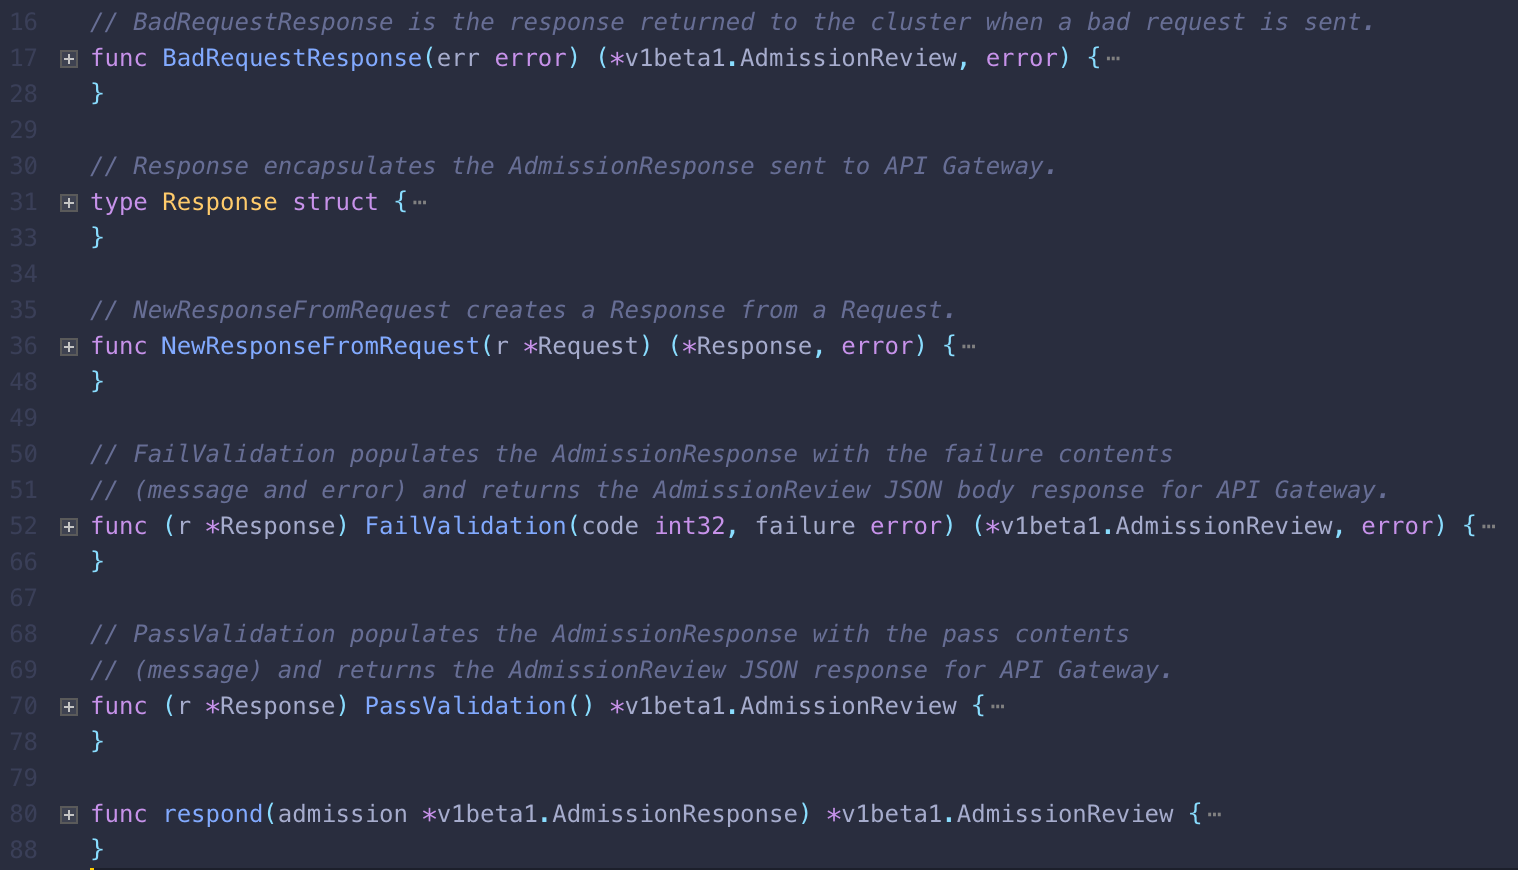
Upon completing these functions, our Lambda function will form another AdmissionReview, but this time it contains an empty AdmissionRequest and a populated AdmissionResponse. We will deny the pod admission from the cluster if the container images present do not meet our requirements. Using the WithProxiedResponse middleware function in pkg/function/middleware.go, the Lambda will respond to API Gateway.
2. Set up the Lambda handler
Now that we’ve covered the building blocks, let’s use them to create the handler. In pkg/function/container.go, we define a type Container for encapsulating the handler of the Lambda function. Doing this makes it easier to mock external dependencies (e.g. the ECR API client), during the simple unit tests found in main_test.go.
First, the Lambda function’s handler will digest the API Gateway request to extract pod information from the AdmissionReview using the methods and types that were presented in the last section. It will parse the contents of the pod from the AdmissionRequest embedded within the AdmissionReview to determine if the container images of the pod present within the review are compliant. Finally, return that judgment to the API Gateway with a response approving or denying the pod into the cluster. Additional details of the execution flow of the handler can be found in the document string above the function.
3. Deploy the webhook for use with AWS SAM
We will run some final commands before deploying the webhook to make our lives easier. Before starting, we assume that you have done the following:
- Configured AWS credentials in your terminal using the AWS CLI for accessing resources in your AWS account and have permission to access CloudFormation, S3, and IAM
- Created an S3 bucket for AWS SAM to put the packaged template
- Updated the
DEFAULT_REGIONandS3_BUCKETvariables on lines 1 and 2 of the Makefile to match the S3 bucket you just created
To deploy the webhook, run the following commands in your terminal. If you do not have make installed, use your preferred package manager to install it. The first command will install the SAM CLI using Python, but you can modify the command to install and use SAM how you see fit. You will also need to install the Go programming language:
make install-tools
make
These commands automate linting, testing, and compiling of our code. You can see the specific commands used in the Makefile.
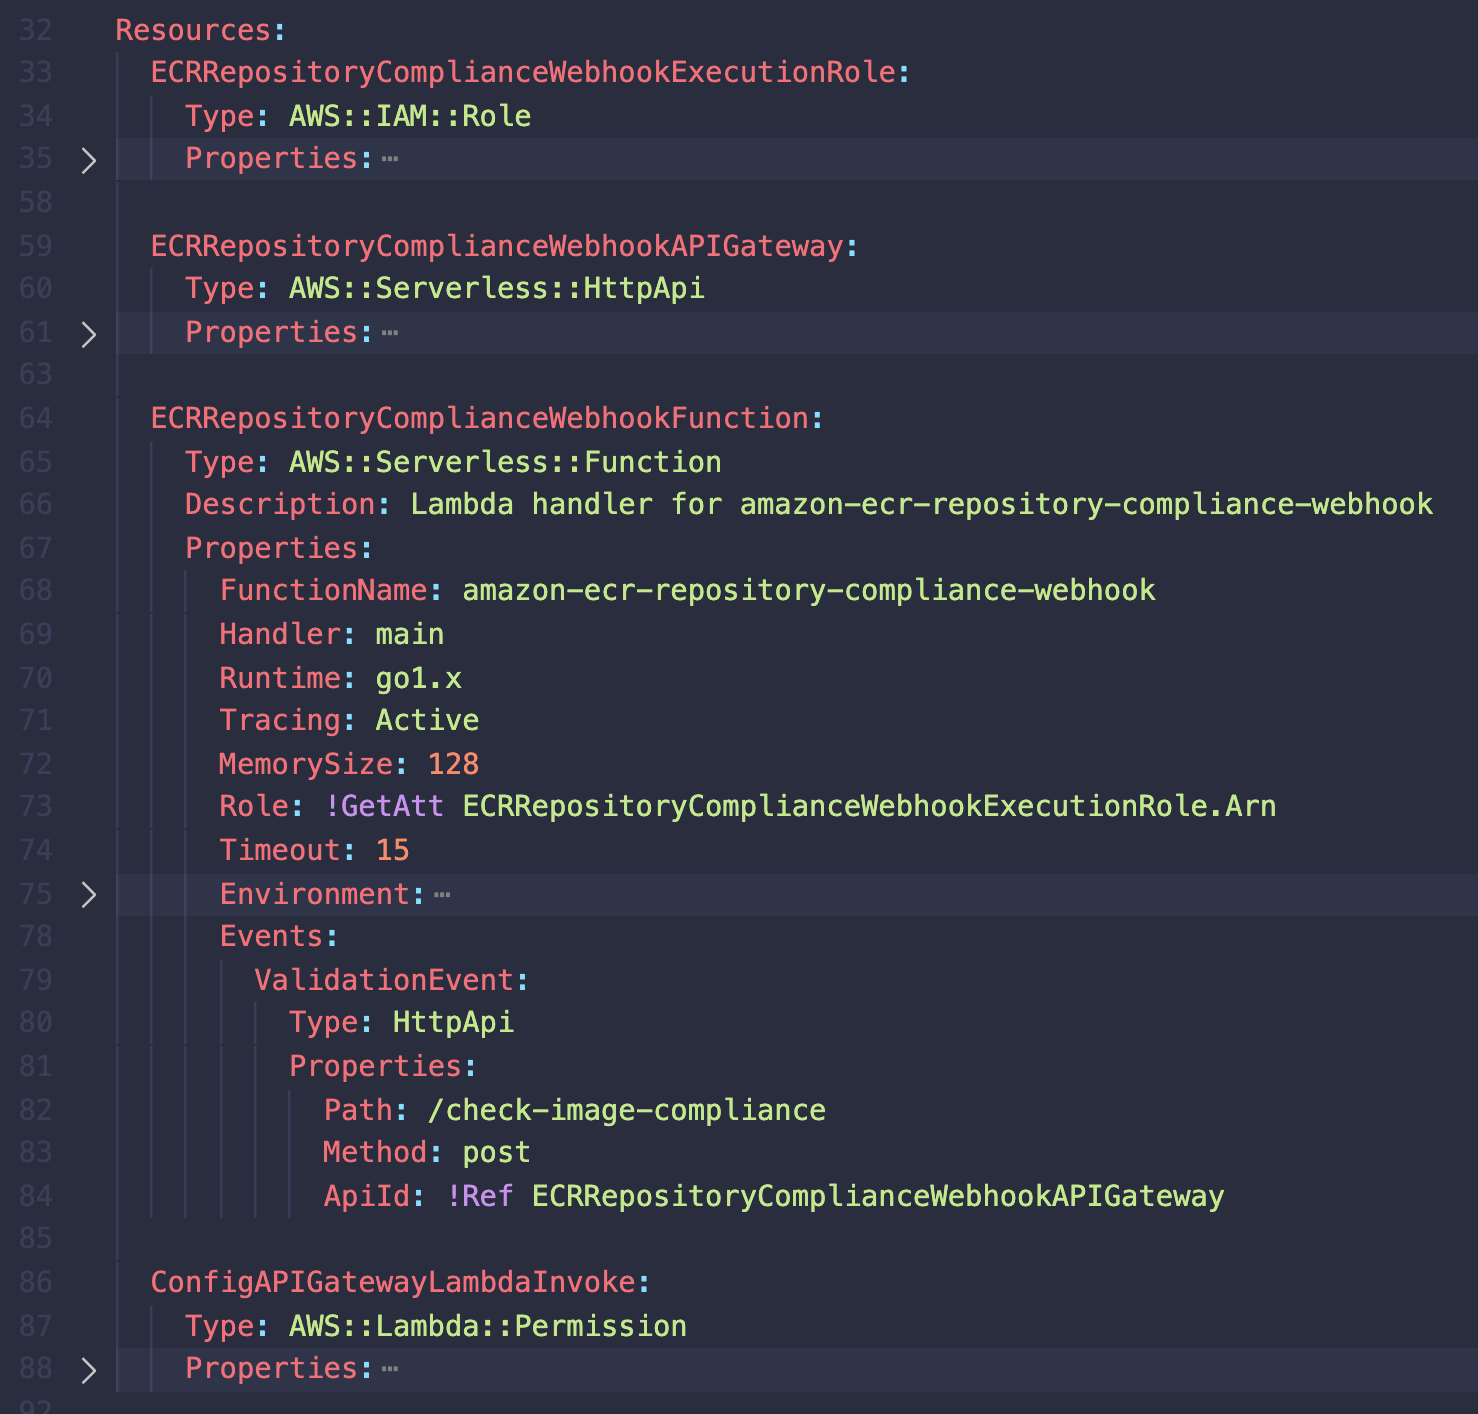
Next, we will use an AWS SAM template to launch each component of the webhook. AWS SAM provides you with a simple and clean syntax to describe the functions, APIs, permissions, configurations, and events that make up a serverless application. We will use it to extend the functionality of CloudFormation. The resources we have specified will package our code for the Lambda function, provision our API Gateway, and establish the corresponding roles and permissions.
Finally, run the following command to deploy this template in your Region:
make sam-deployVerify that the webhook is functioning correctly by following the same steps in the “Deploying and Testing the Serverless Admission Webhook” section above.
Security considerations
Before deploying this solution to a production environment, it is important to consider how this architecture will affect the security of your environment. We currently have no measures to ensure that requests to the webhook are coming from the Kubernetes cluster. As a result, malicious users could spoof requests to the API Gateway and charge our account for its usage. To address this, let’s look at some steps we can take to secure our deployment.
Managed cluster
When using a managed Kubernetes service provider like EKS, the control plane is a managed component of your Kubernetes cluster. You only need to focus on the workloads in your cluster’s data plane. This configuration also means that users are only able to change security settings by editing the control plane. As of May 2020, this means that users cannot guarantee that requests to the API Gateway are coming from the cluster. Thus, this solution is currently only suggested as a reference implementation.
Self-managed cluster
If you are responsible for the administration of your cluster’s control plane (kube-apiserver, etcd nodes, networking, etc), then you are able to set certain flags on your Kubernetes API server before starting it to authenticate requests to the webhook. The AdmissionConfiguration objects allow you to set plugin configuration values for how the ValidatingAdmissionWebhook admission controller will authenticate its requests. Similar to how you grant kubectl access and contexts to different Kubernetes clusters, a kubeconfig can be passed. This makes it possible to pass a token or an API Gateway API key.
Cleaning up
To avoid incurring future charges, delete the CloudFormation stack by running make destroy-stack or this command using the AWS CLI:
aws --region us-east-2 cloudformation delete-stack --stack-name amazon-ecr-repository-compliance-webhookConclusion
By creating a serverless admission webhook with API Gateway and Lambda, our cluster has gained improved security controls. Now we can deny non-compliant deployments in a scalable, highly available, and secure architecture. You can solve even more problems by manipulating any Kubernetes object with the ValidatingAdmissionWebhook and MutatingAdmissionWebhook resources. We hope that this introduction provides a foundation to continue building functionality for your EKS projects.