Containers
Getting visibility into your Amazon EKS Cross-AZ pod to pod network bytes
Introduction
Many customers use Amazon Elastic Kubernetes Service (Amazon EKS) to host their mission-critical applications. As a best practice, we ask our customers to spread their applications across multiple distinct availability zones (AZ).
Because “everything fails all the time,” Werner Vogel, CTO, Amazon
To achieve high availability, customers deploy Amazon EKS worker nodes (Amazon EC2 instances) across multiple distinct AZs. To complement this approach, we recommend customers to implement Kubernetes primitives, such as pod topology spread constraints to achieve pod-level high availability as well as efficient resource utilization.
Often, customers run multiple applications within a single Amazon EKS cluster. Those applications represent large numbers of pods that are scattered across worker nodes and multiple distinct AZs. It’s natural for those applications to communicate in patterns such as application programming interface (API) to API.
It also becomes inevitable for pods to communicate with other pods across multiple distinct AZs and generate cross-availability zone (cross-AZ) data transfer.
One key challenge that customers face is reasoning cross-AZ pod-to-pod network communication patterns and their associated sum of network bytes.
In this post, we show you a solution based on querying and joining two data sources: Amazon Virtual Private Cloud (Amazon VPC) flow logs and an extracted Amazon EKS cluster pods metadata list. The query creates a cross-AZ pod-to-pod network flow table view (including a sum of the egress network bytes).
This post contains a detailed step-by-step walkthrough that builds the solution’s environment.
The following questions are answered with this solution:
- How many network bytes did pod A send to pod B (Egress) ? (Explicit)
- Which cross-AZ pod-to-pod flows does my application (Labeled: Key=app) perform? (Implicit)
Let’s look deeper into the solution and its constructs.
Solution overview
Our solution is based on two boilerplates:
- An Amazon VPC and an Amazon EKS cluster, deployed with the Amazon VPC Container Network Interface (CNI) plugin for Kubernetes. (Currently, this is the only supported Networking CNI plugin for this solution).
- A Python-based AWS Cloud Development Kit (AWS CDK) stack that implements an AWS Lambda function, Amazon Athena tables and queries, and all other required resources and configurations.
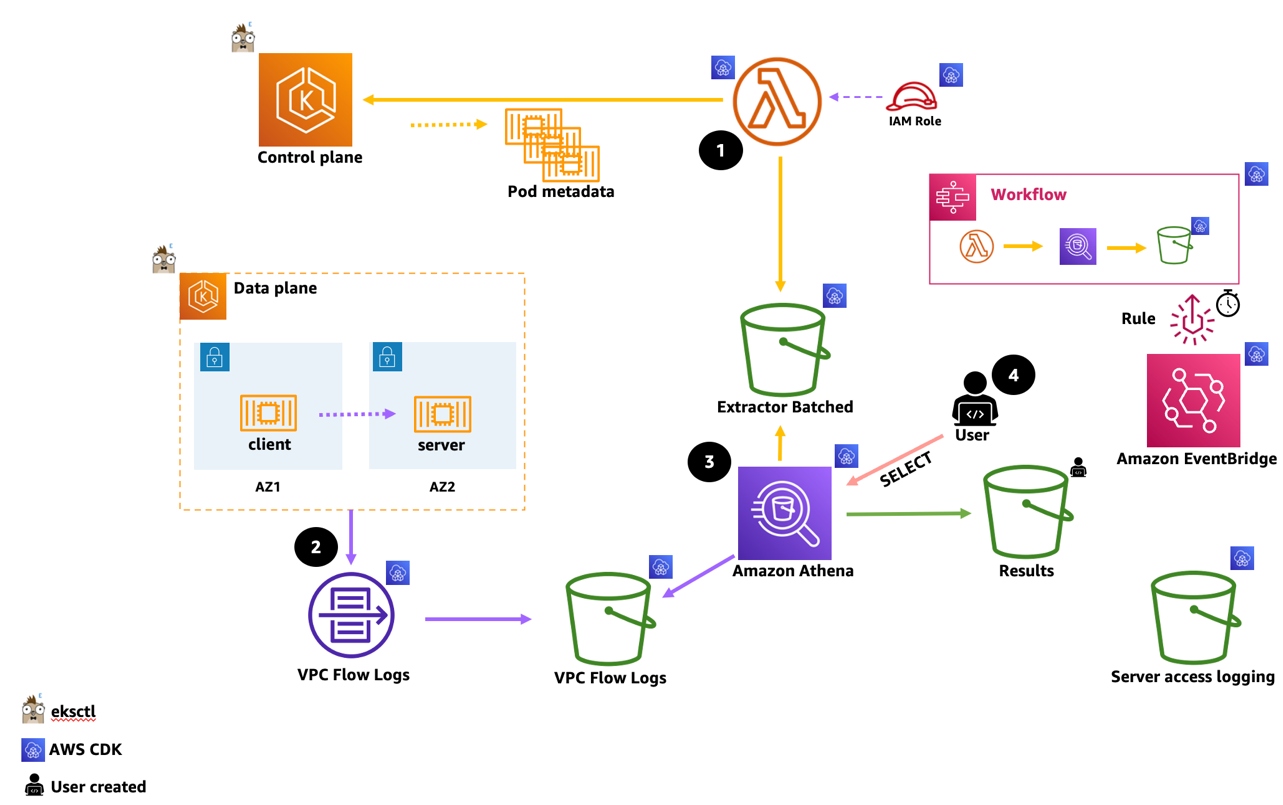
The following diagram depicts how the extract, transform, store, and query process occurs.
(This flow represents an interactive console user that manually executes steps 1, 3, 4).
- The Pod Metadata Extractor lambda function connects to the EKS Cluster API endpoint.
(It authenticates and authorizes using a designated, attached AWS Identity and Access Management (AWS IAM) Role mapped to a k8s RBAC identity). We follow the least privilege paradigm that allows only the get and list API verbs. The extracted data is then transformed and stored on an Amazon S3 bucket in CSV format.
- VPC Flow logs are enabled on the VPC level, records are aggregated and stored on an Amazon S3 Bucket. (This flow is a continues and in-depended of flow 1 above).
- Execution of the Amazon Athena-named query joins both data sources. The query then transforms and aggregates the enriched result, and stores it in a parquet format on an Amazon S3 bucket.
- Lastly, the user executes a simple SELECT query which returns the cross-AZ pod-to-pod data records and their corresponding sum of transferred network bytes (Egress) column. Results are displayed on screen and saved into a designated user configured Amazon S3 bucket. Amazon EventBridge uses a scheduled rule (i.e., hourly), executing a step function state machine workflow that automates Steps 1 and 3, and stores the results on a pre-created Amazon S3 bucket.
Walkthrough
The walkthrough consists of three main steps:
Step 1: Deployment of the Amazon EKS cluster
Step 2: Deployment of the AWS CDK stack
Step 3: Execution and Query (AWS Lambda and Amazon Athena queries)
Prerequisites
- An AWS account
- Shell environment with AWS CLI installed and configured (e.g., cloud9)
- IAM role with policy permissions, that deploys the Amazon EKS cluster, and the AWS CDK resources
- Kubectl
- Amazon EKS command line tool (eksctl) (installed and configured)
- Python3 and Node Package Manager (NPM)
- AWS CDK and its dependencies (provided in Step 2)
- Amazon Athena query results Amazon S3 bucket (interactive execution)
Step 1: Deploy an Amazon EKS cluster
Set the environment
Generate the ClusterConfig
Deploy the cluster
Get the worker nodes and their topology zone data
Example output:
Clone the application repo
Deploy the demo application
Explore the demoapp YAMLs. The application consists of a single pod (i.e., http client) that runs a curl http loop on start. The target is a k8s service wired into two nginx server pods (Endpoints). The server-dep k8s deployment is implementing pod topology spread constrains, spreading the pods across the distinct AZs.
Validate the demo application
Example output:
Validate that the server pods are spread across nodes and AZs
Example output:
Step 2: Deploy the AWS CDK stack
Create a Python virtual environment and install the dependencies.
Our AWS CDK stack requires the VPC ID and the Amazon EKS cluster name
Deploy the stack
Authorize the AWS Lambda function (k8s client)
Let’s get the Pod Metadata Extractor IAM Role. (Used by the AWS Lambda function to authenticate and authorize when connecting to the Amazon EKS cluster API.)
Create a ClusterRole and binding for the Pod Metadata Extractor AWS Lambda function.
Append a role mapping to ConfigMap/aws-auth
⚠ We recommend using eksctl, or another tool, to edit the ConfigMap. For information about other tools you can use, see Use tools to make changes to the aws-auth ConfigMap in the Amazon EKS best practices guides. An improperly formatted aws-auth ConfigMap can cause you to lose access to your cluster.
Validate
Expected output:
At this point, kindly wait a few minutes to allow the VPC Flow Logs to be published, then continue to step 3.
Step 3: Execute, query, and review results
The step functions workflow invokes the AWS Lambda function, and if successful, will run the Amazon Athena named query.
For this post’s walkthrough, we force a manual execution that’s interactive.
Head over to the AWS Console Step Functions area and:
- Select the pod-metadata-extractor-orchestrator state machine
- On the Execution pane, select the Start execution, accept defaults, and select Start execution
- After few seconds, the Graph inspector should appear similar to the following diagram:

- Inspect the output results stored on the pre-created Amazon S3 Bucket. (You can get the bucket name by Inspecting the Definition tab of the pod-metadata-extractor-orchestrator state machine).
Example output:
The step function allows you to implement a batch process workflow that is used to query the results and visualize or analyze them for multipurpose use cases. In the next section, we run the entire process manually and interactively to view the query results on the Amazon Athena console.
Viewing the process and results interactively
- Head over to the Amazon Athena section. (Query results bucket should have been set, see Prerequisites section. This should be a transient In-Region Amazon S3 bucket for the purpose of viewing the results, interactively).
- On the Amazon Athena query pane, start a new query (+ Sign), and execute or run the below query:
Expected output:

Examine the results!
Considerations
- Cost: While the blueprints use minimal resources, deploying them incurs cost.
- The Pod Metadata Extractor AWS Lambda function retrieves all pods (labeled: app) across all namespaces, which adds extra load on the API servers. Enable and observe control plane metrics to optimize the interval and time that the workflow will be executed. In large-scale busy clusters, consider scoping the function to get pods in a specific namespace(s).
- In Amazon EKS clusters where pod churn is high results may be inconsistent. In this use case, consider running the workflow more frequently.
- All S3 buckets will ship server access logs to a designated S3 logs bucket.
As a best practice, by default the logs S3 bucket will have no read permission. - The CDK stack (by default) will generate IAM managed policies which do not restrict resource scope. It will also create IAM entities which contains wildcard permissions.
This default approach is too permissive and is only used for demonstration purposes. - If you would like to implement this solution (or part of it) in production, we highly recommend following the IAM best practices, adhering to the least privilege principle.
- The solution was neither designed to be used as a chargeback nor for any billing purposes.
Cleanup
Destroy the AWS CDK stack
If no longer needed, delete the unneeded S3 buckets.
Destroy the Amazon EKS cluster
Conclusion
In this post, we showed you a solution that provides a cross-AZ, pod-to-pod network bytes visibility inside an Amazon EKS cluster using the AWS VPC CNI plugin. We wanted to emphasize that we built this solution after speaking with many AWS customers. Based on this feedback, a core design tenet was to introduce a solution that doesn’t require customers to deploy any operational k8s constructs. Those constructs (daemonSets, deployments) often mandate privileged access to the underlying nodes and their network namespace.
We can’t wait to see how the community responds to this solution, and we would love to review your pull requests!