These use cases can both be met without vending IAM user accounts or credentials for each user and machine that needs to access Amazon EKS.
In this post, we’ll walk through how to use X.509 certificates as the root of trust for obtaining temporary AWS credentials to access resources in the Amazon EKS Cluster.
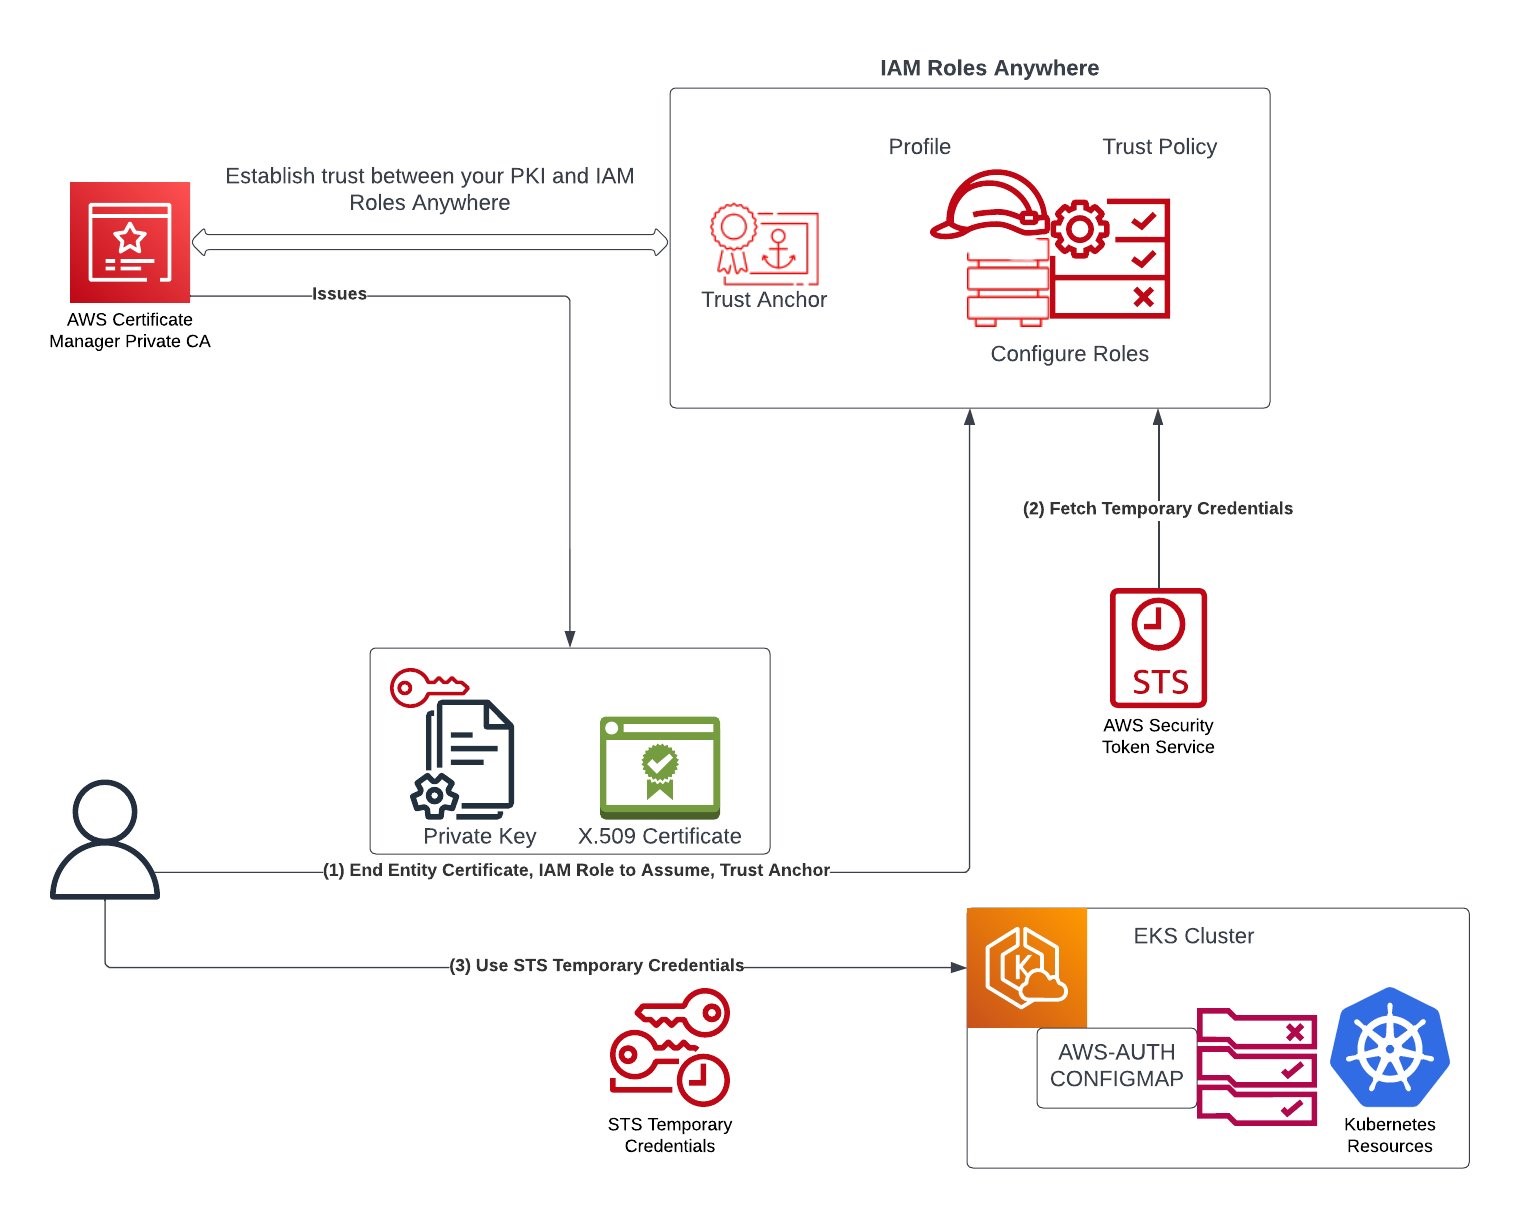
(1) IAM Roles Anywhere relies on public key infrastructure (PKI) to establish trust between your AWS account and certificate authority (CA) that issues end entity certificate. A user wanting to access the cluster resources presents X.509 certificates to IAM Roles Anywhere. The certificates are issued by a CA that you register as a trust anchor (root of trust) in IAM Roles Anywhere. The CA can be part of your existing PKI system, or can be a CA that you created with AWS Certificate Manager Private Certificate Authority (ACM PCA).
Let’s now implement this solution step-by-step. The goal that we want to achieve is to use a X.509 certificate to get read-only access to Amazon EKS Cluster.
1. Switch to working directory, modify name of the Country, Organization, OrganizationUnit, State, Locality, and CommonName before running the following command to create the CA configuration file as ca_config.json.
2. Create an AWS PCA using the ca_config.json file created in last step:
export CA_ARN=$(aws acm-pca create-certificate-authority --certificate-authority-configuration \
file://ca_config.json --certificate-authority-type "ROOT" \
--idempotency-token $(uuidgen) \
--tags Key=Name,Value=MyTestPCA \
--output text --query CertificateAuthorityArn)
View the CA Amazon Resource Name (ARN) by running echo $CA_ARN.
3. Generate a certificate signing request (CSR):
aws acm-pca get-certificate-authority-csr --certificate-authority-arn ${CA_ARN} --output text > ca.csr
4. Using the CSR from the previous step as the argument for the --csr parameter, issue the root certificate:
export ROOT_CERT_ARN=$(aws acm-pca issue-certificate \
--certificate-authority-arn ${CA_ARN} \
--csr fileb://ca.csr \
--signing-algorithm SHA256WITHRSA \
--template-arn arn:aws:acm-pca:::template/RootCACertificate/V1 \
--validity Value=365,Type=DAYS \
--output text --query CertificateArn)
Note: If you are using AWS CLI version 1.6.2 or previous, then use the prefix file:// when specifying the required input file. This ensures that AWS Private CA parses the Base64-encoded data correctly.
5. Retrieve the root certificate:
aws acm-pca get-certificate \
--certificate-authority-arn ${CA_ARN} \
--certificate-arn ${ROOT_CERT_ARN} \
--output text > root_cert.pem
6. Install the root certificate to the CA:
aws acm-pca import-certificate-authority-certificate \
--certificate-authority-arn ${CA_ARN} \
--certificate fileb://root_cert.pem
Now when you run the following, you should see the CA status changing to ACTIVE:
aws acm-pca describe-certificate-authority --certificate-authority-arn ${CA_ARN} --query CertificateAuthority.Status
Step 2: Generate an end user certificate signed with AWS PCA
1. We’ll use OpenSSL command to generates a Certificate Signing Request (CSR) and a private key for a certificate:
openssl req -out csr.pem -new -newkey rsa:2048 -nodes -keyout private-key.pem
You can optionally inspect the content of the CSR by running openssl req -in csr.pem -text -noout.
2. The following command creates a certificate, because no template is specified, an end-entity certificate is issued by default. Update certificate-authority-arn with the PCA ARN created earlier. Adjust the value of --validity in alignment with your organization’s security policies. In this example, we have set the certificate to expire after 7 days.
export CERTIFICATE_ARN=$(\
aws acm-pca issue-certificate --certificate-authority-arn ${CA_ARN} \
--csr fileb://csr.pem \
--signing-algorithm "SHA256WITHRSA" \
--validity Value=7,Type="DAYS" --query CertificateArn --output text)
Run echo $CERTIFICATE_ARN to view the ARN of the certificate that was issued.
3. Retrieve the certificate locally, and save it as cert.pem:
aws acm-pca get-certificate \
--certificate-authority-arn ${CA_ARN} \
--certificate-arn ${CERTIFICATE_ARN} --output text --query Certificate > cert.pem
Step 3: Create an IAM Role Anywhere with Trust Anchor as AWS PCA
1. To use AWS Identity and Access Management Roles Anywhere for authentication to AWS from your workloads that run outside of AWS such as servers, containers, and applications, you first create a trust anchor with the source as the AWS Private CA created in step 1 above.
export TRUST_ANCHOR_ARN=$(aws rolesanywhere create-trust-anchor --name "RolesAnywhereTrustAnchor" \
--source "sourceType=AWS_ACM_PCA,sourceData={acmPcaArn=${CA_ARN}}" \
--enabled --output text --query trustAnchor.trustAnchorArn)
2. Create an AWS IAM role with appropriate permissions to assume after authenticating to IAM Roles Anywhere.
Create and save the following trust policy as rolesanywhere-trust-policy.json. In this example, we are restricting authorization based on attributes that are extracted from the X.509 certificate and Roles Anywhere trust anchor ARN. Please modify the value of aws:PrincipalTag/x509Issuer/CN based on what you define in Step-1 above. Please refer Roles Anywhere Trust Model to additionally define the trust policy to limit the access based on principle of least privilege as applicable to your organization’s context.
cat <<EoF> ./rolesanywhere-trust-policy.json
{
  "Version": "2012-10-17",
  "Statement": [
    {
      "Effect": "Allow",
      "Principal": {
        "Service": "rolesanywhere.amazonaws.com"
      },
      "Action": [
        "sts:AssumeRole",
        "sts:SetSourceIdentity",
        "sts:TagSession"
      ],
      "Condition": {
        "StringEquals": {
          "aws:PrincipalTag/x509Issuer/CN": "www.example.com"
        },
        "ArnEquals": {
          "aws:SourceArn": [
            "$TRUST_ANCHOR_ARN"
          ]
        }
      }
    }
  ]
}
EoF
Create and save the following identity-based policy as rolesanywhere_policy.json. This grants the role permissions to describe and list Amazon EKS clusters.
cat <<EoF> ./rolesanywhere_policy.json
{
  "Version": "2012-10-17",
  "Statement":
    [
      {
        "Effect": "Allow",
        "Action": ["eks:DescribeCluster", "eks:ListClusters"],
        "Resource": "*"
      }
    ]
}
EoF
Run the following AWS CLI commands to create the role and attach the permissions policy:
export ROLE_ARN=$(\aws iam create-role \
--role-name EKSReadOnlyRoleAnywhereTest \
--assume-role-policy-document file://rolesanywhere-trust-policy.json \
--output text --query Role.Arn)
aws iam put-role-policy \
--role-name EKSReadOnlyRoleAnywhereTest \
--policy-name rolesanywhere-inline-policy \
--policy-document file://rolesanywhere_policy.json
3. Create an AWS IAM Roles Anywhere Profile:
export PROFILE_ARN=$(aws rolesanywhere create-profile \
--name EKSReadOnlyAnywherePolicyTest \
--role-arns ${ROLE_ARN} --enabled \
--output text --query profile.profileArn)
Optionally, you can define session policies to further scope down the sessions delivered by AWS IAM Roles Anywhere. This is particularly useful when you configure the profile with multiple roles and want to restrict permissions across all the roles. You can add the desired session polices as managed policies or inline policy (e.g., you can add an inline policy to only allow requests coming from specified IP addresses only).
Step 4: Create Amazon EKS Cluster with identity mapping with created AWS IAM role
1. As a cluster administrator, create a Amazon EKS Cluster and note the cluster name created:
Note: The above command creates the Amazon EKS Cluster with Kubernetes version 1.23+. Please ensure your version of kubectl corresponds to the version of Kubernetes installed as mentioned here.
2. As a cluster administrator, map the AWS IAM role created in step-3 above with a Kubernetes user:
eksctl create iamidentitymapping --cluster ${CLUSTER_NAME} --arn ${ROLE_ARN} --username viewk8
3. As a cluster administrator, bind the user created with view clusterRole, which grants the Kubernetes user and hence the AWS IAM Role as read-only access to see most objects in a namespace:
kubectl create clusterrolebinding cluster-view-role-binding \
--clusterrole view --user viewk8
Testing
1. As a test user (who wants to use the X.509 certificate to access the Amazon EKS cluster that’s created in read-only mode), run the credential helper tool to get temporary AWS credentials:
./aws_signing_helper credential-process --private-key private-key.pem --certificate cert.pem --profile-arn ${PROFILE_ARN} --trust-anchor-arn ${TRUST_ANCHOR_ARN} --role-arn ${ROLE_ARN}
From the above output, set AccessKeyId as AWS_ACCESS_KEY_ID, SecretAccessKey as AWS_SECRET_ACCESS_KEY, and SessionToken as AWS_SESSION_TOKEN in the environment variables for testing.
2. Create or update a kubeconfig file for the EKS cluster created by the administrators in step-4 above.
aws eks update-kubeconfig --name ${CLUSTER_NAME}
3. Call aws sts get-caller-identity to confirm that the assumed role is what you created in step-3 above. You should be able to run kubectl get ns successfully; however, when you run kubectl create ns test you should get access denied.
kubectl get ns
NAME              STATUS   AGE
default           Active   41m
kube-node-lease   Active   41m
kube-public       Active   41m
kube-system       Active   41m

kubectl create ns foo
Error from server (Forbidden): namespaces is forbidden: User "viewk8" cannot create resource "namespaces" in API group "" at the cluster scope
Auditing
It’s important for the customers to gain visibility into AWS account activity including API calls to Kubernetes API server for security and operational best practices to audit user actions. AWS Identity and Access Management Roles Anywhere is integrated with AWS CloudTrail, a service that provides a record of actions taken by a user, role, or an AWS service in IAM Roles Anywhere. AWS CloudTrail captures all API calls for AWS IAM Roles Anywhere as events. CreateSession API authenticates requests with a signature using keys associated with the X.509 certificate, which is used for authentication. The API method of AWS IAM Roles Anywhere, CreateSession acts like AssumeRole — exchanging the signature for a standard SigV4-compatible session credential. Let’s look at how AWS IAM Roles Anywhere provides temporary credentials, and how we can track user activities by analyzing AWS and Kubernetes APIs.
- We used the credential helper tool (
./aws_signing_helper credential-process …) to obtain temporary security credentials from AWS Identity and Access Management Roles Anywhere. This tool is compatible with the credential_process feature available across the language Software Development Kits (SDKs) Refer to AWS IAM Roles Anywhere documentation to learn how to get the credential helper tool. This helper tool manages the process of creating a signature using keys associated with the X.509 certificate and calling the endpoint to obtain session credentials; it returns the credentials to the calling process in a standard JSON format.
- Now, let’s look at some AWS CloudTrail log entries for the activities we performed earlier. We will look at
CreateSession log entry, which is called through the credential helper tool and returns session credentials back. You can see end user X.509 certificate and source IP part of request parameters, and response elements includes AWS temporary credentials and assumedRoleUser with session ID at the end of ARN. Session id is same as the serial number of end user X.509 certificate (c8:……:b1:92). Note down this session ID as we need this session id to co-relate the action end user is performing on Amazon EKS by looking at Amazon EKS Audit logs. You can see the sourceIdentity identifies the user as CN=user1.example.com:
{
    ......
    ......
    "eventSource": "rolesanywhere.amazonaws.com",
    "eventName": "CreateSession",
    "awsRegion": "us-east-1",
    "*sourceIPAddress*": "xxx.xxx.xxx.xxx",
    .....
    "requestParameters": {
        "*cert*": "MIIEQDCCAyigAwI..........VYw",
        "durationSeconds": 3600,
        "profileArn": "arn:aws:rolesanywhere:us-east-1:ACCOUNT_NUMBER:profile/PROFILE_ID",
        "roleArn": "arn:aws:iam::ACCOUNT_NUMBER:role/EKSReadOnlyRoleAnywhereTest",
        "trustAnchorArn": "arn:aws:rolesanywhere:us-east-1:ACCOUNT_NUMBER:trust-anchor/TRUST_ANCHOR_ID"
    },
    "responseElements": {
        "credentialSet": [
            {
                "assumedRoleUser": {
                    "arn": "arn:aws:sts::ACCOUNT_NUMBER:assumed-role/EKSReadOnlyRoleAnywhereTest/00c80...........b192",
                    "assumedRoleId": "AROA..............ADE:00c80...........b192"
                },
                "*credentials*": {
                    "accessKeyId": "AS.............Z",
                    "expiration": "2022-09-08T18:37:31Z",
                    "secretAccessKey": "HIDDEN_DUE_TO_SECURITY_REASONS",
                    "sessionToken": "IQoJb................JrgE"
                },
                "packedPolicySize": 80,
                "*roleArn*": "arn:aws:iam::ACCOUNT_NUMBER:role/EKSReadOnlyRoleAnywhereTest",
                "*sourceIdentity*": "CN=user1.example.com"
            }
        ],
    ......
    ......
}
- After setting
AWS_ACCESS_KEY_ID, AWS_SECRET_ACCESS_KEY, and AWS_SESSION_TOKEN, you can run aws sts get-caller-identity to confirm the identity of the user, which should match with assumedRoleUser in the CreateSession AWS CloudTrail log entry.
- When user runs
kubectl command, then kubectl uses the current AWS identity to call the Kubernetes API, which will be logged into Kubernetes audit logs if audit logging is enabled on your cluster. For kubectl create ns foo that we ran in the instructions above that gave us access forbidden message, the following audit log entry gets generated as sample. You’ll notice that under this audit log entry at extra.canonicalArn corresponds to arn:aws:iam::AWS_ACCOUNT_ID:role/EKSReadOnlyRoleAnywhereTest as the role that was assumed to make the Kubernetes API call.
{
  "kind": "Event",
  "apiVersion": "audit.k8s.io/v1",
  "level": "RequestResponse",
  "auditID": "bfa4fb9a-6669-4fb3-b84b-2fb39640fddb",
  "stage": "ResponseComplete",
  "requestURI": "/api/v1/namespaces",
  "verb": "create",
  "user": {
    "username": "viewk8",
    "uid": "aws-iam-authenticator:AWS_ACCOUNT_ID:AROAUICQPHFVMY7Y5RTBR",
    "groups": [
      "system:authenticated"
    ],
    "extra": {
      "accessKeyId": [
        "MASKED"
      ],
      "arn": [
        "arn:aws:sts::AWS_ACCOUNT_ID:assumed-role/EKSReadOnlyRoleAnywhereTest/00c80...........b192"
      ],
      "canonicalArn": [
        "arn:aws:iam::AWS_ACCOUNT_ID:role/EKSReadOnlyRoleAnywhereTest"
      ],
      "sessionName": [
        "00c80...........b192"
      ]
    }
  },
  "sourceIPs": [
    "xx.xx.xx.xxxx"
  ],
  "userAgent": "kubectl/v1.17.9 (darwin/amd64) Kubernetes/4c69767",
  "objectRef": {
    "resource": "namespaces",
    "apiVersion": "v1"
  },
  "responseStatus": {
    "metadata": {},
    "status": "Failure",
    "reason": "Forbidden",
    "code": 403
  },
  "responseObject": {
    "kind": "Status",
    "apiVersion": "v1",
    "metadata": {},
    "status": "Failure",
    "message": "namespaces is forbidden: User \"viewk8\" cannot create resource \"namespaces\" in API group \"\" at the cluster scope",
    "reason": "Forbidden",
    "details": {
      "kind": "namespaces"
    },
    "code": 403
  },
  "requestReceivedTimestamp": "2022-10-20T19:53:43.433177Z",
  "stageTimestamp": "2022-10-20T19:53:43.440665Z",
  "annotations": {
    "authorization.k8s.io/decision": "forbid",
    "authorization.k8s.io/reason": ""
  }
}
Cleaning up
Delete the resources creates in the blog to avoid incurring costs.
1. Delete the EKS Cluster
eksctl delete cluster –name ${CLUSTER_NAME}
2. Disable private CA
aws acm-pca update-certificate-authority --certificate-authority-arn ${CA_ARN} –status DISABLED
3. Delete private CA
aws acm-pca delete-certificate-authority --certificate-authority-arn ${CA_ARN} --permanent-deletion-time-in-days 7
Conclusion
In this post, we discussed how AWS IAM Roles Anywhere service helps you manage Amazon EKS Clusters with X.509 certificates. This allows you to bridge between the use of X.509 certificates and AWS IAM for controlling access to Amazon EKS clusters.
If you have any questions, you can start a new thread on AWS re:Post or reach out to AWS Support.