Containers
Reduce container startup time on Amazon EKS with Bottlerocket data volume
Introduction
Containers have become the go-to solution for deploying modern and scalable applications. The boot time of these containers can present a significant challenge, particularly when dealing with workloads that require large container images. For instance, data analytics and machine learning workloads often involve images that exceed 1 GiB in size. When running these types of workloads, like Generative AI, on Amazon Elastic Kubernetes Service (Amazon EKS), it can take several minutes to pull and extract these large images from an image registry like Amazon Elastic Container Registry (Amazon ECR). This can negatively impact performance, leading to a poor user experience.
There is an existing post that introduced how to start pods faster by prefetching images . It uses Amazon EventBridge and AWS System Manager to cache container images on nodes and to update the cache as new images get pushed to the image registry. It works well for the existing worker nodes and ongoing image caching. But with new worker nodes added as the cluster scales up, it takes time to pull all images to the new worker nodes.
In this post, we explore a solution to tackle this challenge by using instances running with Bottlerocket, which is an open-source Linux-based operating system (OS) designed by AWS specifically for running containers that helps reduce the container startup time of large images.
Solution overview
When the container runtime initiates a new container, it first checks the local disk for the necessary image contents. This is the default behavior unless the image pull policy is explicitly set to Always, which forces the system to always pull the image from the image repository.
If the image is not present locally, then it pulls the image from the image repository. This retrieval process can take several minutes or even longer, particularly for larger images that are several gigabytes (GBs) in size.
There are several options to speed up the container image retrieval process, which include to:
- Minimize the size of the container image by choosing a slim base image;
- Use multi-stage builds to get rid of unnecessary intermediate contents;
- Speed up the container image downloading, for example by adopting a larger instance size with higher bandwidth;
- Prefetch the container image contents locally to eliminate the need of image downloading;
In some scenarios, the container image is still large in size even after we apply the previous options 1 and 2. Obviously, option 4 is a faster and cost-efficient choice for such scenario.
In this post, we delve into how the data volume feature of the Bottlerocket operating system can be utilized to prefetch container images. This potentially saves minutes before a container can be started, especially in some scenarios like data analysis and AI/ML.
What is Bottlerocket?
Bottlerocket is a Linux-based open-source operating system that is purpose-built by Amazon Web Services for running containers. It is designed to be secure, consistent and operational efficiently.
Bottlerocket has two volumes: an OS volume and a data volume. The OS volume is used for storing OS data and the booting images. Bottlerocket boots from exactly the same OS image every time to guarantee consistency. While the data volume is used for storing container meta data and storage like images and ephemeral volumes. You can explore the documentation here if you would like to learn more about Bottlerocket.
Why do we choose Bottlerocket?
Amazon EKS provides pre-built Amazon EKS optimized Amazon Machine Images (AMIs) for Amazon Linux and Bottlerocket. Amazon Linux AMIs is the default and most popular AMI of Amazon EKS managed node groups. However, it has only one volume shared by the OS and container data by default. Unlike Amazon Linux AMIs, Bottlerocket AMIs provides a volume for container data natively.
Thanks to the design of Bottlerocket, we can easily attach a data volume with prefetched images, separating from the cycle of the OS binary update and security patching.

Figure 1. Volumes of Bottlerocket.
Source: Bottlerocket – a container-optimized Linux.
How do we prefetch container images?
In this solution, we take an Amazon Elastic Block Store (Amazon EBS) snapshot of the Bottlerocket data volume, and reuse this snapshot in an Amazon EKS node group so that all necessary images are already prefetched in local disk once the worker node starts.
The previous processes are automated via a script and details in the following details:
- Spin up an Amazon Elastic Compute Cloud (Amazon EC2) instance with Amazon EKS optimized Bottlerocket AMI;
- Pull application images from the image repository;
- Take a Amazon EBS snapshot of the Bottlerocket data volume;
- Create an Amazon EKS node groups and map the snapshot to its data volume.
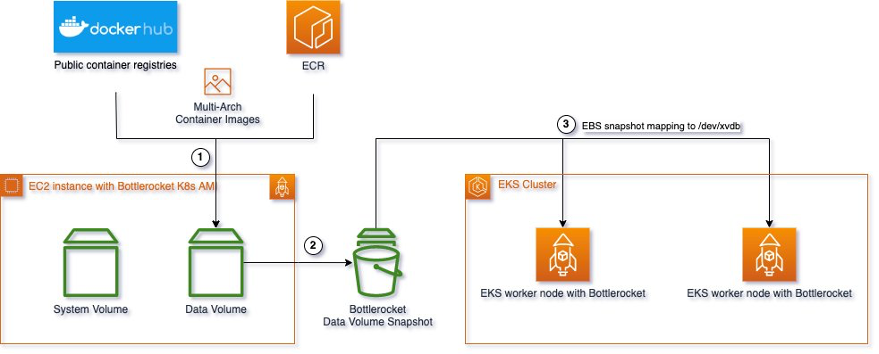
Figure 2. Architecture
Source: Caching Container Images for AWS Bottlerocket Instances
In the next section, we walk you through the whole solution step by step. You’ll learn how you can shorten the container start time and meet your business target more efficiently.
Prerequisites
Before following the instructions below, ensure you have the following:
- An AWS account
- Install the required command line utilities:
- eksctl: 0.147.0
- kubectl: Major: version 1, Minor: version 27, GitVersion: v1.27.2
- Amazon EKS cluster version: 1.24
- jq: jq-1.6
- Optional – Karpenter: v0.31
Set up initial AWS Cloud9 environments
The AWS Cloud9 integrated development environment (IDE) offers a rich code-editing experience with support for several programming languages and runtime debuggers, and a built-in terminal. In this post, we run all the commands in AWS Cloud9 within the AWS Asia Pacific (Tokyo) Region. Here is a setup guideline.
Clone the repository
Run the following command:
Install required the AWS CLI and others
To proceed, you’ll need to install command line tools such as jq, eksctl, kubectl, and AWS Command Line Interface (AWS CLI). Run the following command to install these tools.
Check if the initialization is successful or not.
Set up environment variables
Run the following commands in the AWS Cloud9 terminal:
Walkthrough
Step 1: Build Amazon EBS snapshot for Bottlerocket
In this post, we prefetch the following two images into the Amazon EBS volume:
- ecr.aws/kubeflow-on-aws/notebook-servers/jupyter-pytorch:1.12.1-cpu-py38-ubuntu20.04-ec2-v1.2
- ecr.aws/eks-distro/kubernetes/pause:3.2
We have written a script to automate the Amazon EBS snapshot workflow. This script can be found at ~/environment/containers-blog-maelstrom/bottlerocket-images-cache. Run the following command to start taking snapshot.
Please note that we can put the multiple image URLs into a comma-separated command.
The snapshot.sh script completes the following tasks for you:
- Spins up an Amazon EC2 instance with Amazon EKS optimized Bottlerocket AMI;
- Pulls application images from the image repository;
- Stops the Amazon EC2 instance;
- Takes an Amazon EBS snapshot for the Bottlerocket data volume;
- Deletes the Amazon EC2 instance
It takes approximately 5 minutes to take Amazon EBS snapshots. However, if your image size is larger, then it may take longer. In the end, you’ll have an Amazon EBS snapshot with your required container image prefetched.
Here is a sample of successful output:
Export the Amazon EBS snapshot id to environment variable
You’ll be able to find this Amazon EBS snapshot ID after successfully running the Amazon EBS snapshot command. Export this value as an environment variable for future use.
Step 2: Amazon EKS cluster set up
Create cluster configuration using eksctl
Go to AWS Cloud9 terminal and run the following command, which creates a new Amazon EKS cluster. It takes approximately 15 to 20 minutes to create a new cluster.
Set up managed node group for Bottlerocket
In this YAML file, we created a new Amazon EKS cluster with two Amazon EKS node groups:
- no-prefetch-mng node group launches Amazon EKS node without using the Amazon EBS Snapshot_ID in Step 2, which means that the Amazon EKS node doesn’t have a prefetched image.
- prefetch-mng node group launches Amazon EKS nodes with Amazon EBS Snapshot_ID mapped to /dev/xvdb. This means image is already prefetched in the Amazon EKS node. You can reference the additionalVolumes section in the YAML file for more details.
Connect to the Amazon EKS cluster
Wait for the nodes to be ready
You may use the following command to check whether the nodes are ready.
Wait until the two nodes are in ready status, when you’ll have outputs similar to this:
Step 3: Launch deployment into both node groups
We use the public.ecr.aws/kubeflow-on-aws/notebook-servers/jupyter-pytorch:1.12.1-cpu-py38-ubuntu20.04-ec2-v1.2 image in the Kubernetes deployment. The image size is 4.93 GB. If the worker node hasn’t prefetched the image, then it’ll take some time to download it from Amazon ECR before the pod can start.
To create two pods in each node group, use the following command:
The default image pull policy for container is IfNotPresent, which means that the image is only pulled if it is not already present locally. If the image pull policy is set to Always, the prefetching feature will NOT work.
Check pod events in inflate-no-prefetch
You can use the kubectl get events command to trace the event inside the pod.
Here is the pod events from inflate-no-prefetch deployment:
The pod was scheduled for 2023-08-07T17:13:52Z and started at 2023-08-07T17:14:41Z. It took 49 seconds to start the container, due to the time required to pull a large image from Amazon ECR.
Check pod events in inflate-prefetch
Here is the pod events from inflate-prefetch deployment:
The pod was scheduled for 2023-08-07T17:13:53Z and started at 2023-08-07T17:13:56Z. It took only 3 seconds to start the container because the container image was already present on the Amazon EKS node.
5. Results
By using Bottlerocket to prefetch the large container image, we were able to reduce the time it takes to start a pod from 49 seconds to just 3 seconds.

Figure 3. Comparison with/without the solution
Further reading
Karpenter
Karpenter is an open-source project that automatically scales with the appropriate compute resources to handle the pods scheduling in your Kubernetes cluster. It can also be used to launch a Bottlerocket worker node with the Amazon EBS snapshot. Here is a sample Karpenter provisioner and node template:
Remember to update the stack name in the subnetSelector and the snapshotID in the blockDeviceMappings.
Automation
If you want to start building an Amazon EBS snapshot right after your container image build is complete, then you can run snapshot.sh after the container build in your Continuous Integration (CI) tools. We’ve written a sample automation script using GitHub Actions and pushed the script on GitHub.
We’ve extracted a section of the GitHub Action YAML for explanation purposes. The jobs section is divided into two parts: build_llm_image and build_ebs.
- build_llm_image mainly builds your container image. Since it is a standard Docker build process, we’ll skip this part in the following YAML file.
- build_ebs is the core part of taking an Amazon EBS snapshot.
- In the Configure AWS credentials step, it provides the correct AWS IAM permissions for the GitHub Action runner to run the Amazon EBS snapshot script. The required AWS IAM permission can be found here. When using this AWS IAM policy on production, it is recommended to reduce the permissions as much as possible.
- In the Build EBS Snapshot step, the Amazon EBS snapshot script will begin running.
- In the Commit and Push NodeTemplate step, you’ll obtain an Amazon EBS SNAPSHOT_ID. You can then commit it to your Amazon EKS YAML GitHub repository to update the NodeTemplate.
We have added more descriptions in the full GibHub Action YAML file.
Cleaning up
Amazon EKS cluster and nodes
To avoid any incurring charges if you followed the walkthrough presented in this post, you can run below commands to delete the resources just created.
AWS Cloud9 environment
Please remember to remove the AWS Cloud9 environment. Here is a reference on how to remove it.
Use the following AWS CLI to obtain the AWS Cloud9 environment Id:
You may also use the following CLI for delete the AWS Cloud9 environment. Replace YOUR_CLOUD9_ENV_ID in the following command for deleting the AWS Cloud9 environment:
Amazon EBS snapshots
Use the following AWS CLI to remove the Amazon EBS snapshot that was created by
Conclusion
In this post, we showed you how using the data volume of Bottlerocket instances to prefetch container images can significantly reduce the time required to pull large images from Amazon ECR. This optimization dramatically improved the efficiency and performance of container startup on Amazon EKS by decreasing boot time.
We believe that this solution can be of great benefit to organizations with container workloads that depend on large images and are seeking to enhance application startup performance by reducing boot time. To learn more about Bottlerocket, you can access to the Bottlerocket official website.
Acknowledgement
We would like to extend a heartfelt thank you to my colleague Walkely He and Dongdong Yang, who inspired us and contributed the code that made this post possible.