Containers
Setting up end-to-end TLS encryption on Amazon EKS with the new AWS Load Balancer Controller
In this blog post, I’ll show you how to set up end-to-end encryption on Amazon Elastic Kubernetes Service(Amazon EKS). End-to-end encryption in this case refers to traffic that originates from your client and terminates at an NGINX server running inside a sample app.
I work with regulated customers who need to satisfy regulatory requirements like PCI DSS, HIPAA, and so on. Until recently, I didn’t have simple and effective solution to propose to them. Although it was possible to use ingress controllers like the NGINX Ingress Controller or Traefik fronted by a Network Load Balancer, configuring end-to-end encryption was cumbersome and difficult to automate.
The new AWS Load Balancer manages AWS Elastic Load Balancers for a Kubernetes cluster. The controller provisions an AWS Application Load Balancer (ALB) when you create a Kubernetes Ingress and an AWS Network Load Balancer (NLB) when you create a Kubernetes Service of type LoadBalancer using IP targets on 1.18 or later Amazon EKS clusters.
TLS encryption of ingress traffic to Amazon EKS
One of the ways to intelligently route traffic that originates outside of a cluster to services running inside the cluster is to use Ingress controllers. They are usually fronted by a layer 4 load balancer like the Classic Load Balancer or the Network Load Balancer. The following diagram shows the places in a network where encrypted traffic can be terminated:
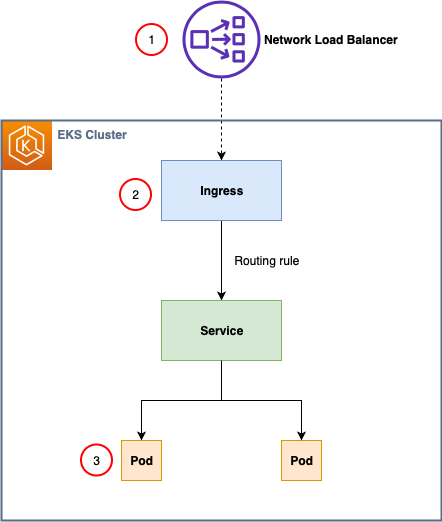
1. Terminate traffic at the load balancer.
2. Terminate traffic at the ingress.
3. Terminate traffic on the pod.
How and where you terminate your TLS connection depends on your use case, security policies, and need to comply with various regulatory requirements.
If there is no strict requirement for end-to-end encryption, try to offload this processing to the Ingress Controller or the NLB. This will help you to optimize the performance of your workloads and make them easier to configure and manage.
In this post, I use a scenario where there is a requirement to have end-to-end TLS encryption and preserve the client IP address. The new AWS Load Balancer Controller supports a Network Load Balancer (NLB) with IP targets for pods running on Amazon EC2 instances and AWS Fargate through Kubernetes service of type LoadBalancer with proper annotation. In this mode, the AWS NLB targets traffic directly to the Kubernetes pods behind the service, eliminating the need for an extra network hop through the worker nodes in the Kubernetes cluster, which decreases latency and improves scalability. Smaller target groups reduces management complexity and makes it less likely you will hit NLB limits in large clusters.
Prerequisites
To complete this tutorial, you need the following:
- An AWS account.
- The AWS Command Line Interface (AWS CLI), with the kubectl and eksctl tools installed and configured. Follow the instructions in Getting started with Amazon EKS – eksctl in the Amazon EKS User Guide.
- Helm CLI.
- The openssl program, a command line tool for using the various cryptography functions of OpenSSL’s crypto library from the shell.
- Set up AWS Certificate Manager Private CA with RSA 2048 selected as the key algorithm in the region where you will perform the rest of the setup.
If you already have these tools installed, be sure to update them before you begin.
Provision an Amazon EKS cluster
You can use the AWS Management Console or AWS CLI, but I recommend using eksctl to provision the cluster. Change node-type and region as appropriate for your environment. Cluster provisioning takes approximately 15 minutes.
This eksctl command creates an Amazon EKS cluster in the us-west-2 Region with Kubernetes version 1.20 and two nodes.
I use the t2.medium instance family in this example. If you’re creating an Amazon EKS cluster in your production environment, use the instance family type appropriate for your needs.
Use the following command to verify the cluster is running and kubectl is properly configured:
Your output should look like this:
NAME STATUS ROLES AGE VERSION
ip-192-168-39-201.us-west-2.compute.internal Ready <none> 4d21h v1.20.4-eks-6b7464
ip-192-168-64-111.us-west-2.compute.internal Ready <none> 4d21h v1.20.4-eks-6b7464
Install AWS Load Balancer Controller
Follow the steps in AWS Load Balancer Controller Installation. You can use Helm or YAML manifests.
Use the following command to verify that AWS Load Balancer Controller is running:
You should see the aws-load-balancer-controller pod is ready with a status of Running:

Installing cert-manager
cert-manager is a Kubernetes add-on to automate the management and issuance of TLS certificates from various issuing sources. It runs within your Kubernetes cluster and will ensure that certificates are valid and, attempt to renew certificates at an appropriate time before these expire.
You can use the regular installation on Kubernetes guide to install cert-manager in you Amazon EKS cluster.
Installing aws-pca-issuer
The AWS PCA Issuer plugin acts as an addon (see https://cert-manager.io/docs/configuration/external/) to cert-manager that signs off certificate requests using AWS Certificate Manager Private Certificate Authority. For installation, please follow following steps.
The AWS PCA Issuer runs on the worker nodes, so it needs access to the AWS ACM resources via IAM permissions. The IAM permissions can either be setup via IAM roles for service accounts or can be attached directly to the worker node IAM roles. In this blog we will use IAM roles for service accounts.
1. Create file pca-iam-policy.json and save the following in it:
 {
   "Version": "2012-10-17",
   "Statement": [
     {
       "Sid": "awspcaissuer",
       "Action": [
         "acm-pca:DescribeCertificateAuthority",
         "acm-pca:GetCertificate",
         "acm-pca:IssueCertificate"
       ],
       "Effect": "Allow",
       "Resource": "arn:aws:acm-pca:<region>:<account_id>:certificate-authority/<resource_id>"
     }
   ]
 }
The latest policy can be found in GitHub.
2. Create and IAM policy called AWSPCAIssuerIAMPolicy
aws iam create-policy \
    --policy-name AWSPCAIssuerIAMPolicy \
    --policy-document file://pca-iam-policy.json
Take note of the policy ARN that is returned
3. Create an IAM role and ServiceAccount for the AWS PCA Issuer, use the ARN from the step above
eksctl create iamserviceaccount \
--cluster=nlb-lab \
--namespace=aws-pca-issuer \
--name=aws-pca-issuer \
--attach-policy-arn=arn:aws:iam::<AWS_ACCOUNT_ID>:policy/AWSPCAIssuerIAMPolicy \
--override-existing-serviceaccounts \
--approve
4. Add the AWS PCA Issuer Helm repository and run helm install command
helm repo add awspca https://cert-manager.github.io/aws-privateca-issuer

helm install aws-pca-issuer awspca/aws-privateca-issuer -n aws-pca-issuer --set serviceAccount.create=false --set serviceAccount.name=aws-pca-issuer
5. Verify that AWS PCA issuer is configured correctly by running following command:
$ kubectl get pods --namespace aws-pca-issuerYou should see the aws-pca-issuer pod is ready with a status of Running:
Create an issuer in Amazon EKS Cluster
Now that the ACM Private CA is active, we can begin requesting private certificates which can be used by Kubernetes applications. We will be using aws-pca-issuer plugin for creating the ClusterIssuer which will be used with the ACM Private CA to issue certificates.
Issuers (and ClusterIssuers) represent a certificate authority from which signed x509 certificates can be obtained, such as ACM Private CA. You will need at least one Issuer or ClusterIssuer before you can start requesting certificates in your cluster. There are two custom resources that can be used to create Issuer inside Kubernetes using the aws-pca-issuer add-on:
- AWSPCAIssuer is a regular namespaced issuer that can be used as a reference in your Certificate custom resources.
- AWSPCAClusterIssuer is specified in exactly the same way, but it does not belong to a single namespace and can be referenced by Certificate resources from multiple different namespaces.
In this blog we will be creating a AWSPCAClusterIssuer. Start with creating a file named cluster-issuer.yaml and save the following in it, replacing arn and region with your own:
apiVersion: awspca.cert-manager.io/v1beta1
kind: AWSPCAClusterIssuer
metadata:
  name: demo-test-root-ca
spec:
  arn: arn:aws:acm-pca:<region>:<account-id>:certificate-authority/<resource_id>
  region: <region>
Deploy the AWSPCAClusterIssuer using following command:
kubectl apply -f cluster-issuer.yamlGenerate a TLS certificate for a backend application
If you own a custom domain, you can sign certificates using certbot and then create a DNS record that points to the provisioned NLB DNS name.
For private networks, development and testing you can use ACM Private CA to issue private certificates.
We will be creating a basic X509 private certificate for our domain.
Create a file named nlb-lab-tls.yaml and save the following in it, (replace nlb-lab.com with your domain):
kind: Certificate
apiVersion: cert-manager.io/v1
metadata:
  name: nlb-lab-tls-cert
spec:
  commonName: www.nlb-lab.com
  dnsNames:
    - www.nlb-lab.com
    - nlb-lab.com
  duration: 2160h0m0s
  issuerRef:
    group: awspca.cert-manager.io
    kind: AWSPCAClusterIssuer
    name: demo-test-root-ca
  renewBefore: 360h0m0s
  secretName: nlb-tls-app-secret
  usages:
    - server auth
    - client auth
  privateKey:
    algorithm: "RSA"
    size: 2048
For certificate with key algorithm of RSA 2048, create the resource using following command:
kubectl apply -f nlb-lab-tls.yamlVerify that the certificate is issued correctly by running following command:
kubectl get certificateYou should see the certificate with a status of Ready in output.
NAME            READY   SECRET                  AGE
nlb-lab-tls-cert   True    nlb-tls-app-secret   12s
You can also run kubectl describe certificate command to check the progress of your certificate.
Deploy the demo application and service
Now deploy the demo application and service to your Amazon EKS cluster. The demo application is a simple NGINX web server configured to return Hello from pod hostname. You can take below complete YAML, and then save it to a file named nlb-tls-app.yaml and apply it to your cluster using following command:
Before you run the command, these are the important parts of the configuration and the changes you need to apply.
In the service object, there are three annotations:
- aws-load-balancer-type instructs AWS Load Balancer Controller to provision the Network Load Balancer for your application.
- aws-load-balancer-proxy-protocol enables proxy protocol version 2 on the Network Load Balancer, which allows the client source IP addresses to be passed to your pod.
- aws-load-balancer-scheme: instructs AWS Load Balancer Controller to provision internet-facing load balancer.
The ConfigMap object contains the following configuration for the NGINX server. Use your Amazon EKS cluster VPC CIDR range in the set_real_ip_from directive. Use your domain name, or if you are using a self-signed certificate, use the DNS name of the Network Load Balancer in server_name directive.
Note: If you are using a self-signed certificate, you will not know the NLB DNS name until you deploy the application. After you deploy it, go to the AWS console , copy the NLB DNS name, and then run the following command to edit ConfigMap and update server_name with the NLB DNS name.
Complete YAML manifest
apiVersion: apps/v1
kind: Deployment
metadata:
name: nlb-tls-app
spec:
replicas: 1
selector:
matchLabels:
app: nlb-tls-app
template:
metadata:
labels:
app: nlb-tls-app
spec:
containers:
- name: nlb-tls-app
image: nginxdemos/nginx-hello:plain-text
ports:
- containerPort: 8443
volumeMounts:
- name: secret
mountPath: /etc/nginx/ssl
readOnly: true
- name: config-volume
mountPath: /etc/nginx/conf.d
volumes:
- name: secret
secret:
secretName: nlb-tls-app-secret
- name: config-volume
configMap:
name: secure-config
---
apiVersion: v1
kind: Service
metadata:
name: nlb-tls-app
annotations:
    service.beta.kubernetes.io/aws-load-balancer-type: "nlb-ip"
    service.beta.kubernetes.io/aws-load-balancer-proxy-protocol: "*"
    service.beta.kubernetes.io/aws-load-balancer-scheme: internet-facing
spec:
ports:
- port: 443
targetPort: 8443
protocol: TCP
name: https
selector:
app: nlb-tls-app
type: LoadBalancer
---
apiVersion: v1
kind: ConfigMap
metadata:
name: secure-config
data:
app.conf: |-
server {
listen 8443 ssl proxy_protocol;
real_ip_header proxy_protocol;
set_real_ip_from 192.168.0.0/16;
server_name <your_server_name>;
ssl_certificate /etc/nginx/ssl/tls.crt;
ssl_certificate_key /etc/nginx/ssl/tls.key;
default_type text/plain;
location / {
return 200 "hello from pod $hostname\n";
}
}After you have applied manifest to the cluster, run the following command to verify that the application is up and running:
You should see that the nlb-test-app pod is running with a status of Ready.
Verify end-to-end encryption
Now use the openssl command to verify end-to-end TLS encryption. Use your custom domain name or NLB DNS name, as appropriate.
You should see a successful TLS handshake and other details in the output:
Now you can verify that the client source IP address is preserved. In your browser, visit https://<your_server_name>, and then run the following command. Use the name of your pod to view pod logs and check that requests are coming from your IP address.
Bash
kubectl logs nlb-tls-app-57b67f67f-nmqj9
Example output:
xxx.xxx.xxx.xxx – – [14/Nov/2020:00:09:47 +0000] “GET / HTTP/1.1” 200 43 “-” “Mozilla/5.0 (Macintosh; Intel Mac OS X 10.15; rv:78.0) Gecko/20100101 Firefox/78.0” “-”
xxx.xxx.xxx.xxx – – [14/Nov/2020:00:09:47 +0000] “GET /favicon.ico HTTP/1.1” 200 43 “-” “Mozilla/5.0 (Macintosh; Intel Mac OS X 10.15; rv:78.0) Gecko/20100101 Firefox/78.0” “-”
Cleaning up
To avoid incurring future charges, perform these cleanup steps.
Delete the application:
Delete the Amazon EKS cluster:
Disable the ACM Private CA. Replace arn and region with your own.
aws acm-pca update-certificate-authority \
--certificate-authority-arn arn:aws:acm-pca:<region>:<account-id>:certificate-authority/<resource-id> \
--region <region> \
--status DISABLED
Delete the ACM Private CA. Replace arn with your own.
aws acm-pca delete-certificate-authority \
--certificate-authority-arn arn:aws:acm-pca:<region>:<account-id>:certificate-authority/<resource_id> \
--region <region> \
--permanent-deletion-time-in-days 7
Conclusion
In this blog post, I showed you how to set up end-to-end TLS traffic encryption to an Amazon EKS cluster using AWS Load Balancer Controller with Network Load Balancer in IP mode. If you have questions or want to contribute, join our aws-load-balancer-controller project on GitHub.