AWS Developer Tools Blog
Deploying .NET Web Applications Using AWS Elastic Beanstalk with Visual Studio Team Services
We recently announced the new AWS Tools for Microsoft Visual Studio Team Services. Today let’s take a deeper look at how you can use the new tools to support deploying your .NET web applications from Team Services to AWS Elastic Beanstalk.
Elastic Beanstalk uses environments to run .NET web applications. Before using this task, you first need to create an environment. You can do this from the Elastic Beanstalk console with a sample application, or by using the AWS Toolkit for Visual Studio with an initial version of your application.
In this post, we won’t cover setting up the tools in Team Services. However, we’re going to assume you already have a Team Services account and know how to push your source code to the repository used in your Team Services build. This post focuses on build definitions that show how to use the AWS Elastic Beanstalk Deployment task.
Setting up the build definition for an ASP.NET application
The AWS Elastic Beanstalk Deployment task in the AWS Tools for Team Services supports either ASP.NET applications that are packaged as a Web Deploy archive, or ASP.NET Core applications published with the dotnet publish command. First let’s take a look at using an ASP.NET application.
Probably the easiest way to get an ASP.NET application built and packaged as a Web Deploy archive is by using the ASP.NET Build Template and removing the Published Artifacts task. This task will be replaced with the AWS Elastic Beanstalk Deployment task.

If you already have a build definition, be sure your Build Solution task has the following MSBuild arguments. These arguments ensure the web application is packaged as a Web Deploy archive and placed into the build artifacts staging directory.
/p:DeployOnBuild=true /p:WebPublishMethod=Package /p:PackageAsSingleFile=true /p:SkipInvalidConfigurations=true /p:PackageLocation="$(build.artifactstagingdirectory)\\"

Now that the project is building, we need to add the AWS Elastic Beanstalk Deployment task. Choose Add Task, and then search for “Beanstalk”. On the found task, choose Add to include the task in the build definition.

For the new task, we need to make the following configuration changes:
- AWS Credentials: The AWS credentials used to perform the deployment. Our previous post on the Team Services tools discusses setting up AWS credentials in Team Services. For this task, the credentials should be for an AWS Identity and Access Management (IAM) user, with a policy that enables the user to update an Elastic Beanstalk environment and describe an environment status and events.
- AWS Region: The AWS Region that the Elastic Beanstalk environment is running in.
- Application Type: Set to ASP.NET.
- Web Deploy Archive: The path to the Web Deploy archive. If the archive was created using the arguments above, the file will have the same name as the directory that contains the web application, and will have a .zip extension. You can find it in the build artifacts staging directory, which can be referenced as $(build.artifactstagingdirectory).
- Beanstalk Application Name: The name you used to create the Elastic Beanstalk application. An Elastic Beanstalk application is the container for a collection of environments running the .NET web application.
- Beanstalk Environment Name: The name you used to create the Elastic Beanstalk environment. An Elastic Beanstalk environment contains the actual provisioned resources that are running the .NET web application.

Now that we have configured the task, we’re ready to deploy to Elastic Beanstalk. If you queue a build now, you should see output similar to this for the deployment.

Setting up the build definition for an ASP.NET Core
For an ASP.NET Core deployment, we don’t use Web Deploy. Instead we need the output folder from the dotnet publish command. The easiest way to get started for this type of deployment is to use the ASP.NET Core build template, and again remove the Publish Artifacts task.
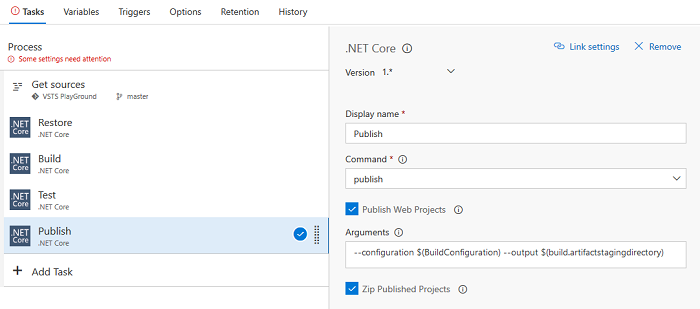
This creates a build definition using the dotnet CLI that restores NuGet dependencies, builds the projects, runs any tests, and then finally executes the dotnet publish command on any web projects. After the publish task, we need to add the AWS Elastic Beanstalk Deployment task the same way we added it for the ASP.NET application.
There are two parameters in the configurations on the AWS Elastic Beanstalk Deployment task that are different for ASP.NET Core:
- Application Type: Set to ASP.NET Core.
- Published Application Path: The path to the .zip file archive of the dotnet publish output. If you didn’t choose Zip Published Projects in the publish task, this parameter can point to the directory the dotnet publish command wrote to.
That’s it. Everything else is the same as the ASP.NET deployment.
Conclusion
We hope Visual Studio Team Services users will find the AWS Elastic Beanstalk Deployment task helpful and easy to use. We also appreciate hearing your feedback on our GitHub repository for these Team Services tasks.