AWS Developer Tools Blog
Serverless ASP.NET Core 2.0 Applications
In our previous post, we announced the release of the .NET Core 2.0 AWS Lambda runtime and new versions of our .NET tooling to help you develop .NET Core 2.0-based serverless applications. Also, with the new .NET Core 2.0 Lambda runtime, we’ve released our ASP.NET Core NuGet Package, Amazon.Lambda.AspNetCoreServer, for general availability.
Version 2.0.0 of the Amazon.Lambda.AspNetCoreServer has been upgraded to target .NET Core 2.0. If you’re already using this library, you need to update your ASP.NET Core project to .NET Core 2.0 before using this latest version.
ASP.NET Core 2.0 has a lot of changes that make running a serverless ASP.NET Core Lambda function even more exciting. These include performance improvements in the ASP.NET Core and underlying .NET Core libraries.
Razor Pages
The Lambda runtime now supports Razor Pages. This means we can deploy both ASP.NET Core Web API and ASP.NET Core web applications. An important change with ASP.NET Core 2.0 is that Razor Pages are now precompiled at publish time. This means when our serverless Razor Pages are first rendered, Lambda compute time isn’t spent compiling the Razor Pages from cshtml to machine instructions.
Runtime package store
Starting with .NET Core 2.0 there is a new runtime package store feature, which is a cache of NuGet packages already installed on the target deployment platform. These packages have also been pre-jitted, meaning they’re already compiled from .NET’s intermediate language (IL) to machine instructions. This improves startup time when you use these packages. The store also reduces your deployment package size, further improving the cold startup time. For example, our existing ASP.NET Core Web API blueprint for .NET Core 1.0 had a minimum size of about 2.5 MB for the deployment package. For the .NET Core 2.0 version of the blueprint, the size is about 0.5 MB.
To indicate that you want to use the runtime package store for an ASP.NET Core application, you add a NuGet dependency to Microsoft.AspNetCore.All. Adding this dependency makes all of the ASP.NET Core packages and Entity Framework Core packages available to your application. However, it doesn’t include them in the deployment package because they’re already available in Lambda.
The Lambda blueprints that are available in Visual Studio are configured to use Microsoft.AspNetCore.All, just like the Microsoft-provided ASP.NET Core Web project templates inside Visual Studio. If you’re migrating a .NET Core 1.0 project to .NET Core 2.0, I highly recommend swapping out individual ASP.NET Core references to Microsoft.AspNetCore.All.
.NET Core and runtime package store version
Currently, the .NET Core 2.0 Lambda runtime is running .NET Core 2.0.4 and includes version 2.0.3 of Microsoft.AspNetCore.All. As the .NET Core 2.0 Lambda runtime was rolling out to the AWS Regions, Microsoft released version 2.0.5 of the .NET Core runtime and 2.0.5 of Microsoft.AspNetCore.All in the runtime package store. The Lambda runtime will be updated to include the latest versions shortly. However, in the meantime, if you update your Microsoft.AspNetCore.All reference to version 2.0.5, the Lambda function will fail to find the dependency when it runs. If you use either the AWS Toolkit for Visual Studio or our dotnet CLI extensions to perform the deployment, and attempt to deploy with a newer version of Microsoft.AspNetCore.All than is available in Lambda, our packaging will prevent the deployment and inform you of the latest version you can use with Lambda. This is another reason we recommend you use either the AWS Toolkit for Visual Studio or our dotnet CLI extensions to create the Lambda deployment package, so that we can provide that extra verification of your project.
Getting started
The AWS Toolkit for Visual Studio provides two blueprints for ASP.NET Core applications. The first is the ASP.NET Core Web API blueprint, which we updated from the preview in .NET Core 1.0 to take advantage of the new .NET Core 2.0 features. The second is a new ASP.NET Core Web App blueprint, which demonstrates the use of the ASP.NET Core 2.0 new Razor Pages feature in a serverless environment. Let’s take a look at that blueprint now.
To access the Lambda blueprints, choose File, New Project in Visual Studio. Under Visual C#, choose AWS Lambda.

The ASP.NET Core blueprints are serverless applications, because we want to use AWS CloudFormation to configure Amazon API Gateway to expose the Lambda function running ASP.NET Core to an HTTP endpoint. To continue, choose AWS Serverless Application (.NET Core), name your project, and then click OK.
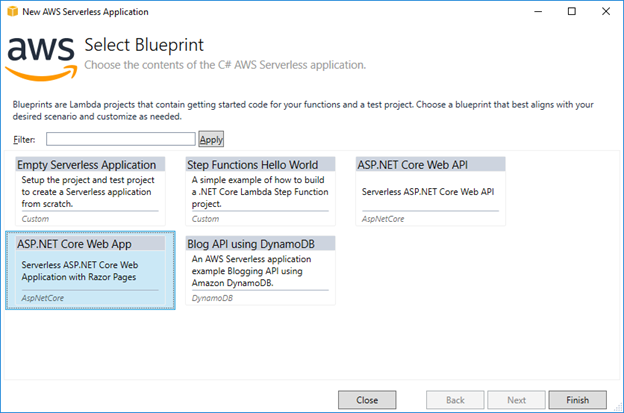
On the Select Blueprint page, you can see the two ASP.NET Core blueprints. Choose the ASP.NET Core Web App blueprint, and then click Finish.
When the project is created, it looks just like a regular ASP.NET Core project. The main difference is that Program.cs was renamed to LocalEntryPoint.cs, which enables you to run the ASP.NET Core project locally. Another difference is the file LambdaEntryPoint.cs. This file contains a class that derives from Amazon.Lambda.AspNetCoreServer.APIGatewayProxyFunction and implements the Init method that’s used to configure the IWebHostBuilder, similar to LocalEntryPoint.cs. The only required element to configure is the startup class that ASP.NET Core will call to configure the web application.
The APIGatewayProxyFunction base class contains the FunctionHandlerAsync method. This method is declared as the Lambda handler in the serverless.template file that defines the AWS Lambda function and configures Amazon API Gateway. If you rename the class or namespace, be sure to update the Lambda handler in the serverless.template file to reflect the new name.
public class LambdaEntryPoint : Amazon.Lambda.AspNetCoreServer.APIGatewayProxyFunction
{
    /// <summary>
    /// The builder has configuration, logging, and Amazon API Gateway already configured. The startup class
    /// needs to be configured in this method using the UseStartup<>() method.
    /// </summary>
    /// <param name="builder"></param>
    protected override void Init(IWebHostBuilder builder)
    {
        builder
            .UseStartup<Startup>();
    }
}
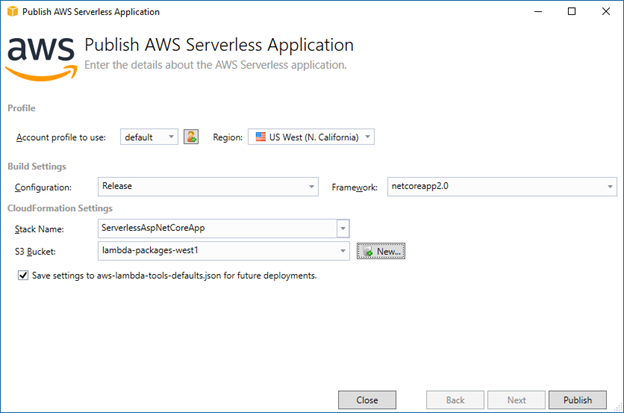
To deploy the ASP.NET Core application to Lambda, right-click the project in Solution Explorer, and then choose Publish to AWS Lambda. This starts the deployment wizard. Because no parameters are defined in the serverless.template, we just need to enter an AWS CloudFormation stack name and an Amazon S3 bucket in the region the application is being deployed, to which the Lambda deployment package will be uploaded. After that, choose Publish to begin the deployment process.
Once the Lambda deployment package is created and uploaded to Amazon S3, and the creation of the AWS CloudFormation stack is initiated, the AWS CloudFormation stack view is launched. This view lists the events as the AWS resources are created. When the stack is created, a URL to the generated API Gateway endpoint is shown.
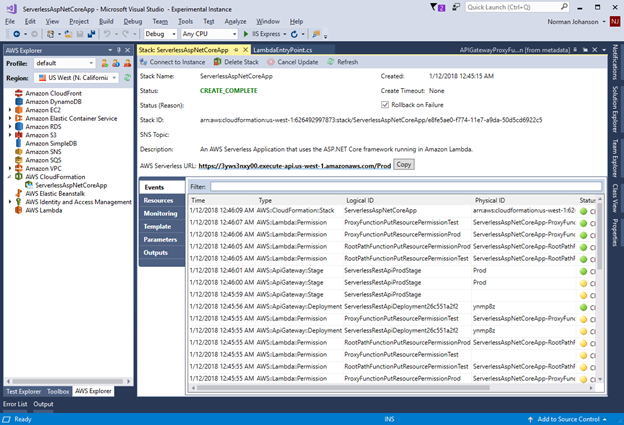
Clicking the link displays your new serverless ASP.NET Core web application.

Using images
If your web application displays images, we recommend you serve those images from Amazon S3. This is more efficient for returning static content like images, Cascading Style Sheets, etc. Also, to return images from your Lambda function to the browser, you need to do extra configuration in API Gateway for binary data.
Migrating Existing ASP.NET Core Web API Projects
Before our new release we already had a preview blueprint for using ASP.NET Core Web API on Lambda using .NET Core 1.0. To migrate that project make the following changes to your csproj file project.
- Make sure the Sdk attribute in root element of your csproj is set to Microsoft.NET.Sdk.Web. The preview blueprint had this attribute set to Microsoft.NET.Sdk.
<Project Sdk="Microsoft.NET.Sdk.Web"> - Update Amazon.Lambda.AspNetCoreServer reference to 2.0.0
<PackageReference Include="Amazon.Lambda.AspNetCoreServer" Version="2.0.0" /> - Replace any references to Microsoft.AspNetCore.* and Microsoft.Extensions.* with Microsoft.AspNetCore.All version 2.0.3
<PackageReference Include="Microsoft.AspNetCore.All" Version="2.0.3" /> - Update target framework to netcoreapp2.0
- Set the property GenerateRuntimeConfigurationFiles to true to make sure a project-name.runtimeconfig.json is created.
<PropertyGroup> <TargetFramework>netcoreapp2.0</TargetFramework> <GenerateRuntimeConfigurationFiles>true</GenerateRuntimeConfigurationFiles> </PropertyGroup> - If your csproj has the following xml you can remove it because appsetings.json will now be included by default since you changed the Sdk attribute to Microsoft.NET.Sdk.Web.
<ItemGroup>
  <Content Include="appsettings.json">
    <CopyToOutputDirectory>PreserveNewest</CopyToOutputDirectory>
  </Content>
</ItemGroup>
After that make any changed necessary to your code to be compatible with ASP.NET Core 2.0 and you are ready to deploy.
Conclusion
With all of the improvements in .NET Core and ASP.NET Core 2.0, it’s exciting to see it running in a serverless environment. There’s a lot of potential with running ASP.NET Core on Lambda, and we’re excited to hear your thoughts about running a serverless ASP.NET Core application. Check out our GitHub repository which contains our libraries that make this possible. Feel free to open issues for any questions you have.