AWS DevOps & Developer Productivity Blog
Using AWS CodeCommit Pull Requests to request code reviews and discuss code
Thank you to Michael Edge, Senior Cloud Architect, for a great blog on CodeCommit pull requests.
~~~~~~~
AWS CodeCommit is a fully managed service for securely hosting private Git repositories. CodeCommit now supports pull requests, which allows repository users to review, comment upon, and interactively iterate on code changes. Used as a collaboration tool between team members, pull requests help you to review potential changes to a CodeCommit repository before merging those changes into the repository. Each pull request goes through a simple lifecycle, as follows:
- The new features to be merged are added as one or more commits to a feature branch. The commits are not merged into the destination branch.
- The pull request is created, usually from the difference between two branches.
- Team members review and comment on the pull request. The pull request might be updated with additional commits that contain changes made in response to comments, or include changes made to the destination branch.
- Once team members are happy with the pull request, it is merged into the destination branch. The commits are applied to the destination branch in the same order they were added to the pull request.
Commenting is an integral part of the pull request process, and is used to collaborate between the developers and the reviewer. Reviewers add comments and questions to a pull request during the review process, and developers respond to these with explanations. Pull request comments can be added to the overall pull request, a file within the pull request, or a line within a file.
To make the comments more useful, sign in to the AWS Management Console as an AWS Identity and Access Management (IAM) user. The username will then be associated with the comment, indicating the owner of the comment. Pull request comments are a great quality improvement tool as they allow the entire development team visibility into what reviewers are looking for in the code. They also serve as a record of the discussion between team members at a point in time, and shouldn’t be deleted.
AWS CodeCommit is also introducing the ability to add comments to a commit, another useful collaboration feature that allows team members to discuss code changed as part of a commit. This helps you discuss changes made in a repository, including why the changes were made, whether further changes are necessary, or whether changes should be merged. As is the case with pull request comments, you can comment on an overall commit, on a file within a commit, or on a specific line or change within a file, and other repository users can respond to your comments. Comments are not restricted to commits, they can also be used to comment on the differences between two branches, or between two tags. Commit comments are separate from pull request comments, i.e. you will not see commit comments when reviewing a pull request – you will only see pull request comments.
A pull request example
Let’s get started by running through an example. We’ll take a typical pull request scenario and look at how we’d use CodeCommit and the AWS Management Console for each of the steps.
To try out this scenario, you’ll need:
- An AWS CodeCommit repository with some sample code in the master branch. We’ve provided sample code below.
- Two AWS Identity and Access Management (IAM) users, both with the AWSCodeCommitPowerUser managed policy applied to them.
- Git installed on your local computer, and access configured for AWS CodeCommit.
- A clone of the AWS CodeCommit repository on your local computer.
In the course of this example, you’ll sign in to the AWS CodeCommit console as one IAM user to create the pull request, and as the other IAM user to review the pull request. To learn more about how to set up your IAM users and how to connect to AWS CodeCommit with Git, see the following topics:
- Information on creating an IAM user with AWS Management Console access.
- Instructions on how to access CodeCommit using Git.
- If you’d like to use the same ‘hello world’ application as used in this article, here is the source code:
package com.amazon.helloworld;

public class Main {
	public static void main(String[] args) {

		System.out.println("Hello, world");
	}
}
The scenario below uses the us-east-2 region.
Creating the branches
Before we jump in and create a pull request, we’ll need at least two branches. In this example, we’ll follow a branching strategy similar to the one described in GitFlow. We’ll create a new branch for our feature from the main development branch (the default branch). We’ll develop the feature in the feature branch. Once we’ve written and tested the code for the new feature in that branch, we’ll create a pull request that contains the differences between the feature branch and the main development branch. Our team lead (the second IAM user) will review the changes in the pull request. Once the changes have been reviewed, the feature branch will be merged into the development branch.

Figure 1: Pull request link
Sign in to the AWS CodeCommit console with the IAM user you want to use as the developer. You can use an existing repository or you can go ahead and create a new one. We won’t be merging any changes to the master branch of your repository, so it’s safe to use an existing repository for this example. You’ll find the Pull requests link has been added just above the Commits link (see Figure 1), and below Commits you’ll find the Branches link. Click Branches and create a new branch called ‘develop’, branched from the ‘master’ branch. Then create a new branch called ‘feature1’, branched from the ‘develop’ branch. You’ll end up with three branches, as you can see in Figure 2. (Your repository might contain other branches in addition to the three shown in the figure).

Figure 2: Create a feature branch
If you haven’t cloned your repo yet, go to the Code link in the CodeCommit console and click the Connect button. Follow the instructions to clone your repo (detailed instructions are here). Open a terminal or command line and paste the git clone command supplied in the Connect instructions for your repository. The example below shows cloning a repository named codecommit-demo:
git clone https://git-codecommit.us-east-2.amazonaws.com/v1/repos/codecommit-demoIf you’ve previously cloned the repo you’ll need to update your local repo with the branches you created. Open a terminal or command line and make sure you’re in the root directory of your repo, then run the following command:
git remote update originYou’ll see your new branches pulled down to your local repository.
$ git remote update origin
Fetching origin
From https://git-codecommit.us-east-2.amazonaws.com/v1/repos/codecommit-demo
 * [new branch]      develop    -> origin/develop
 * [new branch]      feature1   -> origin/feature1
You can also see your new branches by typing:
git branch --all

$ git branch --all
* master
  remotes/origin/develop
  remotes/origin/feature1
  remotes/origin/master
Now we’ll make a change to the ‘feature1’ branch. Open a terminal or command line and check out the feature1 branch by running the following command:
git checkout feature1

$ git checkout feature1
Branch feature1 set up to track remote branch feature1 from origin.
Switched to a new branch 'feature1'
Make code changes
Edit a file in the repo using your favorite editor and save the changes. Commit your changes to the local repository, and push your changes to CodeCommit. For example:
git commit -am 'added new feature'
git push origin feature1

$ git commit -am 'added new feature'
[feature1 8f6cb28] added new feature
1 file changed, 1 insertion(+), 1 deletion(-)

$ git push origin feature1
Counting objects: 9, done.
Delta compression using up to 4 threads.
Compressing objects: 100% (4/4), done.
Writing objects: 100% (9/9), 617 bytes | 617.00 KiB/s, done.
Total 9 (delta 2), reused 0 (delta 0)
To https://git-codecommit.us-east-2.amazonaws.com/v1/repos/codecommit-demo
   2774a53..8f6cb28  feature1 -> feature1
Creating the pull request
Now we have a ‘feature1’ branch that differs from the ‘develop’ branch. At this point we want to merge our changes into the ‘develop’ branch. We’ll create a pull request to notify our team members to review our changes and check whether they are ready for a merge.
In the AWS CodeCommit console, click Pull requests. Click Create pull request. On the next page select ‘develop’ as the destination branch and ‘feature1’ as the source branch. Click Compare. CodeCommit will check for merge conflicts and highlight whether the branches can be automatically merged using the fast-forward option, or whether a manual merge is necessary. A pull request can be created in both situations.

Figure 3: Create a pull request
After comparing the two branches, the CodeCommit console displays the information you’ll need in order to create the pull request. In the ‘Details’ section, the ‘Title’ for the pull request is mandatory, and you may optionally provide comments to your reviewers to explain the code change you have made and what you’d like them to review. In the ‘Notifications’ section, there is an option to set up notifications to notify subscribers of changes to your pull request. Notifications will be sent on creation of the pull request as well as for any pull request updates or comments. And finally, you can review the changes that make up this pull request. This includes both the individual commits (a pull request can contain one or more commits, available in the Commits tab) as well as the changes made to each file, i.e. the diff between the two branches referenced by the pull request, available in the Changes tab. After you have reviewed this information and added a title for your pull request, click the Create button. You will see a confirmation screen, as shown in Figure 4, indicating that your pull request has been successfully created, and can be merged without conflicts into the ‘develop’ branch.

Figure 4: Pull request confirmation page
Reviewing the pull request
Now let’s view the pull request from the perspective of the team lead. If you set up notifications for this CodeCommit repository, creating the pull request would have sent an email notification to the team lead, and he/she can use the links in the email to navigate directly to the pull request. In this example, sign in to the AWS CodeCommit console as the IAM user you’re using as the team lead, and click Pull requests. You will see the same information you did during creation of the pull request, plus a record of activity related to the pull request, as you can see in Figure 5.

Figure 5: Team lead reviewing the pull request
Commenting on the pull request
You now perform a thorough review of the changes and make a number of comments using the new pull request comment feature. To gain an overall perspective on the pull request, you might first go to the Commits tab and review how many commits are included in this pull request. Next, you might visit the Changes tab to review the changes, which displays the differences between the feature branch code and the develop branch code. At this point, you can add comments to the pull request as you work through each of the changes. Let’s go ahead and review the pull request. During the review, you can add review comments at three levels:
- The overall pull request
- A file within the pull request
- An individual line within a file
The overall pull request
In the Changes tab near the bottom of the page you’ll see a ‘Comments on changes’ box. We’ll add comments here related to the overall pull request. Add your comments as shown in Figure 6 and click the Save button.
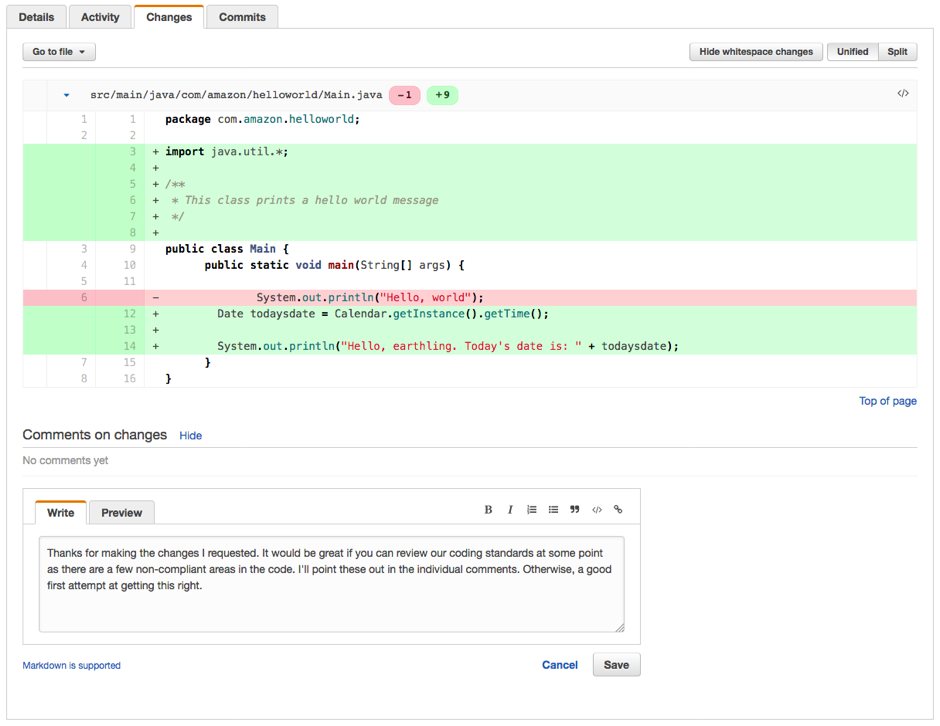
Figure 6: Pull request comment
A specific file in the pull request
Hovering your mouse over a filename in the Changes tab will cause a blue ‘comments’ icon to appear to the left of the filename. Clicking the icon will allow you to enter comments specific to this file, as in the example in Figure 7. Go ahead and add comments for one of the files changed by the developer. Click the Save button to save your comment.

Figure 7: File comment
A specific line in a file in the pull request
A blue ‘comments’ icon will appear as you hover over individual lines within each file in the pull request, allowing you to create comments against lines that have been added, removed or are unchanged. In Figure 8, you add comments against a line that has been added to the source code, encouraging the developer to review the naming standards. Go ahead and add line comments for one of the files changed by the developer. Click the Save button to save your comment.

Figure 8: Line comment
A pull request that has been commented at all three levels will look similar to Figure 9. The pull request comment is shown expanded in the ‘Comments on changes’ section, while the comments at file and line level are shown collapsed. A ‘comment’ icon indicates that comments exist at file and line level. Clicking the icon will expand and show the comment. Since you are expecting the developer to make further changes based on your comments, you won’t merge the pull request at this stage, but will leave it open awaiting feedback. Each comment you made results in a notification being sent to the developer, who can respond to the comments. This is great for remote working, where developers and team lead may be in different time zones.

Figure 9: Fully commented pull request
Adding a little complexity
A typical development team is going to be creating pull requests on a regular basis. It’s highly likely that the team lead will merge other pull requests into the ‘develop’ branch while pull requests on feature branches are in the review stage. This may result in a change to the ‘Mergable’ status of a pull request. Let’s add this scenario into the mix and check out how a developer will handle this.
To test this scenario, we could create a new pull request and ask the team lead to merge this to the ‘develop’ branch. But for the sake of simplicity we’ll take a shortcut. Clone your CodeCommit repo to a new folder, switch to the ‘develop’ branch, and make a change to one of the same files that were changed in your pull request. Make sure you change a line of code that was also changed in the pull request. Commit and push this back to CodeCommit. Since you’ve just changed a line of code in the ‘develop’ branch that has also been changed in the ‘feature1’ branch, the ‘feature1’ branch cannot be cleanly merged into the ‘develop’ branch. Your developer will need to resolve this merge conflict.
A developer reviewing the pull request would see the pull request now looks similar to Figure 10, with a ‘Resolve conflicts’ status rather than the ‘Mergable’ status it had previously (see Figure 5).

Figure 10: Pull request with merge conflicts
Reviewing the review comments
Once the team lead has completed his review, the developer will review the comments and make the suggested changes. As a developer, you’ll see the list of review comments made by the team lead in the pull request Activity tab, as shown in Figure 11. The Activity tab shows the history of the pull request, including commits and comments. You can reply to the review comments directly from the Activity tab, by clicking the Reply button, or you can do this from the Changes tab. The Changes tab shows the comments for the latest commit, as comments on previous commits may be associated with lines that have changed or been removed in the current commit. Comments for previous commits are available to view and reply to in the Activity tab.
In the Activity tab, use the shortcut link (which looks like this </>) to move quickly to the source code associated with the comment. In this example, you will make further changes to the source code to address the pull request review comments, so let’s go ahead and do this now. But first, you will need to resolve the ‘Resolve conflicts’ status.

Figure 11: Pull request activity
Resolving the ‘Resolve conflicts’ status
The ‘Resolve conflicts’ status indicates there is a merge conflict between the ‘develop’ branch and the ‘feature1’ branch. This will require manual intervention to restore the pull request back to the ‘Mergable’ state. We will resolve this conflict next.
Open a terminal or command line and check out the develop branch by running the following command:
git checkout develop

$ git checkout develop
Switched to branch 'develop'
Your branch is up-to-date with 'origin/develop'.
To incorporate the changes the team lead made to the ‘develop’ branch, merge the remote ‘develop’ branch with your local copy:
git pull

$ git pull
remote: Counting objects: 9, done.
Unpacking objects: 100% (9/9), done.
From https://git-codecommit.us-east-2.amazonaws.com/v1/repos/codecommit-demo
   af13c82..7b36f52  develop    -> origin/develop
Updating af13c82..7b36f52
Fast-forward
 src/main/java/com/amazon/helloworld/Main.java | 2 +-
 1 file changed, 1 insertion(+), 1 deletion(-)
Then checkout the ‘feature1’ branch:
git checkout feature1

$ git checkout feature1
Switched to branch 'feature1'
Your branch is up-to-date with 'origin/feature1'.
Now merge the changes from the ‘develop’ branch into your ‘feature1’ branch:
git merge develop

$ git merge develop
Auto-merging src/main/java/com/amazon/helloworld/Main.java
CONFLICT (content): Merge conflict in src/main/java/com/amazon/helloworld/Main.java
Automatic merge failed; fix conflicts and then commit the result.
Yes, this fails. The file Main.java has been changed in both branches, resulting in a merge conflict that can’t be resolved automatically. However, Main.java will now contain markers that indicate where the conflicting code is, and you can use these to resolve the issues manually. Edit Main.java using your favorite IDE, and you’ll see it looks something like this:
package com.amazon.helloworld;

import java.util.*;

/**
 * This class prints a hello world message
 */

public class Main {
   public static void main(String[] args) {

<<<<<<< HEAD
        Date todaysdate = Calendar.getInstance().getTime();

        System.out.println("Hello, earthling. Today's date is: " + todaysdate);
=======
      System.out.println("Hello, earth");
>>>>>>> develop
   }
}
The code between HEAD and ‘===’ is the code the developer added in the ‘feature1’ branch (HEAD represents ‘feature1’ because this is the current checked out branch). The code between ‘===’ and ‘>>> develop’ is the code added to the ‘develop’ branch by the team lead. We’ll resolve the conflict by manually merging both changes, resulting in an updated Main.java:
package com.amazon.helloworld;

import java.util.*;

/**
 * This class prints a hello world message
 */

public class Main {
   public static void main(String[] args) {

        Date todaysdate = Calendar.getInstance().getTime();

        System.out.println("Hello, earth. Today's date is: " + todaysdate);
   }
}
After saving the change you can add and commit it to your local repo:
git add src/
git commit -m 'fixed merge conflict by merging changes'
Fixing issues raised by the reviewer
Now you are ready to address the comments made by the team lead. If you are no longer pointing to the ‘feature1’ branch, check out the ‘feature1’ branch by running the following command:
git checkout feature1

$ git checkout feature1
Branch feature1 set up to track remote branch feature1 from origin.
Switched to a new branch 'feature1'
Edit the source code in your favorite IDE and make the changes to address the comments. In this example, the developer has updated the source code as follows:
package com.amazon.helloworld;

import java.util.*;

/**
 *  This class prints a hello world message
 *
 * @author Michael Edge
 * @see HelloEarth
 * @version 1.0
 */

public class Main {
   public static void main(String[] args) {

        Date todaysDate = Calendar.getInstance().getTime();

        System.out.println("Hello, earth. Today's date is: " + todaysDate);
   }
}
After saving the changes, commit and push to the CodeCommit ‘feature1’ branch as you did previously:
git commit -am 'updated based on review comments'
git push origin feature1
Responding to the reviewer
Now that you’ve fixed the code issues you will want to respond to the review comments. In the AWS CodeCommit console, check that your latest commit appears in the pull request Commits tab. You now have a pull request consisting of more than one commit. The pull request in Figure 12 has four commits, which originated from the following activities:
- 8th Nov: the original commit used to initiate this pull request
- 10th Nov, 3 hours ago: the commit by the team lead to the ‘develop’ branch, merged into our ‘feature1’ branch
- 10th Nov, 24 minutes ago: the commit by the developer that resolved the merge conflict
- 10th Nov, 4 minutes ago: the final commit by the developer addressing the review comments

Figure 12: Pull request with multiple commits
Let’s reply to the review comments provided by the team lead. In the Activity tab, reply to the pull request comment and save it, as shown in Figure 13.

Figure 13: Replying to a pull request comment
At this stage, your code has been committed and you’ve updated your pull request comments, so you are ready for a final review by the team lead.
Final review
The team lead reviews the code changes and comments made by the developer. As team lead, you own the ‘develop’ branch and it’s your decision on whether to merge the changes in the pull request into the ‘develop’ branch. You can close the pull request with or without merging using the Merge and Close buttons at the bottom of the pull request page (see Figure 13). Clicking Close will allow you to add comments on why you are closing the pull request without merging. Merging will perform a fast-forward merge, incorporating the commits referenced by the pull request. Let’s go ahead and click the Merge button to merge the pull request into the ‘develop’ branch.

Figure 14: Merging the pull request
After merging a pull request, development of that feature is complete and the feature branch is no longer needed. It’s common practice to delete the feature branch after merging. CodeCommit provides a check box during merge to automatically delete the associated feature branch, as seen in Figure 14. Clicking the Merge button will merge the pull request into the ‘develop’ branch, as shown in Figure 15. This will update the status of the pull request to ‘Merged’, and will close the pull request.

Conclusion
This blog has demonstrated how pull requests can be used to request a code review, and enable reviewers to get a comprehensive summary of what is changing, provide feedback to the author, and merge the code into production. For more information on pull requests, see the documentation.