The Internet of Things on AWS – Official Blog
Tracking Assets using AWS IoT Core and Amazon Location Service
In this post, we explore the recently launched “location action” feature that connects AWS IoT Core with Amazon Location Service trackers, creating a scalable, simple, and cost effective way to track and store IoT device location updates.
Tracking resources and real-world assets is a critical part of any logistics and operations workflow. Companies need a simple and economical way to view their assets on a single pane of glass, allowing operators to track and monitor their assets in real time, then take the necessary action when they observe issues or anomalies. The ability to track assets with location data can help organizations improve operational uptime, reduce bottlenecks, and improve productivity, reducing operational expenses typically incurred during the maintenance and management of Internet of Things (IoT) devices.
IoT sensors and devices provide a viable option to deliver deeper visibility and predictability required for tracking assets. With IoT sensors and devices, you can continuously record and monitor the movement of assets through a centralized management system. An IoT-enabled device such as a smart bicycle, a delivery truck, a shipping container, or a connected vehicle can publish and subscribe to AWS IoT Core, a fully managed service that lets you connect billions of IoT devices and route trillions of message topics to Amazon Web Services (AWS). These message topics can then interface with a host of AWS services, ranging from storage to messaging to location services, using the Rules Engine.
Rules Engine enables you to send data from IoT devices to 20+ downstream services using Actions including Amazon Simple Storage Service (Amazon S3), Amazon Simple Notification Services (Amazon SNS), Amazon Kinesis, and AWS Lambda.
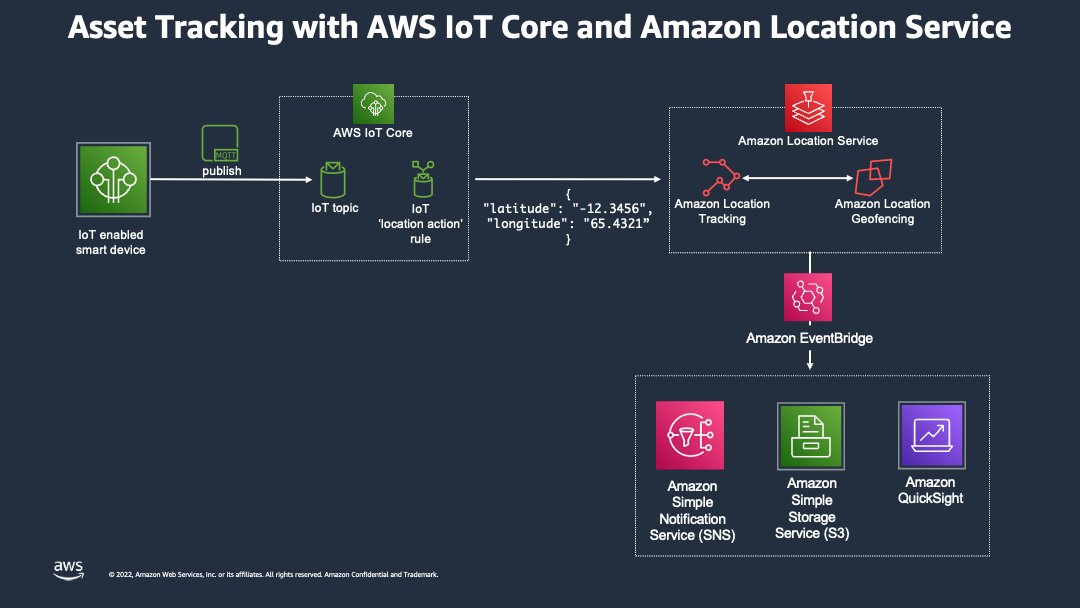
Fig.1 Tracking Assets using AWS IoT Core and Amazon Location Service – Sample Architecture
A typical workflow involving the IoT rules “location action” capability looks like this.
Step 1: IoT enabled devices can use the MQTT protocol to send messages to AWS IoT Core. These messages can typically consist of geospatial data like latitude and longitude, providing insight into the physical location of the assets with accuracy within a few meters. Alternatively, the AWS IoT Core Device Location feature enables IoT devices without built-in GPS to relay their location information to AWS IoT Core using cellular, GNSS (Global navigation satellite system), or network location.
Step 2: AWS IoT Core then listens to these messages and the Rules Engine processes them.
Step 3: Rules Engine invokes the “Location action” functionality, triggering a connection to an Amazon Location Service tracker resource.
Step 4: These tracker resources can then interface with Amazon Location geofences, with the ability to trigger events when a tracker resource enters or exits a geofence.
Step 5 : A geofence event can be sent to an event bus like Amazon EventBridge, which can subsequently connect to other services or workflows like notifications, storage, or analytics.
This entire solution can be setup without deploying any infrastructure, in a serverless manner with just a few lines of code.
How to use the IoT Device Simulator to trigger a “location Action”
Setting up the IoT Device Simulator
The IoT Device Simulator solution helps customers test device integration and improve the performance of their IoT backend services, via an intuitive web-based graphical user interface (GUI). The solution allows customers to create and simulate hundreds of connected devices, without having to configure and manage physical devices, or develop time-consuming scripts. Using the instructions on the solution page, deploy the IoT Device Simulator to your AWS Account.
Creating a device
Once the IoT Device Simulator is deployed, you can log in and create your device.
To create a device
- Navigate to Device Types, choose Add device type
- Choose Automotive Demo
- In the Device Type Definition, do the following:
- For Device type name, enter Tracking Demo
- For Topic enter
iot/trackingdemo
- Choose Save
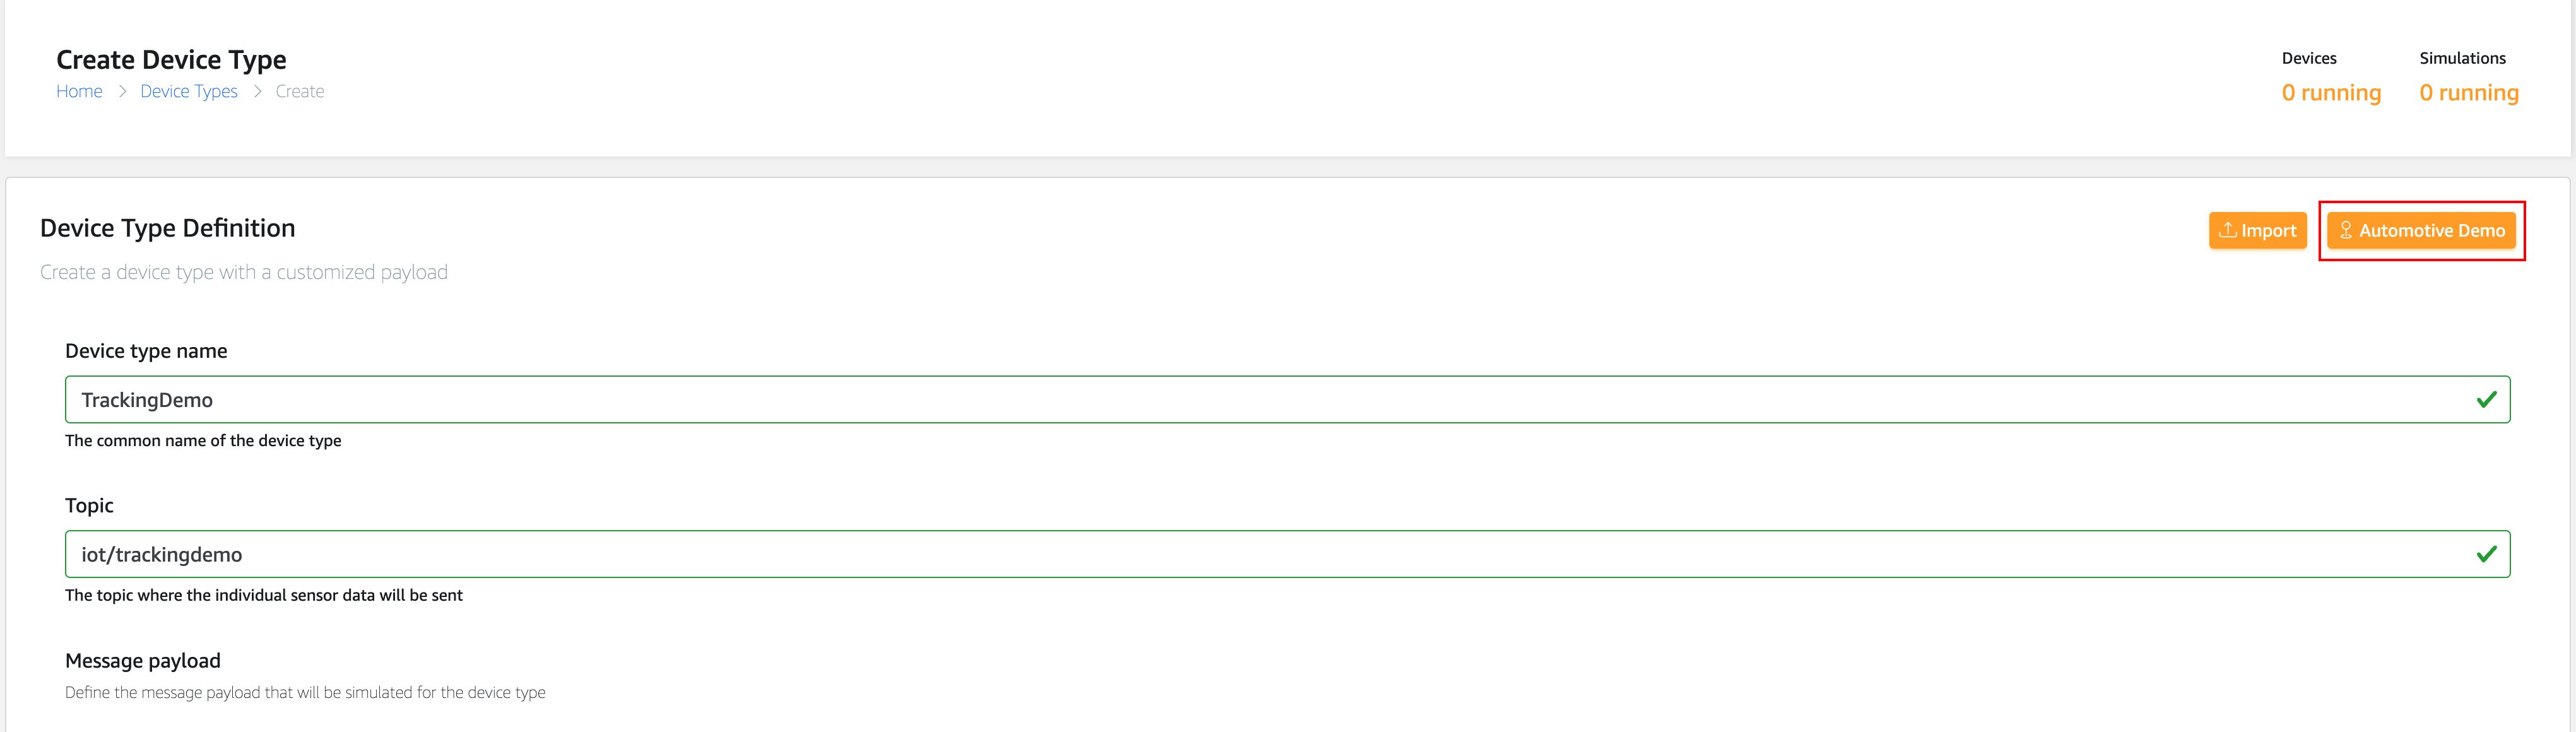
Fig.2 Creating a Device Type
Creating a simulation
- Navigate to Simulations, and choose Add Simulation
- In the Simulation Details, do the following:
- For Simulation name, enter TrackingDemo
- For Simulation Type, choose Automotive Demo
- For Select a device type, choose TrackingDemo
- For Data transmission interval, enter 5
- For Data transmission duration, enter 600
- Choose Save
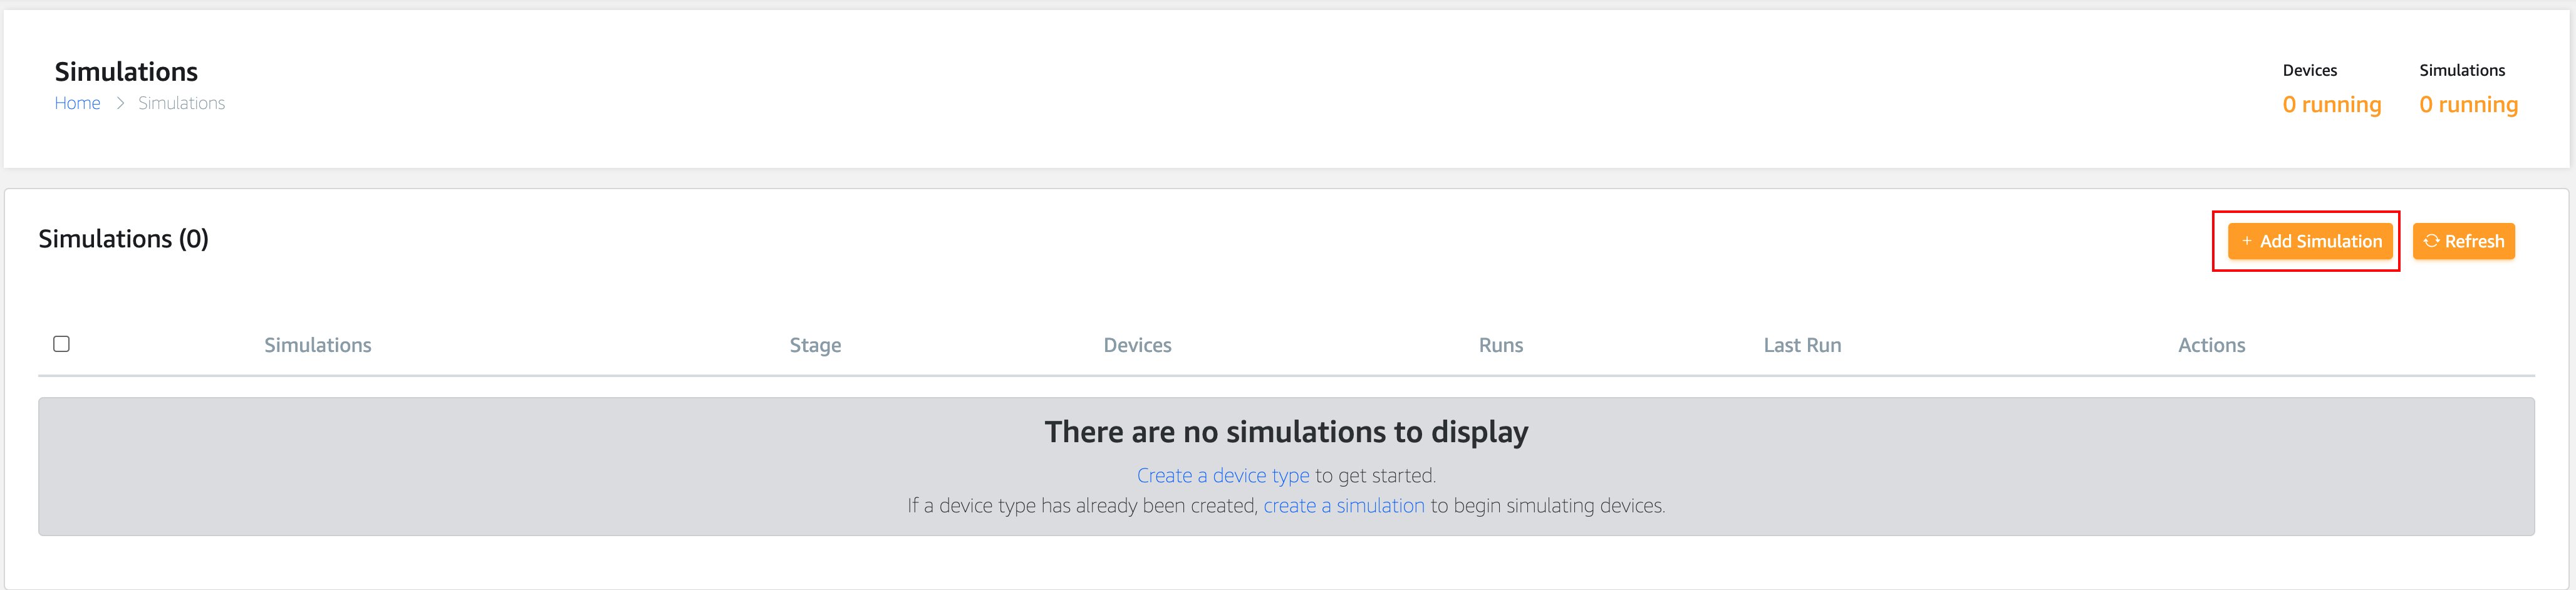
Fig. 3 Creating a Simulation
Now that you have created a simulated device, it’s time to create your AWS IoT Core rule.
Create an AWS IoT Core rule
- Navigate to the AWS IoT Core console
- Select Message Routing, then select Rules
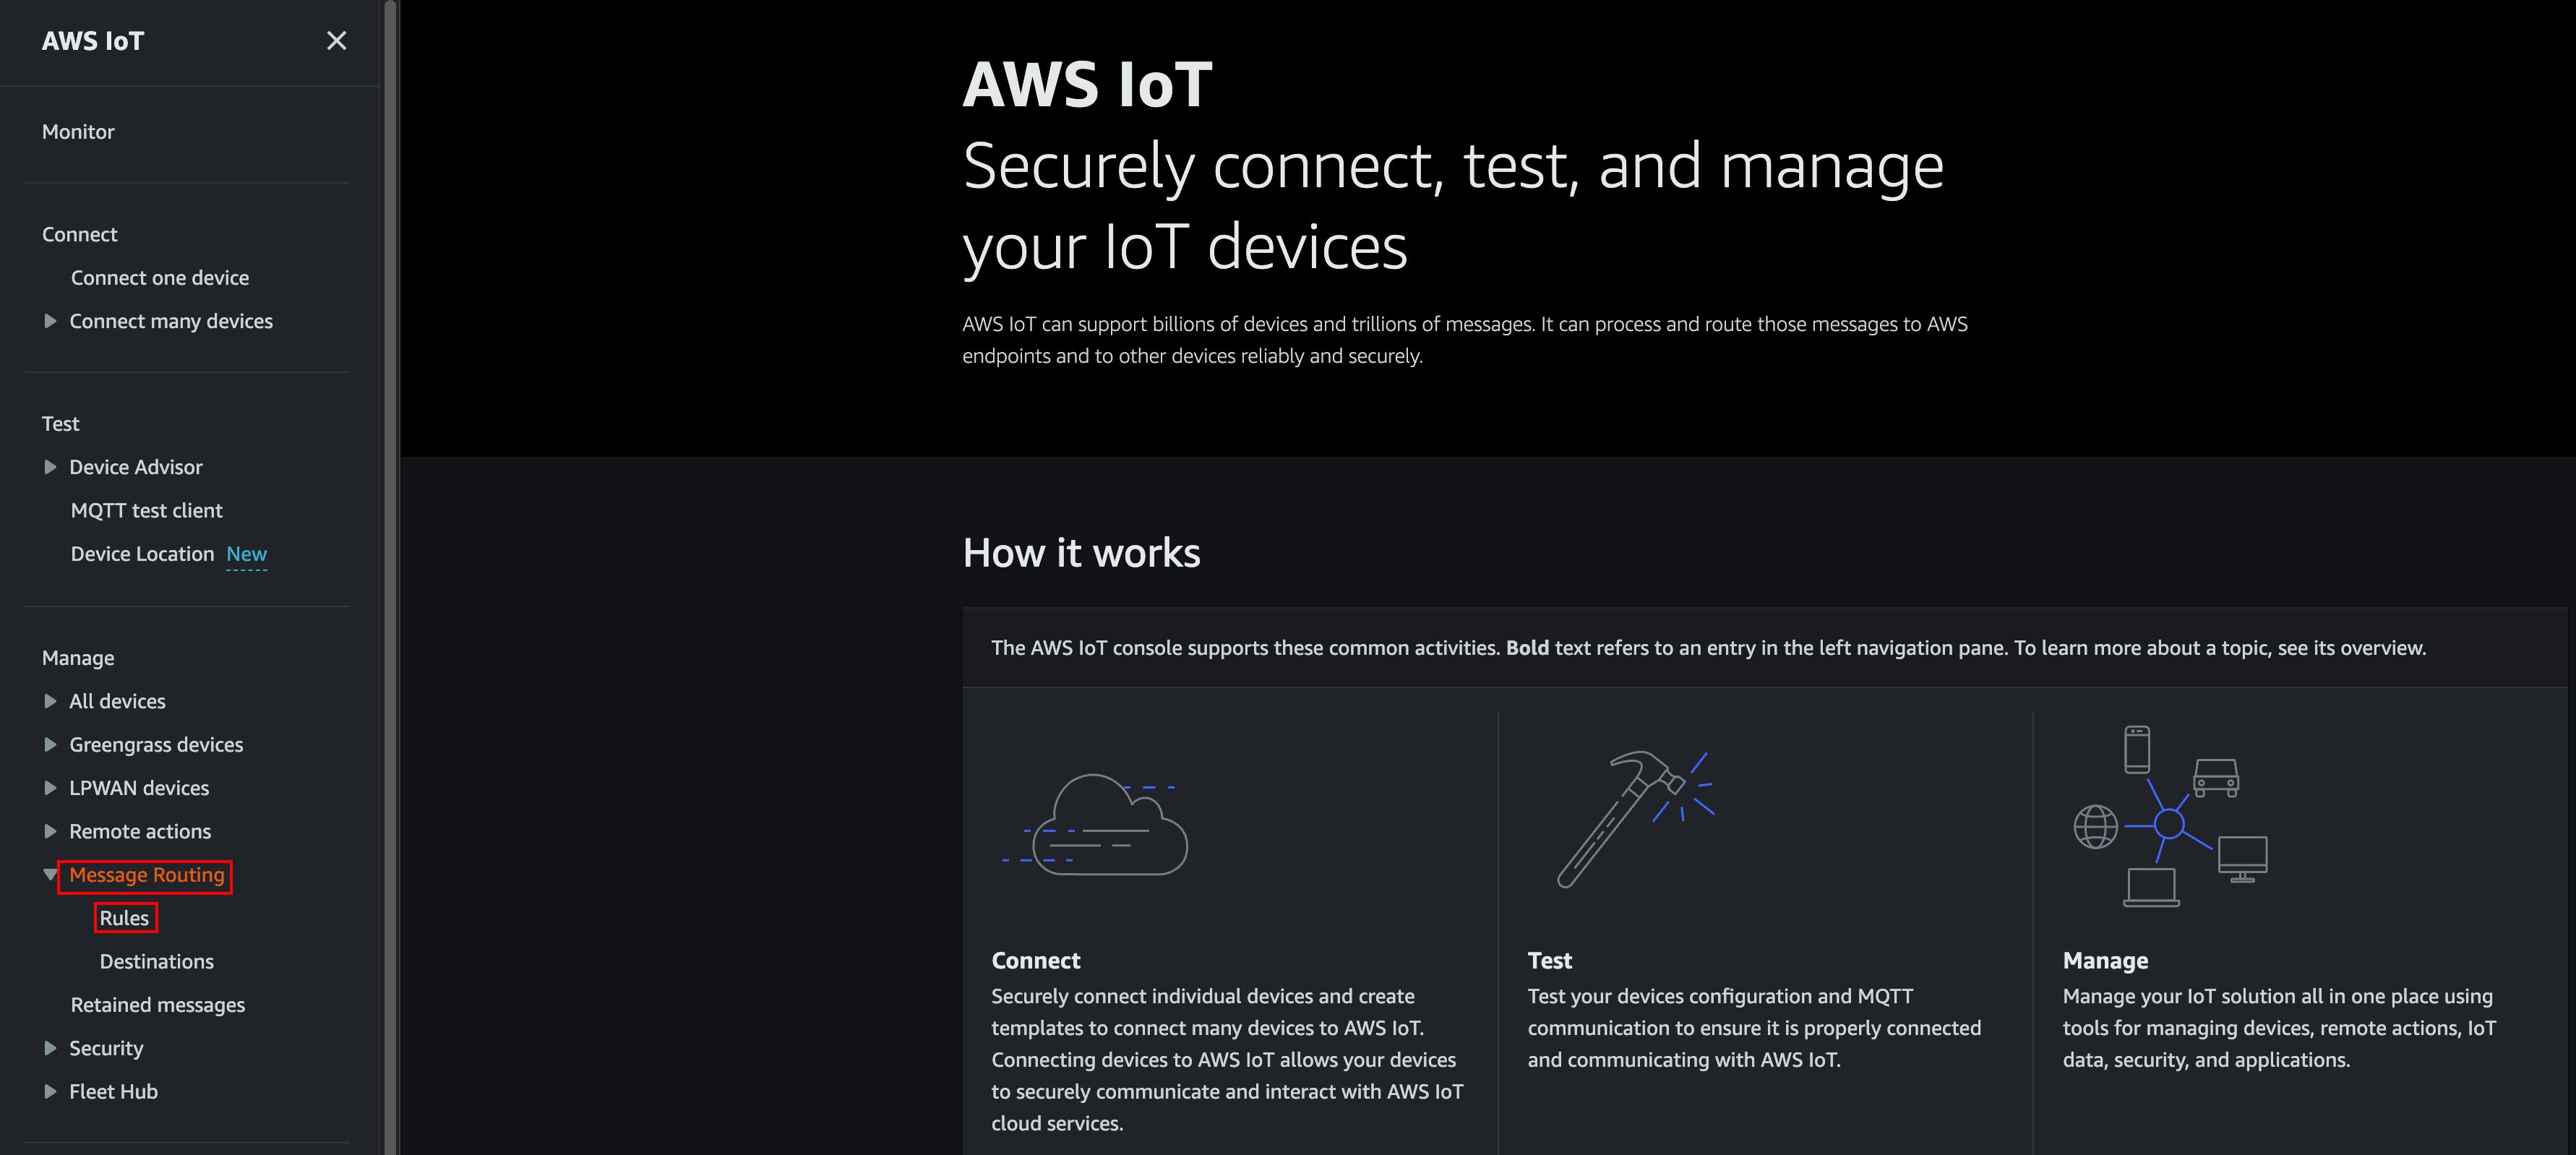
Fig 4. IoT Core Console
- Choose Create Rule

Fig 5. Creating the Rule
- In the Specify rules properties page, enter the following:
- For Rule name, enter TrackingDemo
- For Description, enter An IoT Rule for Amazon Location Service Tracking
- Choose Next
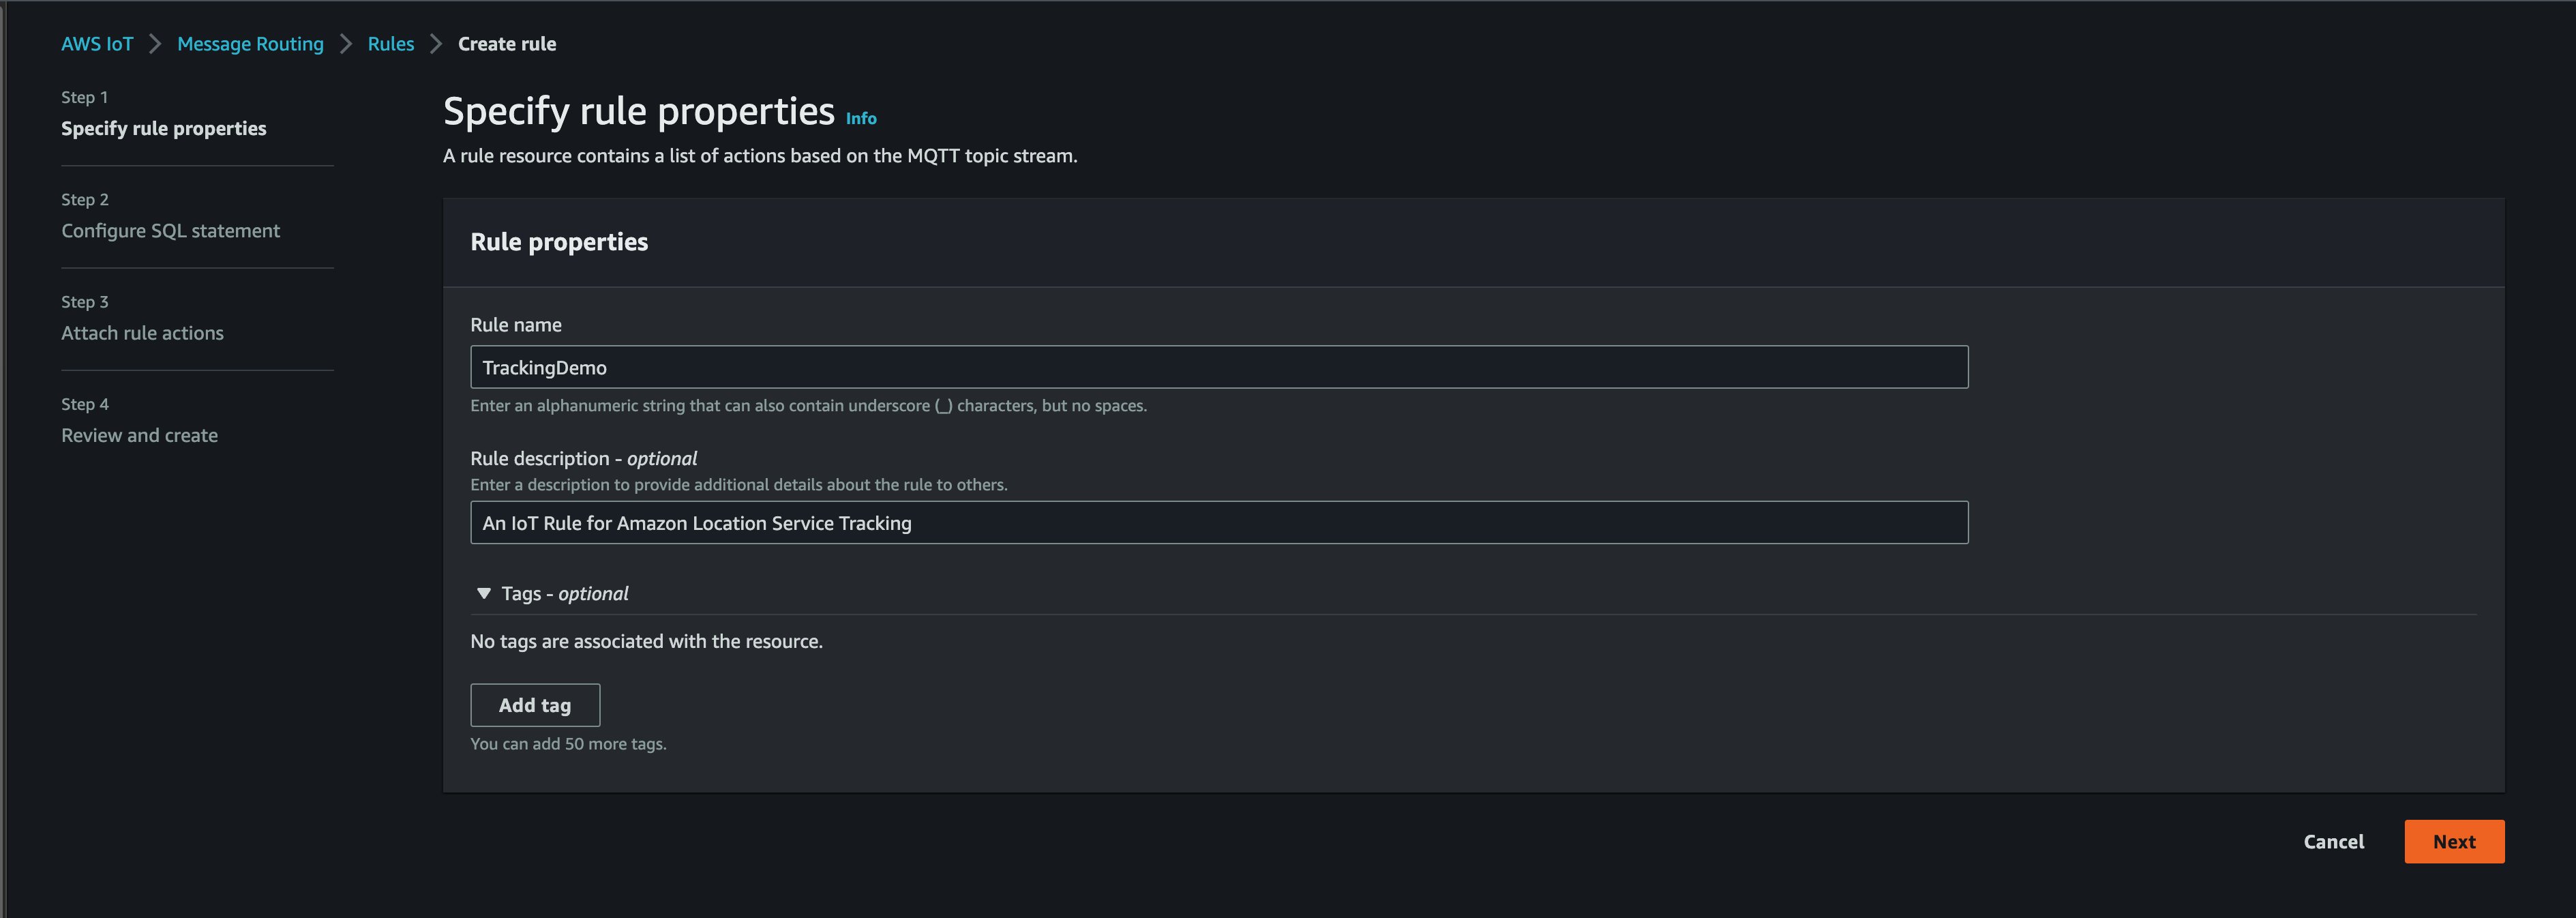
Fig. 6 Specifying rule properties
- On the Configure SQL statement page, enter the following:
- For SQL statement, enter
SELECT * FROM 'iot/trackingdemo'
- For SQL statement, enter
- Choose Next
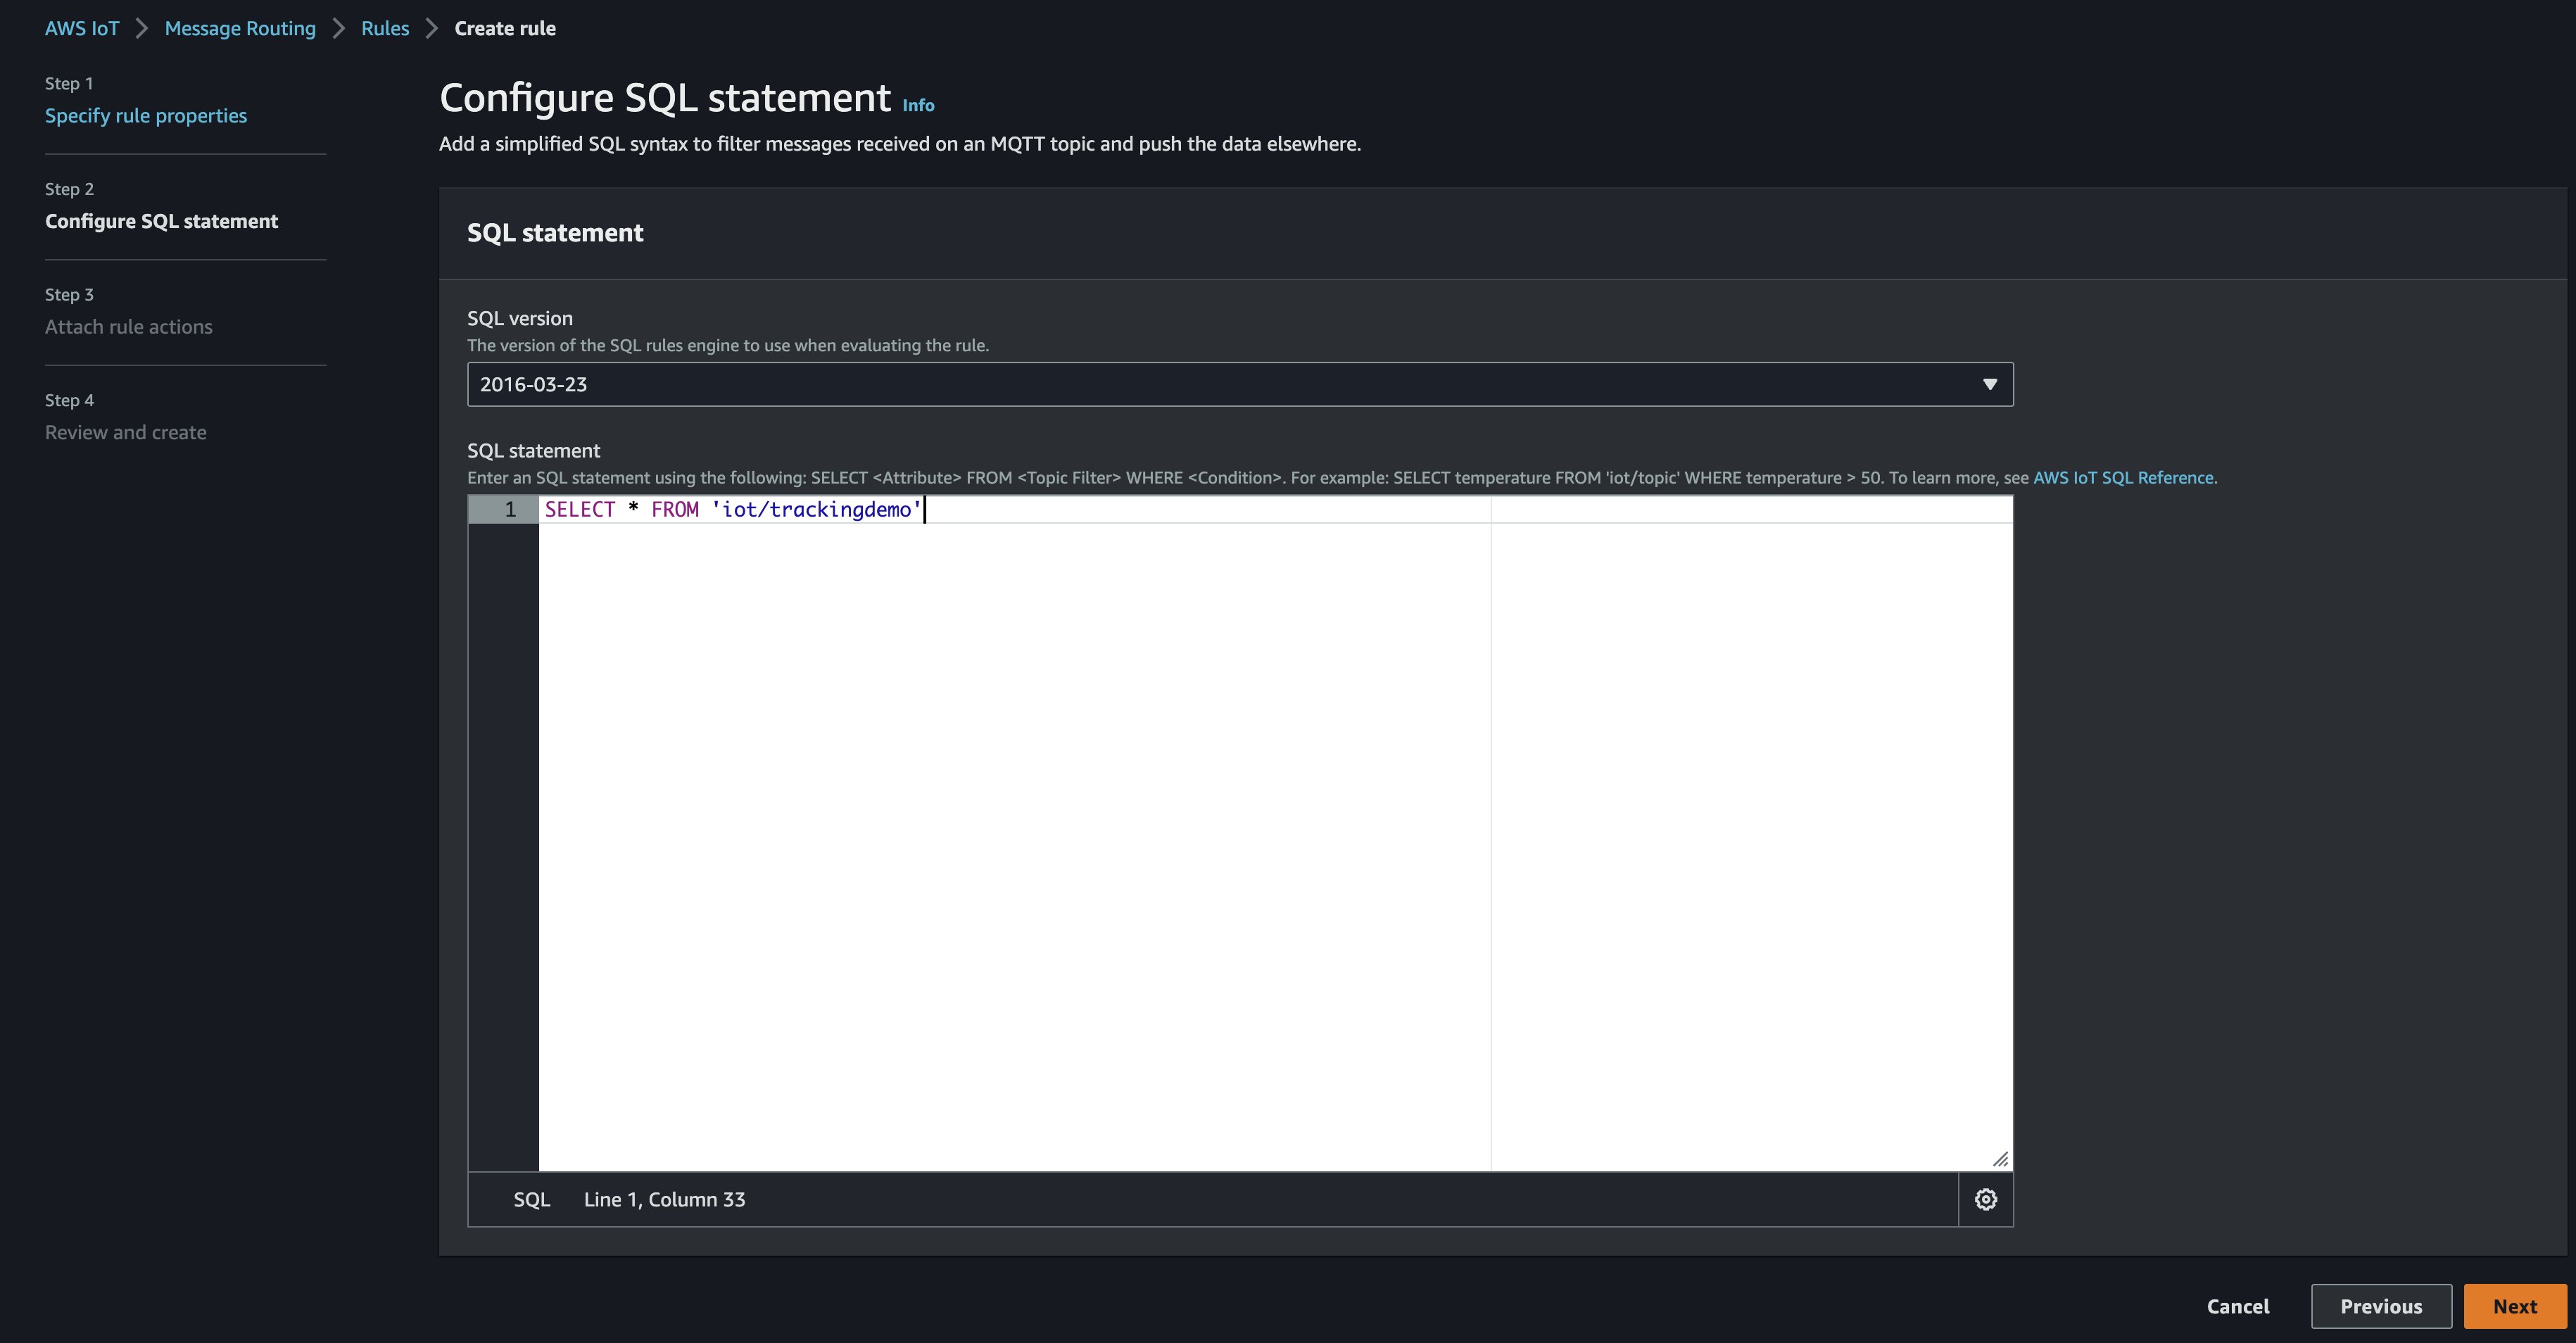
Fig. 7 Configuring SQL Statement
- In the Rules actions dialog box, do the following:
- For Action 1, select the Choose an action dropdown, and select Location
- In the Tracker name section, choose Create a tracker
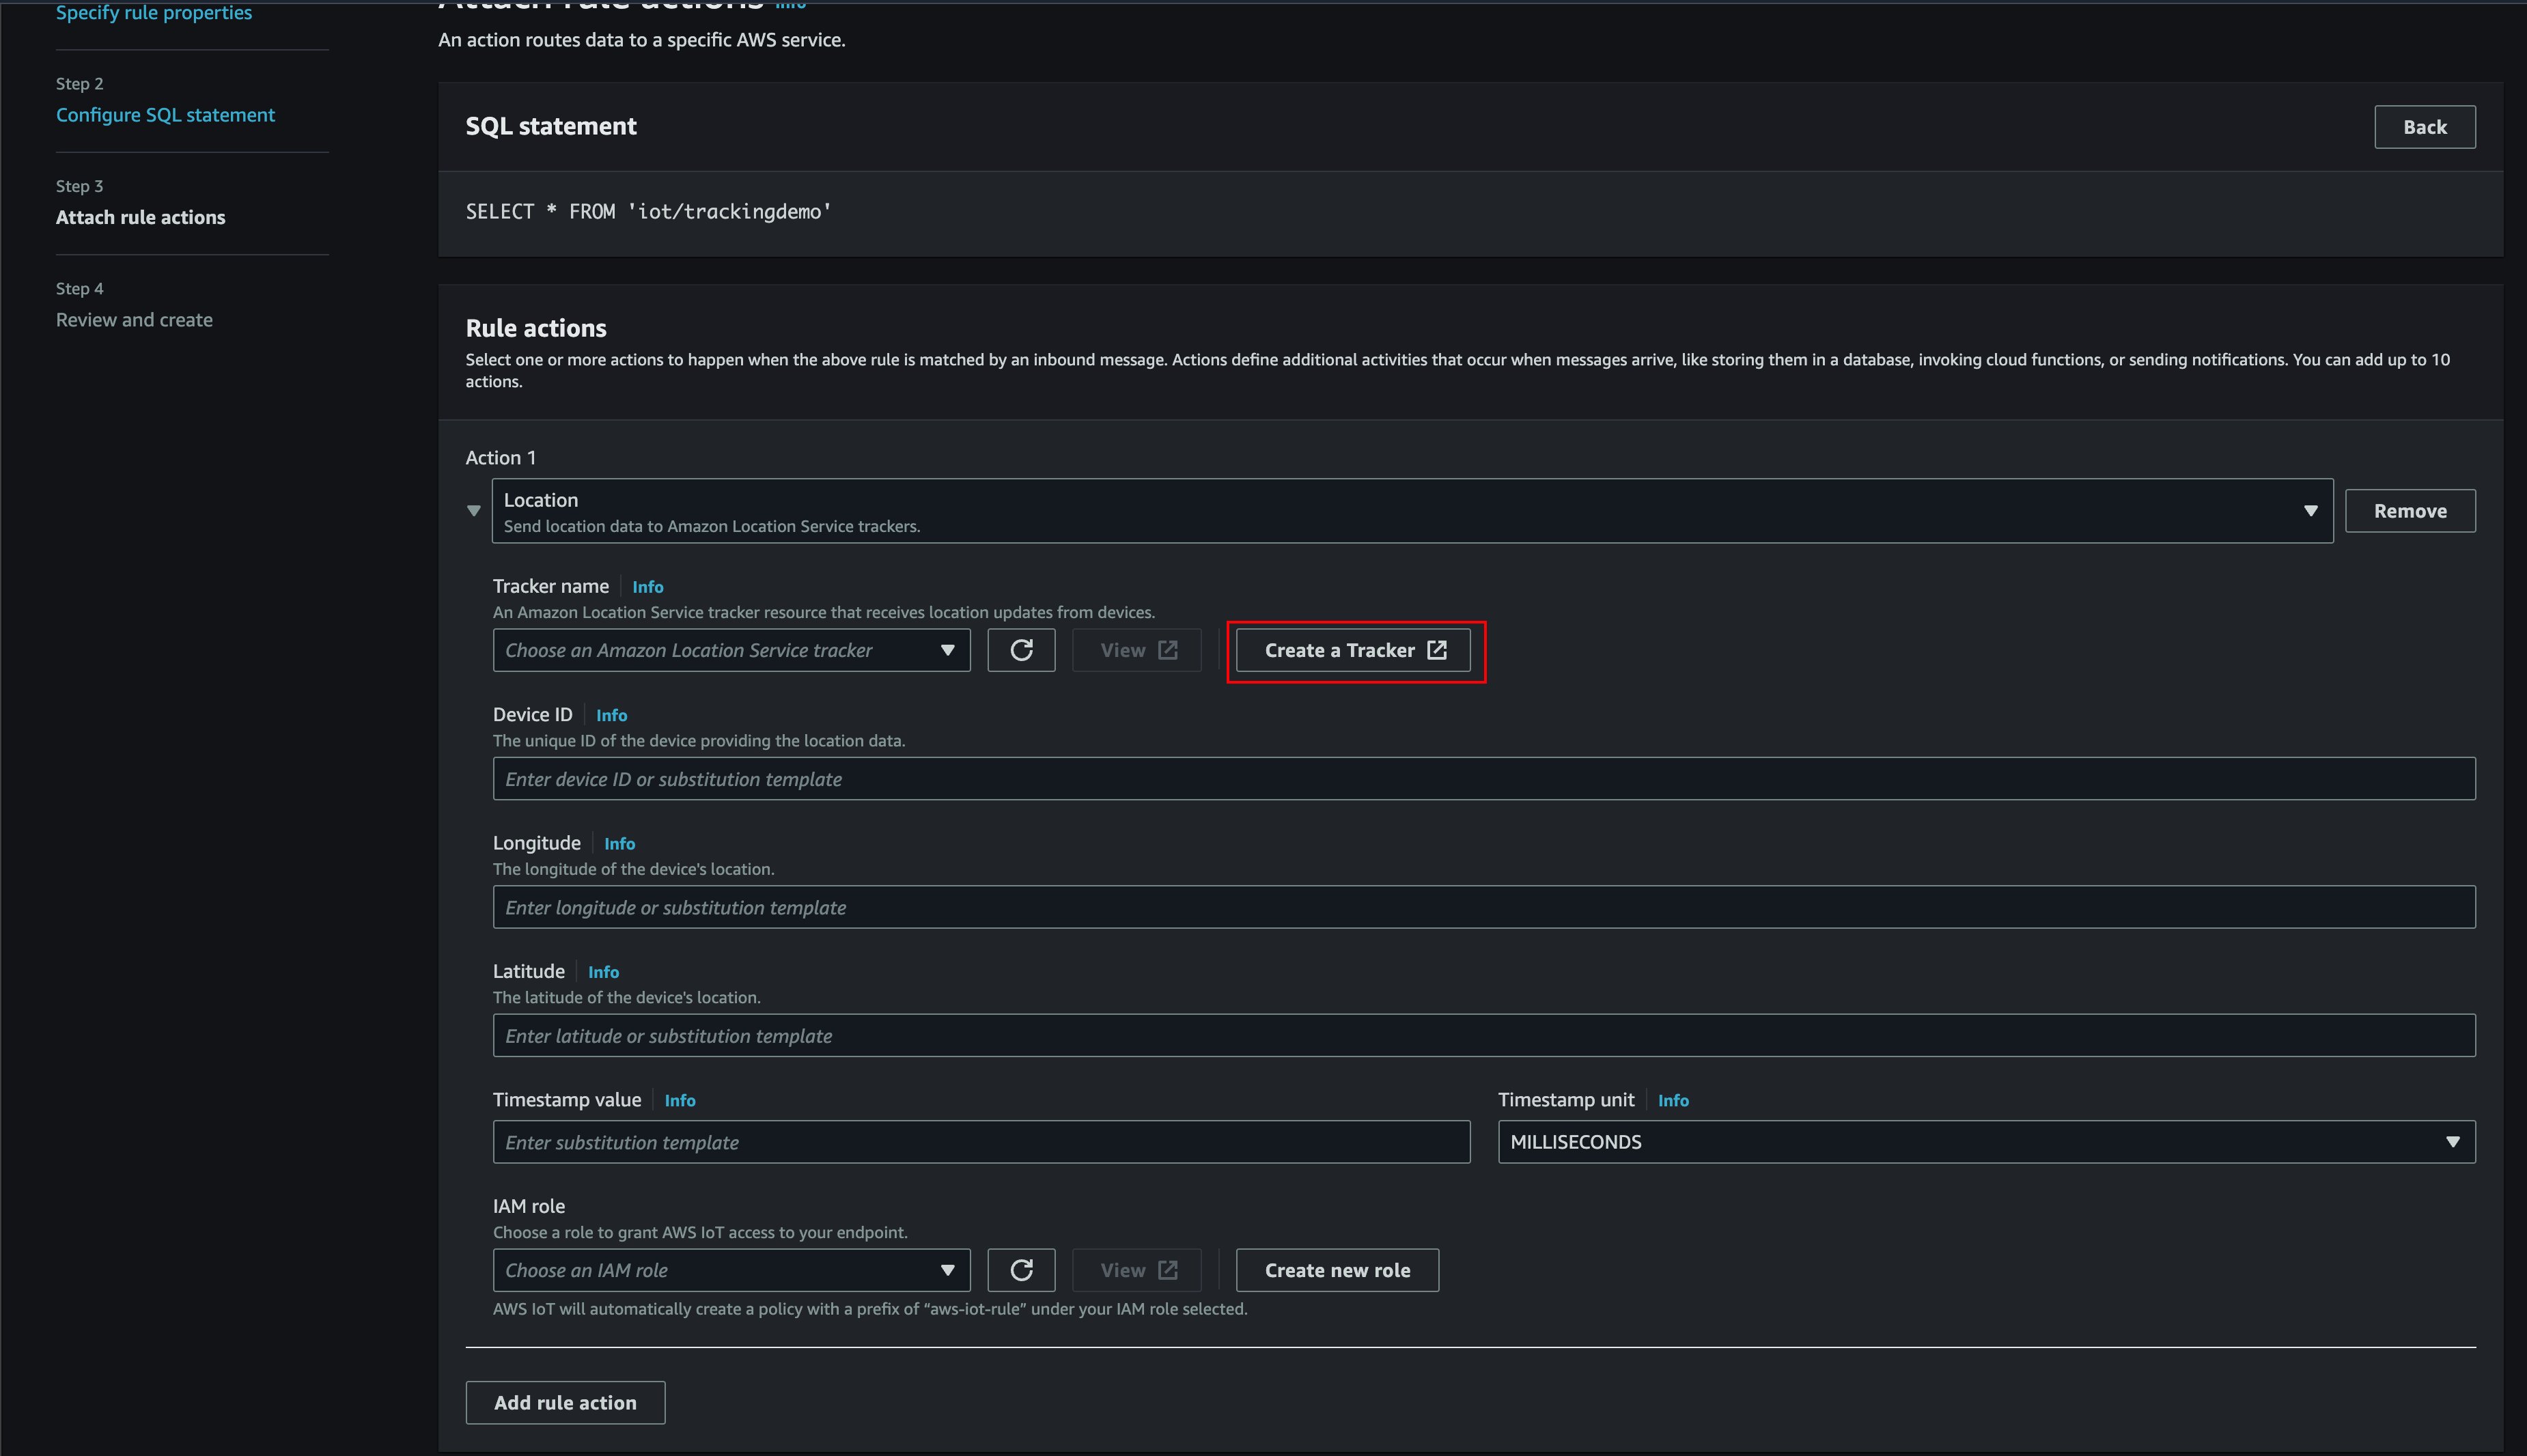
Fig. 8 Creating a Tracker
To create a tracker
- On the Create tracker page, do the following:
- For Name enter TrackerDemo
- For Position filtering, choose Accuracy-based filtering
- Choose Create tracker
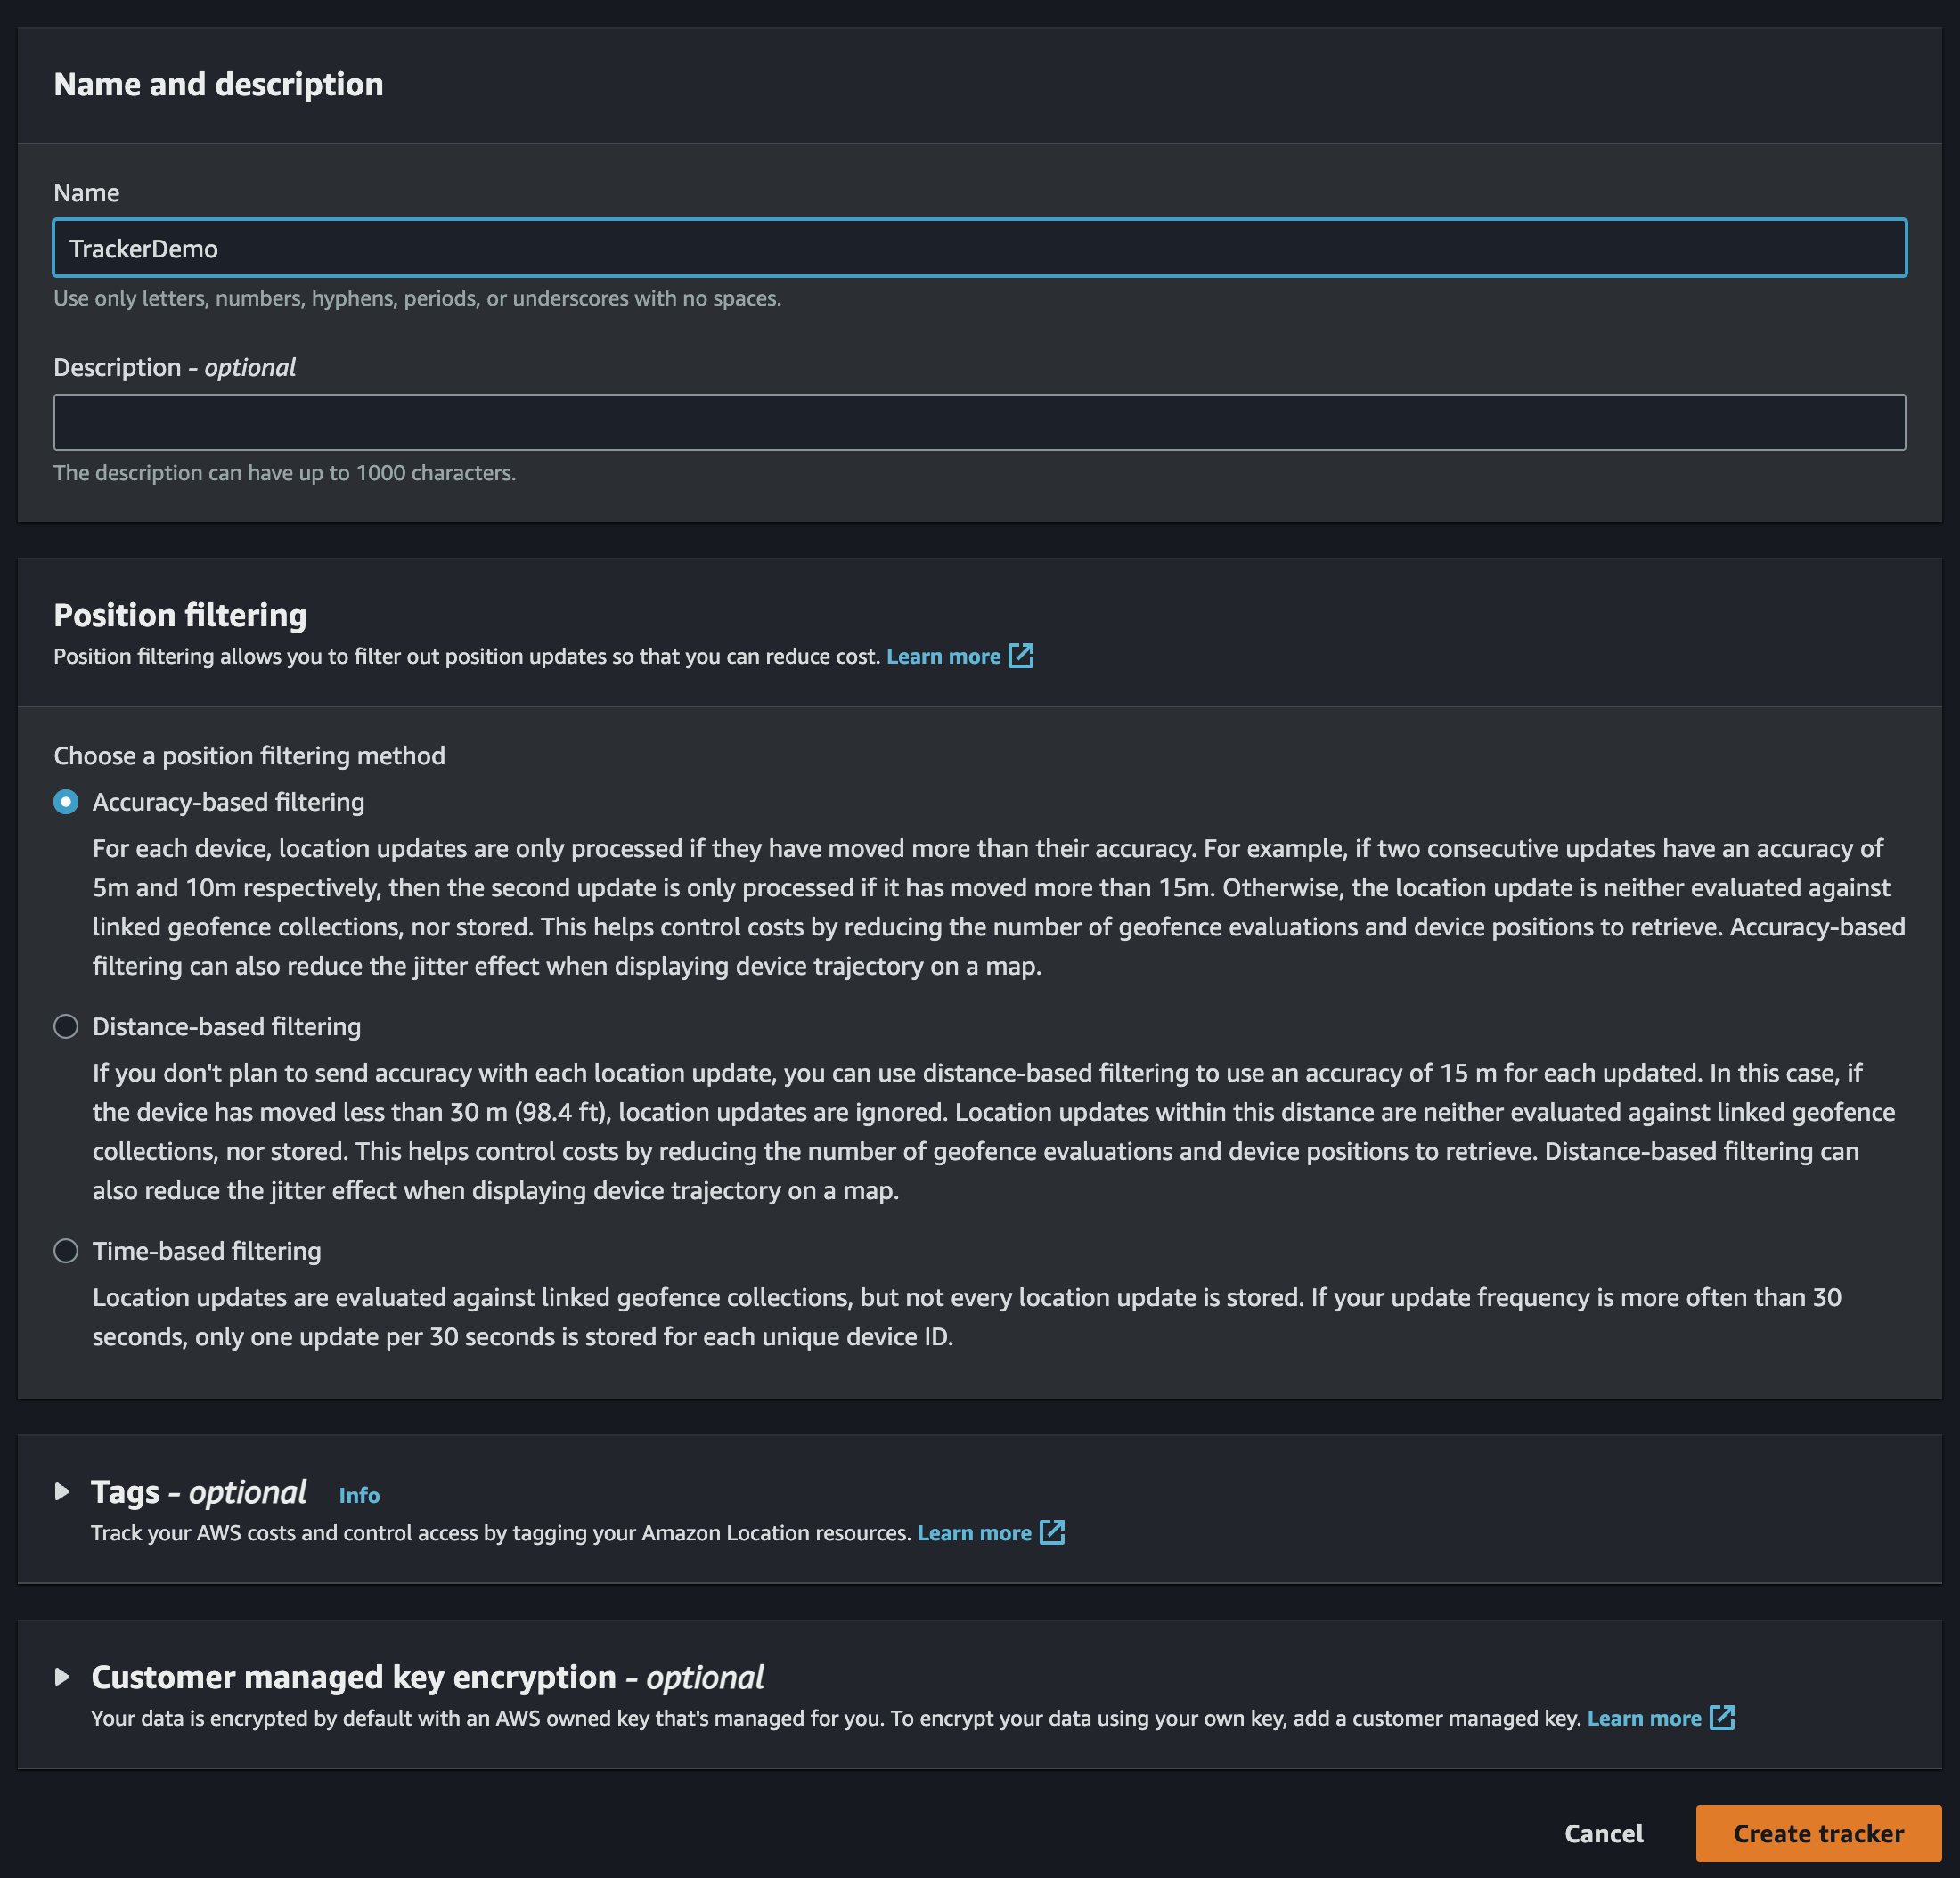
Fig. 9 Tracker Properties
To configure the tracker rule
- Navigate to your AWS Iot Core tab, and choose Refresh next to the Choose an Amazon Location Service tracker dropdown
- Select TrackerDemo
- Since AWS IoT Core supports substitution, you can derive these fields directly from the payload. Enter the following:
- For Device ID enter ${VIN}
- For Longitude enter ${location.longitude}
- For Latitude enter ${location.latitude}
- For Timestamp value enter ${timestamp()}
- Choose Create new role and enter TrackingDemo for the Role name.
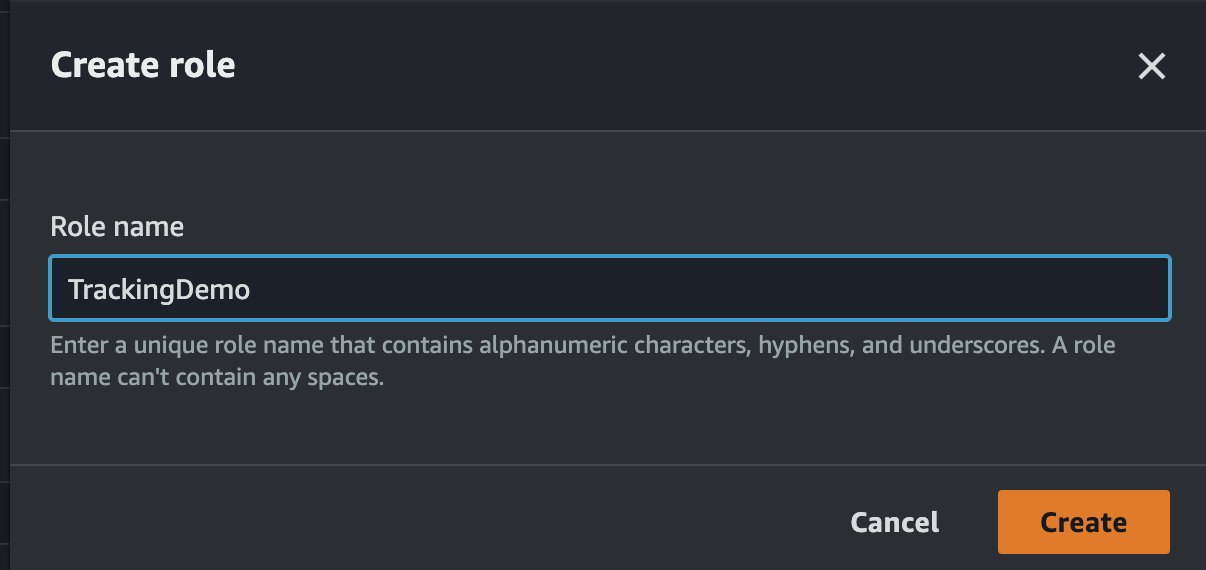
Fig. 10 Creating the IAM Role
Your configuration should look like this
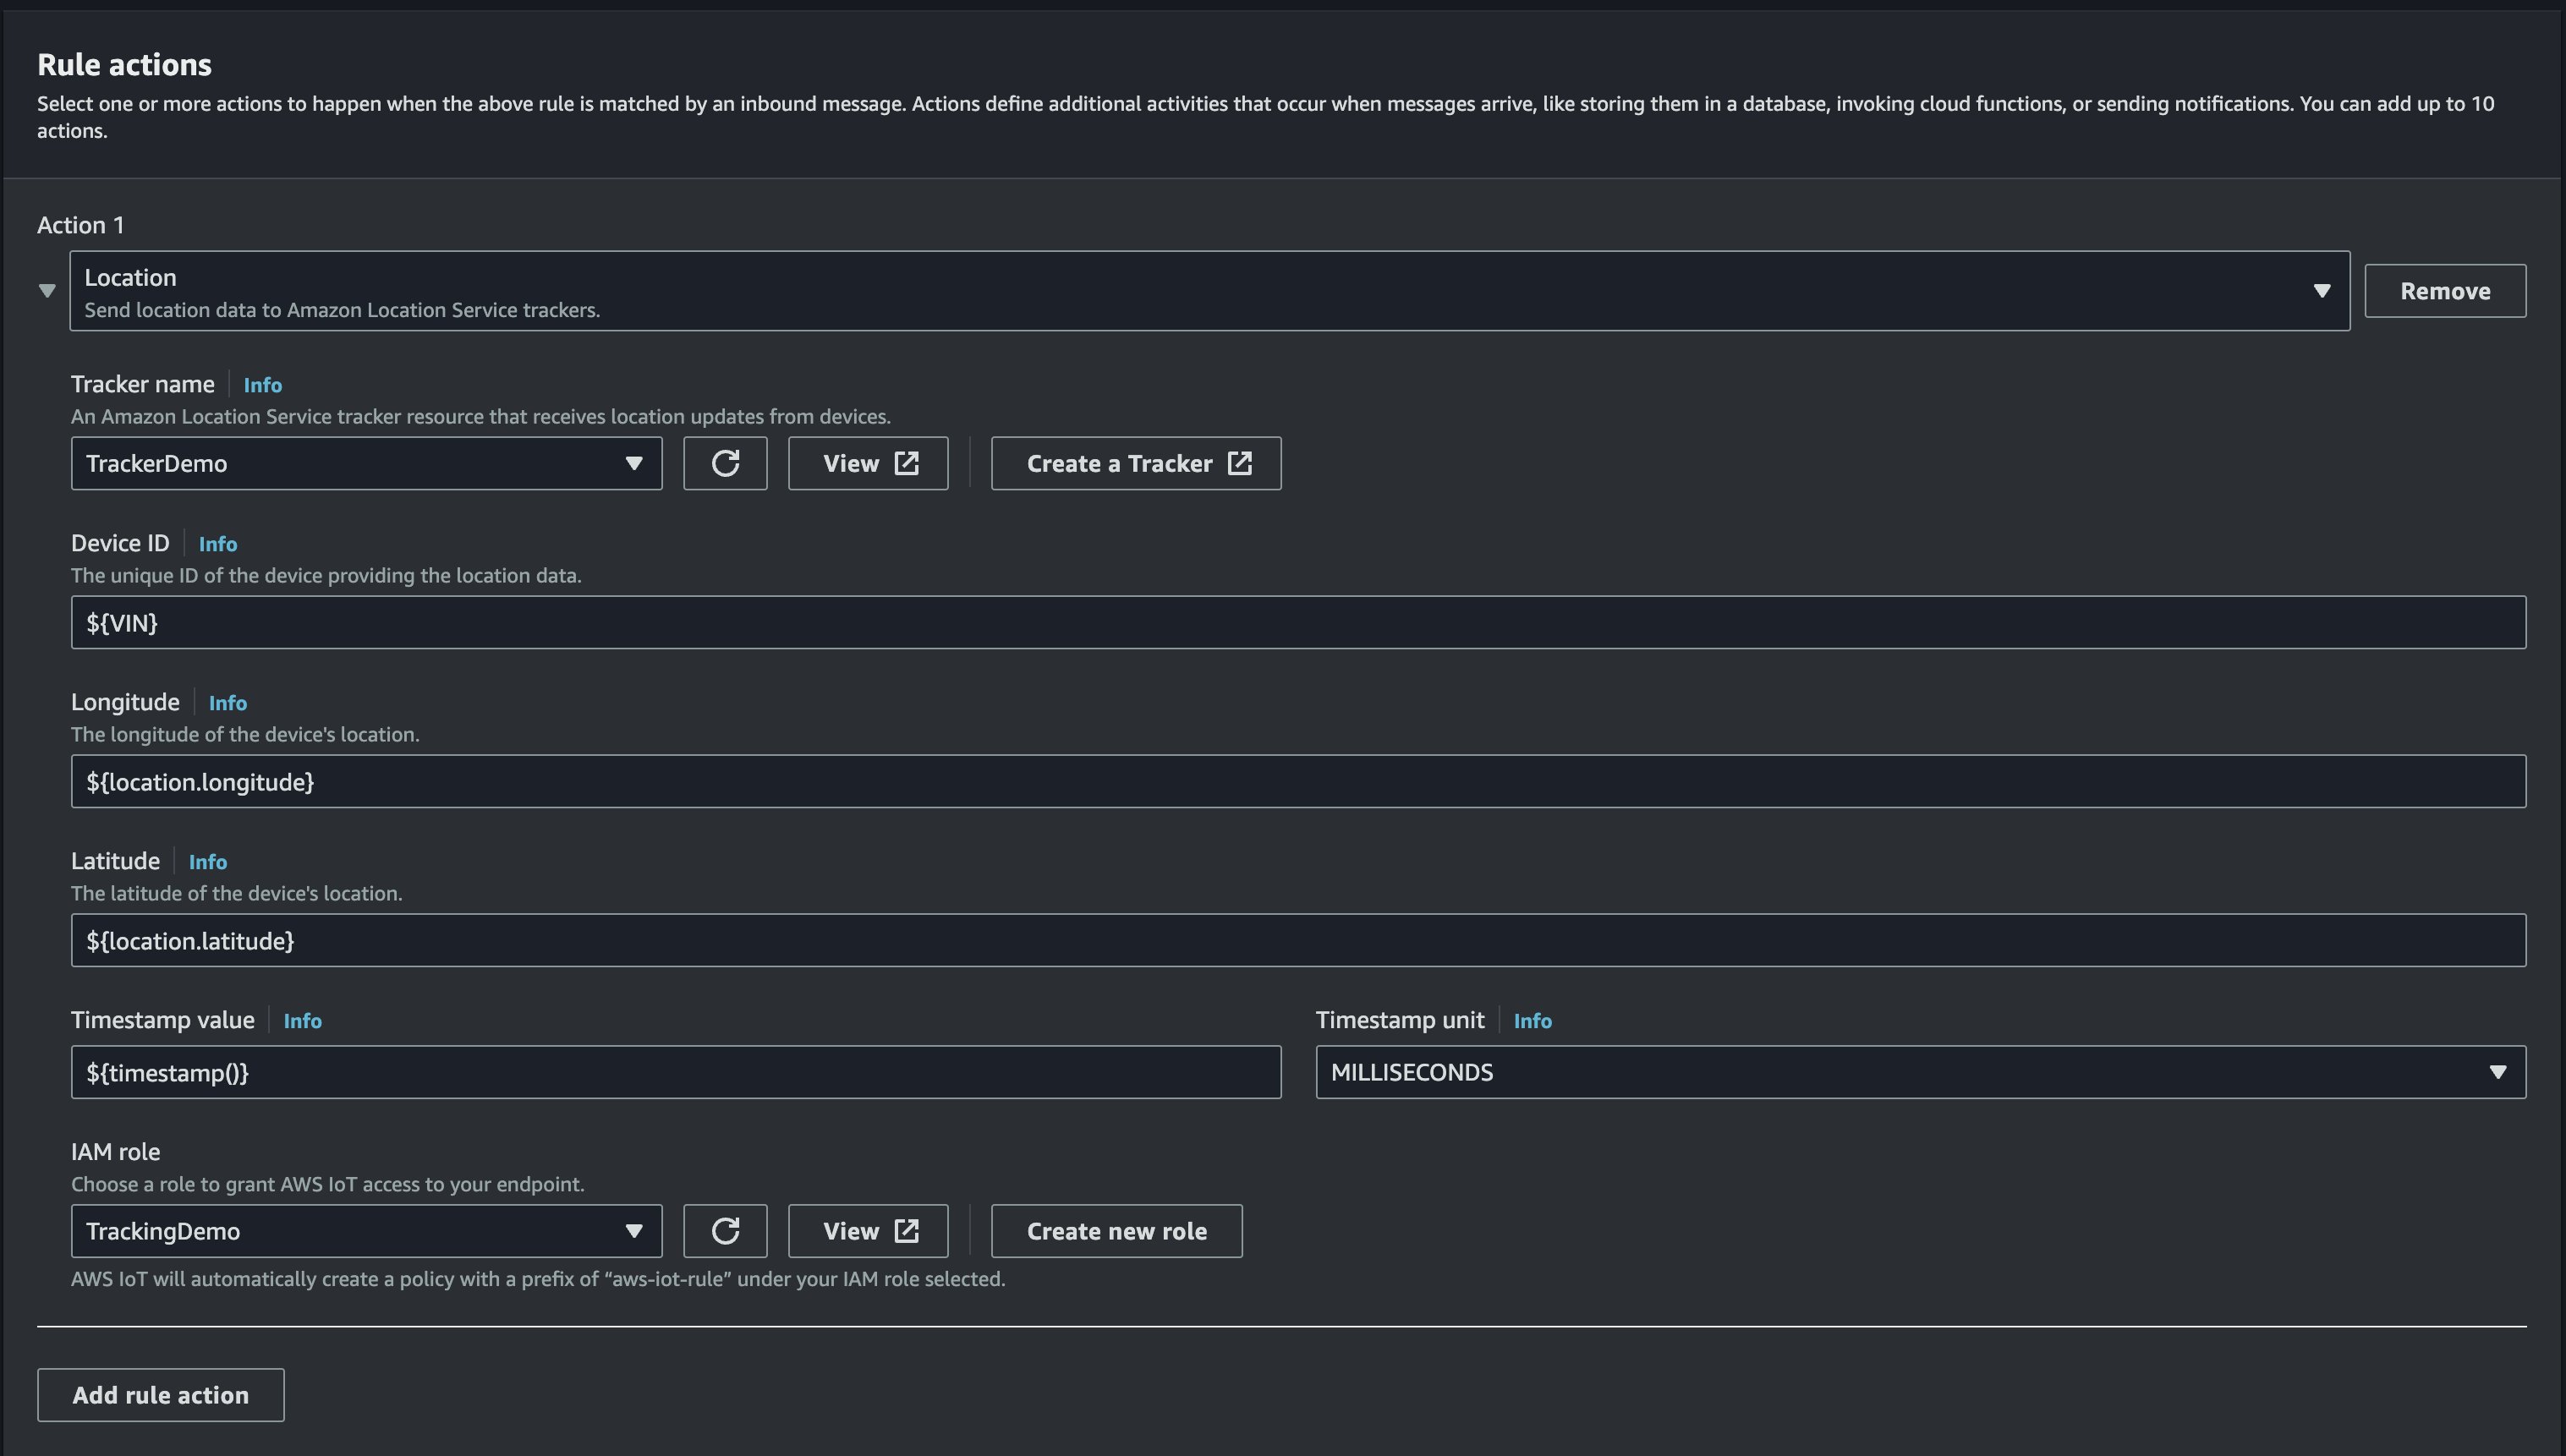
Fig. 11 Rule Configuration
Choose Next then choose Create on the Review and create page.
Starting the simulation
- Navigate to your IoT Device Simulator, choose View next to TrackingDemo

Fig. 12 Viewing the Simulation
- Choose Start and within a few seconds, you should see the map update with the position of your simulated device. If it doesn’t show up within a few seconds, refresh the page.
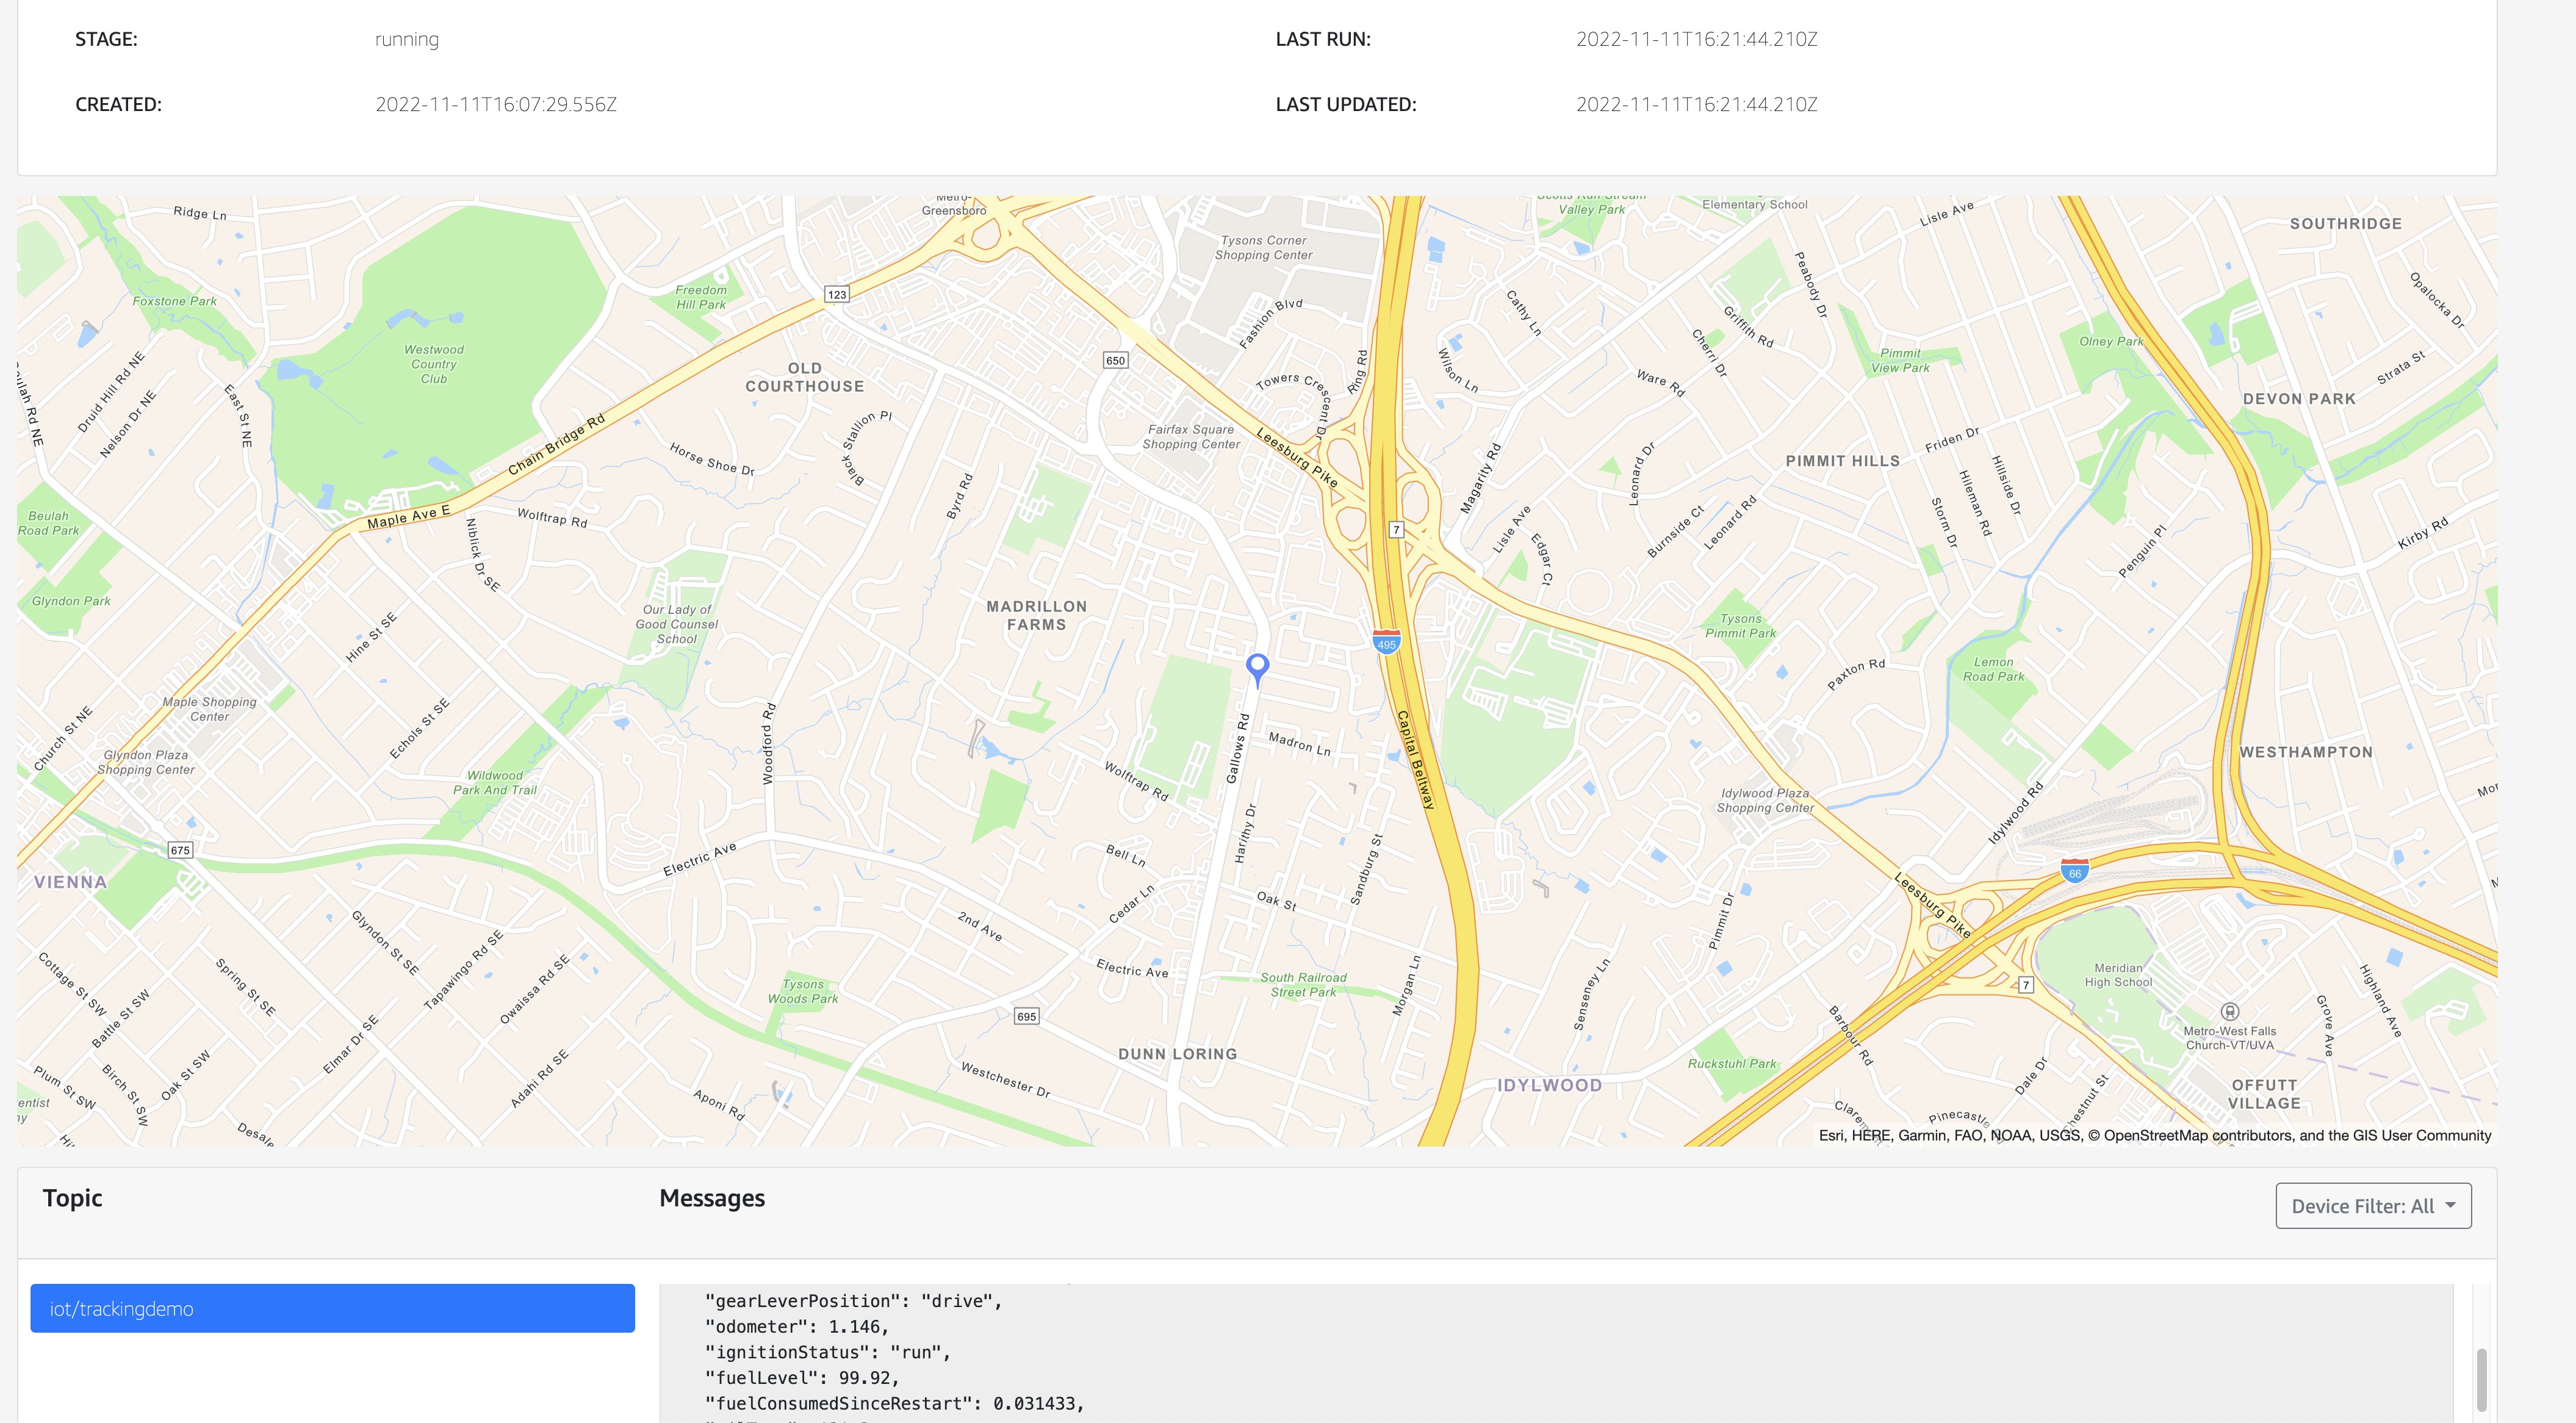
Fig. 13 Starting the Simulation
Viewing the Amazon Location Service tracker
You can now confirm that the tracker is being updated. From the simulation, copy the VIN number from the Messages portion of the page. The Messages portion shows all the raw data being sent to AWS IoT Core.
Viewing Tracker History
- Navigate to the AWS IoT Core Console and open CloudShell which is located in the top right menu bar near the Region. This will open an interactive command line interface that you can use to issue commands against the Location Service API.

Fig. 14 CloudShell Service
- Enter the following command, substituting <VIN> for the VIN number from the simulator
aws location get-device-position --device-id <VIN> --tracker-name TrackerDemo - This will return the latest device position. For example:
[cloudshell-user@ip-10-0-136-227 ~]$ aws location get-device-position --device-id <VIN> --tracker-name TrackerDemo
{"DeviceId": "<VIN>;",
"Position": [
-77.227279,
38.918713
],
"ReceivedTime": "2022-11-11T16:30:47.807000+00:00",
"SampleTime": "2022-11-11T16:30:47.665000+00:00"}
4. You can use the same CloudShell session to view the device position history as well. Enter the following command:
aws location get-device-position-history --device-id <VIN> --tracker-name TrackerDemo5. This will provide a list of past device updates, up to 30 days. This data can be used to plot the device history on a map, or perform analytics regarding distances traveled, time spent at locations, and more.
Cleanup
To remove the IoT Device Simulator, follow the steps in the implementation guide.
To delete the AWS IoT Core rule
- Navigate to AWS IoT Core choose Message Routing
- Choose Rules, select TrackingDemo and select Delete.
Summary
In this post, you have learned how to use the new Location Action feature in AWS IoT Core rules to update an Amazon Location Service tracking resource using messages from AWS IoT Core. Using the IoT Device Simulator, you can set up a simple demo of a device moving down a road, and using the Amazon Location Service API, you can track and visualize that device’s current position, as well as its position history. These granular insights on location data can help you better manage your devices, reduce operational expenses, and empower your maintenance crew with actionable information. To learn more about the Amazon Location action for AWS IoT Core, visit the documentation here.
About the Authors
 Zachariah Elliott works as a Solutions Architect focusing on Amazon Location Service at AWS. He is passionate about helping customers build geospatial solutions on AWS. He is also part of the IoT Subject Matter Expert community at AWS and loves helping customers develop unique IoT-based solutions.

Anand Vijayan works as a Senior Product Manager focusing on Amazon Location Service at AWS. He is excited about geospatial technologies and enjoys helping customers solve complex problems at scale leveraging the power of the cloud. He is an avid astronomer and has a keen interest in all things space.