AWS Messaging Blog
Creating a Seamless Handoff Between Amazon Pinpoint and Amazon Connect
Note: This post was written by Ilya Pupko, Senior Consultant for the AWS Digital User Engagement team.
| Time to read | 5 minutes |
| Learning level | Intermediate (200) |
| Services used | Amazon Pinpoint, Amazon SNS, AWS Lambda, Amazon Lex, Amazon Connect |
Your customers deserve to have helpful communications with your brand, regardless of the channel that you use to interact with them. There are many situations in which you might have to move customers from one channel to another—for example, when a customer is interacting with a chatbot over SMS, but their needs suddenly change to require voice assistance. To create a great customer experience, your communications with your customers should be seamless across all communication channels.
Welcome aboard Customer Obsessed Airlines
In this post, we look at a scenario that involves our fictitious airline, Customer Obsessed Airlines. Severe storms in one area of the country have caused Customer Obsessed Airlines to cancel a large number of flights. Customer Obsessed Airlines has to notify all of the affected customers of the cancellations right away. But most importantly, to keep customers as happy as possible in this unfortunate and unavoidable situation, Customer Obsessed Airlines has to make it easy for customers to rebook their flights.
Fortunately, Customer Obsessed Airlines has implemented the solution that’s outlined later in this post. This solution uses Amazon Pinpoint to send messages to a targeted segment of customers—in this case, the specific customers who were booked on the affected flights. Some of these customers might have straightforward travel itineraries that can simply be rebooked through interactions with a chatbot. Other customers who have more complex itineraries, or those who simply prefer to interact with a human over the phone, can be handed off to an agent in your call center.
About the solution
The solution that we’ll build to handle this scenario can be deployed in under an hour. The following diagram illustrates the interactions in this solution.
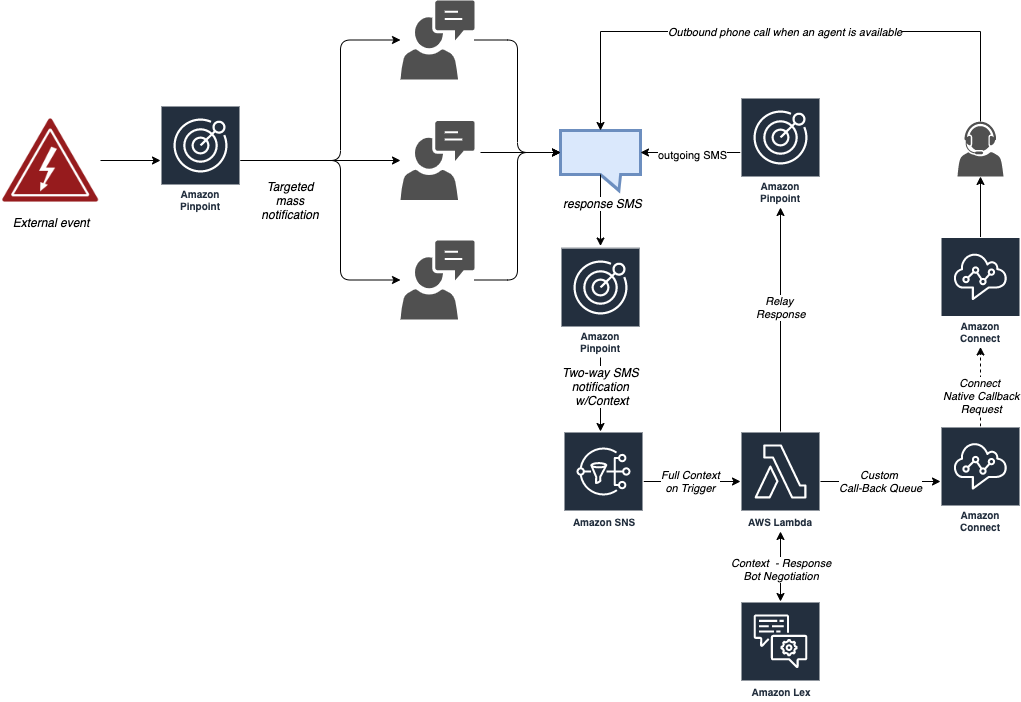
At a high level, this solution uses the following workflow:
- An event occurs. Automated impact analysis systems trigger the creation of custom segments—in this case, all passengers whose flights were cancelled.
- Amazon Pinpoint sends a message to the affected passengers through their preferred channels. Amazon Pinpoint supports the email, SMS, push, and voice channels, but in this example, we focus exclusively on SMS.
- Passengers who receive the message can respond. When they do, they interact with a chatbot that helps them book a different flight.
- If a passenger requests a live agent, or if their situation can’t be handled by a chatbot, then Amazon Pinpoint passes information about the customer’s situation and communication history to Amazon Connect. The passenger is entered into a queue. When the passenger reaches the front of the queue, they receive a phone call from an agent.
- After being re-booked, the passenger receives a written confirmation of the changes to their itinerary through their preferred channel. Passengers are also given the option of providing feedback on their interaction when the process is complete.
To build this solution, we use Amazon Pinpoint to segment our customers based on their attributes (such as which flight they’ve booked), and to deliver messages to those segments.
We also use Amazon Connect to manage the voice calling part of the solution, and Amazon Lex to power the chatbot. Finally, we connect these services using logic that’s defined in AWS Lambda functions.
Setting up the solution
Step 1: Set up Amazon Pinpoint and link it with Amazon Lex
The first step in setting up this solution is to create a new Amazon Pinpoint project and configure the SMS channel. When that’s done, you can create an Amazon Lex chatbot and link it to the Amazon Pinpoint project.
We described this process in detail in an earlier blog post. Complete the procedures in Create an SMS Chatbot with Amazon Pinpoint and Amazon Lex, and then proceed to step 2.
Step 2: Set up Amazon Connect and link it with your Amazon Lex chatbot
By completing step 1, we’ve created a system that can send messages to our passengers and receive messages from them. The next step is to create a way for passengers to communicate with our call center.
The Amazon Connect Administrator Guide provides instructions for linking an Amazon Lex bot to an Amazon Connect instance. For complete procedures, see Add an Amazon Lex Bot.
When you complete these procedures, link your Amazon Connect instance to the same Amazon Lex bot that you created in step 1. This step is intended to provide customers with a consistent, cohesive experience across channels.
Step 3: Set up an Amazon Connect callback queue and use Amazon Pinpoint keyword logic to trigger it
Now that we’ve configured Amazon Pinpoint and Amazon Connect, we can connect them.
Linking the two services makes it possible for passengers to request additional assistance. Traditionally, passengers in this situation would have to call a call center themselves and then wait on hold for an agent to become available. However, in this solution, our call center calls the passenger directly as soon as an agent is available. When the agent calls the passenger, the agent has all of the information about the passenger’s issue, as well as a transcript of the passenger’s interactions with your chatbot.
To implement an automatic callback mechanism, use the Amazon Pinpoint Connect Callback Requestor, which is available on the AWS GitHub page.
Next steps
By completing the preceding three steps, you can send messages to a subset of your users based on the criteria you choose and the type of message you want to send. Your customers can interact with your message by replying with questions. When they do, a chatbot responds intelligently and appropriately.
You can add to this solution by expanding it to cover other communication channels, such as push notifications. You can also automate the initial communication by integrating the solution with your systems of record.
We’re excited to see what you build using the solution that we outlined in this post. Let us know of your ideas and your successes in the comments.