Front-End Web & Mobile
Amplify UI’s new Authenticator component makes it easy to add customizable login pages to your React, Angular, or Vue app
June 27, 2024: This blog post covers Amplify Gen 1. For new Amplify apps, we recommend using Amplify Gen 2. You can learn more about Gen 2 in our launch blog post.
This post is written by Nikhil Swaminathan and Eric Clemmons who work at AWS Amplify.
AWS Amplify UI recently announced a new version of the Authenticator component for JavaScript (JS)-based web apps, giving developers the easiest way to add login experiences to their app with a single line of code. The new version of the Amplify UI library ships with connected components such as the Authenticator for React, Angular, and Vue, along with a set of themeable UI primitives such as buttons, text, and inputs. This gives you a single library to build your entire app user interface leveraging our connected and primitive components.

In this blog post we will deploy a React app with Amplify Hosting, set up auth, and then integrate the <Authenticator> UI component in minutes. We will then show how to customize the UI, and share the same auth backend across a React and Vue app.
Get started – one-click hosting
To get started, deploy a basic create-react-app sample by clicking on the button below.
![]()
You will be asked to connect your GitHub account. Once connected, Amplify will fork the sample repository in your account and ask you to confirm deployment.

That’s it! This triggers a CI/CD pipeline as shown and within a minute or two your main branch should be hosted at an amplifyapp.com domain.
Create an app backend with authentication
Now that our app is hosted, let’s add auth to it. Navigate to the backend environment tab and choose Get started. This will trigger a workflow to setup a default staging Amplify environment. Once setup, choose Edit backend. This will open the Admin UI – the Admin UI is a visual interface to create and manage your backend, hosted outside the AWS console.
In the Admin UI, navigate to the ‘Authentication’ tab to set up auth. For this post, we are going to set up login mechanisms to be Email, Sign-in with Facebook, and Sign in with Google. Amplify uses CloudFormation to deploy your backend, storing your backend definition as infrastructure-as-code.
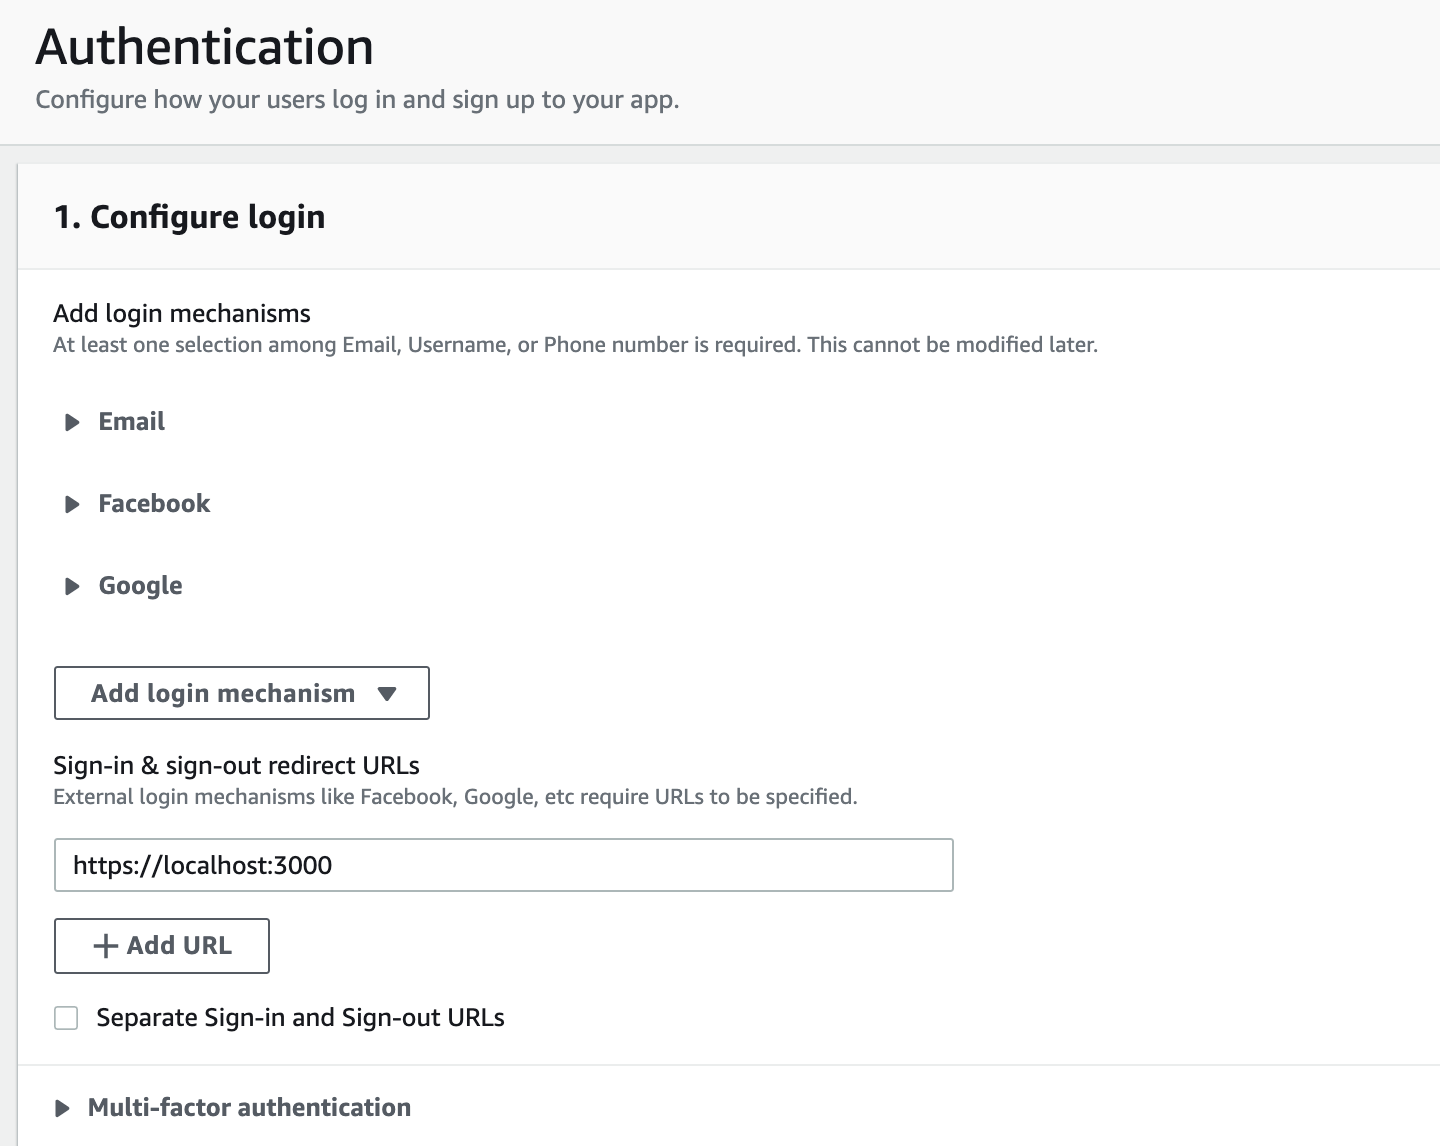
Set up auth with Email, Facebook, Google
Add <Authenticator> UI to our React app
Now that your backend is set up, let’s go ahead and build our app. First, let’s clone our React sample locally and then connect to our backend. To connect to this backend, install the Amplify CLI and Amplify UI React library.
# Step 0: git clone the cra-starter forked repo

# Install Amplify UI and the Amplify JS lib
npm i @aws-amplify/ui-react aws-amplify

# Install Amplify CLI
npm install -g @aws-amplify/cli

# Connect to backend
cd cra-starter
amplify pull --appId XXX --envName staging
# Accept defaults
Do you want to modify your backend? (y/N): Y
Update your App.js to use the withAuthenticator Higher-order component (HOC). The HOC gives you complete sign-in, sign-up, forgot password workflows in your app with a few lines of code.
import { Amplify } from 'aws-amplify';
import { withAuthenticator } from '@aws-amplify/ui-react';
import '@aws-amplify/ui-react/styles.css';

import awsExports from './aws-exports';
import React from 'react';
Amplify.configure(awsExports);


function App({ signOut, user }) {
  return (
    <div>
      <h1>Hello {user.username}</h1>
      <button onClick={signOut}>Sign out</button>
      </div>
  );
}

export default withAuthenticator(App);
That’s it! The new version of the authenticator is now ready to use. The main benefits over previous versions are:
Zero-config setup with the Admin UI and CLI: The Authenticator UI automatically detects your deployed authentication settings and displays the relevant login mechanisms – in this case Email Facebook, and Google.

New, themeable UI: To build a consistent experience, the connected components are built using brand new Amplify UI primitive components such as buttons, text fields, and tabs that are globally themeable.
Customize default UI
The biggest piece of customer feedback we’ve solved with this release is making the Authenticator easy to use yet fully customizable. Customers have told us that love using the <Authenticator> to get a fully working sign-in, sign-up workflow in their app in minutes, but want the UI to look and feel like their app. To address this feedback we shipped Authenticator un-styled or headless by default, giving customers full control over state, layout, styling, and transitions.
Match your brand
The Authenticator has several “slots” that you can customize to add messaging & functionality to meet your app’s needs. This example demonstrates how to build a login page with a customized font, logo, brand colors, and spacing. You can use the new UI primitives to build custom components and insert them as slots into the Authenticator. Check out the entire sample

Change your layout
Login pages have unique layouts – let’s say you want a 50-50 layout where the login box appears on the left and an image appears on the right. You can use a combination of primitive components such as Flex, Grid, Image along with the Authenticator, to slot the custom components (e.g. Header, Footer) into the page. Check out the entire sample.
import {
  Authenticator,
  Flex,
  Grid,
  Image,
  useTheme,
  View
} from "@aws-amplify/ui-react";

import { Header } from "./Header";
import { Footer } from "./Footer";
import { SignInHeader } from "./SignInHeader";
import { SignInFooter } from "./SignInFooter";

const components = {
  Header,
  SignIn: {
    Header: SignInHeader,
    Footer: SignInFooter
  },
  Footer
};

export function Login() {
  const { tokens } = useTheme();

  return (
    <Grid templateColumns={{ base: "1fr 0", medium: "1fr 1fr" }}>
      <Flex
        backgroundColor={tokens.colors.background.secondary}
        justifyContent="center"
      >
        <Authenticator components={components}>
          {({ signOut, user }) => (
            <main>
              <h1>Hello {user.username}</h1>
              <button onClick={signOut}>Sign out</button>
            </main>
          )}
        </Authenticator>
      </Flex>
      <View height="100vh">
        <Image
          src="https://images.unsplash.com/photo-1495954222046-2c427ecb546d?crop=entropy&cs=tinysrgb&fit=crop&fm=jpg&h=1600&ixid=MnwxfDB8MXxyYW5kb218MHx8Y29tcHV0ZXJzfHx8fHx8MTYzNzE5MzE2MQ&ixlib=rb-1.2.1&q=80&utm_campaign=api-credit&utm_medium=referral&utm_source=unsplash_source&w=900"
          width="100%"
          height="100%"
          objectFit="cover"
        />
      </View>
    </Grid>
  );
}
Login box with image, 50-50.
Deploy updates with full-stack CI/CD
Now that you have updated your app code, let’s push the changes to your branch. Amplify Hosting offers full-stack CI/CD, allowing you to use a Git-based workflow to push updates to your frontend and backend. In the AWS Amplify console, connect the hosting branch to your backend env, and setup a service role.

Now simply git push changes from your local machine to see your updates live at an amplifyapp.com URL.
Create a Vue login page with the same backend
You can now use Amplify UI to build consistent login experiences across React, Vue, and Angular apps. To connect to the same auth backend from your Vue app, run the Amplify CLI from your Vue project root. When the CLI asks you if you want to modify the backend from this app, choose N. You should see an aws-exports.js added to your src folder that contains all the same information about your backend.
cd VueApp
amplify pull --appId XXX envName staging
Do you plan on modifying this backend ( Y/n ) n
Once that is done, import and add the Authenticator component to your template:
<script setup>
  import { Authenticator } from "@aws-amplify/ui-vue";
  import "@aws-amplify/ui-vue/styles.css";
  import Amplify from 'aws-amplify';
  import awsconfig from './aws-exports';

  Amplify.configure(aws-exports);
</script>

<template>
  <authenticator />
</template>
Summary and next steps
In this blog post we walked through hosting a React app with full-stack CI/CD, adding authentication to it, customizing the UI, and the building a Vue app with the same backend. To clean up your project, simply run amplify delete from the command line or delete the app from the AWS console.
To learn more about Amplify UI, please visit our documentation at https://ui.docs.amplify.aws/.